PDF Output Business Object
Properties and Editor
In the PDF Output Business Object library, the Properties tab on the right-hand side allows performing four actions:
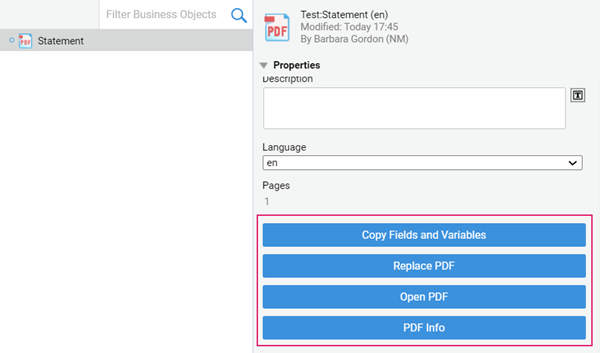
- Copy Fields and Variables allows copying fields and Variable definitions from a different PDF Output Business Object. Consider that, if the target PDF Output contains variable definitions with the same name, these are overwritten.
- Replace PDF allows replacing the default PDF with a different one. Default PDF is a blank A4 page (by replacing the default PDF, you can also change its size).
- Open PDF opens the PDF in a separate tab.
- PDF Info provides information on PDF version, size, and so on.
Once you open your PDF Output Business Object, the editor is divided into four parts:
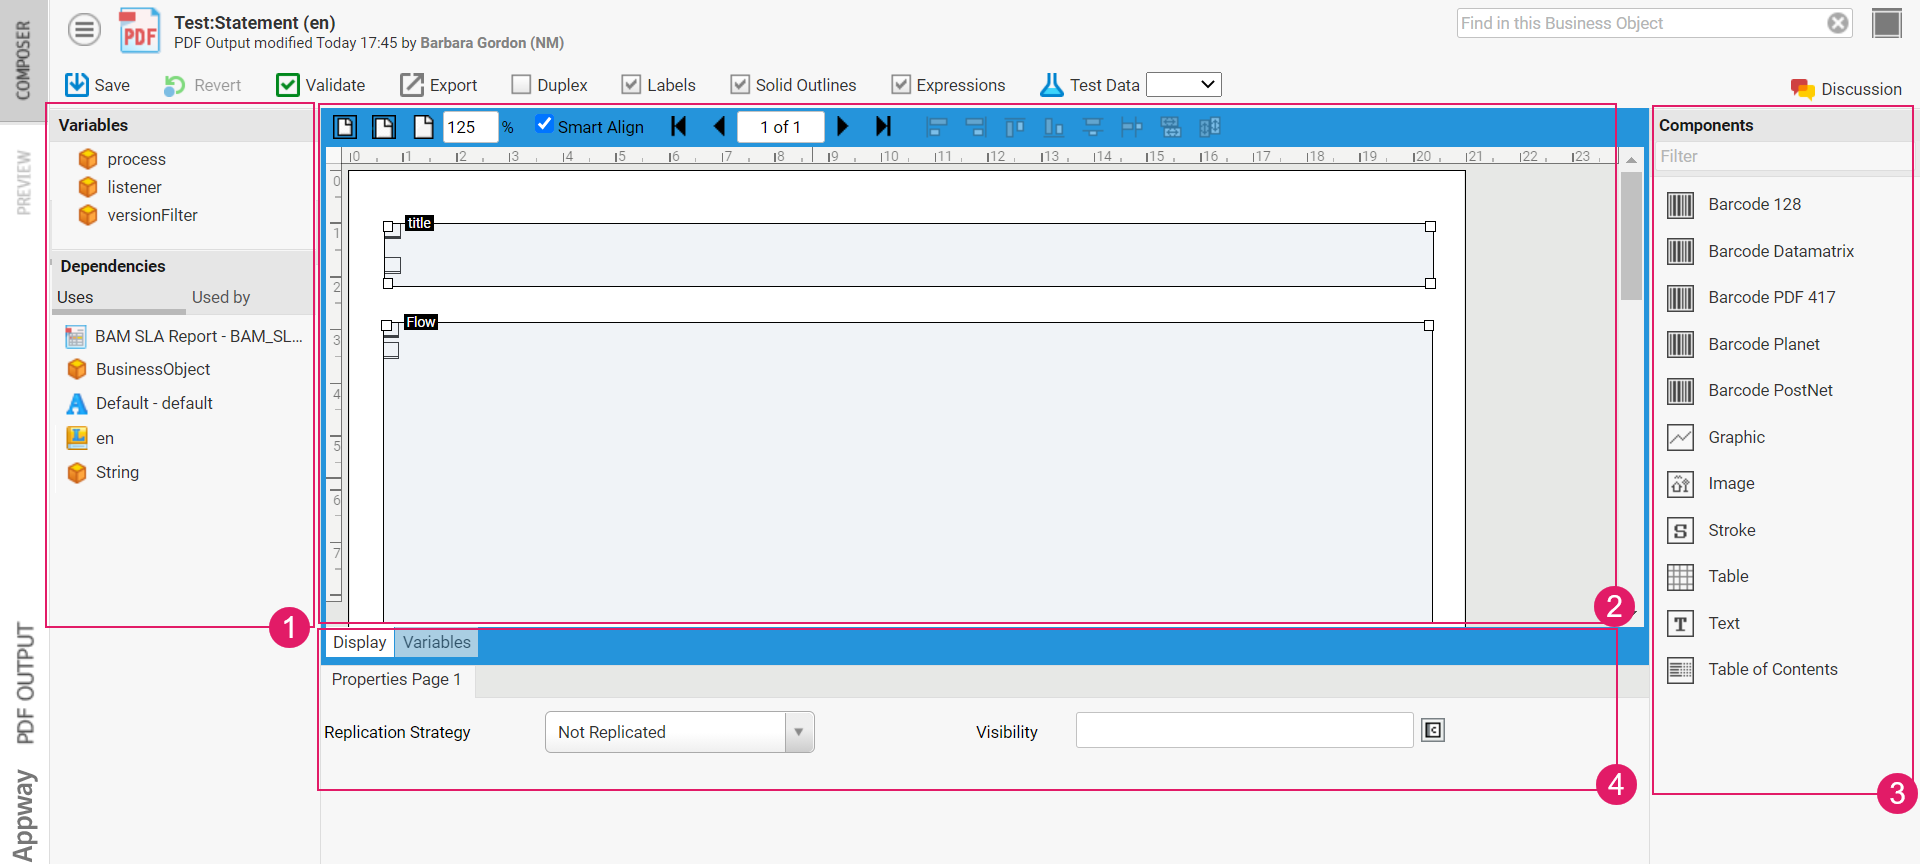
- Dependencies
- The actual editor, where you can edit your PDF Output
- The Components library, which shows a list of all Field types you can use to assemble your PDF Output, as well as a list of assigned variables.
- The available Properties for the currently selected Component/s. If no Component is selected, the PDF Output's properties are shown.
Resizing Editor Areas
All four Areas of the Editor can be resized. Depending on what you're doing, different functions of the editor may be more important to you. Resize areas to suit your current task. Here's how you do it:
- Move your mouse near the border between different areas
- As soon as your mouse icon turns to the "resizer" icon, click and drag
Working with Fields
Adding Fields
You can either add Fields of a specific type with an empty binding, or Text fields with a specific binding.
- To add a Field of a specific type, drag from the Fields list.
- To add a Text Field with a functional binding, drag from the "Assigned Variables" tree.
Selecting Multiple Fields
You can select multiple Fields. To add or remove a Field from the list of selected Fields, do the following:
- Hold down the Ctrl key
- While keeping the Ctrl key pressed, left-click on the Field
Another way to select a large number of fields is using the drag selector:
- Click outside of any field
- Start dragging. A square appears.
- Keep dragging until all fields you want to select are within the square
- Release the mouse button
You can discern between selected and unselected Fields by the color of their border:
- Unselected Fields have a black border
- Selected Fields have a blue border
Selecting "hidden" Fields
Sometimes, a Field can be hidden behind another Field. If that occurs, it can be impossible to select this hidden field by simply clicking on it. If this happens, hold down "Alt" while clicking. This will cycle the selection through all fields overlapping the point you are clicking.
Removing Fields
In order to remove one or several Fields, do the following:
- Select the Field or Fields you wish to delete
- Either right-click on a Field and select "Remove Field" or "Remove," or
- Simply hit the backspace or delete key
Copying Fields
To create copies of Fields, do the following:
- Select the Field or Fields and start dragging
- Press the Ctrl key and keep it pressed
- Drag the selected Fields over a purple drop target. The target turns blue if the copy action is possible.
- Release the mouse button
- Release the Ctrl key
You can also copy fields using the Copy and Paste function:
- Select the Field or Fields you want to copy
- Press the Ctrl-C or select "Copy" from the context menu
- Go to the page where you want to paste the Fields
- Hit Ctrl-V or select "Paste Field(s)" from the context menu
Arranging Fields
When editing a PDF Output, one of the most important tasks is getting the Fields to look correct in the resulting PDF file. In order to help you achieve this, the editor provides several features.
Help Lines
Help lines are temporary and are removed if you close the PDF Output. When dragging Fields, they attach to help lines. Hold down Ctrl to disable this temporarily.
- To add help lines, click into the ruler.
- To move help lines, drag the help lines.
- To delete a help line, drag it to the ruler.
- To delete all help lines, use the context menu.
Automatically Aligning, Distributing and Resizing Fields
To automatically resize selected Fields to match the height of the Text Style they contain, use the Context Menu. Select "Resize Field to Text Height".
If several Fields are selected, you can align and distribute these Fields using the buttons in the button bar:

Figure 1 : The buttons used to automatically align Fields
From left to right, the buttons in the button bar do the following:
- Align all selected Fields to their leftmost border
- Align all selected Fields to their rightmost border
- Align all selected Fields to their topmost border
- Align all selected Fields to their bottommost border
- Evenly distribute all selected Fields vertically
- Evenly distribute all selected Fields horizontally
- Resize all selected Fields to the first selected Field's width
- Resize all selected Fields to the first selected Field's height
Roll your mouse over a button to show a tool tip indicating the button's action.
Smart Align
Smart Align automatically aligns a Field to other Fields whilst the Field is being dragged. Check or uncheck the Smart Align check box to activate or deactivate this feature. To turn this feature off temporarily, simply hold down Ctrl while dragging fields.
Cross-Hair
To show a Cross-Hair to help you align Fields, hold down Ctrl + Shift while moving the mouse.
Properties
All Fields, as well as each page, have a set of Properties which change how they look and behave. These Properties are listed in the bottom center part of the editor. If one or several Fields are selected, these Fields' Properties are shown. If no Field is selected, the currently opened page's properties are shown.
All fields have a generic set of Properties, as well as a set of Value Field Parameters specific to the field type.
Page Properties
Page Properties control the visibility and replication of the current page. Replication of any page is used when content with unknown size is expected.
- Replication Strategy — Determines the strategy of replication. This property is only used in conjunction with Output Fields containing Dynamic Tables.
- Not Replicated
- Replicated if visible (depending on the Visibility property below)
- Always Replicated
- Visibility — An Expression evaluation to
trueorfalsewhich determines if the page is visible
Generic Field Properties
Properties common to all fields are called Generic Properties and they are found in the Properties tab. They are:
- Name — A human-readable name. This is important if another Field references the current Field. If such references are needed, Fields' names are used.
- Description — A short, human-readable description used for documentation purposes
- Next Field ID — Fields containing dynamic content can be interconnected to control the flow of propagation of the dynamic content.
- x — Horizontal position on the page, measured from the top left corner, in millimeters
- y — Vertical position on the page, measured from the top left corner, in millimeters
- width — Width in millimeters
- height — Height in millimeters
- Background Color — A color used to fill the field's background. If no color is set, the field is transparent.
- To set a color, use RGB values from 0-255, e.g. "100,100,100" for a medium grey
- Copy — Copy Strategy of Fields
- Copy to Next page
- Copy to All Pages
- Z-Index — Specifies the order in which Fields are "stacked" or "drawn." Fields with larger Z-Indices are drawn over other Fields and appear "above" them.
- Expression — The Field's binding, i.e. the variable it takes its display value from
- Visibility — An Expression indicating whether a field is visible
- Replication Strategy — Is Field Replicated if more space is needed to display its content. This attribute is used in conjunction with dynamic content.
- Emptyvisibility — Fields with dynamic content can be set to invisible if no more content is available.
- Blank — Expression evaluation to True of False to control the visibility of a Field
Value Field Parameters
Each field type has a number of additional Properties. The first Value Field Parameter is the Field's type itself, which can be changed even after placing a Field of a given type. The other Parameters are described below.
Barcode 128
Standard barcode type
- Align — Field content's horizontal alignment; "justified" tries to fill the full width of all but the last line
- VAlign — Field content's vertical alignment
- Minimum Bar Width — Minimum width of the thin bars of the barcode (this must be tested with the barcode scanner in use)
- Height — Height of the barcode image
- Rotation — Rotation of the barcode in Degrees (0 or 90 Degrees)
- Scale
Barcode Datamatrix
Standard 2D bar code type
- Align — Field content's horizontal alignment; "justified" tries to fill the full width of all but the last line
- VAlign — Field content's vertical alignment
- Rotation — Rotation of the bar code in Degrees (0 or 90 Degrees)
- Scale
Barcode PDF 417
Standard 2D barcode type
- Align — Field content's horizontal alignment; "justified" tries to fill the full width of all but the last line
- VAlign — Field content's vertical alignment
- Rotation — Rotation of the bar code in Degrees (0 or 90 Degrees)
- Scale
Barcode Planet
Standard barcode type
- Align — Field content's horizontal alignment; "justified" tries to fill the full width of all but the last line
- VAlign — Field content's vertical alignment
- Foreground Color — The color used to draw the barcode itself, given in single-quoted RGB-values (e.g. '100,100,100')
- Background Color — The color used to draw the barcode's background, given in single-quoted RGB-values (e.g. '200,200,200')
- Rotation — Rotation of the barcode in Degrees (0 or 90 Degrees)
- Scale
Barcode PostNet
Standard barcode type
- Align — Field content's horizontal alignment; "justified" tries to fill the full width of all but the last line
- VAlign — Field content's vertical alignment
- Foreground Color — The color used to draw the barcode itself, given in single-quoted RGB-values (e.g. '100,100,100')
- Background Color — The color used to draw the barcode's background, given in single-quoted RGB-values (e.g. '200,200,200')
- Rotation — Rotation of the barcode in Degrees (0 or 90 Degrees)
- Scale
Image
Any Image from the Resources
- Align — Field content's horizontal alignment; "justified" tries to fill the full width of all but the last line
- VAlign — Field content's vertical alignment
- Resource — A Resource (image etc.) type to be rendered into the Field.
- URL
- File Path
- Scale
- DPI
Stroke
Square Overlay to strikeout parts of the underlying Document.
- Stroke — Type of Stroke: Single Stroke or Cross Stroke
- Color — Color of the stroke, given in single-quoted RGB-values (e.g. '100,100,100')
- Line Width — Width of a stroke, given in pt or mm
Table
Table is used to display more complex content. Its Expression is always bound to a Dynamic Document via a specific expression which refers to the XML description defining the visual structure of the dynamic content. For more details on this, refer to the document 'Dynamic Output Form Definition Guide'
DYNAMICFORM('id')— The ID is be found in the Studio -> Dynamic Document- Font — The Font to be used to print the Table
- Font Color — The Font's color, given in single-quoted RGB-values (e.g. '100,100,100')
- Lead — Lead of the Font (line spaces)
Text
Multi-line Field containing a text string.
- Indent — Start position of the first line
- Font Style — A Style from a list of pre-defined Font Styles
- Font Color — The Font's color, given in single-quoted RGB-values (e.g. '100,100,100')
- Lead — Space between the lines of text
- Align — Text's horizontal alignment; "justified" tries to fill the full width of all but the last line
- VAlign — Text's vertical alignment
- Hyphenation — Whether to use hyphenation when rendering the text
- Run direction — Determines the direction in which the text is rendered. Set right-to-left for languages such as Arabic or Hebrew.
Table of Contents
The Table of Content is described with a Dynamic Document and bound with the following Expression.
DYNAMICFORM('id') — The ID is found in the Studio -> Dynamic Document
- Font — Font used to render the text
- Font Color — The Font's color, given in single-quoted RGB-values (for example '100,100,100')
- Lead — Lead of the Font (line spaces)
Keyboard Shortcuts
The PDF Output Editor provides a number of keyboard shortcuts. Note that most shortcut keys are common to all editors (see ). The following table summarizes how these shortcuts behave in the specific case of the PDF Output Business Object.
| Shortcut | Description |
|---|---|
| Ctrl-S | Save the Screen |
| Ctrl-A | Select all Fields |
| Ctrl-W | Close the Screen Editor |
| Ctrl-D | Duplicate all active fields |
| Ctrl-C | Copy all active Fields |
| Ctrl-X | Cut all active Fields |
| Ctrl-V | Paste copied fields |
| Delete or Backspace | Delete the selected Fields |
| Holding down Ctrl key while clicking on a Field | Toggle the Field's selection (i.e. add it to the selection if it was unselected, or remove it from the selection if it was selected) |
| Holding down Ctrl key while dragging open a selector square | Add the fields inside the selector square to the selection |
| Holding down Alt key while clicking several overlapping Fields | Switch which of the fields is selected |
| Holding down Alt key while starting to drag a Field | Copy the Field instead of moving it |
| Hold Shift and Ctrl while moving mouse | Display Cross Hair |
| Arrow Keys | Move Selected Fields (also hold down Alt to move 10 Pixels at a time) |
| Hold down Shift and press Arrow Keys | Resize (also hold down Alt to resize 10 Pixels at a time) |
| Hold down Shift while moving Fields | Only move horizontally or vertically |
| Hold down Shift while resizing Fields | Only resize horizontally or vertically |
| Hold down Ctrl while moving Fields | Ignore help lines and smart align if it is activated |
| Tab | Deactivate the currently active Field and activate the next Field |
| Shift-Tab | Deactivate the currently active Field and activate the previous Field |
| Ctrl | Temporarily disable "snap-to" for Guidelines and Smart Align |
Use Cases
This section illustrates some uses cases you may encounter while working with PDF Output BOs.
Changing/ Updating Fields in Multiple PDFs
In some cases, you may need to change a PDF Output field in multiple PDFs. Let's assume, for example, you originally set up a field to be the client's first name followed by their last name. Now you need to change it into last name - first name.
To avoid having to manually change each PDF Output field, we recommedn thar static Data Class attributes such as $person.name or $person.birthdate in a PDF Output field: Always use Data Class functions instead.
Follow these steps:
1. First, create a function in the Data Class corresponding to the value needed for the field in the PDF Output. For example, go to the Data Class Person and add a function such as:
Function getName() : String Begin
Return JOIN($this.firstName, ' ', $this.lastName);
End
2. Add an expression in the PDF Output field: $person.getName(). This way, only the function needs to be changed when you wish to adapt the PDF Output field, instead of you having to adapt the expression in each PDF Output field displaying the name of a client.
Estimating Barcode Sizes
Let's suppose you want to create or adapt a barcode in a PDF Output document. Since the data contained in the barcode is usually filled through a function, the preview tab cannot show you how large the barcode field will be. However, this is important information to style PDF documents.
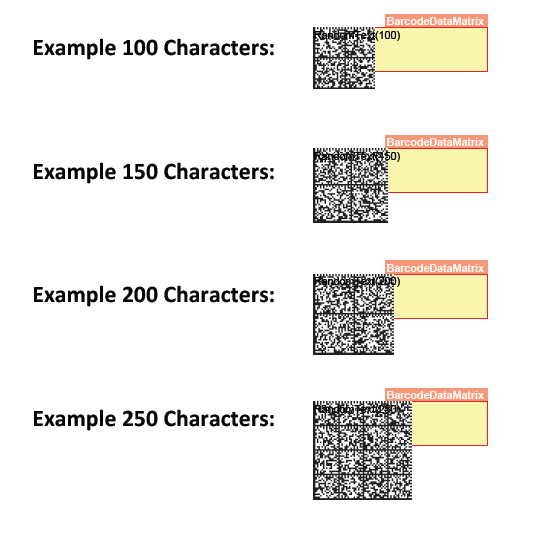
There is actually a way to test the size of any barcode according to the number of characters it will likely contain. Let's take the example of a datamatrix barcode.
-
Choose an existing PDF Output object and add a mock barcode (e.g. Barcode Datamatrix).
-
Estimate the number of characters which the data in the barcode will include. For example: 100.
-
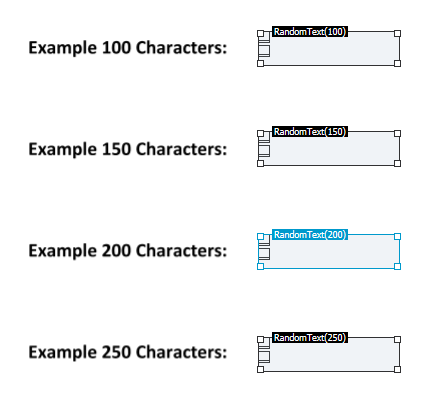
In the Expression field of the Barcode component, enter a string expression with the estimated number of characters or use the function
RandomText(n)to add n characters. For example 100 characters: '1234567890123456789012345678901234567890123456789012345678901234567890123456789012345678901234567890'OR
RandomText(100)
-
Validate, save and click on the Preview tab.
This is how a Datamatrix Barcode with 100/150/200/250 characters would look like:
Numbering Pages
To add page numbering when rendering PDF documents, you can , add a Text component in your PDF document. Within this Text component, there are multiple placeholders you can use, as illustrated below.
Placeholders that do not consider injected duplex pages
-
$$KDCurrent overall page number
-
$OD[0-9]Current overall page number plus an additional offset, e.g. '$$OD3'
-
$$P[0-9]Current page number in current form plus an additional offset, e.g. '$$P3'
-
$$MMaximum page number in current form.
-
$$MPMaximum page number in current form plus an additional offset defined by '$$P[0-9]'. To make this option work it must appear in the same string as the '$$P[0-9]' expression.
-
$$XDMaximum overall page number.
-
$$XDOMaximum overall page number plus an additional offset defined by $$OD[0-9]. To make this option work it must appear in the same string as the $$OD[0-9] expression
Placeholders that consider injected duplex pages
-
$$KCurrent overall page number.
-
$$O[0-9]Current overall page number plus an additional offset, e.g. '$$O3'.
-
$$P[0-9]Current page number in current form plus an additional offset, e.g. '$$P3'.
-
$$N -
Maximum page number in current form.
-
$$NPMaximum page number in current form plus an additional offset defined by '$$P[0-9]'. To make this option work it must appear in the same string as the '$$P[0-9]' expression.
-
$$XMaximum overall page number.
-
$$XOMaximum overall page number plus an additional offset defined by $$O[0-9]. To make this option work it must appear in the same string as the $$O[0-9] expression.