Web API Business Object
The Web API Business Object enables you to expose HTTP-based service endpoints, allowing other systems, mobile applications, or websites to consume data and services provided by your FNZ Studio Solution.
The Web API can also be described as the counter-part of the Integration Link Business Object and the WebServices extension:
- Integration Links and the WebServices extension support consuming SOAP and REST services and are fully integrated in FNZ Studio.
- Web APIs support exposing REST-like services to third parties and are fully integrated in FNZ Studio.
In detail, Web APIs perform three tasks:
- Reading incoming data – The Web API reads incoming HTTP requests which use the GET, POST, PUT, or DELETE methods (external reference on HTTP requests). The data provided in the following request elements is parsed by the Web API: request URL (Route), body (JSON format), headers, and query strings.
- Processing incoming data – For each Method (GET, POST, PUT, DELETE ), the Web API allows defining a Script Function which specifies the business logic according to which the incoming data is processed.
- Returning data – As a result of the processing by the Script Function, the Web API can return data in the response body (JSON format) and in the header when sending back the HTTP response (external reference on HTTP responses).
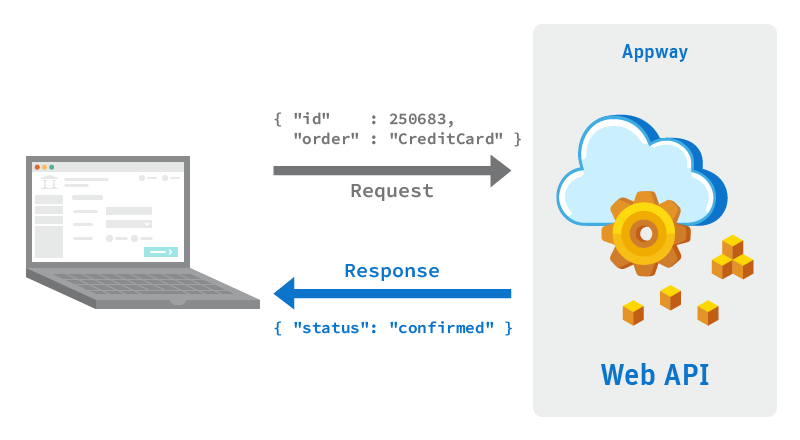
This image illustrates the simple flow described above: a request is sent to the Web API (JSON format), the request is processed by the Web API, which sends a response (JSON format) back to the caller:
Constructing a Web API in FNZ Studio consists of two steps:
- Modeling the Web API: Model your Web API Business Object using Routes, Methods, and Components.
- Configuring the Web API: This includes activating the Web API and defining security settings. All Web API configuration options are available in the Package Configuration.
Example Web API Use Case An example of a REST-like service is a simple to-do list with two endpoints:
- The first endpoint
/todosis responsible for all to-do items. It allows:- Retrieving all of the to-do items in the list (using the GET method)
- Adding a new item to the list (using the POST method).
- The second endpoint
/todos/{todoId}is responsible for specific to-do items. It allows:- Updating an existing to-do item (using the PUT method)
- Deleting a specific to-do item (using the DELETE method).
In the course of this article, we'll refer back to this simple to-do list example to clarify Web API functionality.
Modeling the Web API
The Web API is a Business Object and is modeled in the dedicated editor.
To create a new Web API, go to a Package, right-click on the Web API object in the Library and select New Web API.
The New Web API dialog has two properties which are unique to the Web API:
- API Version – Defines the version of the Web API. This version number is part of the URL used to call the Web API. This means you can maintain different versions of a Web API, each of which can be called under a unique URL.
- API URL – Previews the URL used to call the Web API. The URL is built according to the following syntax:
Copy
.../api/[PackageName]/[IDofWebAPI]/v[VersionNumber]
There are three types of Controls available for modeling a Web API in the editor: Routes, Methods, and Components.
Note: The Web API Business Object is not available in the Base Package.
Routes
A Route defines a single endpoint of a Web API. To add a Route to a Web API, drag it from the right-hand component panel into the composition area.
A Route is built-up from a sequence of one or more Route Elements, where a Route Element can either be of the type Static or Dynamic. Click on Add Route Element to add a further Route Element. A maximum of ten Route Elements can be added to a Route.
In this example, we have a Route with one static and one dynamic Route Element:
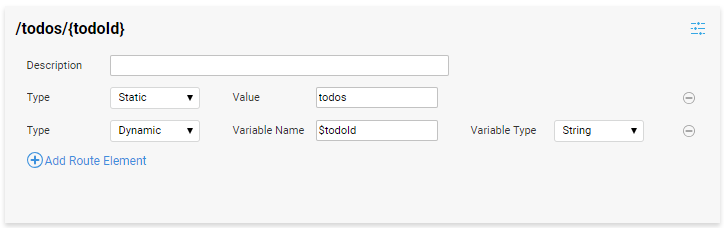
When calling this Route, the value provided for the dynamic Route Element is automatically converted into a String and made available in the variable $todoId. This variable can be used later on when processing the request with a Script Function.
Examples
.../todos/42-> variable$todoId= 42.../todos/aw8-> variable$todoId= aw8
When calling a service endpoint, the caller needs to call the full URL of the endpoint, for example:
https://webapi-example.com/appway/api/TodoDemo/Todo/v1/todos/42
This full URL is assembled according to the following syntax:
[server]/api/[PackageName]/[IDofWebAPI]/v[VersionNumber]/[StaticElement]/[DynamicElement]
Route Element Precedence
The order in which you define Routes within a Web API Business Object does not matter. However, there are clear rules as to how requests are processed which could be matched to multiple routes:
- Rule 1: Static Route Elements take precedence over dynamic Route Elements.
- Rule 2: Routes are matched by checking Route Elements from left-to-right.
- Rule 3: A request is only matched to a Route if it has the exact number of Route Elements.
- Rule 4: Web APIs should not contain multiple Routes that have the same sequence of static and dynamic Route Elements.
Example 1 The following two Routes are defined in a Web API Business Object:
/a/{b}/a/b
If there is a call to the endpoint /a/b, the call is matched to the route /a/b as the static element takes precedence (Rule 1).
Example 2 The following two Routes are defined in a Web API Business Object:
/{a}/{b}/a/{b}
Again, a request like /a/ is mapped to the second Route as the static element takes precedence (Rule 1).
Example 3 The following two Routes are defined in a Web API Business Object:
/{a}/b/a/{b}
The two Routes have the same number of static and dynamic elements. A request like /a/b will be matched to the second Route since matching is performed from left-to-right (Rule 2).
Example 4 The following Route is defined in a Web API Business Object:
/a/b/{c}
A request like /a/b will not match this Route because it only has two elements, whereas the Route definition expects three elements. The number of Route Elements does not match (Rule 3).
Example 5 The following two Routes are defined in a Web API Business Object:
/a/{b}/a/{c}
Having multiple Routes with the exact same sequence of static and dynamic elements like /a/{b} and /a/{c} results in a validation error at design time (Rule 4). If the validation error is ignored and this setup is used in Production, the Web API does not guarantee which matching Route will be taken.
Methods
Web APIs support four types of HTTP methods:
- GET
- POST
- PUT
- DELETE
The names of these Methods are derived from the HTTP protocol (external reference on HTTP methods). Each request sent to a Web API Route must specify one of these four Methods. If the Route implements this Method, it processes the request accordingly. If the Route does not implement the Method, the Web API returns an error response stating that the type of Method is not allowed (HTTP status code 405).
When to Use Which Method
The HTTP specification defines criteria that each Method should implement. We recommend you comply with these criteria when building your Web API. However, it is ultimately up to you to decide when to use which Method and if your Web API adheres to the specification. The following table can help you during your decision-making process:
| Method | When to Use |
|---|---|
| GET | To fetch data without modifying it. As per specification, a caller can assume that:
|
| POST | To create a new artifact. |
| PUT | To update / modify an existing artifact. As per specification, a caller can assume that sending the same PUT request multiple times will lead to the same response every time. An HTTP method with this characteristic is referred to as "idempotent" (external reference). |
| DELETE | To delete an existing artifact. As per specification, a caller can assume that sending the same DELETE request multiple times will lead to the same response every time. An HTTP method with this characteristic is referred to as "idempotent" (external reference). |
Adding a Method
To add a Method, drag it from the right-hand Controls panel onto the Route. A Route accepts a maximum of one Method of each type, i.e. a Route cannot have more than four Methods.
Add a Method’s Business Logic via Script Function
The essential part when processing a request is the business logic which takes the request and its data as input, processes it, and then returns an output that is sent back as a response. The Web API relies on FNZ Studio Script Functions to implement this business logic.
After adding a Method, select the Script Function which contains the business logic. As you already know from other Business Objects (e.g. when using Screens in a Process), assign the variables to input parameters of the chosen Script Function in the Variable Assignments area:

Note: The return type of your Script Function should match the type specified in the Method’s Response Body component.
In most cases, you will want to assign data coming from a request to the Script Function. One source of such data can be dynamic Route Elements. However, there are several further options for accessing data which are supported by the Web API and which can be used by implementing the Components described in the following section.
Components
Web API Components make it easy to interact with a request and extract data from it or to define and modify a response.
Request Body
A caller sending a request using a POST, PUT, or DELETE method can send data in the request body (external reference on request body). The Request Body component defines how the incoming data is parsed. Specify the Appway Data Class or Primitive Type in the Variable Type field which represents the request’s data and defines the variable(s) which will contain the data when processing the request.
When the Map to Child Data Class setting is enabled, the Request Body type is determined by the script defined in the Target Child Data Class Script field.
The script defined in the Target Child Data Class Script field must return a Data Class Reference or a String that refers to a Data Class that inherits from the type selected in the Variable Type selector.
The Web API requires that callers send request body data in the JSON format. The Web API Request Body automatically deserializes the JSON into an instance of the specified Primitive Type, Data Class or Sub-Class specified in the Variable Type field.
Note: The GET method does not support request bodies.
Response Body
The Response Body component is the counter-part of the Request Body component. It defines the Data Class or Primitive Type which is returned as a body as part of the response.
The Data Class or Primitive Type defined in the Response Body in the Variable Type field needs to equal the return type of the Script Function that is defined on the Method. Think of this component as the “contract” between the Web API and the Script Function when it comes to sending data back to the caller.
The return value of the Script Function is automatically serialized into the JSON format. You do not need to use functions like TranslateTo() for this purpose.
Get Header
To get the data of a HTTP header from a request, you can use the Get Header component (external reference on HTTP headers). Within the Get Header component, define the following properties:
-
Header Name – The name (or key) of the header to read.
-
Variable Name – The name of the variable which to instantiate with the value of the header.
-
Variable Type (read-only) – Header values are always read as
String. If you require a different type, manually cast it inside your business logic. -
Required – If checked, the Web API returns an error in case the header is not present in the request.
-
Description – An optional description for the header, e.g. stating what values are expected.
Note: Depending on your scenario, add this Component to the most suitable level of your Web API: to 'All Routes', to an individual Route, or to a Method. See Component Chain for details.
Query Parameter
When a caller sends a request to a Route, they can append a Query String which can contain a sequence of query parameters such as:
/todos?search=shopping&order=creationDate
To extract a Query Parameter, use the Query Parameter component (one Component for each parameter). After dragging a Query Parameter onto your Web API, define the following properties:
-
Parameter Name – The name (or key) of the query parameter to read.
-
Variable Name – The name of the variable to instantiate with the value of the query parameter.
-
Variable Type – Query parameter values can be of one of the following types:
String,Integer, orBoolean. If you require a different type, manually cast it inside your business logic. -
Required – If checked, the Web API returns an error in case the query parameter is not present in the request.
-
Description – An optional description for the query parameter, e.g. stating what values are expected.
Note: Depending on your scenario, add this Component to the most suitable level of your Web API: to 'All Routes', to an individual Route, or to a Method. See Component Chain for details.
Set Header
In some cases, you might want to set a HTTP Header (name and value) as part of your response. To do so, use the Set Header component. The Set Header component has the following properties:
-
Header Name – The name (or key) of the header to set.
-
Header Value – The value of the header you are setting.
-
Description – An optional description for the header, e.g. stating what values are included.
Note: Depending on your scenario, add this Component to the most suitable level of your Web API: to 'All Routes', to an individual Route, or to a Method. See Component Chain for details.
Web API – Further Information
Component Chain
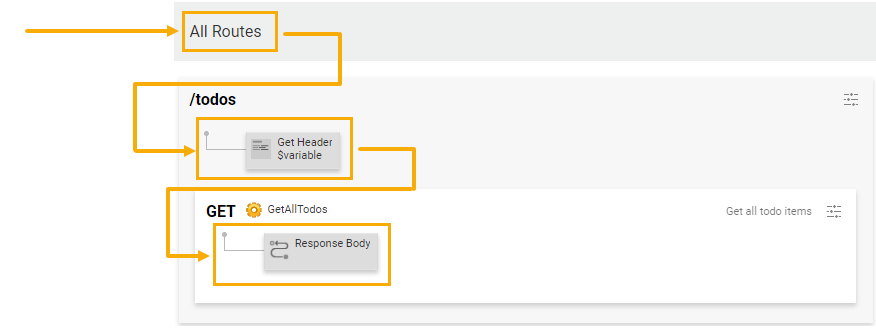
There are three different levels on which the Get Header, Set Header, and Query Parameter components can be set. Using a higher level means you can avoid creating redundant Components in all lower levels. Incoming requests pass from the highest to the lowest level. The available levels from the highest down are:
- All Routes – The Component is evaluated for all individual Routes and Methods defined in the Web API Business Object.
- Individual Route – The Component is evaluated for all Methods defined within the Route.
- Method – The Component is only evaluated for the Method within which it is defined.
Incoming requests pass from the highest to the lowest level as shown here:
Automatic JSON Serialization and Deserialization
The Request Body and Response Body components allow you to define the Variable Type (can be a Data Class or a Primitive Type) and the Collection Type (Single Element, Indexed Elements, or Named Elements). An incoming request with a JSON payload is automatically deserialized from JSON into an instance of the defined FNZ Studio Data Class/Primitive Type. Similarly, the payload being sent back is automatically serialized from an FNZ Studio Data Class/Primitive Type instance into JSON.
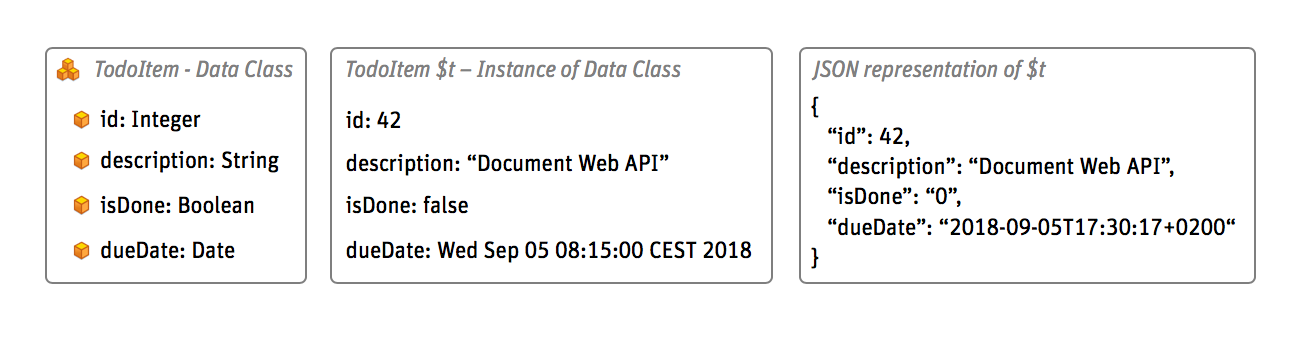
This schema illustrates how a Data Class is represented in the JSON format:
Internally, the Web API uses the JSON translation that is also used by the functions TranslateFrom() and TranslateTo(). In case you need to inspect the (de)-serialization behavior of any of your Data Classes/Primitive Types, use these two functions and the Interactive Script Editor to quickly understand how data is translated.
In case a JSON request body cannot be deserialized to an instance of an FNZ Studio Data Class/Primitive Type, for example because the JSON structure does not match or is invalid, the Web API automatically returns an error to the caller with an HTTP status code 400 (bad request).
Web API Requests (Date Formatting)
When using dates for Web API requests, you need to follow the ISO 8601 standard.
Dates can be specified with or without a time reference, and with or without a timezone offset in the following form:
Z, ±hh, ±hh:mm or ±hhmm
Dates are then parsed using the local system time zone, which behaves differently depending on whether a date contains only a time reference (in this case, UTC +00:00 is used), or a time and a timezone offset (in this case, the given timezone offset is used).
Following are date examples currently supported by Web API requests:
- Basic Date Formats:
2024-08-07 (Year-Month-Day)represents August 7, 2024. - Combined Date and Time Formats:
- Date and Time (Basic):
2024-08-07T14:30:00Zrepresents August 7, 2024, at 14:30:00 UTC. - Date and Time with Positive Timezone Offset:
2024-08-07T14:30:00+02:00/2024-08-07T14:30:00+0200represent August 7, 2024, at 14:30:00 with a timezone offset UTC +2 . - Date and Time with Negative Timezone Offset:
2024-08-07T14:30:00-04:00represents August 7, 2024, at 14:30:00, with a timezone offset UTC -4. - Date and Time with Fractional Seconds (Milliseconds):
2024-08-07T14:30:00.123Zrepresents August 7, 2024, at 14:30:00 and 123 milliseconds (UTC offset).
- Date and Time (Basic):
Important! Note that, even if the input value supports up to nine fractional parts of a second (nanosecond-precision), date parsing only supports millisecond-precision. Example:
Date provided: 2024-08-07T14:30:00.123456789Z
Date parsed: August 7, 2024, at 14:30:00 (UTC offset) with a 123-millisecond precision.
Supported Primitive Types
When working with data, the Web API allows you to use any Data Class available to you. In addition, the Web API also supports the following Primitive Types which are available in the Base Package:
- Boolean
- Date
- Double
- Float
- Integer
- Long
- Money
- String
When using any of these Primitive Types, the Web API benefits from the same auto-conversion mechanism you already know from FNZ Studio. For example, if a payload contains a String “3.14” and you define it to be mapped to the Primitive Type ‘Money’, FNZ Studio automatically converts the String into a Money instance (using the default currency).
In some places, the Web API limits the number of Primitive Types that are allowed to be used. For example, dynamic Route Elements can only be String or Integer, and Query String Parameter variables can only be String, Integer, or Boolean. You do not have to remember these limitations, since the Web API user interface indicates which Primitive Types are allowed.
In case a value from a request cannot be mapped to the defined Primitive Type, the Web API automatically sends an error response, indicating which mapping failed.
Error Handling
There are two levels of error handling regarding Web APIs:
-
Errors within the Web API itself, e.g. if a Query Parameter is required but is not included in the incoming request. These errors are handled automatically and appropriate error messages are sent back to the caller.
Note: Automatically sent error responses contain the JSON property `“errorCode”: 10000`. This error code is a placeholder that is currently not used by the Web API, but might be used in the future to uniquely differentiate built-in Web API errors.
-
Errors within the business logic defined in a Script Function (which is used by a Method of your Web API). In such cases, automatic handling of errors is not possible, but you can create and return error messages from the Script Function using the
ReturnWebApiErrorfunction. This function accepts the following parameters:$errorMessage(String) Error message that is sent back as part of the response.$statusCode(Integer, Optional) HTTP status code used when sending the response (default=500).
For most errors, the Web API automatically includes an Error Number as part of the error response that is sent back to the caller, e.g.: [ErrorNumber:85]. This error number indicates that additional error information has been added to the FNZ Studio server logs. When an error has occurred, an FNZ Studio Adminstrator can use the error number to search the logs and then further analyze the issue, e.g. using stack trace data.
Binary File Upload
Web API supports uploading binary files. To do so, set the Variable Type of the Request Body component to HttpFileUpload. HttpFileUpload is a Primitive Type that exists in the Base Package and is pre-installed with your FNZ Studio instance. Since a Request Body component is required, you need to use one of the following Methods: POST, PUT, or DELETE.
We recommend you send binary data as part of a 'multipart/form-data' request (external reference on Content-Type). Doing so instantiates the Request Body variable as an HttpFileUpload object with the following properties:
- contentType – The content type of the file (e.g.
application/pdf). - date – When the file was uploaded.
- filePath – An absolute file path of the location where the file has been stored on the server.
- originalFileName – The original file name of the uploaded file.
- userId – The user who uploaded the file.
If a Request Body is defined to be of the type HttpFileUpload but the request does not use 'multipart/form-data', the Web API writes the entire body into a binary file named file.dat. In such cases, the originalFileName is always set to file.dat.
Uploading Multiple Binary Files with a Single Request
The Web API also supports uploading multiple files within a single 'multipart/form-data' request. To do so, configure the Request Body component as follows:
- Variable Type remains
HttpFileUpload - Collection Type can be Indexed Elements or Named Elements. The difference between these two options is:
- Indexed Elements – An indexed collection where every element is an instance of
HttpFileUpload. - Named Elements – A named collection where the keys match the name-properties specified in the 'multipart/form-data' request. If a request contains multiple files with the same value for the name-property, the Web API returns an error.
- Indexed Elements – An indexed collection where every element is an instance of
Versioning and VersionFilter
Web APIs are normal Business Objects, therefore they benefit from FNZ Studio’s built-in versioning system like any other Business Object, e.g. by being able to revert to an older version. There are, however, two versioning aspects that are specific to the Web API:
- Versioning for the caller – When creating a new Web API Business Object, you assign an explicit version number which becomes part of the URL a caller uses. This version is bound to the ID of the Web API Business Object. To create a new version for a caller, create a new Business Object which uses the same ID, but increment the API version.
- Web API and VersionFilter – When a caller sends a request to a Web API, a new Timestamp Filter with the current time is created and the request is processed using this Timestamp Filter. The Timestamp Filter is set to use only committed versions of Business Objects, i.e. you have to commit your Web API and the Business Objects it uses before any changes will take effect when processing a request. The Web API does not support processing requests using an older version of the Web API Business Object by sending a version filter as part of the request.
Statistics
The Web API Statistics page is available at System Maintenance > Statistics in the Studio. For each Web API defined on your installation, the following information is available:
- Number of Requests – Overall number of requests sent to the Web API in the defined time range.
- Payload Size of Requests – The overall payload size of all requests sent to the Web API in the defined time range.
- Payload Size of Responses – The overall payload size of all responses sent by the Web API in the defined time range.
- Total Payload Size – The sum of the request and response payload sizes.
By default, the Web API statistics are displayed for the past month, but you can adjust the From and Until dates according to your needs.
Configuring the Web API
After setting up a Web API Business Object, the Web API needs to be configured in the Configure Package dialog of the Package in which it is contained before it can be used. Each Web API Business Object is configured individually.
Note: To access the Configure Package dialog, click on the Package in the Package overview and click on the Open Configuration button in the sidebar.
Activating the Web API
By default, a Web API is inactive when it is created. This means that it does not process any requests, an error message is returned instead. To activate a Web API and start using it, click on the Activate Web API button.
Access Control
This section of the configuration defines who can call the Web API. The following fields are available:
- Authentication – Defines whether to authenticate calls to the Web API:
- Required – Applies authentication to the Web API. Further settings are made using Authenticator and Accessible to. This is the default setting.
- Not required – Enables anyone to call the Web API.
- Authenticator – If authentication is required, define the approach to use:
Application Server – Delegates authentication to the Application Server, i.e. the authentication approach used by the server also applies to the Web API. Recommended for setups such as Kerberos or X509. Calls need to be done via
/secure/api/instead of/api/.Note: Only users who have been assigned one of the following J2EE security roles can access URLs with the prefix `/secure/api/`: Administrator, User, or WebAPI.
Basic Authentication with Local Users – Authentication via username & password where username must be a local FNZ Studio user. Recommended for setups where only a single technical user needs to authenticate.
Basic Authentication delegated to Application Server – Authentication via username & password which are delegated to the FNZ Studio authentication mechanism. Recommended for setups such as LDAP with Form-based authentication.
- Accessible to – Defines the scope of authenticated users which can call the Web API:
- All Authenticated Users – All users authenticated by the specified Authenticator can call the Web API.
- User/Users in – Allows selecting a specific user or user role/group to which the permission to call the Web API is restricted.
Rate Limiting
Allows defining how many requests a user can make. The following fields are available:
- Rate Limit – Define whether the number of requests is Limited, or users can make an Unlimited amount of requests. Default: Limited
- Requests – If the number of requests is limited, set the maximum number of requests allowed per minute. Default: 100
Security Header – Cross Site Request Forgery (CSRF)
CSRF protection is enabled by default and we strongly recommend keeping this setting. The only exception to this rule is if this Web API is called from systems that do not support custom headers – in this case set CSRF protection to Disabled.
When CSRF protection is enabled, all requests must contain the header: X-CSRF-Token: WebAPI.
Security Header – Cross Origin Resource Sharing (CORS)
If you intend to call the Web API from external websites via AJAX calls, CORS must be enabled (default: Disabled). If this option is disabled, external websites are not able to call the Web API.
When Enabled is selected, the following options are available:
-
Allow access from the following origins – Define the origin(s) from which access is allowed. An origin is defined by the hostname (e.g.
www.appway.com). Default:* -
Additional allowed headers – All "CORS-safe" headers are allowed by default. Define any additional headers you want to permit here by clicking on the Add Header link. Default: X-CSRF-Token (used when CSRF protection is enabled, see the preceding section)
-
Allow Methods – Select the Methods that are permitted for external websites to use: GET, POST, PUT, and DELETE.
-
Allow Credentials – Select the checkbox to Allow cookies, authorization headers and TLS client certificates to be sent by the external website.
-
Allow browser to cache CORS settings for – Sets for how long the browser caches the CORS settings (default: 600).
For more information on CORS, see this external reference.