Data Class To XML Mapping
Introduction
When you need to map an FNZ Studio Data Class to XML, you may use the TranslateTo Script Function to generate an XML document of your Data Class. However, You may encounter certain issues:
-
Some elements are not mapped as attributes of other elements.
-
You need to ensure that the reverse "XML to FNZ Studio object" transformation yields an object that is the same as (equal to) the original object.
This article illustrates how you can customize the XML file of a Data Class and respect reversibility constraints.
Creating Basic XML Representations from FNZ Studio objects
FNZ Studio's WebServices Extension contains two script functions, TranslateTo and TranslateFrom. The TranslateTo function allows an XML representation of an FNZ Studio object to be created, while TranslateFrom allows an FNZ Studio object to be created from an XML representation.
Note: The TranslateTo and TranslateFrom functions can also be used to translate to/from JSON, but you will need to adjust the $format parameter accordingly. As JSON does not support attributes, Step 2 below does not apply when mapping to JSON.
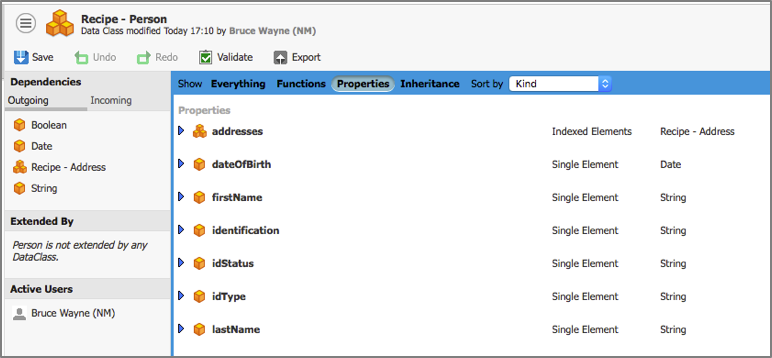
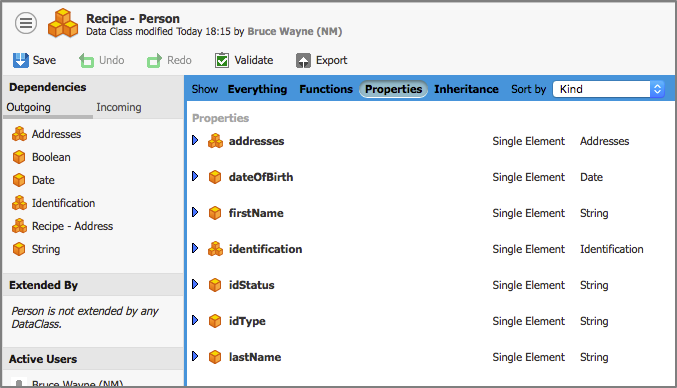
The XML generated for a class is quite simple: Each data class property is mapped to an XML element, where the tag name of the element is the property name. Here is a simple Person data class that has an indexed list of Address objects.
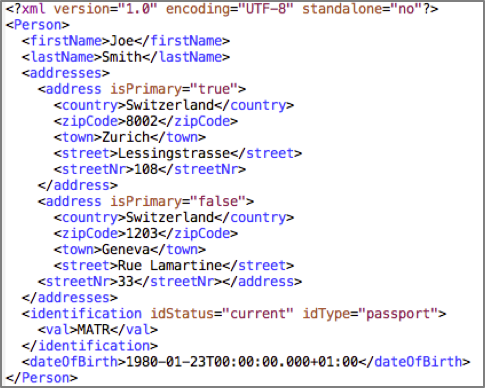
When an instance $p of Person is created, the following XML document represents the result of TranslateTo($p, 'xml'):
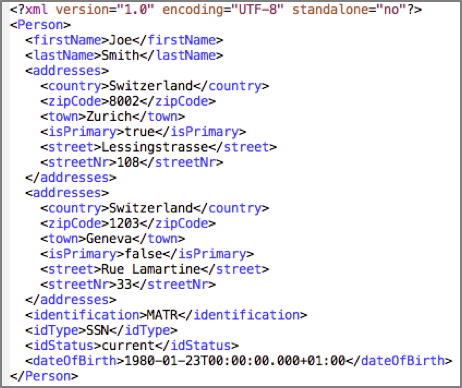
But we want to be able to customize this XML representation. For instance, certain elements should appear as attributes of other elements, and the addresses should appear in a nested structure.
Reversibility Constraints
In addition to the possibility of customizing the generated XML, there is a mandatory reversibility constraint: When an FNZ Studio object is transformed to XML, the reverse 'XML to FNZ Studio object' transformation must yield an object that is the same as (equal to) the original object. This constraint is expressed in the following script code, where the EQUAL($p1, $p2) expression of line 6 must evaluate to true.

Customizing the XML
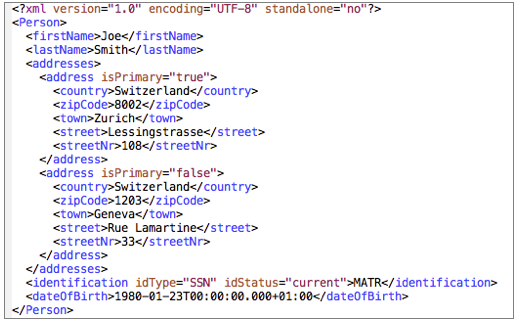
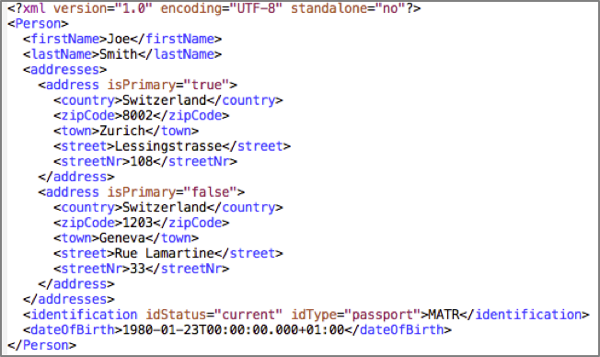
We want the generated XML for our Person object to be structured like the XML document below. Note how the 'isPrimary' property of the Address data class is represented as an attribute of each 'address' element, and the 'idType' and 'idStatus' properties of 'Person' are also attributes. The list of addresses are sub-elements of an 'addresses' element.
So how do we achieve this? By following these four steps:
- Step 1: Introduce a nested structure into the XML, so that addresses are nested inside of an 'addresses' element. This also isolates the identification properties of 'Person' that are to become attributes.
- Step 2: Introduce the attributes into the XML
- Step 3: Remove the redundant
<val>tag from the XML - Step 4: Handle the reversibility constraint
Step 1: Nesting Structure in XML
The first step is to introduce nesting into the XML, for two reasons:
- The address elements should be represented as sub-elements within a parent 'Addresses' element, and not all appear at the same level as the other 'Person' elements.
- The properties linked to identification ('idType', 'idStatus' and 'identification') are extracted into a sub-elements of a new identification element. This is required so that the 'idType' and 'idStatus' properties can be represented as attributes of the new identification element in a next step.
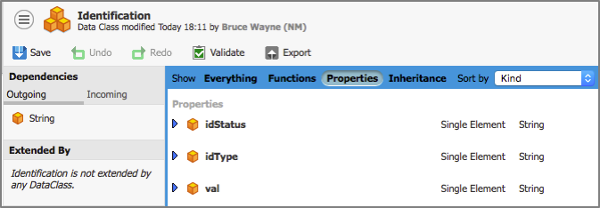
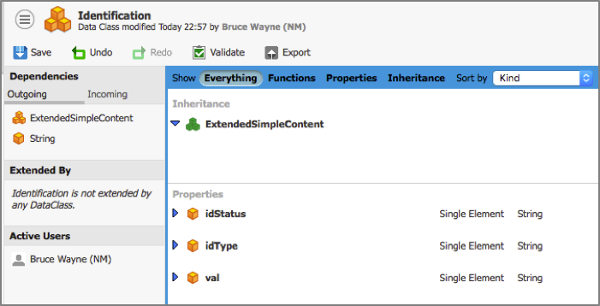
To create a nested element at the XML level, the corresponding data class property needs to be typed with a data class. We therefore need to create a class Addresses with a single property, 'address', which is an indexed list of "Address" objects. We also need to create an Identification class with properties 'val', 'idType' and 'idStatus'.
The Person data class is modified to handle the new data classes:
- The identification property is of type Identification, encapsulating the 'val', 'idStatus' and 'idType' values
- The addresses property references an object encapsulating a list of addresses
Following these changes, the XML code generated by the TranslateTo function for our test object looks like this:
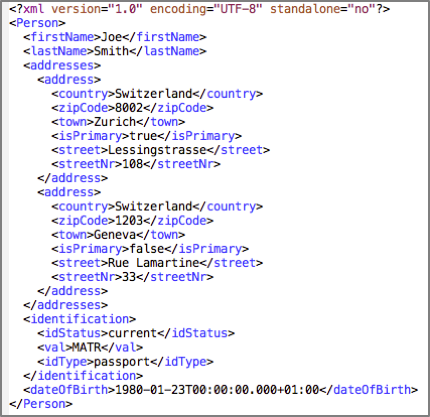
The addresses are now listed inside of an 'addresses' element, and the original identification elements are inside a parent identification element.
Step 2: Introducing the Attributes
Now that the XML has structure, the attributes can be introduced. Our goal is to define 'isPrimary' as an attribute in the "Address" object, and define 'idStatus' and 'idType' as attributes in the Identification class.
This requires the modification of the data class's metadata. We need to modify the metadata in order to specify that a property must appear as an XML attribute rather than as a standalone element when an object of that class is transformed to XML.
The metadata of a data class can be modified by clicking on the menu in the top left corner of the Editor.
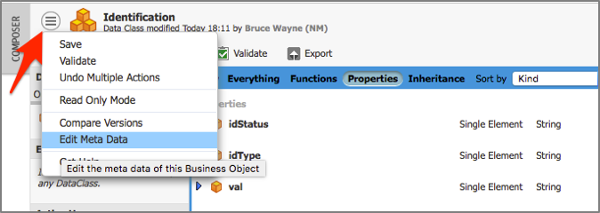
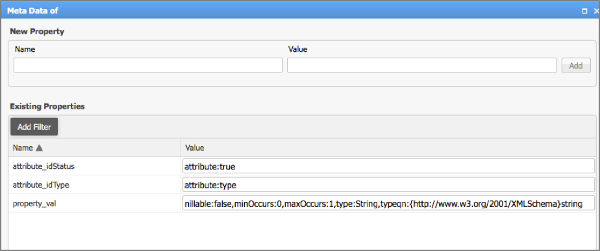
Each property, 'prop', that is to be made an attribute must have a name and value pair in the metadata. In our case, the name is attribute_prop and the value is 'attribute:true'. Thus, the following metadata is entered for the Identification class.
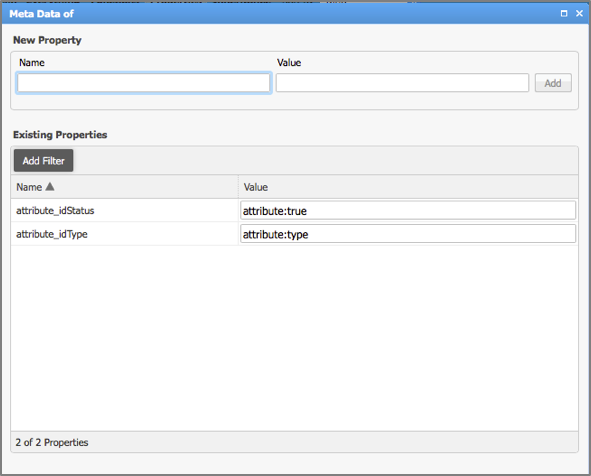
Similarly, the following metadata is created for the Address class:

Once we've added this metadata, the XML looks like this:
Note how attributes are now present in the XML.
Step 3: Removing Tags
One small issue with our XML document up to this point is the element <val>MATR</val>. The <val> tag value represents the value of the whole identification element. This should be removed from our XML.
To remove the <val> tag, we need the Identification class to inherit from the class ExtendedSimpleContent. The use of the ExtendedSimpleContent class tells FNZ Studio’s TranslateTo function not to use the <val> tag for a property named 'val' in that class.
This change yields the correction that we sought, and the XML now reflects our requirements.
Step 4: Transformation Reversibility
The use of ExtendedSimpleContent breaks our reversibility constraint: The absence of the <val> tag could confuse the underlying transformation machinery in the WebServices extension about how to handle the corresponding XML element.
To resolve this issue, we again use metadata. Specifically, the metadata needs to instruct the underlying XML reader about how to interpret the XML in relation to the 'val' property of the data class.
The metadata name is property_val and the value is an XSD-inspired expression:
nillable:false,minOccurs:0,maxOccurs:1,type:String,typeqn:{http://www.w3.org/2001/XMLSchema}string
XSD (XML Schema Definition) is a means of describing the elements of an XML document. The result of adding this metadata is that the transformation is now reversible, and the script code shown at the start of this article now evaluates to true.
The code of the Person, Address, Identification and Addresses classes used in this article are included in the following .awexport file: Customizing_XML_Recipe.awexport