Inter-Process Communications
Introduction
Process Instances started with FNZ Studio are generally self-contained; they are independent from other Process Instances, even if they are started from the same Process ID.
There are, however, certain situations where Process Instances need to communicate with each other. An example is when you have a Process that deactivates a user's account, perhaps due to delinquency. When this Process completes, it would be wise to cancel any other in-flight Process Instances related to this user – such as a running process for a service upgrade for that user.
This article walks you through an example of a main Process that then generates further Process Instances, dependent on the main Process. This example illustrates a simple polling process, where the main process sets a question, and the dependent processes provide the replies.
Let's start by taking a look at the Main Process.
The Main Process
The elements of the example MainProcess are a Screen Task, a Script Task, and a Redirect Task:
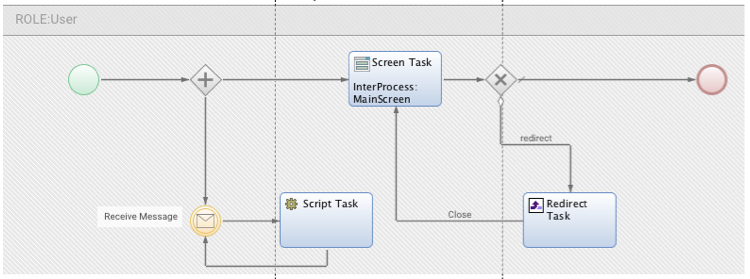
When the Process starts, an AND gateway creates two parallel tokens. One token directs the user to the screen, while the other triggers the Receive Message Signal component. The Signal component then starts listening for incoming messages.
The main screen, shown to the user, looks like this:

The first time the user sees this screen it asks for a poll question to be set. This question is then propagated to all dependent Process Instances that are subsequently started.
Once a question has been set, the user now sees this:
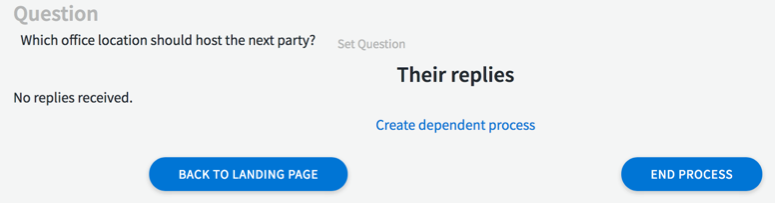
From this screen, the user can choose one of three options:
- Create dependent process — Creates a Process Instance linked to—and dependent on—this main Process Instance. I'll cover this dependent Process Instance in the text that follows.
- BACK TO LANDING PAGE — Redirects the user to the landing page screen (that shows active Process Instances). The 'Back to Landing Page' button redirects the user to an Entry Point defined in the Package.
Note: If you import the awdeployment file included at the end of the article, ensure Entry Point access via Configure Package > Entry Point Access Control
- END PROCESS — Ends the Process, regardless of whether dependent Process Instances have been created or not. When clicked, 'End Process' also deletes all dependent Process Instances that have been created.
So what happens when a user clicks on Create dependent process? A new Process Instance is created, and the Process Instance ID of the main Process is set as an attribute of this newly-created Instance. The following script — contained as a script action in the 'Create dependent process' button — is executed in order to achieve this.
Named Any $variables := NewNamed(Any);
$variables['question'] := $question;
String $id := StartProcess('InterProcess:DependentProcess', false, $variables);
ProcessInstanceSetAttribute($id, 'mainProcess', ProcessInstanceId());
Note: This example simply redirects users to the exact same page after clicking 'Create dependent process'. They can either continue creating more dependent Process Instances, or click on 'Back to Landing Page' to see the list of the created Process Instances.
Remember the AND gateway when an instance of MainProcess is started? The first token goes to the screen above, while the second token goes to a Receive Message Signal. This Signal is configured to listen for incoming messages passed to this Process Instance. The signal is configured as follows:

- Name — Receive Message
- Message Variable — The message variable defines how we access the message in our script. Choose
$messagefrom the dropdown. - Message Queue — Select an existing Process message queue (one you have dedicated for these messages) from the dropdown.
Note: If you download the example awdeployment file at the end of this article, create the queue to test the solution yourself via Solution Maintenance > Process Messages - Add Queue
Next, go to the Advanced tab of the Receive Message component. Ensure that Transient is checked. This setting enables the Process Instance to end gracefully.
Once a message is received by the Receive Message component, it goes into a script task which processes the message and adds it to an indexed collection of received messages. This script task, once executed, is connected back to the Receive Message signal to enable it to listen to further/additional messages.
Dependent Process
Here's what the dependent Process looks like:
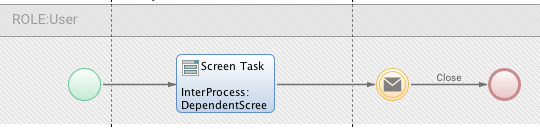
The dependent Process is started by MainProcess, which sends a token to a screen task. The poll question of the main Process is set as a variable in the dependent Process, so the user can see the poll question when she provides her reply.
To access the dependent Process Instance, launch LandingProcess and click this Instance in the displayed table of Process Instances.
The screen of the dependent Process looks like this:
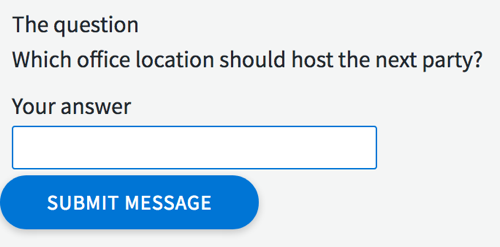
The screen displays the question set by the main Process Instance, then asks for the user's answer. Once the user clicks on the Submit Message button, a message is sent via the Send Message intermediate event before a graceful completion.
The Send Message component has the following settings:
- Message Queue – InterProcess. This is the same value as the Message Queue property of the Receive Message Signal in the main Process.
Most of the configuration is done on the Message tab of this component:

The important things to note here are:
- Sender — This is the sender of the message. In this example, we use the Process Instance's ID.
- Data — The variable containing the message. This is defined as a Process Instance variable.
- Process Instance ID — The ID of the target Process Instance that should receive the message. In this example we use the Process Instance attribute mainProcess, which was set by the main Process Instance when this instance was created.
Landing Process
Once you've created a reasonable number of dependent Process Instances, launch the LandingProcess to view all active Process Instances.
Click on each dependent Process Instance and set the message you want to be sent to the main Instance. Once all dependent Process Instances have submitted the messages, click on the main Process Instance to view the messages sent.
End Result
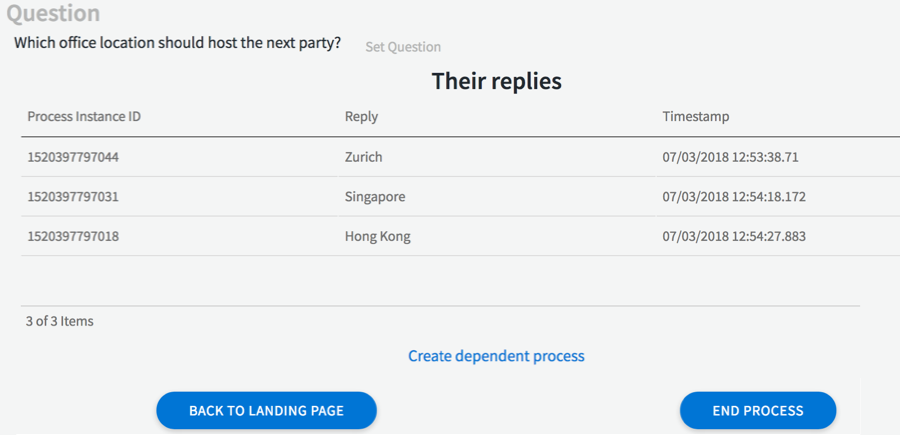
The screen below shows all messages received by the example main Process Instance.
Example Download
Download the deployment file containing Business Objects referenced in this article: interprocess_communcations.awdeployment
The awdeployment file contains the following items:
- Processes
- MainProcess: The main Process which starts the dependent Processes
- DependentProcess: Processes started by the main Process
- LandingProcess: A non-persistent Process that just lists all persistent Process Instances active in the system
- Screens
- MainScreen: Used by MainProcess
- DependentScreen: Used by DependentProcess
- LandingScreen: Used by LandingProcess
- Data Class
- UserMessage: The data class passed between Process Instances