Actions Extension
Introduction
The Appway Business Rules engine provides the ability to create condition action rules. Condition action rules are a type of rule that trigger an action when a specific condition is satisfied. From a solution point of view, it is desirable to have actions that tackle solution-specific needs: that is where custom actions are used. Custom Actions allow users to create these solution-based actions for business rules.
In a client onboarding solution, we can have many Solution-specific custom actions:
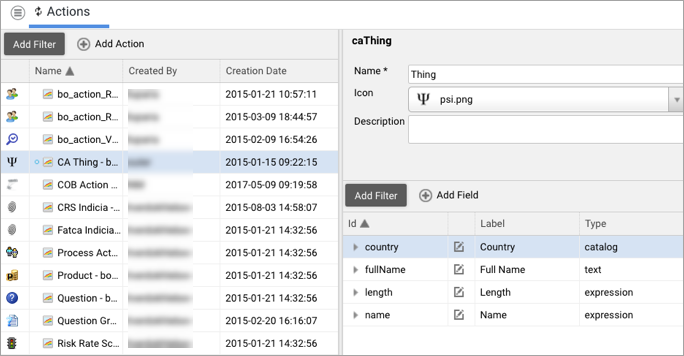
- The Account action that defines the creation of an account with a specific type. The "id" field of the Account action allows the user to select a specific type of account based on the type definitions found in a Catalog.
- The Question action creates a "question" to be asked on a Screen, e.g. "What is the age of the customer?" The Question action consists of many different fields which define dynamic binding locations for the question, question text, etc.
- The Role action defines the "role" of a specific customer taking part in an onboarding process. The Role action consists of a field for selecting the role for a customer from a Catalog, a field for defining the binding location of the role, and so on.
Custom Actions consist of a set of fields (properties) that the solution developer defines. Once a custom action is defined, it becomes available as an Action in the Business Rule Editor.
Custom Actions and business rules are subject to versioning. When executing business rules in a process, the rule and custom action objects belonging to the version of the process instance are used.
Custom Actions are deployable objects. The definition of a custom action is stored in 'Resource' Business Objects with mime type application/custom-action-xml. The ID of the resource is prefixed with "bo_action_". These resources can be created in different Packages and moved between Packages. The ID of the Action must be unique among all the Packages. The system will not allow you to create an action with an ID that is the same as an ID of an Action from the other Package.
Custom Action Editor
The Custom Action editor tool in available in Appway Studio at System Configuration > Rules > Actions allows you to create new or edit existing custom actions. See details in the Manage Custom Action section.
Prerequisite: You need Manage PackagesPermission to access this Studio tool.
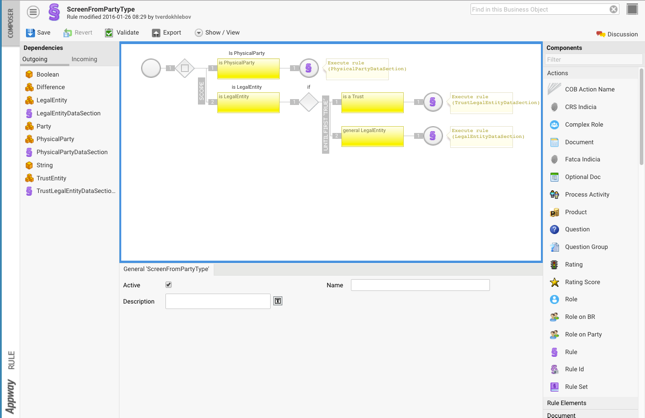
Business Rule Editor
The custom actions are displayed in the Components > Actions section of the Business Rule editor. See details in the Rule Evaluation section.
Prerequisite: You need Manage PackagesPermission to access this Studio tool.
Manage Custom Action
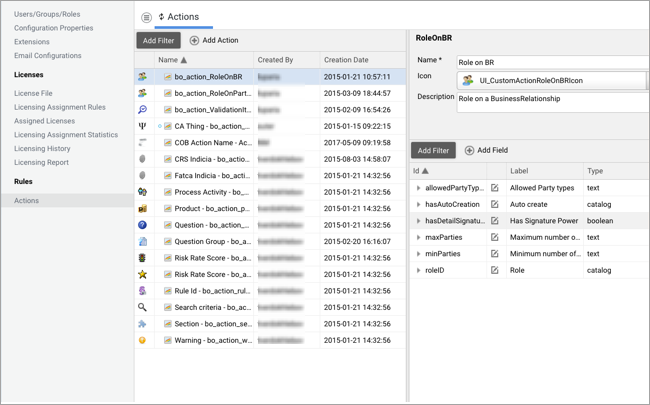
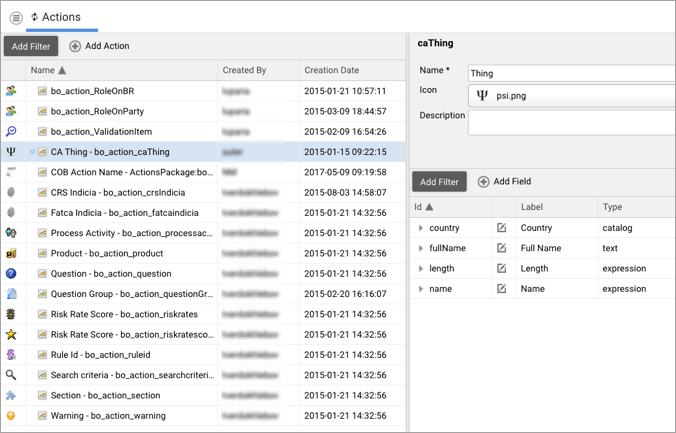
Custom Actions are managed in the Appway Studio at System Configuration > Rules > Actions.
Note: We strongly suggest that you create and/or modify your custom actions in Appway Studio. Do not edit the resource directly.
Creating a new Custom Action
Select Add Action from the Custom Action management tool page menu and enter the following:
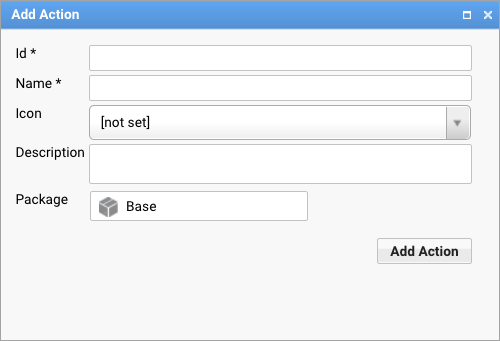
| Field | Description |
|---|---|
| Id * (mandatory) | The unique ID of the Action |
| Name * (mandatory) | The display name of the Action |
| Icon | The icon for the Action |
| Description | A description of the purpose of the Action |
| Package | The Package where the Resource BO (which contains the custom Action) is added. |
When you click Add Action, the custom action is created and it is now available in the Business Rule editor.
Note: The Action is created but not committed, indicated by the small blue circle next to the Action's name.
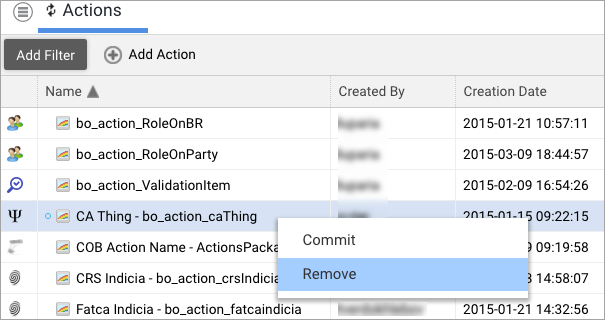
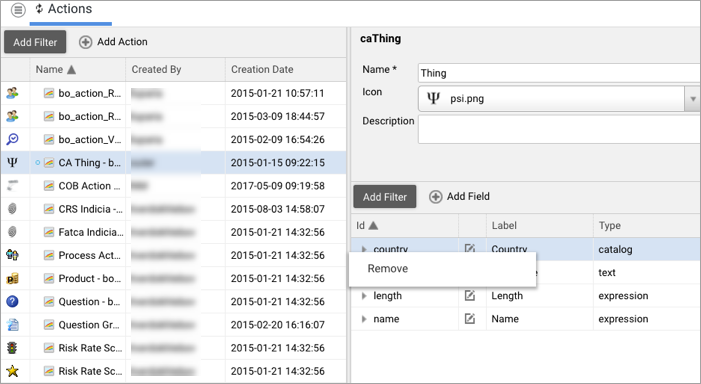
Deleting a Custom Action
Right-click the custom action you want to delete and select Remove from the context menu.
A confirmation dialog asks you for permission before actually executing the command.
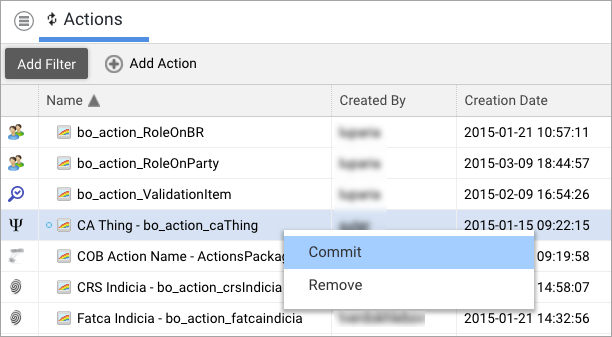
Committing a Custom Action
Right-click the custom action you want to commit and select Commit from the context menu.
A confirmation dialog asks you for permission before actually executing the command.
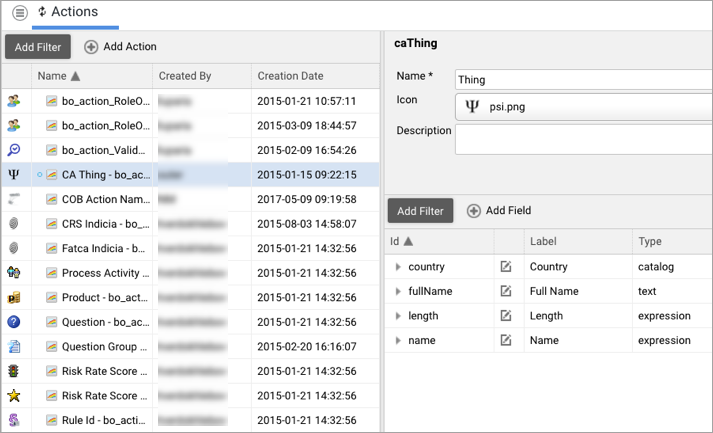
Editing Action Properties
Select the custom action whose properties you want to change. In the action detail view to the right, edit the desired property (Name, Icon, and Description).
Adding a Custom Action Field
Select the custom action and click Add Field in the action detail view right above the list of fields. A dialog opens up and guides you through creating the field.
-
Select the field type.
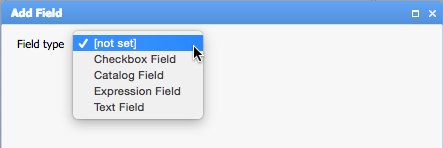
-
Specify the field’s properties.
-
Once all properties have been defined, click the Add Field button at the bottom of the dialog.
The new field is added to the custom action, and a new uncommitted version of the custom action is created.
Checkbox Field
Th Checkbox field captures a binary state in a business rule:
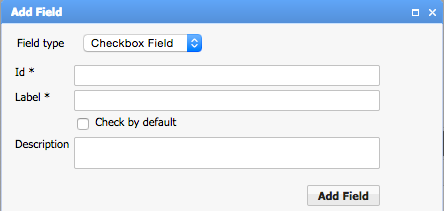
| Parameter | Description |
|---|---|
| Field type | Checkbox Field |
| Id * (mandatory) | The ID of the field, unique within the current custom action. Can be used in report text templates to reference the field value. |
| Label * (mandatory) | The display label in the rule editor |
| Check by default | The state of the checkbox when initially used in the rule editor |
| Description | The description output as a tooltip in the rule editor |
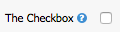
In the rule editor, the field is represented as a checkbox with a label.
Catalog Field
The Catalog field presents a dropdown box with a catalog of possible values:
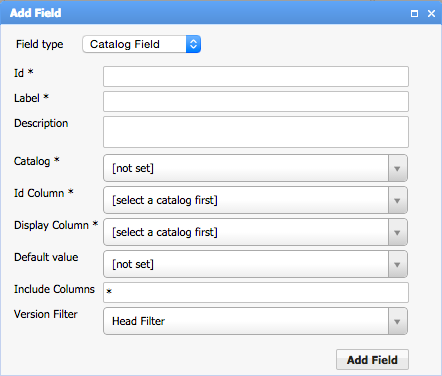
| Parameter | Description |
|---|---|
| Field type | Catalog Field |
| Id * (mandatory) | The ID of the field, unique within the current custom action. Can be used in report text templates to reference the field value. |
| Label * (mandatory) | The display label in the rule editor |
| Description | The description output as a tooltip in the rule editor |
| Catalog * (mandatory) | The catalog whose values must be used for the dropdown box |
| Id Column * (mandatory) | The column of the catalog used as the identifier (value) of the dropdown box |
| Display Column * (mandatory) | The column of the catalog that is used as the display value of the dropdown box |
| Default value | The initial default selection in the rule editor |
| Include Columns | Comma-separated list of column names of the catalog whose value is added to the action result; use * to indicate all columns. |
| Version Filter | The filter used for selecting values from the catalog when the action is executed |
In the rule editor, the field is represented as a dropdown box.

Expression Field
The Expression field allows you to define an expression:

| Parameter | Description |
|---|---|
| Field type | Expression Field |
| Id * (mandatory) | The ID of the field, unique within the current custom action. Can be used in report text templates to reference the field value. |
| Label * (mandatory) | The display label in the rule editor |
| Expression | The default expression in the rule editor |
| Evaluate on Action Execution | When the action is executed, indicate if the expression should be evaluated (checked) or not (unchecked) |
| Description | The description output as a tooltip in the rule editor |
In the rule editor, this is represented as a script field.

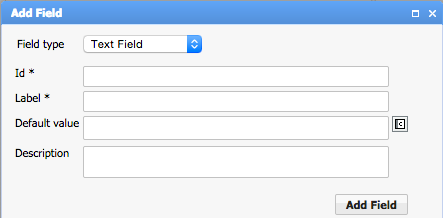
Text Field
The Text field allows you to enter an expression that generates text at evaluation time:
| Parameter | Description |
|---|---|
| Field type | Text Field |
| Id * (mandatory) | The ID of the field, which is unique within the current custom action and can be used in report text templates to reference the field value |
| Label * (mandatory) | The display label in the rule editor. |
| Default Value | Expression displayed as a default expression in the rule editor. |
| Description | Description output as a tooltip in the rule editor. |
In the rule editor, the field is represented as a script field.

Updating a Custom Action Field
To edit a field definition:
- Select the custom action.
- Select the field in the field list.
- Click the edit icon in the second column.
A dialog for the selected field opens. The dialog allows you to edit all properties except the field type and the field ID.
After updating the property values, either:
- Click the Save button to activate the changes
- Close the dialog without saving to ignore the changes
Deleting a Custom Action Field
To delete a custom action field:
- Select the custom action.
- Right-click on the field you want to delete.
- Click Remove from the context menu.
Rule Evaluation
The result of evaluating a Business Rule or a Business Rule Set is an indexed collection of Action objects. Each rule action that is triggered during evaluation can contribute one or more Action objects to the indexed collection.
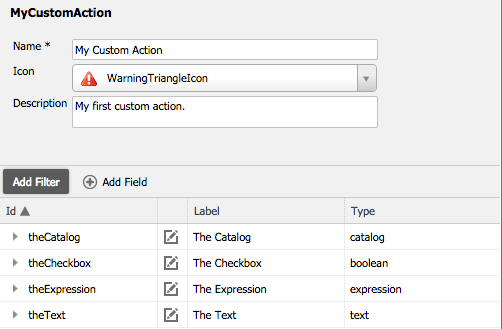
Consider the following custom action definition:
And the following Business Rule:
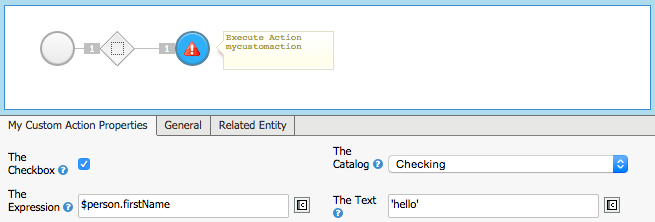
An example Action object produced by the rule above is:
Action{

   bindingValues=Any{},

   expressions=String{},

   params=String{

      additionalInfo=null,

      relatedEntityId=null,

      relatedEntityName=null,

      relatedEntityType=null,


      theCatalog=checking,

      theCatalog.description=[LABEL:account.checking],

      theCatalog.id=checking,

      theCheckbox=true,

      theExpression=$person.firstName,

      theText=hello

   },

   source=1425913788348,

   type=MyCustomAction

}
Each field adds at least one entry to the Action.params collection. The key of the entry is equal to the field ID.
Catalog Field Entries
The key of the dropdown selection is the field ID. For all other entries, the key is prefixed with the field ID.
In the example above, the entries in the Action.params collection are:
| Entry | Reason |
|---|---|
theCatalog=checking
|
The value that has been selected in the rule |
theCatalog.id=checking
|
The ID of the value that has been selected in the rule |
theCatalog.description=[LABEL:account.checking]
|
This entry exists because the "description" column was mentioned in the "Include Columns" property of the custom action field definition |
Checkbox Field Entry
The key is the field ID. The value is either true (checked) or false (unchecked) See the rule definition.
In the example above, the entry in the Action.params collection is:
| Entry | Reason |
|---|---|
theCheckbox=true
|
Checked in the rule definition |
Expression Field Entry
The entry contains the expression result or the expression (script) text. The actual value depends on the custom action field definition property Evaluate on Action Execution.
In the example above, the entry in the Action.params collection is:
| Entry | Reason |
|---|---|
theExpression=$person.firstName
|
Expression entered in the rule definition; custom action field definition "Evaluate on Action Execution" is false (unchecked) |
Text Field Entry
The key is the field ID. The value is the string result of evaluating the expression found in the rule definition.
In the example above, the entry in the Action.params collection is:
| Entry | Reason |
|---|---|
theText=hello
|
Result of evaluating the expression entered in the rule definition. |
Text Report
Business Rule Actions allow you to define a custom Report Text Pattern. Values from action fields can be referenced using the pattern: <ACTION_ID.FIELD_ID>.
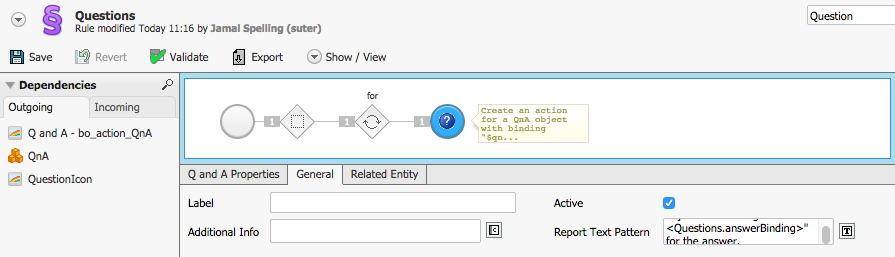
For example, the rule below uses the Question custom action with the report pattern:
Create an action for a QnA object with binding "<Questions.answerBinding>".
As an example, call the script:
RULETEXT(GETBUSINESSOBJECT('Rule', 'Questions'))
This script generates the following report:
For numbers i between 1 and 3 do the following

Create an action for a QnA object with binding "$qna.answer".
Rule-Based Screen
Assume you have to create a screen that consists of an unknown number of questions that a user must answer. The list of questions is triggered by a rule. Each answer to a question must be stored at a different location within your data model.
Requirements like this ask for a generic implementation where binding locations for user input screen components must work with dynamic expressions. That means at design time, the binding locations are unknown.
In Appway, we implement this pattern using the BindingProxy function (Functions extension) in combination with custom actions.
BindingProxy takes a binding expression as a String, a variable name as a String and an entity. It creates a scope where the given variable points to the given entity, and evaluates the binding expression in the context of this scope. The result of executing the BindingProxy statements is a pointer which can then be used to set and get values for the screen component.
Using this method separates the model logic from the Screen logic.
Here's how to do it:
-
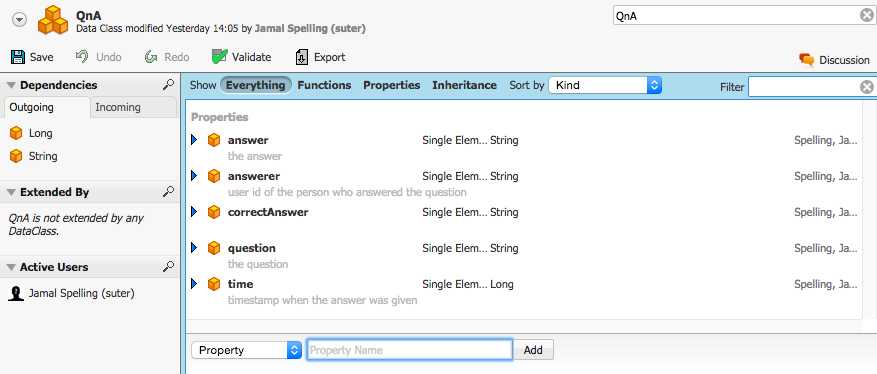
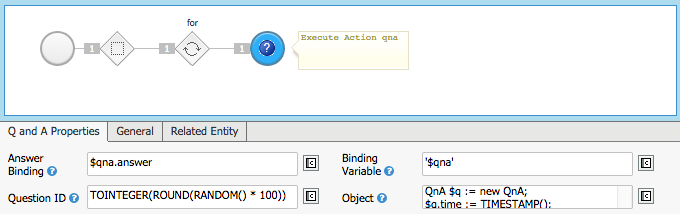
Use Data Class QnA to store the data entered by the user.
-
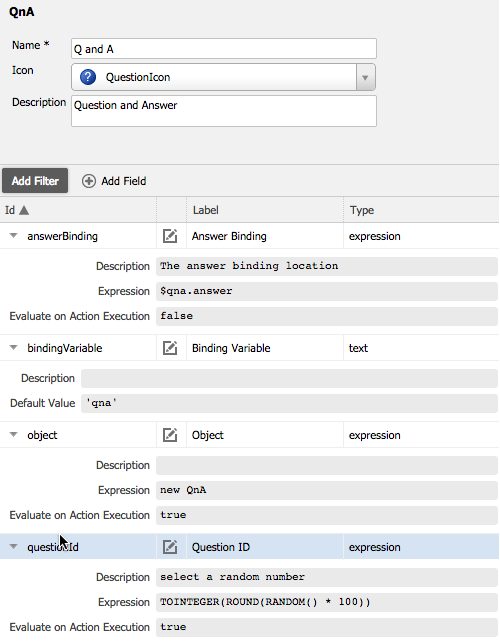
Create the QnA instance using the custom action "object" field. Create the bindings in this instance using the bindingVariable and answerBinding fields.
-
The rule which produces the custom actions looks like this:
-
The Screen components use the
BindingProxyfunction to create real dynamic bindings. For example, the binding expression for the Answer field looks like this:CopyBindingProxy($qnaAction.params['answerBinding'], $qnaAction.params['bindingVariable'], $qnaAction.params['object'])