Mail Extension
Introduction
The Mail Extension provides Process tasks to send mails, Integration Link components that receive email, Data Classes to represent email objects, functions to send email using SMTP protocol, and functions to fetch email from a POP3 or SMTP mailbox.
Mail Configurations
You can manage multiple email configurations for incoming and outgoing mail. To open the mail configuration management screen, go to System Configuration > Email Configurations.
The list of existing mail configurations is displayed. Default incoming and default outgoing configurations are added automatically.
Right-click on any of the existing configurations to:
- Edit or delete the configuration
Note: The default configurations cannot be deleted.
- See the configuration dependencies
- Test the configuration
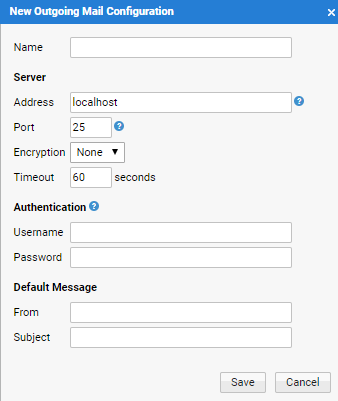
Outgoing Mail Configurations
In the Email Configurations table, outgoing mail configurations are indicated by an envelope icon with a green arrow. They all use the SMTP protocol to send messages, with an option to use the secure SMTPS version.
To add an outgoing mail configuration, click the menu icon in the top left corner at System Configuration > Email Configuration, and select Add New Outgoing Mail Configuration.
A configuration window opens where you can set up mail configuration properties:
When you have completed configuration, you can test it by right-clicking on the configuration in the table and selecting Test from the context menu.
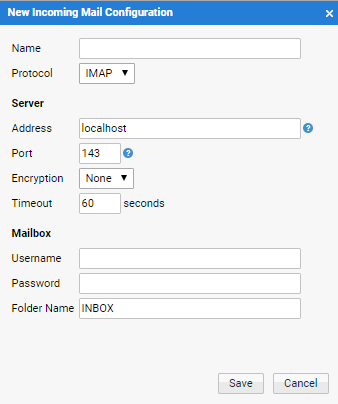
Incoming Mail Configurations
In the Email Configurations table, incoming mail configurations are indicated by an envelope icon with a red arrow. The configurations use either the POP3 or IMAP protocol to send messages, with an option to use the secure versions of both – POP3S or IMAPS.
To add an incoming mail configuration, click the menu icon in the top left corner at System Configuration > Email Configuration, and select Add New Incoming Mail Configuration.
A configuration window opens where you can set up mail configuration properties. You can choose between the POP3 and IMAP protocol, and dependent on that choice, the Folder Name field will be disabled or enabled, respectively:
When you have completed configuration, you can test it by right-clicking on the configuration in the table and selecting Test from the context menu.
Sending Email
Send Mail Task
The Send Mail Task is used to send a message to an SMTP server. It can be found as an element in the Process editor.
To use it, drag and drop it into a Process and connect it properly to the other elements.
Send Mail Task Properties
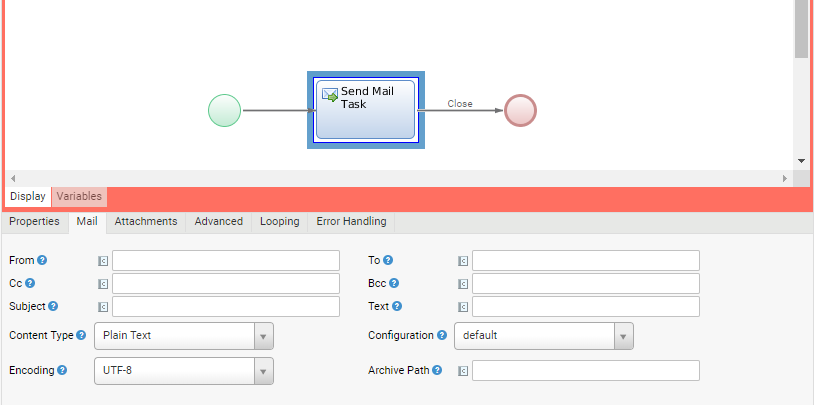
The following options are available:
- From – The email of the message sender
- To – Contains recipient(s) of the message. Multiple recipients should be separated by either a semicolon (;) or a comma (,)
- Cc – Contains the recipients who should receive a copy of the message. Multiple recipients should be separated by either a semicolon (;) or a comma (,).
- Bcc – Contains the recipients who should receive a blind copy of the message. Multiple recipients should be separated by either a semicolon (;) or a comma (,).
- Subject – Contains the message subject
- Text – Contains the actual content of the message
- Content Type – Used to switch between plain text and HTML content
- Alternative Text – Alternative plain text content for an HTML mail. This property is visible only if Content Type is set to HTML.
- Configuration – A mandatory field which should be set to one of the previously-created outgoing mail configurations. If the From and Subject fields are not set, the ones from the configuration will be used when sending email.
- Encoding – Used to set the encoding of the message
- Archive Path – Used to set the path to a folder or file where the sent mail is stored. If left empty, sent messages will not be stored.
For example,
archive/would save the sent mails to a folder namedarchivelocated in Data Home. On the other hand,archive, without the "/" slash, would save the mail to the same filearchiveinside the Data Home, thus overwriting it.
Attachments
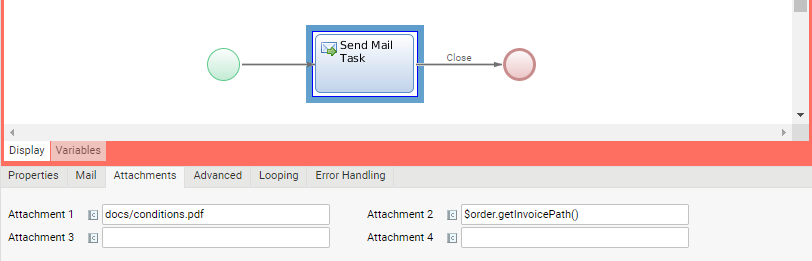
To manage message attachments, select the Send Mail Task, and then Attachments tab. Up to four attachments can be specified.
As illustrated in in the following image, attachments can be specified as static, with a path relative to the data home (like attachment 1), or dynamic, using an expression (like attachment 2):
SendMail Script Function
The function SendMail() is used to send a MailMessage object to an SMTP server. There are three parameters, one of which is mandatory:
- The function expects an instance of the Data Class
MailMessageas the first parameter (mandatory). - The (optional) second parameter is the form of a file path (see below).
- The (optional) third parameter is the ID of the outgoing configuration to be used for sending. If this parameter is not specified, the default configuration will be used.
MailMessage $message := NewObject(MailMessage);

// ...

$message.setServer('smtp.provider.com');

$message.setPort(25);

SendMail($message);
If you do not explicitly set the SMTP server address, port, username, or password in the MailMessage object, the Mail extension will take these values from its configuration (see below). This also applies to message subject and sender (from).
The function has no return value. Errors are indicated by throwing exceptions.
Sending HTML Messages
If you would like to send emails with HTML content, you should first set the content type of the mail message to text/html. Next, you have to produce HTML code and add it to your message:
MailMessage $message := NewObject(MailMessage);

// ...

$message.setContentType('text/html');

$message.setText('Hello <b>World</b>');

// ...
You can also specify an alternative plain text content for the HTML part:
// ...

$message.setContentType('text/html');

$message.setText('Hello <b>World</b>');

$message.setAltText('Hello World');

// ...
This MSDN article gives a good overview of the HTML and CSS elements supported in Outlook 2007.
Use Screens to Define HTML Content
Instead of hard-coding your HTML code (or using a Script Function as a generator), you can build your HTML content as an FNZ StudioScreen and use the function GetScreenHTML() to produce HTML code from this Screen.
This function has one mandatory parameter and three optional parameters:
- The first parameter (mandatory) is the ID of the Screen.
- With the second parameter you can control the translation language. If it isn't set, its default value is either the language in the current user's preferences, or the system's default language.
- The third parameter is a named collection of variable assignments for the Screen.
- The fourth parameter is a version filter used to select a specific version of the Screen. If this parameter isn't present (or is set to null), the current version filter of the Process is used.
String $screenId := 'OrderConfirmation';

Named Any $assignments := NewNamed(Any);

$assignments['orderId'] := $order.getId();

String $html := GetScreenHTML('OrderConfirmation', 'en', $assignments);
- Only the following Screen Components ARE supported in HTML mails: Text, Heading 1, Heading 2, Preformatted Text and similar components; Link and Link Container; Image and Div; Info Table and its subcomponents; If, For, For Each and other logic components; Include, Template, Template Area, Placeholder; HTML Head Style, Script, Raw Code and Raw Code Container.
- The Adaptive Flow Layout and Layout Container Screen Components ARE NOT supported in HTML mails.
- JavaScript is not supported.
- Images cannot be embedded. Use URLs pointing to external images.
- Form fields and other controls are not supported.
Authentication
The following authentication mechanisms are supported for Mail Configurations:
- None
- Basic
- OAuth 2.0 (available for IMAP and SMTP protocols)
Basic Authentication
This authentication mechanism requires a username and password that can be stored in FNZ Studio Composition (System Configuration > Email Configuration). See the Mail Configurations section for information.
These properties can also be set on the every MailMessage object:
$message.setUsername('numcom');

$message.setPassword('changeit');
As soon as both properties are defined, the Mail extension will try to authenticate itself during mail transmission.
OAuth 2.0 Authentication
This authentication mechanism requires a username and an access token.
There are various flows to retrieve and refresh access tokens. The mechanism to retrieve and refresh access tokens must be implemented in the solution (see section 'Access Token Refresh Mechanism - Example' just below for an example mechanism).
The access tokens must be stored as password using the Auth:StorePassword($alias, $accessToken) Script Function. The alias must have the following name: appway-email-access-token-for-{{email-configuration-id}} where {{email-configuration-id}} represents the name of the email configuration.
Note: The same alias is used for both incoming and outgoing email configurations which have the same name.
Access Token Refresh Mechanism - Example
The example below shows how to acquire an access token using the Username / Password Flow for Microsoft Exchange Online.
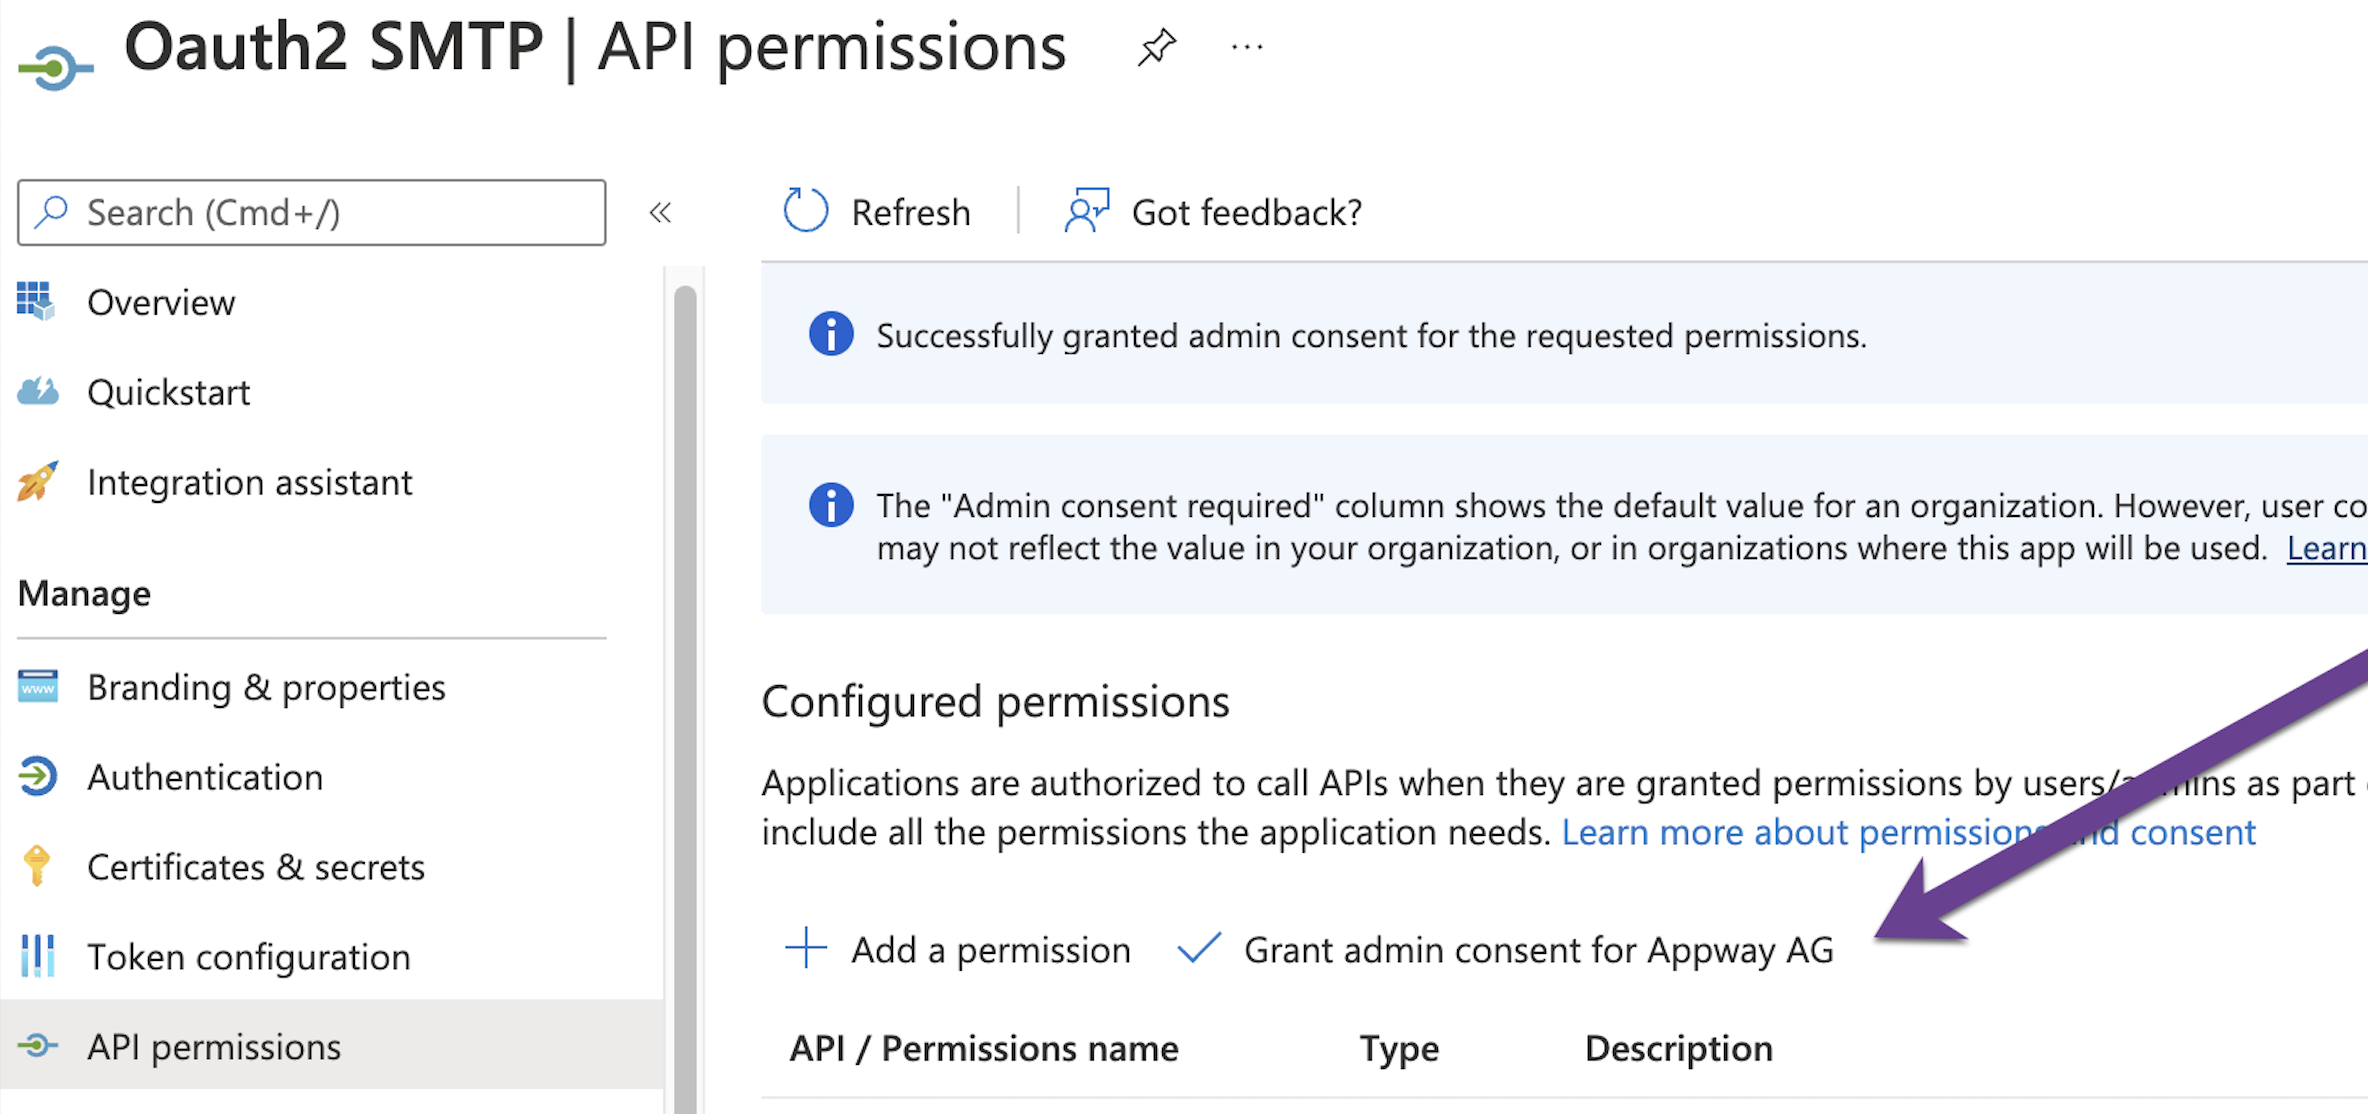
In the Microsoft official documentation you can find details on how to set up and configure an Azure Application: Authenticate an IMAP, POP or SMTP connection using OAuth
For the Username / Password Flow to work, the Grant admin consent option needs to be enabled and the right permissions must be set.
The following script can be used to retrieve and store an access token to send emails using the SMTP protocol for an email configuration named default:
Auth:StorePassword('email-configuration-password', 'some-password');

String $payload := 'grant_type=password&';

$payload := $payload & 'scope=https://outlook.office365.com/IMAP.AccessAsUser.All&';

$payload := $payload & 'client_id=some-client-id&';

$payload := $payload & 'username=oauthtest@appway.ch&';

$payload := $payload & 'password=' & Auth:RetrievePassword('email-configuration-password');

//

RestClient $rc := new RestClient;

$rc.setBaseURI('https://login.microsoftonline.com/');

String $response := $rc.httpPostWithXForm('/organizations/oauth2/v2.0/token', null, $payload);

Named Any $json := CAST(Named Any, ParseJSON($response));

String $accessToken := TOSTRING($json['access_token']);

//

Auth:StorePassword('appway-email-access-token-for-default', $accessToken);
Since the access token has a limited lifetime, the script must be executed regularly such that the access token does not expire.This can be done using a custom Quartz Job that can be defined using the ScriptExecutionJob Extension.
File Output
If you set the second (optional) parameter of SendMail() to a valid file path, the function will write the generated mail to this location. The mail is saved in text format as defined by RFC 822.
MailMessage $message := NewObject(MailMessage);

$message.setFrom('noreply@numcom.com');

$message.addTo('info@numcom.com');

$message.setSubject('Test');

$message.setContentType('text/plain');

$message.setText('This is a test mail');

SendMail($message, 'work/tmp/mail.txt');
Output:
Message-ID: <26680377.1258964659894.JavaMail.Appway@demo>

Date: Mon, 23 Nov 2009 09:24:19 +0100 (CET)

From: noreply@numcom.com

To: info@numcom.com

Subject: Test

MIME-Version: 1.0

Content-Type: multipart/mixed; boundary="----=_Part_5_8636258.1258964659894"

------=_Part_5_8636258.1258964659894

Content-Type: text/plain; charset=us-ascii

Content-Transfer-Encoding: 7bit

This is a test mail

------=_Part_5_8636258.1258964659894--
The function SaveMail() may be used to save a MailMessage object in this format without sending it.
Mail Server Lookup
If you have to send an email to an external domain and there is no local SMTP server available, you can make a lookup in order to find the mail server responsible for the recipient's domain.
String $server := MailServerLookup('numcom.com');

$message.setServer($server);
Note: If you have to send your email to multiple recipients in different domains, you will have to lookup every recipient domain individually and send separate mails.
Receiving Email
Fetch POP3/IMAP Messages Using Integration Link
You can poll the mailbox using Integration Link Business Object. To do so, create a new Integration Link and open it in the editor.
Fetch POP3 Messages Using Integration Link
To create a POP3 mailbox listener:
-
Select POP3 Mail Server Listener from the Select a start element dropdown list available in the Intregration Link. POP3 Mail Server Listener appears as the start element of the Integration Link.
-
Set the description of the component and choose the incoming mail configuration to be used for accessing the mailbox (on the General tab). If there is no configuration available for selection, it means that no POP3 configuration has been created yet (see Incoming Mail Configurations).
-
Further properties of the component are available on the Consumer tab:
- Initial Delay – Time before polling starts since integration link started. If no unit is provided, it is specified in milliseconds by default.
- Delay – Time between polls. If no unit is provided, it is specified in milliseconds by default.
- Use Fixed Delay – Whether to use fixed delay or not.
- Delete – Whether to delete the message after it has been processed.
You can specify the following units:
- ms – millisecond
- s – second
- m – minute
- h – hours
- d – days
- w – weeks
- M – months
- y – years
Examples
-
You can specify multiple units. For example, setting Initial Delay = 1w 1d would trigger the start of the polling in 8 days.
-
To configure a listener that will start 1000 milliseconds after the Integration Link has started, and that will poll the server every 15 minutes and 30 seconds, make the following settings:
- Initial Delay = 1000
- Delay = 15m 30s
Fetch IMAP Messages Using Integration Link
Fetching messages using the IMAP Mail Server Listener is very similar to using the POP3 Mail Server Listener, except that there is an additional option to set: which mailbox folder should be polled. IMAP queries the INBOX folder by default. You can check folder names by testing the selected IMAP configuration from the Email Configurations table as explained in Mail Configurations.
Component Output
The output of both the POP3 and IMAP listeners is a message in the RFC 822 format, so it can be used as an input message to some other Integration Link components.
For example, you can choose to notify the message queue and trigger another Process after receiving an mail message, or you can just choose to archive the message using the Logger component, and then at a later point to parse it back into an actual mail message using the Parsing Mail Messages.
Fetch POP3 Messages Using Script Function
The function FetchPOP3() is used to download mail messages from a POP3 mailbox. The function takes eight parameters, of which the last three are optional:
- The first parameter has to be a path to an existing directory on the file system. Downloaded mail messages are saved in this directory. The mail messages are saved as text files as defined by RFC 822.
- The second and third parameters have to be the name and port of the POP3 server. The default POP3 port is 110.
- The fourth and fifth parameters are POP3 user name, and password.
- The sixth parameter is a flag used to indicate whether downloaded messages should be deleted in the POP3 mailbox on the server. The default value is
true. - The seventh parameter is an integer and used to limit the number of downloaded messages.
- The eighth parameter is a flag to indicate whether the function should use an SSL connection. The default value is
false. Note that some providers require SSL connections. By default, using an SSL connection also implies a different port number (e.g. 995 for Gmail).
The function returns an indexed collection of absolute file paths. These file paths point to the downloaded mail message files.
Indexed String $files;

$files := FetchPOP3('work/tmp/mails', 'pop3.numcom.com', 110, $username, $password);
Parsing Mail Messages
The function ReadMail() is used to read the content of a RFC 822 formatted text file and returns a MailMessage object. The function has two parameters:
- The path to the file to be parsed. If the file does not exist, an exception is thrown.
- (Optional) A flag used to indicate whether the function should parse only the mail headers (
true, default value), or the complete message (false).
MailMessage $message := ReadMail('work/tmp/mail.txt', false)
If the mail message contains attachments, they are extracted and saved as individual files in the same directory as the parsed file. The name of the attachment file contains the message id followed by "-attachment-" and an incremented index for every attachment.
Data Classes
The following Data Classes are available when you install the Mail extension:
MailMessageMailHeaderMailAttachment
If you install a new version of Mail extension, it may also redeploy new versions of these Data Classes. You shouldn't make changes to these Data Classes, or you will have to reapply these changes after installing a new version.
Data Classes generated by Mail Extension have the meta data attribute Generator set to MailExtension and the attribute Adapter-Version contains the version number of the Mail Extension.
MailMessage
MailMessage is the main Data Class to represent a single email message object.
MailMessage $message := NewObject(MailMessage)
The Data Class has more than 15 properties. Some of them are used to save message properties (from, to, subject etc.), others are used to hold message transport oriented information (server, port, username etc.).
There are set- and get-methods for most properties. You can either access the property directly, or you can use the methods.
$message.from := 'noreply@appway.com';

// or

$message.setFrom('noreply@appway.com');
The properties to, cc and bcc contain indexed collections of recipient email addresses. The methods addTo, addCc and addBcc may be used to add recipients to these collections. Multiple recipients should be separated by semicolon:
$message.addTo('info@appway.com');

$message.addCc('sales@appway.com;hr@appway.com');
The two properties headers and attachments contain indexed collections of MailHeader and MailAttachment objects (see below).
MailHeader
The Data Class MailHeader is used to represent email headers. Every header has a name and a value.
MailHeader $header := NewObject(MailHeader);

$header.setName('X-Generator');

$header.setValue('Appway');

$message.addHeader($header);
Headers are used to transport meta data about the email content. Properties like from and to of the Data Class MailMessage are automatically converted to headers. But if you would like to add custom headers, use this MailHeader Data Class. Note that custom (non-standard) mail header names should start with the prefix "X-".
MailAttachment
This Data Class represents an attachment. An attachment is always saved as file on the file system. Instances of MailAttachment then contain a path to this file in the property named path.
MailAttachment $attachment := NewObject(MailAttachment);

$attachment.setName('invoice.pdf');

$attachment.setPath($invoicePath);

$message.addAttachment($attachment);
Setting JavaMail Properties
The MailMessage object has a named collection of Strings called properties. These values are set in the mail session.
Example 1 – Enable SSL:
MailMessage $mail := NewObject(MailMessage);

// ...

$mail.setProperty('mail.smtp.ssl.enable', 'true');

// ...

SendMail($mail);
Example 2 – Enable TLS:
MailMessage $mail := NewObject(MailMessage);

// ...

$mail.setProperty('mail.smtp.starttls.enable', 'true');

// ...

SendMail($mail);
For a list of supported JavaMail properties, check the JavaMail documentation.
Example: Send mail with Gmail using TLS
MailMessage $mail := NewObject(MailMessage);


$mail.server := 'smtp.gmail.com';


$mail.port := 587;


$mail.from := 'bruce.wayne@gmail.com';


$mail.to.addElement('test@numcom.com');


$mail.subject := 'Gmail TLS test';


$mail.text := 'This is a test message';


$mail.username := 'bruce.wayne@gmail.com';


$mail.password := 'IamBatman';


$mail.setProperty('mail.smtp.starttls.enable', 'true');


SendMail($mail);
Email Notification Delivery Channel
By default, notifications are delivered Appway-internally. However, there is the concept of "Notification Delivery Channels" which implement alternative delivery mechanisms. The Mail Extension contains a delivery channel for delivering notifications via email. In particular, the extension deploys the notification delivery channel with the ID "email", and users can subscribe or be subscribed to topics via this channel, meaning that the corresponding notifications will be delivered to them via email.
FNZ Studiosupports the concept of notifications in the workspace. You can define topics, users can subscribe to topics, and notifications with certain topics are delivered to the correct users. You can read more about the notification system in the Workspace Notifications (external resource).
First Steps
Before starting, make sure you have a valid default e-mail configuration as described above. Then you can enable the email notification delivery channel by setting the following extension configuration property (you have to restart the extension for the change to take effect):
mail.notificationchannels.simple.enabled = true
For a test run, register yourself to a made-up topic "myTestTopic". This means that notifications with the topic "myTestTopic" should be delivered to you via email.
RegisterForNotifications(User:CurrentUserGetId(), 'myTestTopic', 'email')
Before sending a notification that should arrive in your email inbox, you have to make sure that your email address is set in your FNZ Studiouser preferences. Click on your name in the top right corner of the Studio, and select Edit Profile to see if a value is set in the Email field.
Now, everything is prepared to send a notification:
SendPubSubNotification(['myTestTopic']:String, null, User:CurrentUserGetId(), 'Test', 'Hi there, this notification should arrive via e-mail')
We sent a notification with topic "myTestTopic", type "Test", and text "Hi there, this notification should arrive via e-mail". For more information on this function and other notification related script functions, see Workspace Notification Script Functions (external resource).
After a few moments, the notification should appear in your inbox.
Basic Configuration
You can define the outgoing mail configuration via the configuration property:
mail.notificationchannels.emailconfiguration
The user preference name from which to get the user's email address can be configured using the property:
mail.notificationchannels.addresspreference
Designing the Notification Email
To customize the notification email, you can specify an FNZ Studio Screen, which will be rendered as the body of the email, and an FNZ Studio Script Function, which will be evaluated to get the subject of the email. The corresponding Extension configuration properties are:
mail.notificationchannels.simple.content.bodyscreenid
mail.notificationchannels.simple.content.subjectfunctionname
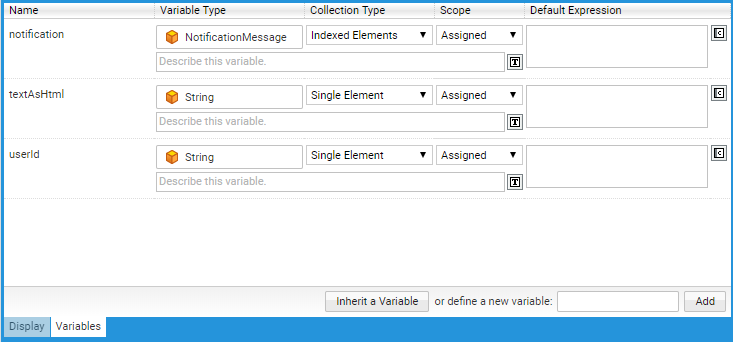
In both cases, the content can depend on the notification sent and the user ID of the receiver. The Screen has variables for these two properties which are assigned the correct values by the Extension whenever a notification email is rendered. Furthermore, it has to have an assigned variable textAsHtml which contains the text of the notification with all links, attributions, and mentions translated to HTML links.
Email body Screen variable definitions:

Note: The notification email Screen has the same limitations as the `GetScreenHTML()` function.
Similarly, the subject function is called with the notification and receiver user ID as arguments to generate the subject for a particular notification email. The signature must look as follows:
Function Notification_GetEmailSubject(NotificationMessage $notification, String $userId) : String Begin

// Return a subject based on the notification and the receiver

End
Advanced Configuration
There are a couple of configuration options which you can use to tune the behavior and performance of the email notification delivery channel:
You can choose if the Screen and function should be rendered/evaluated for every user (which is necessary if you want to use the receiver user information), or should only be rendered/ evaluated once and the result should be reused for all receivers (which is more efficient) by setting the configuration property:
mail.notificationchannel.strategy.createperuser = true/false
Furthermore, you can choose if the channel should send a separate email for each receiver of a notification, or should send one email with all receivers in BCC using the configuration property:
mail.notificationchannel.strategy.sendperuser = true/false
Note: The combination createperuser=true and sendperuser=false does not make sense, since when sendperuser is false, only one email is sent, and is thus forbidden.
Notification Digest
Beyond the simple email notification delivery channel described above, the Mail Extension also allows you to register one or more email digest channels that collect notifications and send them out all at once at specified times. The available configuration properties are:
mail.notificationchannels.digest.1.enabled– Set totrueorfalseto enable/disable the channel (default: false).mail.notificationchannels.digest.1.id– An ID for the notification delivery channel. This ID will be used in the backend to store the corresponding subscriptions, but is not shown to the user (default: email-daily).mail.notificationchannels.digest.1.name– A name for the notification delivery channel. This name will be shown to the user in the frontend (default: "Email (once a day)").mail.notificationchannels.digest.1.cron– Cron expression that defines when the digest is sent (default: "0 0 17 * * ?" which means every day at 5 pm).mail.notificationchannels.digest.1.content.bodyscreenid– Screen to be rendered as the email body (default: none).mail.notificationchannels.digest.1.content.subjectfunctionname– Function to be evaluated for the subject (default: none).
The body Screen and subject Function work as described for the simple channel above. The only difference is the assigned variables/parameters, since for the digest channels, you get an indexed collection of notifications instead of only one notification.
The Screen's variable definitions have to look like this:
The Function signature has to look like this:
Function NotificationDigest_GetEmailSubject(Indexed NotificationMessage $notifications, String $userId) : String Begin

// Return a subject based on the notifications and the receiver

End
To add another digest notification delivery channel, you can add another set of the configuration properties listed above, where you replace the "1" by "2" (or the next higher integer, respectively). To add a weekly digest channel, for example, you would add the following properties to the Extension configuration:
mail.notificationchannels.digest.2.enabled = true

mail.notificationchannels.digest.2.id = email-weekly

mail.notificationchannels.digest.2.name = Email (once a week)

mail.notificationchannels.digest.2.cron = 0 0 17 * 5 ?

mail.notificationchannels.digest.2.content.bodyscreenid =

mail.notificationchannels.digest.2.content.subjectfunctionname =