System Startup and Shutdown
Introduction
FNZ Studio is a distributed system. Therefore startup and shutdown are complex - the nodes of the distributed system have to talk to each other. There are three phases in both startup and shutdown:
- Before init/stop of cluster service
- Init/Stop of cluster service
- After init/stop of cluster service
Furthermore, we distinguish four cases of startup and shutdown:
- Full system startup
- Full system stop
- Adding a node
- Removing a node
The four cases are described individually in the following chapters. Cheat sheets providing a summary are available for download: startup-and-shutdown-cheat-sheets.pdf
Full System Startup
During a full system startup, the following steps happen:
-
Each application server is started.
-
FNZ Studio starts on each node.
-
FNZ Studio nodes connect to each other: If a minimum cluster size is configured, the nodes will wait for each other while creating the Hazelcast instance.
-
One node goes first and performs a system-wide initialization.
-
All other nodes follow.
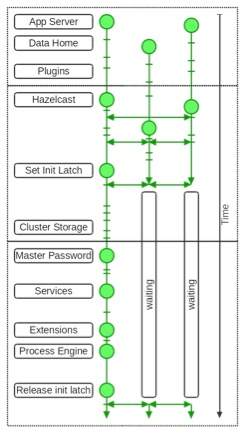
Figure 1 : Full system startup
Figure 1 shows a full system startup of three FNZ Studio nodes, where the three vertical threads represent the timelines of the different nodes, and time flows from top to bottom. The horizontal lines separate the three phases (before/during/after cluster service startup).
In the following sections, the three phases are described in more detail.
Before Init of Cluster Service
This phase corresponds to the topmost part of Figure 1. Before the Cluster Service is started, no communication between the different nodes is possible and therefore every node starts individually. The application server and FNZ Studio are started on every node. FNZ Studio's context listener is called and the following steps are executed:
-
Remember startup time (see Studio > Overview: Uptime)
-
Find and validate data home (see the Data Home step in Figure 1)
- Configure the data home based on the following configurations, where the precedence is according to the listed order
- Servlet context attribute
nm.data.home - Servlet init parameter
nm.data.home* Java system propertynm.data.home* Environment variableNM_DATA_HOME
* Classpath default propertynm.data.home
- Servlet context attribute
- Required directory structure
- Required: conf directory
- Required to not exist: several subdirectories which existed in Appway 5.3
- If not found or invalid, startup (of this node) fails
- Configure the data home based on the following configurations, where the precedence is according to the listed order
-
Configure Log4j
- Skip initialization if
nm.log4j.initializeis false - Load configuration from the following locations in this order:
{nm.data.home}/conf/log4j.propertiesclassloader://com/nm/conf/log4j.properties
- After successfully loading these properties, additional properties are tried to load from
{nm.data.home}/conf/log4j-additional.properties
- Skip initialization if
-
Check system, JAAS, and Hazelcast config
-
Prepare data home directory structure
-
Validate context class loader
-
Start application service
-
Register bean utils converters for XML digesters
-
Initialize UID generator
- Initialize with current system time
- Load previous state from
{nm.data.home}/conf/uid.properties[.tmp]- Uses
nm.uid.prefix
- Save current state
- Thread which runs every 5 minutes
- Thread runs every 1 minute if many UIDs are requested
- On shutdown
- State stored to uid.properties.tmp and then renamed to uid.properties
-
Load and validate configuration
- Prepare configuration schema and property types
classloader://com/nm/conf/default.types.properties
- Prepare certificates
classloader://com/nm/conf/numcom[2].crt
- Load default properties
classloader://com/nm/conf/default.properties
- Load unique and no-sync property names
classloader://com/nm/conf/unique.propertiesnm.uid.prefix,nm.cluster.local.nodename
classloader://com/nm/conf/nosync.propertiesnm.data.home
- Load installation properties
- Ensure license
- Load content properties
- Load java (aka system) properties
- Load server properties
- Load memory properties
- Restrictions:
- No
nm.license.* nm.*properties only if known
- No
- Overwrite order
{nm.data.home}/-conf/installation.propertiesconf/license.propertiesconf/content.propertiesconf/conf.properties
- Validate
nm.uid.prefix: blank or validnm.cluster.local.nodename: not blank
- Warn
- If
nm.uid.prefixis blank
- If
- If configuration can not be activated or is invalid, startup (of this node) fails
[1]
- Prepare configuration schema and property types
-
Initialize OWASP Enterprise Security API (ESAPI)
-
Intitialize BeanShell framework
-
Start cluster map config service
-
Start adapter service (aka extension service)
-
Start execution statistics service
-
Start web request service
-
Start plugins
-
If startup of any plugin fails, the startup fails
[1] Note that configuration property nm.cluster.shutdown.jvm.stop.onStartupFailure (default = true) causes JVM to shut down in case of a forced cluster shutdown due to a startup failure. See also section 3.
-
Init of Cluster Service
This phase corresponds to the middle part of Figure 1. Upon initialization of the Cluster Service, the Hazelcast instance is created and from then on, communication between the nodes is available. When the Cluster Service init is called, the following steps happen:
-
The Hazelcast instance is created on every node (see Hazelcast step in Figure 1)
- Initial config is loaded from
{nm.data.home}/conf/hazelcast.xmlorclassloader://com/nm/conf/hazelcast.xml - Default map configs are added to config
- All map configs are collected and added to config (Appway 6.2)
- Map configs are updated (eviction and near cache)
- Map store implementations are created and added to config (default is filesystem)
- Hazelcast is started and connects to configured cluster nodes
- ? wait for min cluster size if configured
- Initial config is loaded from
-
Log message: "Hazelcast instance "appway" created."
-
Hazelcast listeners are created
- Membership listener
- Client listener
- Migration listener
-
Test state of other nodes
- If any other node is RUNNING ? set joining flag
- If any other node is STOPPING or DONE ? stop as well
-
Subscribe to key topic
- Needed to support master password functionality
-
If not joining a running cluster (joining flag is not set)
- Try to set the init latch
- If successful, continue
- Log message: "Init latch set."
-
If not successful, wait until the init latch is released
- Log message: "Waiting for init latch..."
-
This ensures that a single node can perform system initialization without interfering with other nodes
-
Test state of other nodes - again
- Ensure joining flag is correct
- Shutdown if a node stopped while waiting for init latch
-
Assert max cluster size is respected
- Always init first node
- Get max cluster size from license file
- If cluster size below or equal to max cluster size, continue
- Else stop first non-running node and test again
-
Connect to cluster storage (see Cluster Storage step in Figure 1)
- Touch and eagerly load data in all persistent maps
- If a persistent map has eviction enabled no data is loaded
- Touch and create non-persistent maps
- Print sizes of all persistent maps
-
Log message: "Connected to cluster data."
-
Create lock pool for process instances
nm.cluster.lockpool.processinstances.size- defines size (default is 2048 for Appway 10 and lower, -1 for Appway 11 and higher)
nm.cluster.lockpool.processinstances.timeout- defines lock timeout (default = 120 seconds)
-
Create entry listeners
- Notified upon any change in a given map
-
Subscribe to topics
- Message listeners listen for messages published on a given topic
-
Log message: "Cluster service ready".
After init of Cluster Service
This phase corresponds to the bottom part of Figure 1. After the Cluster Service is initialized, regular FNZ Studio start-up continues. Towards the end of the startup phase, the application state is set to RUNNING and the init latch is released. This triggers the other nodes to continue and finish with their startup. When the Context listener is called, the following steps happen:
- Start user service and key service
- Start repository
- Start cluster log service
- Compact if first node
- ? Left-over 10- blocks
- ? Left-over 1d blocks
- Replace in-memory cluster log appender
- Compact if first node
- Log message: "start-up phase 1 done."
- Find master password (see Master Password step in Figure 1)
- Initialize key service if found
See the Master Password section for more details on the usage of this functionality.
-
Start all remaining services (see Services step in Figure 1)
-
Fire services started event (Appway 6.2)
-
Start extensions (see Extensions step in Figure 1)
-
Start data source registry
-
Start process engine (see Process Engine step in Figure 1)
-
Register JMX beans
-
Fire application started event
- Job scheduler starts
- Dependency analysis starts
-
Commit and clear any remaining thread-local variables
-
Set application state to RUNNING
-
Release init latch (see Release init latch step in Figure 1)
- Now all other nodes continue and finish their startup
-
Log message: "start-up phase 2 done."
Full System Shutdown
During a full system shutdown, the following steps happen:
-
Publish cluster shutdown
-
Perform system shutdown
-
Stop cluster service
-
Stop application server
Important! For a step-by-step description of how to safely trigger a shutdown of the full cluster, see Shutting down a large cluster.
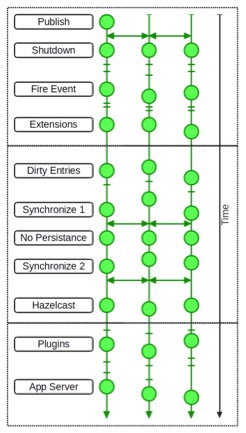
Figure 2 : Full system shutdown
Figure 2 shows a full system shutdown of three FNZ Studio nodes, where the three vertical threads represent the timelines of the different nodes, and time flows from top to bottom. The horizontal lines separate the three phases (before/during/after cluster service shutdown).
In the following, the three phases are described in more detail.
Before Stop of Cluster Service
This phase corresponds to the top part of Figure 2. After the cluster shutdown command was published to all nodes, system shutdown is triggered on each node. Services and extensions are stopped while the cluster service is still fully functional.
-
Trigger on one node
- Publish cluster shutdown (see Publish step in Figure 2)
- REST:
{URL}/rest/cluster/shutdown - JMX:
ClusterServiceInfo - ClusterService:
publishShutdown()
- REST:
- Publish cluster shutdown (see Publish step in Figure 2)
-
Shutdown listener is called on each node (see Shutdown step in Figure 2)
- Set cluster shutdown flag
- Set application state to STOPPING
- System shutdown is called
-
Release breakpoints
-
Stop process data service
- Disable logout listener
- Delete non-persistent process instances
- Delete orphaned value stores
-
Unregister JMX beans
-
Fire application shutdown event
- Stop services
- Stop UID generator
- Stop job scheduler
-
Stop repository
-
Fire services stopped event
-
Stop extensions (see Extensions step in Figure 2)
-
Dispose job scheduler
-
Clear reflection caches
-
Commit thread-local changes
-
Stop cluster log service
Stop of Cluster Service
This phase corresponds to the middle part of Figure 2. After the cluster service is stopped, no more communication among the cluster nodes is possible. The last step of stopping the cluster service is to shutdown the Hazelcast node. The Cluster service shutdown is called and the following steps happen:
-
Print dirty map entry counts
-
Flush all dirty map entries (see Dirty Entries step in Figure 2)
-
Wait until everything is saved
- Warn and continue after two minutes
-
Sync on cluster (see Synchronize 1 step in Figure 2)
- Wait for at most three minutes
-
Disable persistent storage functionality ** (see No Persistence step in Figure 2)
- Nothing can be modified after this point
-
Log Message: "Hazelcast map stores disabled."
-
Sync on cluster (see Synchronize 2 step in Figure 2)
- Wait for at most three minutes
-
Shutdown Hazelcast node
- After this point no communication between the nodes is possible
-
Log Message: "Hazelcast shutdown done (node detached)."
After Stop of Cluster Service
This phase corresponds to the bottom part of Figure 2. After the cluster service is stopped, no communication among the nodes is possible anymore. The plugins are stopped and finally the application server is stopped on each node.
System shutdown is called and the following steps are executed:
- Dispose lock pool
- Stop plugins
- Print last Log4j message
- Log Message: "Appway will soon be stopped, but Application Server might continue running..."
- Stop Log4j
- Clear thread-local variables
- Set application state to DONE
- JVM is shut down
[2]
Finally, you have to stop the application server, since FNZ Studio internal cluster shutdown cannot stop the application server itself.
[2] Note the following JVM-related configuration properties (System Configuration > Configuration Properties in FNZ Studio Composition):
- nm.cluster.shutdown.jvm.stop (default = true) causes JVM to shut down after a regular cluster shutdown.
- nm.cluster.shutdown.jvm.stop.onStartupFailure (default = true) causes JVM to shut down in case of a forced cluster shutdown due to a startup failure.
Adding a Node
- Before init of cluster service
- Same as on full system startup
- Init of cluster service
- Connect during creation of Hazelcast instance
- Partition migration will be started immediately
- Joining flag will be set ? Therefore, no init latch
- The rest is the same as for a non-first node during full system startup
- Connect during creation of Hazelcast instance
- After init of cluster service
- The same as for a non-first node during full system startup
Removing a Node
- Before stop of cluster service
- Ensure only one node stops at a time
- Set application state STOPPING
- Call system shutdown ? as for full system shutdown
- Stop of cluster service
- Try flush at most two times
- No sync on cluster
- Shutdown Hazelcast node
- After stop of cluster service
- The same as for a full system shutdown