Local Windows 10 Machine Installation
This recipe provides a step-by-step guide to installing the Platform as a local instance, running on a Windows 10 Pro 64-bit machine. This recipe complements the more general installation guidelines, and provides the specific parameterizations needed for installation on Windows.
Step 1: Setting Up Apache Tomcat
In order to run the Platform on a local machine, you need to install and run a Tomcat Apache server:
- Check the exact version of Apache Tomcat compatible with the version of the Platform you are installing in the Technical Requirements article. The following steps use version 8.5.11 as an example.
- Go to http://tomcat.apache.org > Downloads > Tomcat 8.0 > 8.5.11 (where is the latest upgrade number) > Binary Distributions > Core > "ZIP" package (preferred 64-bit Windows zip) (e.g.
apache-tomcat-8.5.11{xx}.zip). - Create your project directory (e.g:
C:\myApacheorC:\myProject) and unzip the downloaded file into your project directory. Tomcat will be unzipped into directoryc:\myApache\apache-tomcat-8.5.11{xx}. - For ease of use, shorten and rename this directory to
C:\myApache\tomca.
Names which contain spaces may cause issues with running the server.
Take a look at the installed Tomcat directory. It contains the following sub-directories:
- bin: Contains the startup script (
startup.batfor Windows andstartup.shfor Unix and Mac OS X), shutdown script (shutdown.batfor Windows andshutdown.shfor Unix and Mac OS X) binaries, as well as other binaries and scripts. - conf: Contains the system-wide configuration files, such as
server.xml,web.xml,context.xml, andtomcat-users.xml. - lib: Contains the Tomcat system-wide JAR files, accessible by all web apps. External JAR files (such as MySQL JDBC Driver) can be placed here manually.
- logs: Contains Tomcat log files. You may need to check for error messages here.
- webapps: Contains the web apps to be deployed. You can also place the WAR (web app Aachive) file for deployment here.
- work: Tomcat's working directory used by JSP, for JSP-to-Servlet conversion.
- temp: Contains temporary files.
Step 2: Setting up the Java JDK
In order to have Tomcat running on your system, make sure that you have installed the latest Java JDK. Go to the Oracle Download Area and download the latest version for your machine (e.g. jdk-8u121-windows-x64.exe).
Note: Check the exact Java JDK versions compatible with the version of the Platform you are installing in the Technical Requirements article.
You now need to create an Environment Variable, JAVA_HOME:
-
Find your JDK installed directory. The default is
C:\Program Files\Java\jdk1.8.0_{xx}, where{xx}is the upgrade number. Take note of your JDK installed directory. -
To set the environment variable "JAVA_HOME" in Windows 7/8/10, go to: Control Panel > System > Advanced system settings > Advanced tab > Environment Variables > System Variables > New.
-
In Variable Name, enter JAVA_HOME.
-
In Variable Value, navigate with the browse button to your JDK installed directory.
-
-
To verify, re-start a CMD shell (a restart is needed to refresh the environment) and issue:
Copy> SET JAVA_HOME
> java -version
JAVA_HOME=c:\Program Files\Java\jdk1.8.0_{xx}Verify that the JAVA_HOME is YOUR JDK installed directory.
This Environment Variable is needed for starting Tomcat through the Command Line/PowerShell in Windows. Starting Tomcat this way means that it is not running in the background as a service, and can be terminated if the connection with the host is lost.
Enabling Tomcat to be able to run as a service through the Task Manager of Windows (without the need of the CMD/PowerShell) is covered later in this recipe.
Step 3: Starting the Tomcat Apache Server
- After copying the file to that location, open Windows' PowerShell and navigate to the folder where you have unzipped Tomcat. Run the
startup.batas follows:..\tomcat\bin> .\startup.bat - Allow access if firewall protection pops-up.
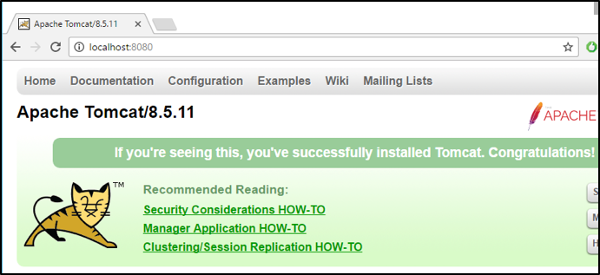
- Open a web browser and navigate to: localhost:8080
If everything is OK, you should see the following page:
Step 4: Configuring One Node
-
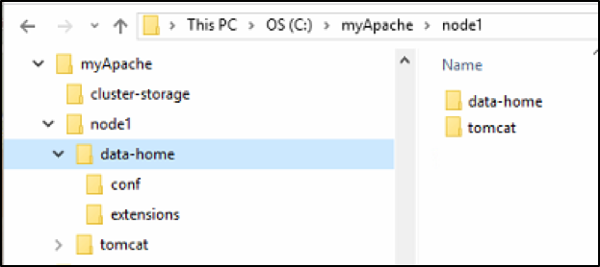
Create a new folder inside
C:/myApache/with the name: cluster-storage. This folder is used to model the cluster-wide persistent store. All the nodes need to have access to the same folder: the persistent store. -
Next, create a new folder inside
C:/myApache/with the name: node1. This folder is used to model a node. -
Copy the Tomcat folder to node1.
-
Create a folder in
C:/myApache/node1with the name: data-home. -
Create two subfolders within this data-home folder: conf and extensions.
-
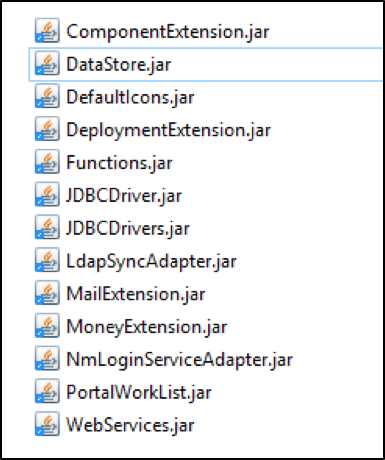
Copy the following "extension" files from the .zip file to the extensions folder you have just created.
-
Copy the
conf.properties,content.properties,hazelcast.xml, andjaas.conffiles into the conf folder. -
Copy the license file to
…/data-home/conf/license.properties. For a single-node test installation, use the license file which comes packaged in the WAR file. For all other cases, contact Support to request a license file. -
Open the
conf.propertiesfile with a Text Editor program and change the nodename and UID prefix:
-
Add the following line of code to the
content.propertiesfile:Copynm.system.id = My Local Appway Node -
Verify that the license is still valid in the
license.propertiesfile. -
Copy the WAR file (e.g.
nm-6.3.4.war) into the tomcat/webapps folder, rename it to ROOT.war, and remove the existing ROOT folder. -
Copy the
NmJAASLoginModules.jarto tomcat/lib -
Define the
nmdevrealm intomcat/conf/server.xml -
In the same file, add a parameter with your data-home location. Your
server.xmlfile should look like this: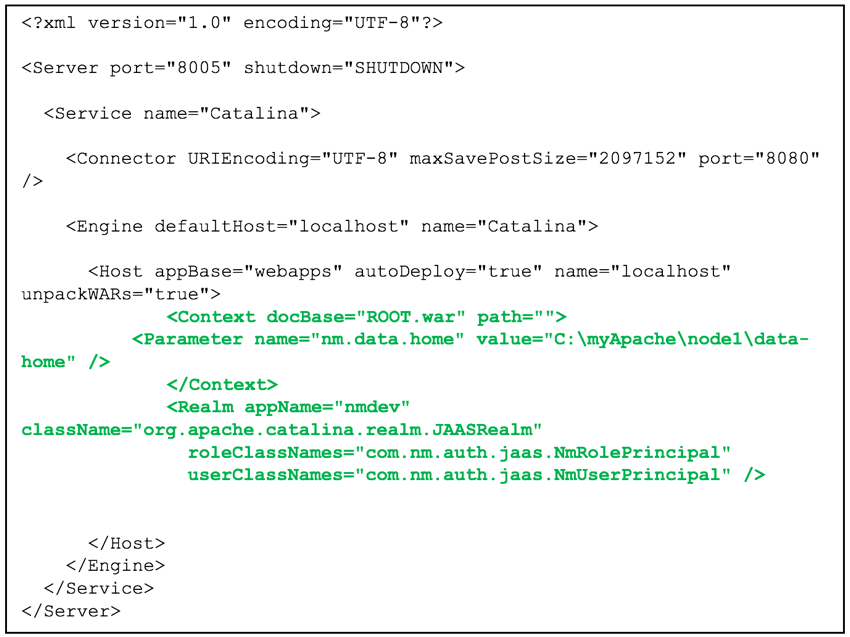
-
Open a new PowerShell in Windows, navigate to your Tomcat bin folder:
C:\myApache\node1\tomcat\binand start up the server with :...\tomcat\bin>.\startup.bat -
Go back to your browser and navigate to
localhost:8080. If everything is working correctly, you should see the following message: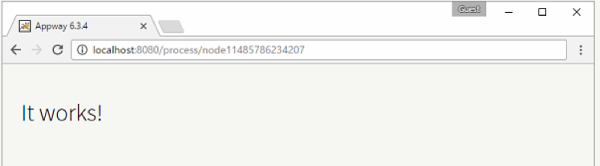
-
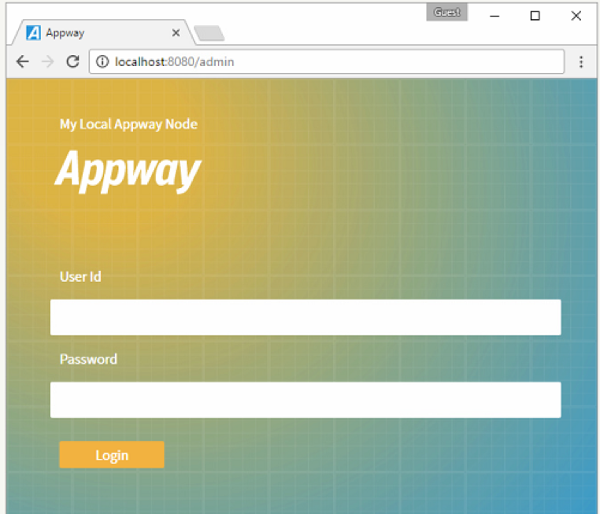
Now go to the
localhost:8080/adminpage and you should see the login page of FNZ Studio Composition:
Step 5: Running One Appway Node as a Service
-
To install Tomcat as a service, open a PowerShell and navigate to
C:\myApache\node1\tomcat\bin -
Execute:
.\service.bat install -
Double-click the tomcat8w.exe file. Navigate to the Java tab and add the following command in the Java Options field:
Copy-Dnm.data.home=C:\myApache\node1\data-home"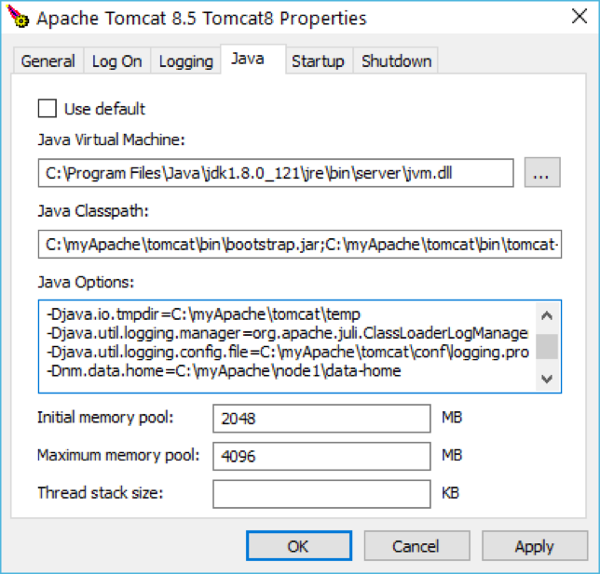
-
Go to the Windows Task Manager > Services tab. Find the Tomcat8 service, right-click and start the process.

-
Navigate to
localhost:8080/admin, and log in to FNZ Studio Composition.