Job Scheduling
Introduction
In FNZ Studio, there are jobs that run in the background and take care of different parts of the system, e.g. the process engine or clean-up jobs. The Job Scheduler tab monitors these jobs and allows users to manage jobs. Managing jobs includes pausing them, or setting the schedule on which they should trigger.
Elasticity
The scheduling of jobs is fully elastic.
First of all, let's summarize how jobs are scheduled. Every node in the cluster has a local scheduler, and such scheduler is responsible for executing a job when its associated trigger is fired. The scheduler can be in one of the following states:
- Started
- Standby
- Shutdown
The trigger is the mechanism by which jobs are scheduled. In FNZ Studio, a trigger has the following characteristics:
- it can only point to one job
- it is always a cron expression
Schedulers and triggers are transparently aligned among cluster nodes. Here is how the Scheduler algorithm works: When scheduling a job, we privilege the state of the running cluster compared to local configurations. In other words, if a job already exists in a running cluster, its state is used when scheduling the same job on another node (e.g. a joining node). Local configurations are used only if the node that 'wants' to schedule the job is the first node forming the cluster.
Following this principle, when a node 'wants' to schedule a job will set the following:
- Scheduler state
- Trigger cron expression
- Trigger state
Based on the existence of the job in other cluster nodes, the behavior is the following:
| Setting | Job exists | Job does not exist |
|---|---|---|
| Scheduler state | Aligns with the state in the cluster | Sets to 'Started' |
| Trigger cron expression | Aligns with the runtime cron expression in the cluster | Uses the local cron expression which could be hard-coded or set in a configuration property |
| Trigger state | Aligns with the state in the cluster | Sets to 'Started'. Pauses the trigger if forced by some business logic or configuration property |
Job Scheduler Table
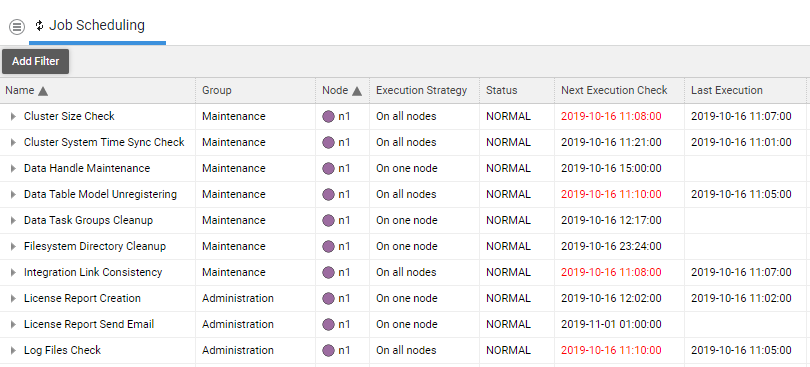
Access the Job Scheduler tab via System Maintenance > System Overview > Job Scheduling.
The table on the Job Scheduler tab displays a list of all active jobs within the entire cluster. The following information is available:
- Name – Displays the job name. Click on the arrow to the left of the job name for details on its function.
- Group – Displays the group the job belongs to.
- Node – Displays the name of the cluster node where the job is active. "All" refers to entries in the table related to the cluster as a whole.
- Execution Strategy – Specifies if the job is running "On one node", "On all nodes" or "Unknown (on all nodes)".
- Status – Displays the status of the job:
- PAUSED: the job is paused
- BLOCKED: the job is blocked
- COMPLETE: the job has no more fire-times in its schedule
- ERROR: an error occurred
- NONE: no trigger is associated with this job
- NORMAL: normal running state
- UNKNOWN: default status when none of the previous applies
- Next Execution Check – Specifies when the job will run next.
- Last Execution – Specifies when the job last ran.
- Runs – Displays how many times the job has already run.
- Errors – Displays how many times the job experienced an error.
- Run Time (min) – Displays the minimum execution time of the job.
- Run Time (avg) – Displays the average execution time of the job.
- Run Time (max) – Displays the maximum execution time of the job.
How is Cluster Information Merged?
For clusters consisting of more than one node, information from individual nodes is merged and displayed in an entry where the Node column contains "All". Every column has a different way of merging the information:
- Name – No need to merge, the job name is the same for all nodes.
- Group – No need to merge, the group name is the same for all nodes.
- Node – Static, "All"
- Execution Strategy – No need to merge, the execution strategy is the same for all nodes.
- Status– A concatenation of the status of each individual node (e.g. PAUSED/NORMAL).
- Next Execution – The closest Next Execution value of all individual nodes.
- Last Execution – The most recent Last Execution value of all individual nodes.
- Runs – The sum of Runs of all individual nodes.
- Errors – The sum of Errors of all individual nodes.
- Run Time (min) – The minimum Run Time (min) of all individual nodes.
- Run Time (avg) – The average Run Time (avg) of all individual nodes.
- Run Time (max) – The maximum Run Time (max) of all individual nodes.
Functionality
Pause and Resume Schedulers
Click on the triangle icon next to the Job Scheduler tab and select Pause Schedulers on All Nodes. This prevents all of the jobs in the entire cluster from being scheduled and executed. To restore the scheduler, select Resume Schedulers on All Nodes.
Reset Statistics and Refresh
Click on the triangle icon next to the Job Scheduler tab and select Reset All Statistics. Click on the two circular arrows next to the tab name to refresh the information in the table.

Sort and Filter
Sort all columns in ascending or descending order by clicking on the small triangle icon in the column header. Filter any column by hovering the mouse cursor above the column header and clicking on the magnifying glass icon. At the bottom of the table you can see how many of the jobs satisfy the filter (e.g. 17 of 19 Jobs).
Manage a Job
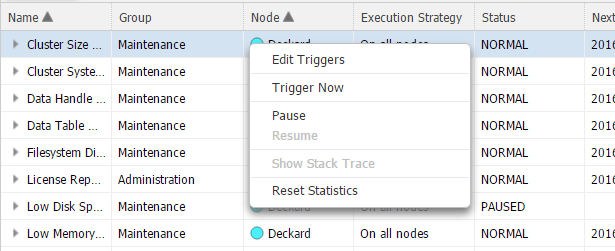
Use the right-click menu to manage jobs:
- Edit Triggers (Whole Cluster) – Select this option to open a new window where information like Name, Description, Type, Status, Execution and Next Execution is listed. This information is read-only apart from Execution where you can edit the cron expression which defines when the job is executed.
- Trigger Now (Whole Cluster)/Trigger on Node [nodeName] Now – Triggers the immediate execution of the job on all of the nodes or the selected one (depending on the row type).
- Pause on All Nodes/Pause on Node [nodeName] – Pauses the execution of the job on all of the nodes or the selected one (depending on the row type).
- Resume on All Nodes/Resume on Node [nodeName] – Resumes the execution of the job on all of the nodes or the selected one (depending on the row type).
- Show Stack Trace – Displays the stack trace if an error occurred.
- Reset Statistics for All Nodes/Reset Statistics for Node [nodeName] – Resets the statistics of all of the nodes or the selected one (depending on the row type).
Job Scheduling Troubleshooting
At times, scheduled background jobs may no longer be executed. In this case, the Job Scheduling table ( System Maintenance > System Overview > Job Scheduling) shows overdue jobs with dates in the past written in red in the column Next Execution Check.
There are two possible scenarios:
- The main job scheduler thread Scheduler-1_QuartzSchedulerThread has crashed. This thread is responsible for assigning a job to a job scheduler worker thread when a job has to be executed.
- All job scheduler worker threads have either crashed, or they have ran into a deadlock or endless loop.
In both cases, scheduled jobs can no longer be executed. Their Next Execution Check date shows a value in the past (in red) because execution failed at that time.
Failure Analysis
We recommend that you first take a look at the active Java threads. In FNZ Studio Composition, go to Solution Maintenance > Processes > Java Threads. You should see five threads with names like SchedulerThread-1-1, SchedulerThread-1-2 etc. and one thread with the name Scheduler-1_QuartzSchedulerThread:
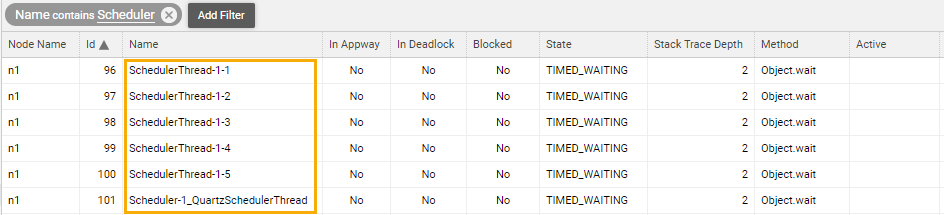
The first five threads are the job scheduler worker threads. They are used to execute jobs. Check the values in the State, Method, and Active columns to understand whether these threads are currently executing a job or not. In the figure above, all threads are currently waiting for a new job.
If a thread is currently active, the Active column shows how long the thread has already been working on the current job. You can right-click on a thread to get a context menu with a View Stack Trace command. The stack trace can help you diagnose where the thread is losing time, or where it is blocked. If one or more of the worker threads is blocked, you most likely will have to restart FNZ Studio.
If the main job scheduler thread Scheduler-1_QuartzSchedulerThread is not listed anymore, it has crashed. This thread can crash if an OutOfMemoryError or other unexpected exception is thrown during its execution. Restart FNZ Studio in order to restart the job scheduler.
Note: The number of job scheduler worker threads can be configured using the configuration property nm.scheduler.threadpool.size. The default value is "5". If you change this configuration property, restart the job scheduler by restarting FNZ Studio for the change to take effect.
Troubleshooting
Setting Job Schedules with Cron Expressions
Problem
In the Job Scheduler, how can I express a particular job schedule? I don't understand the jobs' Execution property.
Solution
FNZ Studio uses the Quartz Job Scheduler to execute jobs. It relies on powerful but potentially confusing cron expressions to set schedule plans.
A cron expression is a string comprised of six or seven fields separated by white space. Each field can contain any of the allowed values, along with various combinations of the allowed special characters for that field.
The fields are as follows:
- Seconds (mandatory) possible values: 0–59, - * /
- Minutes (mandatory) possible values: 0–59 , - * /
- Hours (mandatory) possible values: 0–23 , - * /
- Day of month (mandatory) possible values: 1-31 , - * ? / L W
- Month (mandatory) possible values: 1–12 or JAN–DEC , - * /
- Day of week (mandatory) possible values: 1–7 or SUN–SAT , - * ? / L #
- Year (optional) empty, possible values: 1970–2099 , - * /
Note: The legal characters and the names of months and days of the week are not case sensitive: MON is the same as mon.
Special characters
* 'All values' — Used to select all values within a field. Example '*' in the minute field means 'every minute'.
? 'No specific value' — Useful when you need to specify something in one of the two fields in which the character is allowed, but not the other. Example I want my trigger to fire on a particular day of the month (say, the 10th), but don't care what day of the week that happens to be, I would put 10 in the day-of-month field, and ? in the day-of-week field. See the examples below for clarification.
- Used to specify ranges. Example '10–12' in the hour field means 'the hours 10, 11 and 12'.
, Used to specify additional values. Example 'MON,WED,FRI' in the day-of-week field means 'the days Monday, Wednesday, and Friday'.
/ Used to specify increments. Example '0/15' in the seconds field means 'the seconds 0, 15, 30, and 45'. And '5/15' in the seconds field means 'the seconds 5, 20, 35, and 50'.
You can also specify '/' after the '*' character. In this case, '*' is equivalent to having '0' before the '/'. '1/3' in the day-of-month field means 'fire every 3 days starting on the first day of the month'.
L 'Last' - This has different meaning in each of the two fields in which it is allowed.
Example (day-of-the-month) The value 'L' in the day-of-month field means 'the last day of the month' — day 31 for January, day 28 for February on non-leap years. Example (day-of-week) If used in the day-of-week field by itself, it simply means '7' or 'SAT'. But if used in the day-of-week field after another value, it means 'the last xxx day of the month' — for example '6L' means 'the last Friday of the month'.
When using the 'L' option, do not specify lists, or ranges of values, as you'll get confusing results.
W
'Weekday' — used to specify the weekday (Monday–Friday) nearest the given day.
Example
If you specify 15W as the value for the day-of-month field, the meaning is: 'the nearest weekday to the 15th of the month'. If the 15th is a Tuesday, then it fires on Tuesday the 15th. If the 15th is a Saturday, the trigger fires on Friday the 14th. If the 15th is a Sunday, the trigger fires on Monday the 16th.
However if you specify 1W as the value for day-of-month, and the 1st is a Saturday, the trigger fires on Monday the 3rd, as it does not 'jump' over the boundary of a month's days.
The 'W' character can only be specified when the day-of-month is a single day, not a range or list of days.
The 'L' and 'W' characters can also be combined in the day-of-month field to yield 'LW', which translates to 'last weekday of the month'.
# Used to specify the 'nth' XXX day of the month. Example The value of '6#3' in the day-of-week field means 'the third Friday of the month' (day 6 = Friday and #3 = the 3rd one in the month). Other examples: "2#1" = the first Monday of the month and "4#5" = the fifth Wednesday of the month.
Note: If you specify '#5' and there are not 5 of the given days-of-week in the month, then no firing will occur that month.
Examples
- 0 0 12 * * ?: Fire at 12pm (noon) every day
- 0 15 10 ? * *: Fire at 10:15am every day
- 0 15 10 * * ?: Fire at 10:15am every day
- 0 15 10 * * ? *: Fire at 10:15am every day
- 0 15 10 * * ? 2016: Fire at 10:15am every day during the year 2016
- 0 * 14 * * ?: Fire every minute starting at 2pm and ending at 2:59pm, every day
- 0 0/5 14 * * ?: Fire every 5 minutes starting at 2pm and ending at 2:55pm, every day
- 0 0/5 14,18 * * ?: Fire every 5 minutes starting at 2pm and ending at 2:55pm, AND fire every 5 minutes starting at 6pm and ending at 6:55pm, every day
- 0 0-5 14 * * ?: Fire every minute starting at 2pm and ending at 2:05pm, every day
- 0 10,44 14 ? 3 WED: Fire at 2:10pm and at 2:44pm every Wednesday in the month of March.