Business Object Import/Export
This document outlines the procedures for exporting and importing Business Objects from or into your system from the Design System > [Package] > Maintenance tab.
Export
Exporting Business Objects
FNZ Studio allows you to export one or multiple Business Objects in the version you need. Files containing Business Objects have the ending AWEXPORT.
To export the Business Objects contained in a Package, follow these steps:
-
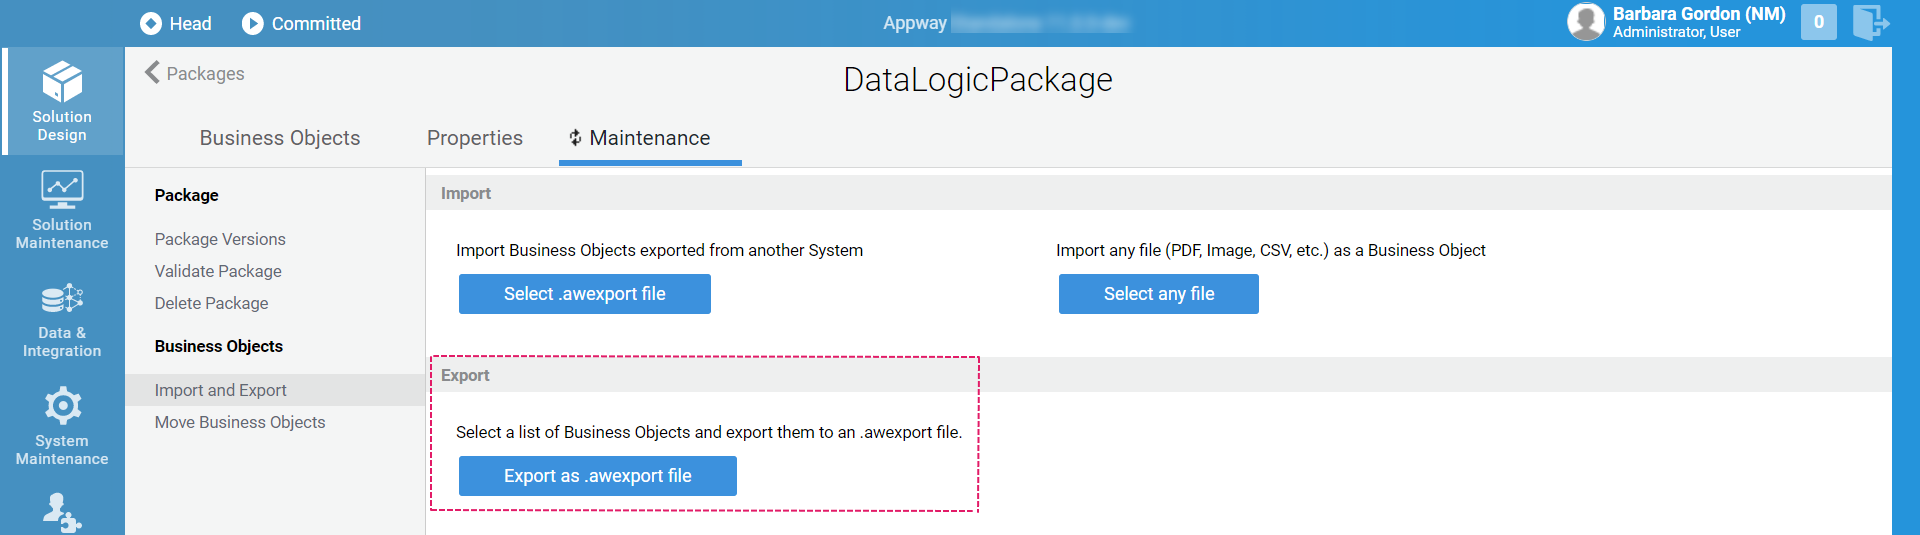
Go to the Solution Design > Packages > [Package] > Maintenance > Import and Export, and click on the Export to .awexport file button.
-
Alternatively, to export one or more Business Objects of the same type (e.g. Screens) from the Library, select them and right-click to open the context menu. Then, select the Export Selected option. The Export window is displayed.
-
The Export window is displayed with a list of Business Objects. Each column allows you to apply filters to display only the desired items. Click on the Filter icon in the column header to display the available filters. For example, the Export column allows you to select one of the following filters:
- Business Objects is Export to see the Business Objects that will be exported.
- Business Objects is NOT Export to see all the Business Objects that will not be exported.
-
You can export Business Objects from a version older than Head (default option). To do so, click on the Change Versions button, and then select which version to export. The list of Business Objects is reloaded, thus reflecting the Business Objects available in this version. For more information on versioning, see Business Object Versioning. Take the following features into account:
- If you previously selected Business Objects, and these are available in the version you have selected, they are still selected.
- If you have selected Business Objects that are not available in the selected version, they disappear from the list, and are not exported. In this case, you get a notification at the end of the process.

-
Select the Business Objects you want to export by selecting the corresponding check boxes. If you need to select a large number of Business Objects, you have different options:
- Click on Select Visible or Deselect Visible to select or deselect all the visible Business Objects at once. These options, combined with filters, allow you to quickly select Business Objects based on complex rules. For example, you can export all the Business Objects of the type 'Screen' which were modified during the last week by the user 'Tom Smith', except the ones containing the word 'Test' in their names.
- Click on the Select Custom List Content or Deselect Custom List Content buttons to add or remove all the Business Objects contained in a Custom List to the selection.
- Click on the Select Dependencies button to add the currently selected Business Objects, as well as their dependent objects, to the list. The system then checks the newly added Business Objects, and adds their dependent Business Objects to the list. This action is repeated until all dependencies are satisfied. This option prevents you from exporting any unsatisfied dependencies. However, consider that this often means that a large number of additional Business Objects is added to the export.
-
Click on the Export button. The system generates an
.AWEXPORTfile -
Click on the Download .awexport file button to download it to your local system.
Exporting a Custom List
In this scenario, you only want to export a specific set of Business Objects.
- First, create a Custom List with a list of Business Objects to include (or exclude) from the export. This export can only be performed in the context of a Package. FNZ Studio provides two types of Custom List:
- Static Custom Lists: Static lists are populated manually. Drag and drop the relevant objects to your list.
- Smart (dynamic) lists: Smart lists are populated dynamically based on rules. The rules are based on object attributes such as "last modified date", "last modified user", "committed" and so on.
- Once you have your Custom List defined, go to Solution Design > Packages, and click on the desired Package.
- Select the Maintenance tab, and then click on the Export as .awexport File button.
- Use the Select custom list content button in the export window to select and add the Business Objects from your custom list to the .AWEXPORT file.
- Use the Deselect custom list content button to exclude all the Business Objects in a custom list from the export.
- Click on the Select Dependencies button to add all the outgoing dependencies of your Business Objects.
- Click on the Export button to generate your
.AWEXPORTfile. Alternatively, you can export a Custom List and its contents by right-clicking on a Custom List from the Business Object library and selecting the Export List option from the context menu.
Import
Importing Business Objects
The import process is performed inside a Package. This option allows you to import Business Objects from a Package that has the same ID as the Package you are currently in. Files containing Business Objects have the ending AWEXPORT.

-
To import Business Objects into your target system, either select Import .awexport File from the Business Object context menu, or go to Solution Design > Packages > [Package] > Maintenance > Import and Export and select the Import from .awexport File button.
-
Alternatively, select Import .awexport File from the Business Object context menu.
-
Browse to the desired
.AWEXPORTfile. The system shows the list of the Business Objects contained in the.AWEXPORTfile. Some of the columns contained in the Import window are described below:State It shows either 'OK' or 'WARN'. 'WARN' indicates a problem with the import, e.g., you might be overwriting a local Business Object with an older version of the same Business Object. Click the column header and select 'WARN' to see all the BOs with warnings.
Import Selected check boxes indicate the BOs that will be imported. Import State It indicates the state of the imported BO in relation to your local system:
- Current Head Version: the imported BO is the same as the one in your local system. Importing it replaces the local version with an equal version (not recommended).
- New Business Object: the imported BO does not exist yet in the local system.
- Overwrites Local Changes: the imported BO exists in the local system, and it replaces the changes made in the local system.
- Overwriting local BO with different BO: the imported BO has the same ID as a local BO, but does not share any common history with it. Depending on the BO, this could represent an issue.
- Custom List: a Custom List with the same ID already exists in the local system. The imported Custom List will overwrite the local one. By default, the system does not import these Custom Lists.
Import Modifier The user who created the imported BO version. Import Modification Date The date on which the imported BO version was created.
Local Modifier The person who created the local BO version that will be overwritten by the import. Local Modification Date The date on which the local BO version was created. Local Name The display name of the local BO. Since names are versioned, this can be different from the name of the imported BO, and can help you identify which local BO will be overwritten. Locally Committed Specifies whether the local BO version is committed. Lock State Specifies whether the local BO is locked (which prevents the import process from overwriting it).
- If there is a Business Object with a version clash, double click on it to open a visual history viewer.
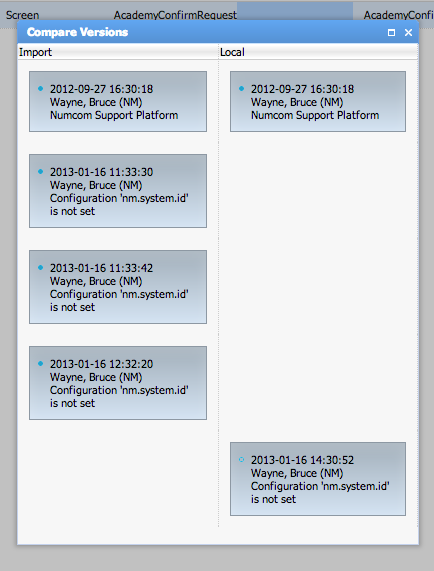
- On the left, you see the versions of the imported Business Object. On the right, you see the versions of the local Business Object. Versions are sorted by time: if two versions are equal, they appear side-by-side. In the example above, only the first version of this Business Object matches between import and local. There were three additional changes made to the imported Business Object, and one additional change to the local Business Object. The local change was made after the import changes, so it appears below them. Each box shows the change timestamp, the user who made the change, and the name of the system where the change was made. The dot indicates whether it was you who made the change (blue dot), and whether that version was committed (filled dot).
-
(Optional), Select the following check boxes:
- Create Custom List for Imported Objects to automatically create a Custom List containing all the newly imported Business Objects.
- Commit Imported Objects to commit the imported Business Objects. In this case, you need to enter a comment.
-
Click on the Import button. Once the import is complete, you get a notification.
Importing Other File Types
You can import any files from your local file system. Depending on the type of file, the system automatically generates different kinds of Business Objects. For example, a PDF can be turned into a PDF Output, and a JPG image can be turned into a Resource.

-
Go to Solution Design > Packages > [Package] > Maintenance > Import and Export and click on the Import Any File button, or open the Business Object context menu, and select the entry with the same name.
-
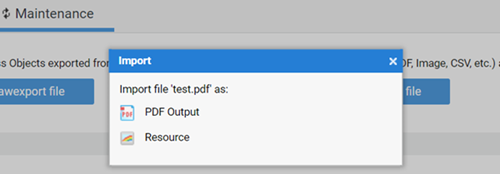
In the dialog box, browse to the desired file. If the uploaded file can be turned into more than one type of Business Object, select a type. For example, a PDF file can be turned into a PDF Output or a Resource.
-
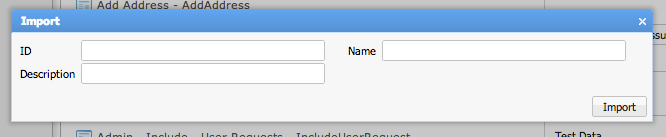
Set the new Business Object properties. In the case of a 'PDF Output', for example, fill the ID, Name, and Description fields.
-
Click on the Import button. Once the import is complete, you get a notification.
Appendix: Import Statistics
When exporting Business Objects e.g., from your development system and importing them into your testing system, you may notice that you only see a small number of different Business Objects in the list.
You are only seeing some of the exported BOs because most of the Business Objects from your development system already exist on your test system in the exact same version, and already are the head version (see section Versioning and Deployment further down). To prevent problems, FNZ Studio will not allow you to import these versions again.
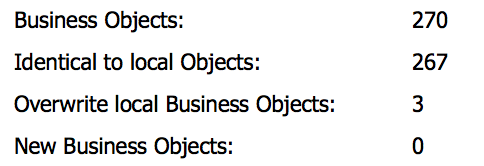
At the top-right of the Import dialog, you see a section that looks like this:
-
Business Objects is the total number of Business Objects that were exported from the development system. That is s the number of Business Objects in the export file.
-
Identical to local Objects is the number of Business Objects in the export file that are completely identical to the Business Objects already existing on your test system and currently part of the active head version. FNZ Studio does not allow you to import these Business Objects, because importing them would not make any user-visible changes to your app, and would actually cause issues.
-
Overwrite local Business Objects shows the number of Business Objects in the export file that are different from the current head version, and will overwrite the current head version. That could be because they were changed on the dev system, or because somebody made changes on the test system. Either way, you can import these Business Objects, and the imported Business Objects will become the new head versions.
-
Finally, New Business Objects shows the number of Business Objects in the export file that currently do not exist in the target system at all.
The overall list of Business Objects you can import will show the Business Objects listed under the Overwrite local Business Objects and the New Business Objects section. Even though the export file contains a large number of Business Objects, only some of them are eligible for importing, because all of the other Business Objects would not alter the app on the local FNZ Studio installation.
Versioning and Deployment
To understand how deployment in FNZ Studio works, you need to have a basic grasp of how versioning in FNZ Studio works. This section is not a full introduction to versioning, but it outlines the main points you need to understand in order to use deployment properly. For more information, see Business Object Versioning
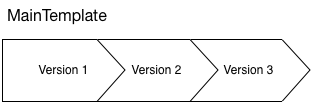
Business Objects in FNZ Studio have versions. Basically, every time you commit a Business Object, you create a new persistent version of that Business Object. FNZ Studio stores and keeps track of all versions. So if you have a Screen called Main Template, that's not just one specific, unique Screen; it's really a list of different versions of that Screen.
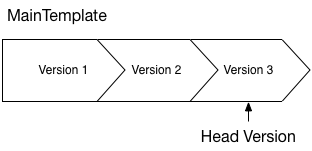
The newest version in that list is the one you see in the Studio. It's called the head version. When you create or import a new version of a Business Object, that new version is attached at the front of the list and becomes the new head version.
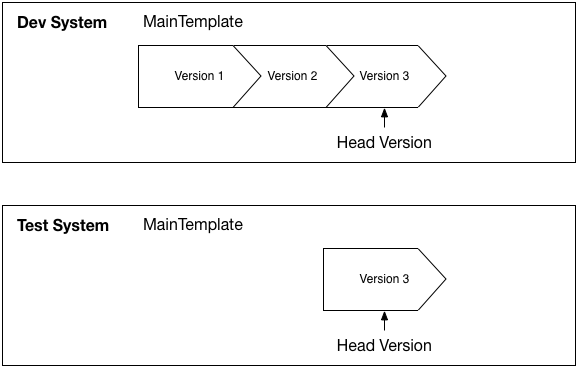
When you export Business Objects, you can pick which version to export. When you import Business Objects, whichever Business Object version you exported on the source system will become the head version on the target system, where the import is done.
FNZ Studio keeps track of different versions by assigning a unique ID to that version. Now, imagine that you have imported the head version of our Main Template Screen on a test system:
let's imagine you do another deployment from Dev to Test, and you again export a list of Business Objects that contain Main Template. However, nobody made a change to Main Template on the dev system. What would happen if FNZ Studio allowed you to import this exact same Business Object version again?
FNZ Studio would have to create a copy of that Business Object version, assign it a new unique ID, and append it to the front of the version list:
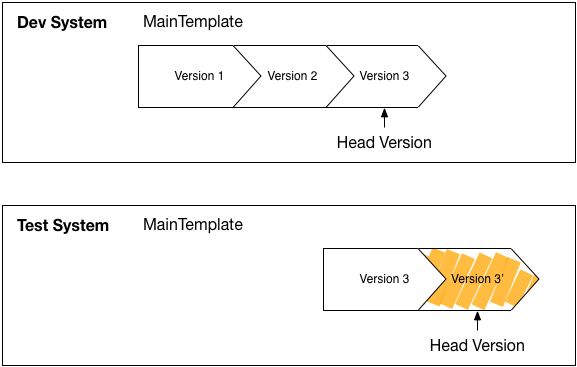
In other words, if we allowed this, then deploying Business Objects between systems could create new versions of Business Objects on the target system that do not exist on the source system!
To prevent this kind of problem, FNZ Studio does not allow you to import Business Object versions that are already head versions on the target system.