One Click Deployment (Solution Import/Export)
An essential aspect of managing FNZ Studio Solutions is the ability to efficiently and reliably perform deployment operations. One-click Deployment provides a set of capabilities to improve the overall experience of importing and exporting FNZ Studio Solutions across different environments.
Introduction
In most installations, a number FNZ Studio environments are involved in the development and deployment processes. Usually, a Solution is built on a Development environment, is periodically moved to a Quality Assurance or User Acceptance Testing environment and, finally (once tested), it is installed on a Production environment to become accessible by the end users. You can see a possible use case in the following schema representing the deployment of a full Solution (a list of versioned Packages plus other artifacts):
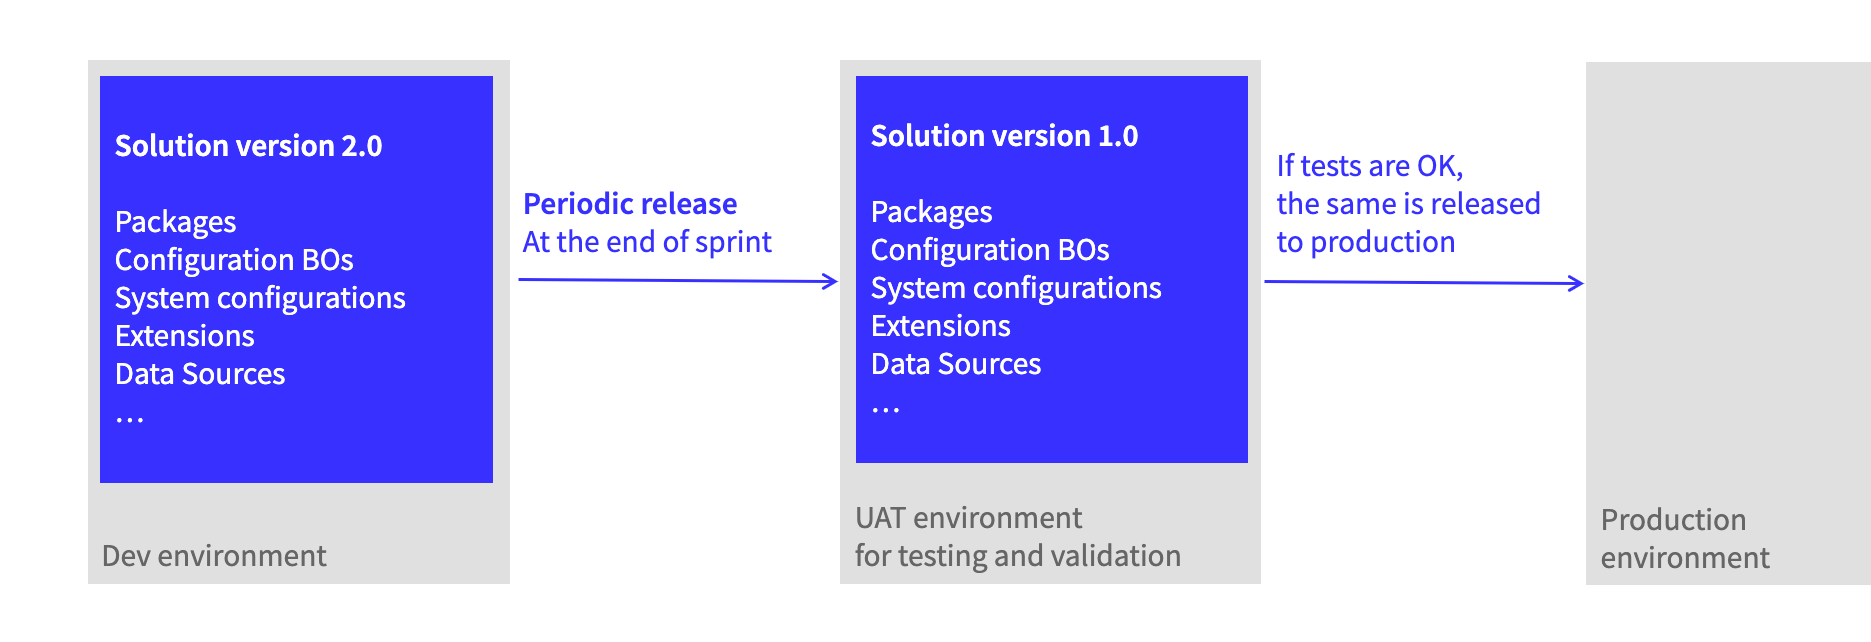
One-click deployment aims at simplifying and speeding up such operations, by enabling effortless and reliable Solution releases in full compliance with any requirements. Learn how in the following video video.
In addition to operations available from the user interface, FNZ Studio provides also a comprehensive set of APIs to enable deployment automation.
Deployment APIs provide functionalities to support remote deployment with no need to access Appway Studio. This allows for efficient and repeatable deployments, even in cases in which some environments are not accessible. This is achievable through the interaction with third-party CI/CD software (e.g. Jenkins).
This article will guide you through:
- Exporting Packages and Configuration Business Objects
- Exporting other artifacts
- Importing Packages and Configuration Business Objects
- Importing other artifacts
- Import/Export Use Cases
- Depolyment APIs and how to use them
Note on Terminology
The following table illustrates the main terms related to Package import/export, with specific reference to Package versioning.
| Term | Description |
|---|---|
| Package version | A Package version contains all the committed Business Objects that were in the Package when that version was created. A Package version can be created in FNZ Studio Composition from the Packages page (Maintenance > Package Versions > Create Version). A Package version is identified by a version tag such as 1.0.1, or 2.0.0-beta with no modification (dot) icon. In some cases, in the UI, it is followed by its creation date, e.g. 1.0.1 (2021-01-01). |
| Package (modified) version | A Package containing uncommitted Business Objects is known as a modified Package version (Package (modified) in the UI). A modified Package version is identified by the same version tag as the Package version containing only committed Business Objects (e.g. 1.0.1, or 2.0.0-beta) but it is preceded by a modification (dot) icon. In some cases, in the UI, it is followed by the suffix (modified), e.g. 1.0.1 (modified).nNote: Exporting and using a modified Package version means using modifications that, potentially, occurred in that Package after the creation of the version, including changes that could still be under development. |
| Version selector | In the Export wizard when selecting the version of a Package to be exported, you can choose:
|
| Head version | A Head version refers to the most recent, and potentially modified, version of a Package and its Configuration Business Objects. By exporting a Head version of a Package, you may be getting potentially uncommitted modifications of Business Objects and Configuration Business Objects. This means that, if your Solution is still under development, you need to be aware that you may be exporting partial changes occurred in your Solution. |
| Latest Created (Latest) version | A Latest Created version (abbreviated in Latest) refers to the latest created Package version. All the Business Objects in the Package are picked in their committed versions. However, consider that Configuration Business Objects that are exported with this version can be modified. |
One-Click Deployment Upgrade
This sections outlines the actions that you may need to take if you are using One-Click Deployment and you upgrade to a higher FNZ Studio Platform version
Upgrading from Appway 11.0 to 11.1 or higher
In Appway 11.1 Deployment Profiles internally store Package version numbers instead of their version UUID.
- Affected Solutions: Solutions that created Deployment Profiles in Appway 11.0
- Necessary action/s: Re-create Deployment Profiles in Appway 11.1 or higher.
One Click Deployment: Solution Import/Export
Exporting Your Solution
Exporting Packages and Configuration Business Objects
When exporting an FNZ Studio Solution, the main artifacts to be selected are Packages and Business Objects. One particular type of Business Objects is represented by the Configuration Business Objects associated with each Package or other Business Objects. Examples of such Configurations are (see details and links in the next section):
- Package configurations containing information on replaced Business Objects, Package and Entry Point permissions, as well as WebAPI configurations for the Package
- Overriding Translations containing the Overriding Translations defined for the Package Labels
- Business Data Storage (BDS) configurations containing information about Data Class mapping through the BDS
- Data History configurations containing information about Data Classes and properties tracked through the Data History
Through the export capabilities provided by FNZ Studio Composition, it is possible to efficiently select Packages and Configuration Business Objects and to export them as an .AWDEPLOYMENT file.
Moreover, the following features are provided to simplify the export operations:
- Possibility to select Packages to be exported directly from the Package Overview
- An efficient FNZ Studio Composition wizard to perform export operations while keeping all relevant information available at a glance
- Fine-grained control on the export content (including Package versions and Configuration Business Objects)
- Batch operations to quickly select relevant Package versions or Configuration Business Objects
- A Review Table to double-check the content of your export
- FNZ Studio Composition Logs in case of errors
- Deployment Profiles, which allow saving the choice of Packages and Configurations to reuse them
The steps required to perform an export are:
-
IMPORTANT! Be aware of a substantial change of behavior between Appway 10.1.5 (or lower) and Appway 11 in Configuration Business Object export. Check all details in the System Upgrade 10 to 11 document in the legacy documentation.
Package and Configuration Selection
As a first step of the export, you need to select the Packages and Configurations you need. The selection can be done already from the Package Overview screen.
-
In the Package Overview screen, select the Packages you want to export (or all Packages). You can use the keyboard shortcuts explained in the dedicated section. The number of selected Packages is shown in the right sidebar.
Note that Packages are kept selected when changing the Package filter. This is useful to allow multiple selection of Packages that match different filters.
-
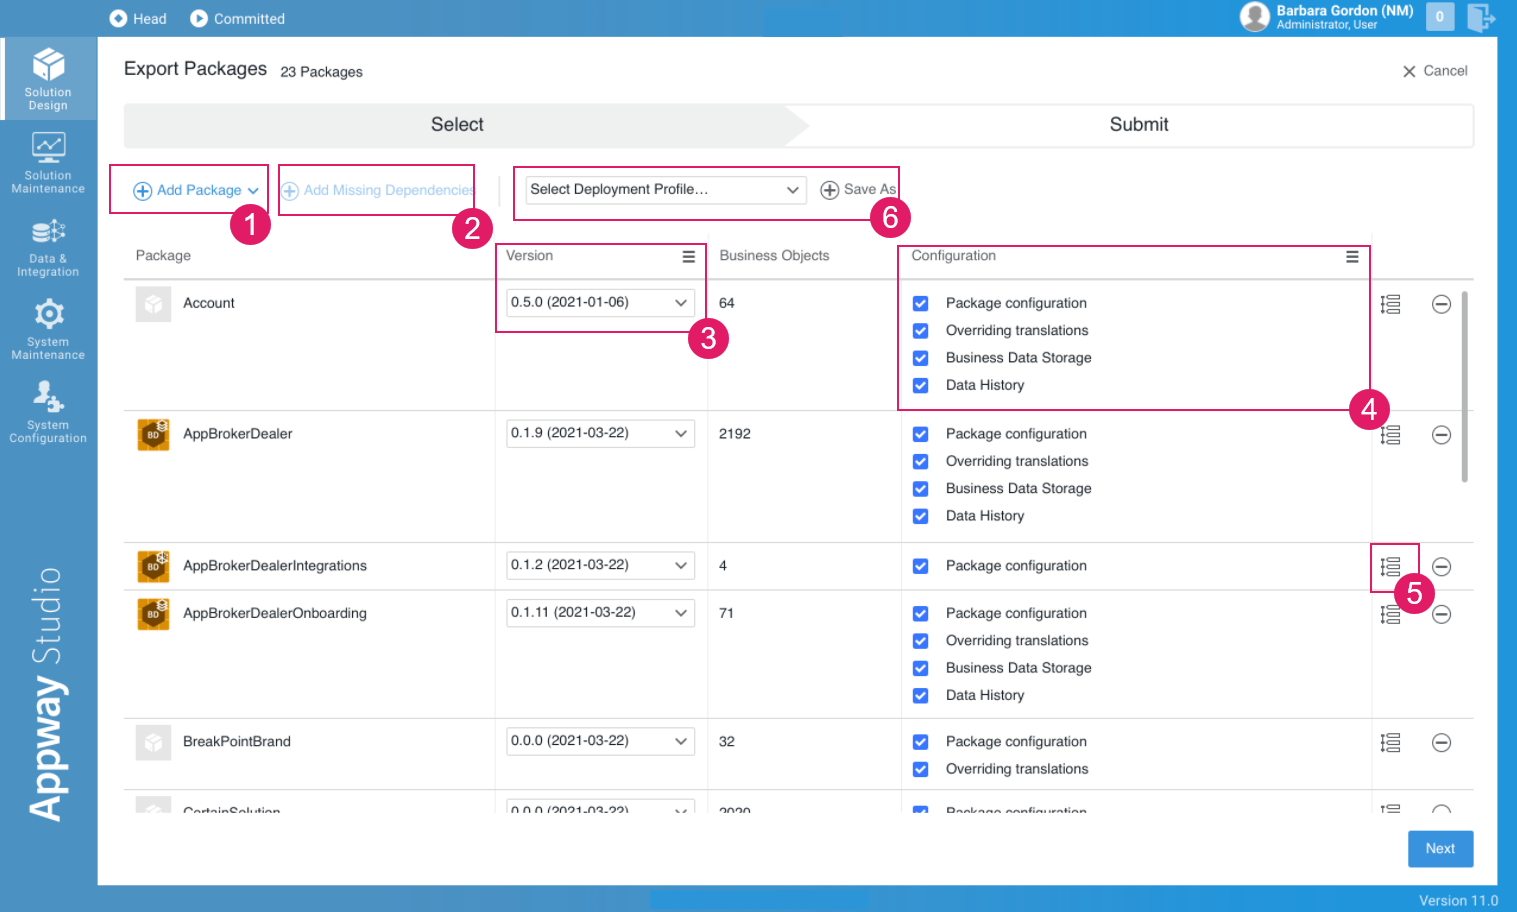
Click on the Export button. The Export Packages screen is displayed, where you can perform several actions described below.
A banner warns you if you try to export Packages that are not allowed (e.g. Base or Platform Packages, deleted Packages).
-
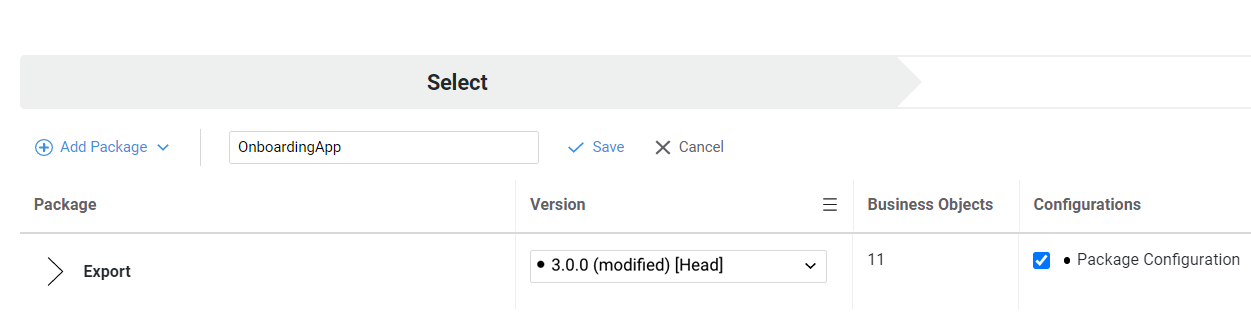
(1) Add more Packages by clicking the Add Packages button. The selected Packages are added to the list. You can remove Packages at any time by clicking on the Remove Package icon on the right of each Package row.
-
(2) Add other dependent Packages to the list by clicking the Add Dependencies button. Note that dependencies are evaluated based on the versions selected for each Package, but Packages are always added to the table in their 'head' versions.
-
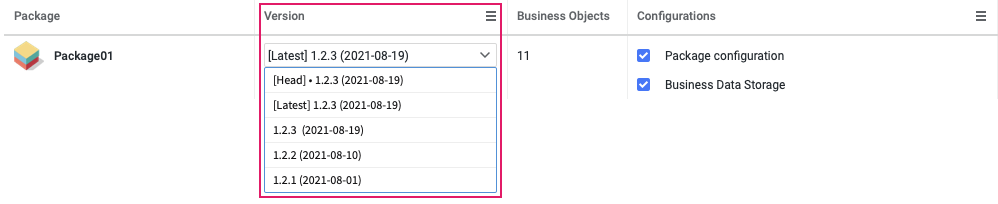
(3) Select the Package version to be exported by using the version dropdown next to each Package in the Version column. By clicking on the menu icon, you can perform multiple selection. Available options are: [Latest] Version X.Y.Z (default option), [Head] Version X.Y.Z, and Version X.Y.Z (see also the Package versions and deployment profiles section for details on versioning).
-
(4) Select or deselect the Configuration Business Objects to be exported. By clicking on the menu icon, you can perform multiple selection.
-
Package configuration - Exports the settings determining how a Package behaves in the context of your Solution (replaced Business Objects, Entry Points, Package Permissions, and Web API configurations for that Package).
-
Overriding translations - Exports the translations defined in the Translations tab of the Package.
-
Business Data Storage - Exports the Database mapping information (table, column names and so on) for Data Classes mapped by the Business Data Storage (BDS).
-
Data History - Exports the tracking settings created in the Data History for each Data Class.
-
-
(5) Click on the Show Version History icon to see the history of Version Notes for that Package (if any).
-
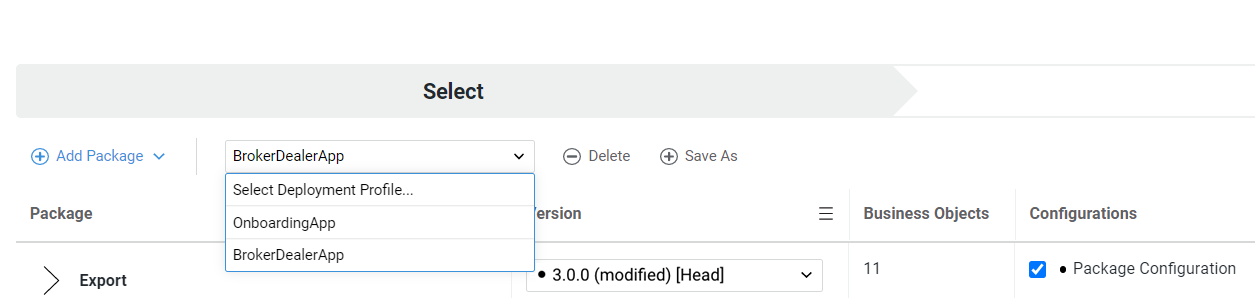
(6) Optionally, save a Deployment Profile (see full information in the related section).
- Click on Next to continue to the Confirmation screen (proceed to the Export Confirmation section).
Deployment Profile Feature
Deployment Profiles allow saving export settings and reuse them. This feature is especially useful if you need to repeatedly export the same set of Packages and Configuration Business Objects (e.g. if you perform recurrent exports from your DEV to your UAT and PROD environments). This feature, therefore, allows exporting a set of Packages and Configuration Business Objects quickly and safely, as you need to set all the necessary configurations just once.
To create a Deployment Profile, perform the following steps:
-
Once you have set all your export configurations (Packages, Package versions, Configuration Business Objects) as described in the related section (links), click on the Save as button next to the Select Deployment Profile.. dropdown list.
-
Enter the desired profile name, and click on Save.
Deployment Profile name restrictions apply: must start with a letter or a number; must be between 3 and 40 characters; can contain underscores, dots, plus, minus, square and round brackets.
- The Deployment Profile is created.
- To export a Solution defined through a Deployment Profile, open the export wizard, select the Profile from the dropdown list, and proceed. You can also delete a Deployment Profile at any time from the same dropdown list.
Package Versions and Deployment Profiles
When defining a Deployment Profile, special attention needs to be paid to the definition of Package versions. When setting a Package version in the export wizard, there are different options available:
-
[Latest] Version X.Y.Z: corresponds to the latest created version of the Package. It does not include modifications occurred after versioning.
-
[Head] Version X.Y.Z: corresponds to the most recent version of the Package, possibly containing modifications occurred after versioning. In this latter case, there will be a dot next to the version number.
-
Version X.Y.Z: corresponds to a specific Package version X.Y.Z.
Important note: By exporting Packages in their [Head] versions, you may export uncommitted changes. Therefore, we recommend that you create profiles using Package [Latest] versions (option selected by default when exporting Packages), instead. This ensures that the you are exporting non-modified versions of Packages, which do not contain changes under development.
Each version type is reevaluated when the profile is chosen to perform the export. For example, when creating a Profile, this may contain Package A in its Latest version 1.0.0. When applying this profile at a later point for an export operation, Package A Latest version could be 2.0.0, and this will be the exported version.
This mechanism ensures that Deployment Profiles can be created once and used every time the Solution needs to be exported, keeping up to date with the development of the Solution.
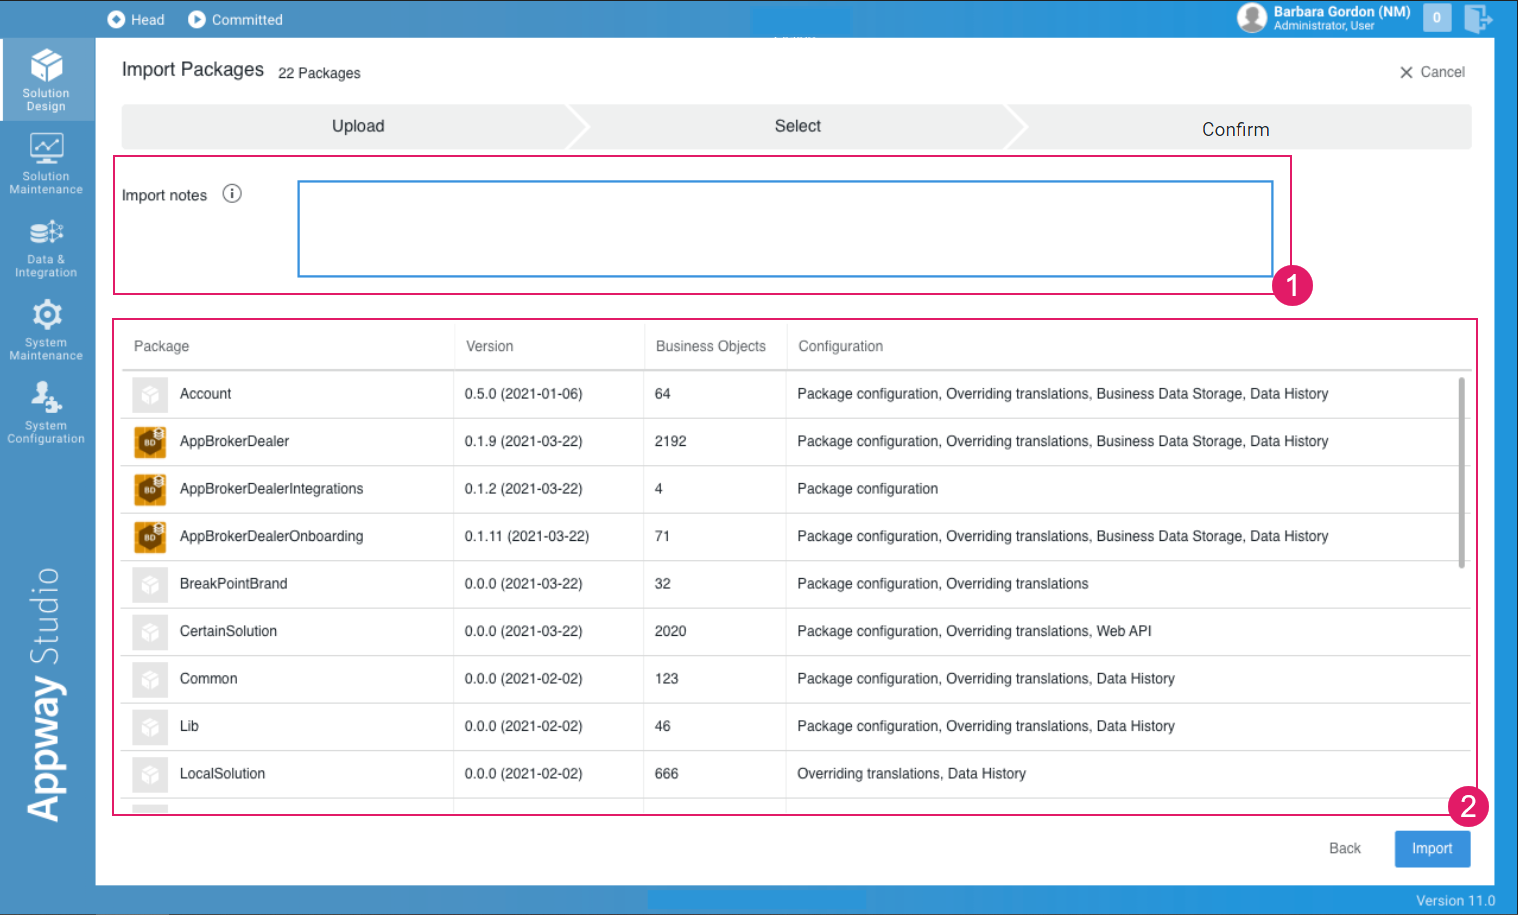
Export Confirmation
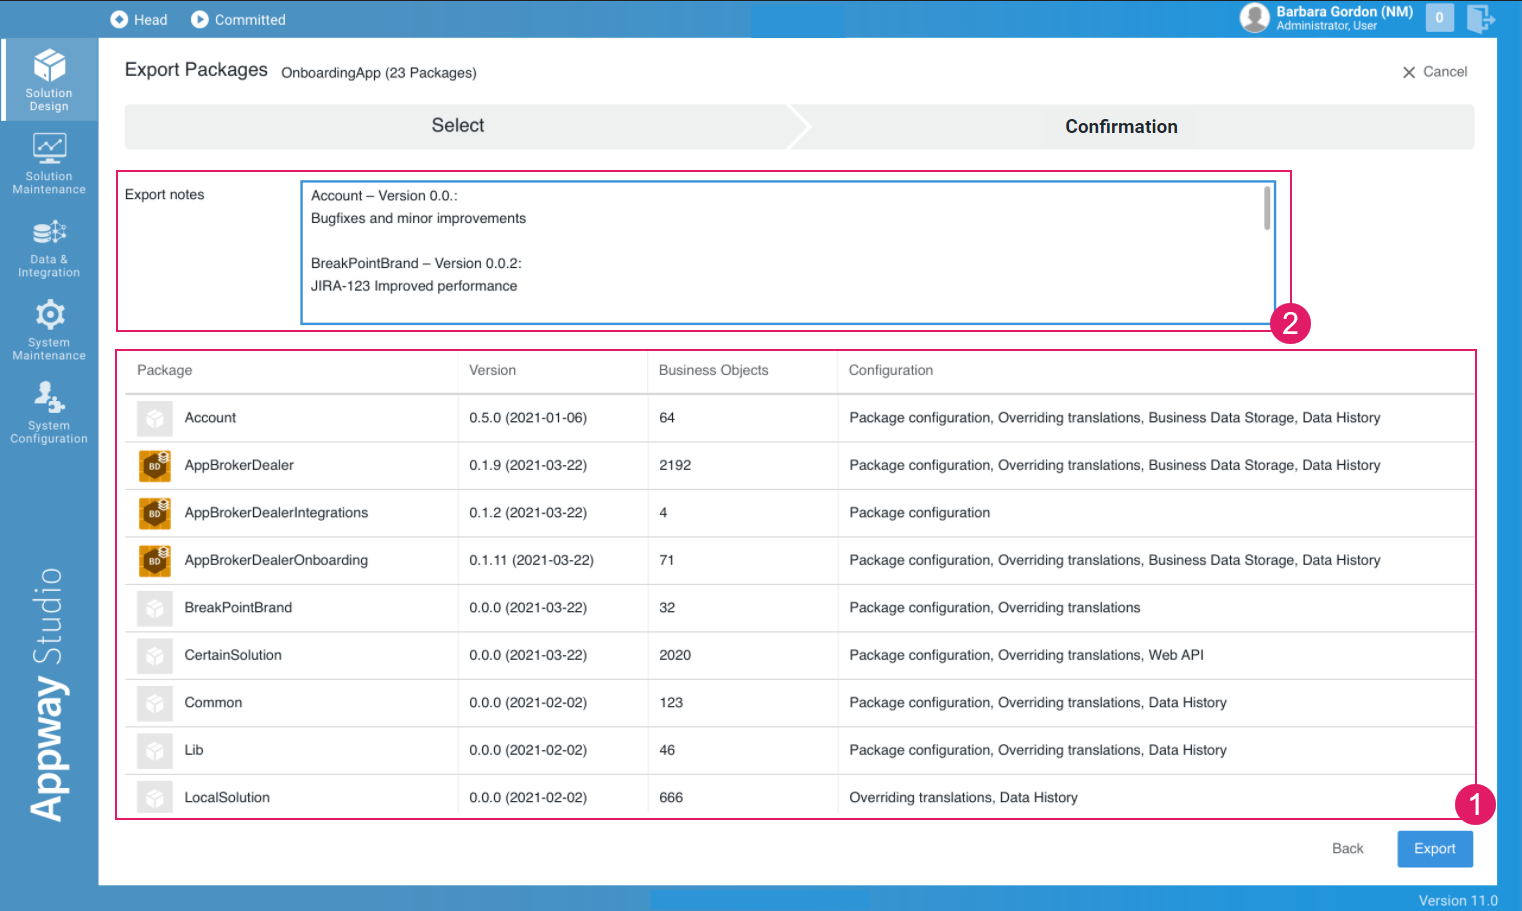
- The table allows reviewing the content of the export, namely, included Packages, Package versions, and the selected Configuration Business Objects (
1). - The Export Notes field gets automatically pre-filled with the list of Packages and versions being exported, as well as with the latest version notes for those Packages. However, you can add other export comments that will be visible to yourself or other users when importing those Packages (
2). - Click on the Export button.
- If the export is successful, you can download the
.AWDEPLOYMENTfile. The name of the.AWDEPLOYMENTfile can have the format[Package or Profile name]_[System ID]_[Export date]or[Number of Packages]_[System ID]_[Export date]. - In case of error, click the button to access the Error Logs available in System Maintenance > Logging.
Shortcuts
The following table outlines the shortcuts available in the Export flow:
| Screen | Item | Shortcut | Operation |
|---|---|---|---|
| Package Overview | - | CTRl+A (CMD-A) | Select All Packages |
| Package Overview | - | CTRL+click (CMD-click) | Select individual Packages |
| Package Overview | - | SHIFT+click | Select consecutive Packages |
| Select (Export Packages) |
|
ESC | Exits menu |
Exporting Other Artifacts
When exporting a full Solution, you might need to export other artifacts apart from Packages and configuration Business Objects. The following sections cover the export of these artifacts.
System Configuration Export
- The content of the configuration to be exported must be saved in text files, as in the following table:
| Type | Affected File |
|---|---|
| Content Configuration | data/conf/content.properties
|
| Server Configuration | data/conf/conf.properties
|
2. If you have access to the file system: copy the properties file directly from the data/conf folder.
3. If you do not have access to the file system: in FNZ Studio Composition, copy the content of the configuration from the configuration editor, and save it to the relevant properties file (System Configuration > Configuration Properties).
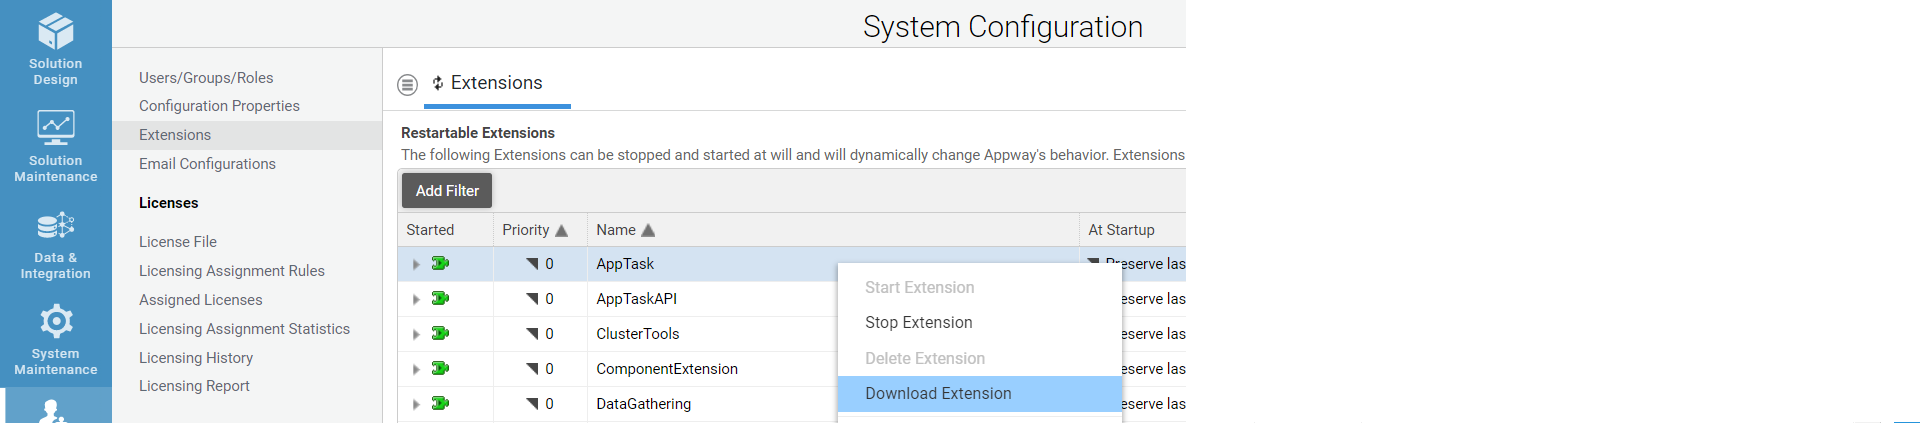
Extension Export
-
If you have access to the file system: copy the
.jarfile (ExtensionA.jar) and the.cfgtext file (ExtensionA.jar.cfg) from thedata/extensionsfolder.The extensions configuration file (`.cfg`) is optional and if missing, the default configuration is used.
-
If you do not have access to the file system: Download the extension from FNZ Studio Composition
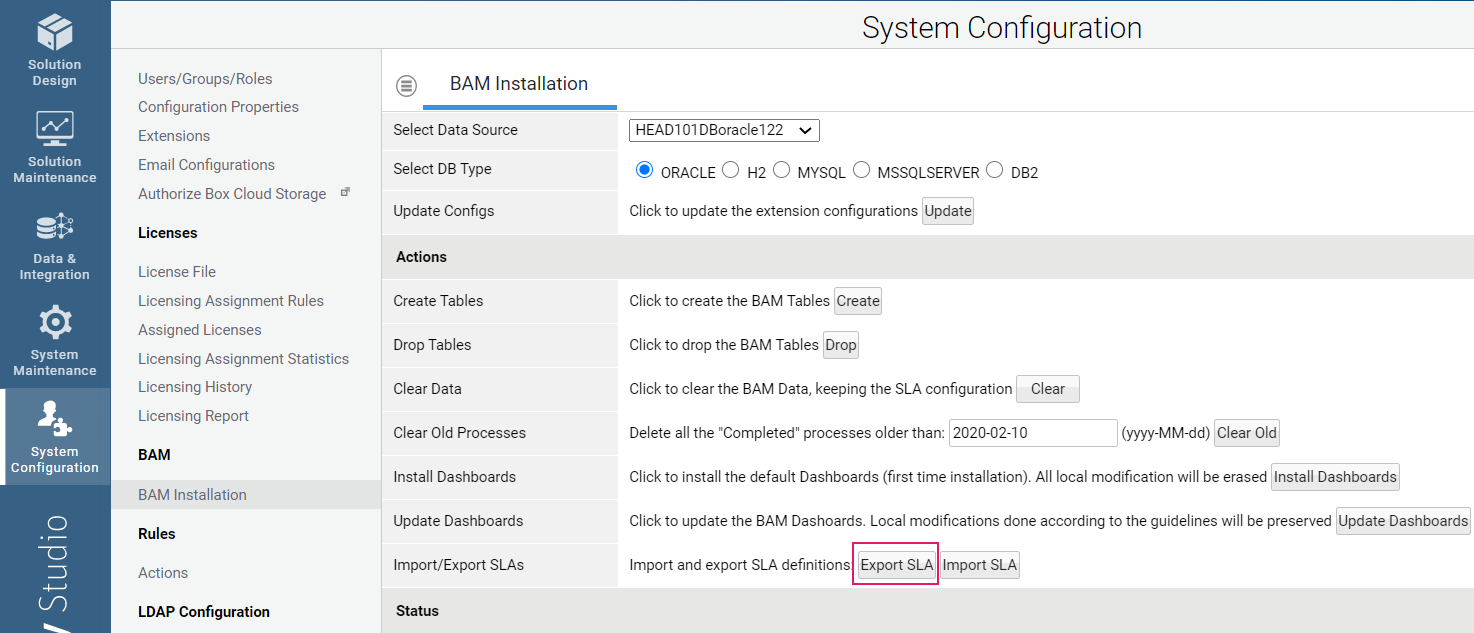
BAM SLA Definition Export
For the Business Activity Monitoring (BAM) component, the export of SLA definitions is done with the Export SLA button under System Configuration > BAM Installation.
- Click on the Export SLA button to generate the SLA definitions file as shown in the figure below.
License Export
The licensing assignment rules under System Configuration > Licensing > Licensing Assignment Rules are created manually in the target environment.
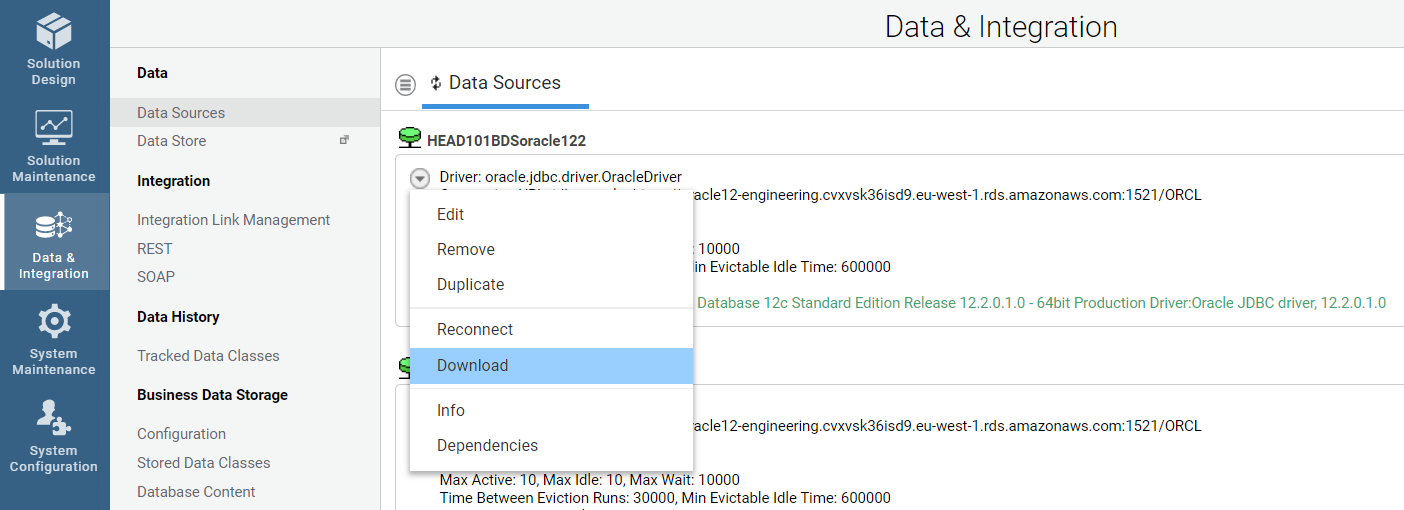
Data Source Export
The export of Data Source definitions is done via Data & Integration > Data > Data Sources.
For each Data Source to be exported, click on the menu icon as shown in the figure below, and then click Download. An XML file is generated with the relevant Data Source definitions.
Email Configuration Export
The email configurations under System Configuration > Email Configurations are moved manually. The configurations to move must be recreated manually in the target environment.
Workspace Notifications Topic Export
The topic definitions under Solution Maintenance > Processes > Notification Management >Topics must be recreated manually in the target environment.
Message Queue Export
The message must be created manually in the target environment. To display the message queues from the source environment, go to Solution Maintenance > Processes > Process Messages
Importing Your Solution
Importing Packages and Configuration Business Objects
As in the export wizard, import capabilities allow importing a Solution you exported through an .AWDEPLOYMENT file, including Packages and Configuration Business Objects, with few manual operations.
Moreover, the following features are provided to simplify import operations:
- An efficient FNZ Studio Composition wizard to perform import operations while keeping all relevant information at a glance.
- Fine-grained control on the import content (including Package versions and Configuration Business Objects)
- A Review Table to double-check the content of your import
- A log of the import operations for tracking and compliance purposes
- A Business Object Review Table to review the changes in the Business objects being imported
The steps required to perform an import are:
-
.AWDEPLOYMENTfile upload -
Note that, starting from Appway 11.1, a prevention mechanism avoids import/export concurrency, thus ensuring safer deployment operations and avoiding unwanted override of Business Objects. While an import is running, no concurrent import or export operations can run on the same FNZ Studio instance. An error message is displayed in the UI in this case. The operation lock time-to-live can be configured through the property `nm.deployment.lock.ttl`.
Upload of the .AWDEPLOYMENT file
-
Click on the Import button. The Upload screen is displayed, where you can either drag and drop or upload the
.AWDEPLOYMENTfile to be imported. -
An overview screen is displayed showing information on the import content:
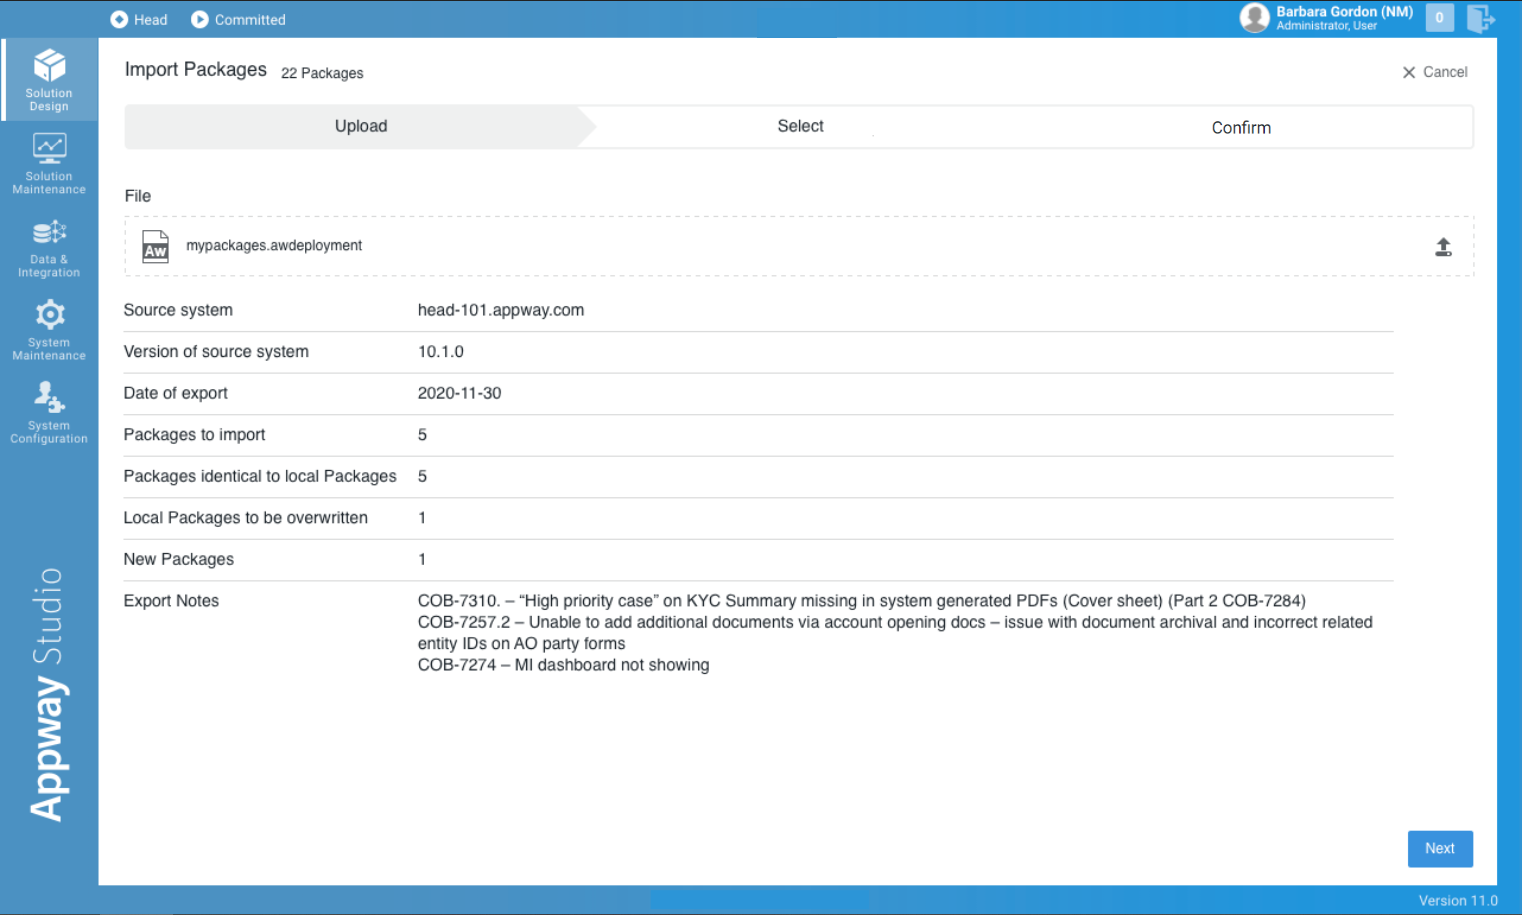
-
Source system - Indicates the System Id of the system in which the `.AWDEPLOYMENT was generated
-
System version - Shows the FNZ Studio version from which the
.AWDEPLOYMENTwas exported.Important note! FNZ Studio does not support Package backward compatibility. Therefore, importing Packages from a higher FNZ Studio major or feature version (e.g., from FNZ Studio 2025 to FNZ Studio 2024) is not supported. -
Date of export - Date of the export as reported in the
.AWDEPLOYMENTfile. -
Packages to import - Indicates the total number of Packages to be imported (consider you can add or remove Packages at a later stage).
-
Identical to local Packages - Indicates the number of Packages that are identical in your local environment and in the import
.AWDEPLOYMENTfile. -
Overwrites local Packages - Indicates the number of Packages that are present both in your local environment and in the import
.AWDEPLOYMENTfile, which are not identical. -
New Packages - Indicates the number of Packages that are present only in the import
.AWDEPLOYMENTfile. -
Export notes - Contains the export notes that were written in the
.AWDEPLOYMENTfile during the export.
-
-
If you find any issues, you can re-import an
.AWDEPLOYMENTfile by clicking on the Upload icon at the top right. -
Click on Next.
Package and Configuration Selection
-
The Select screen is displayed, where you can perform several actions:
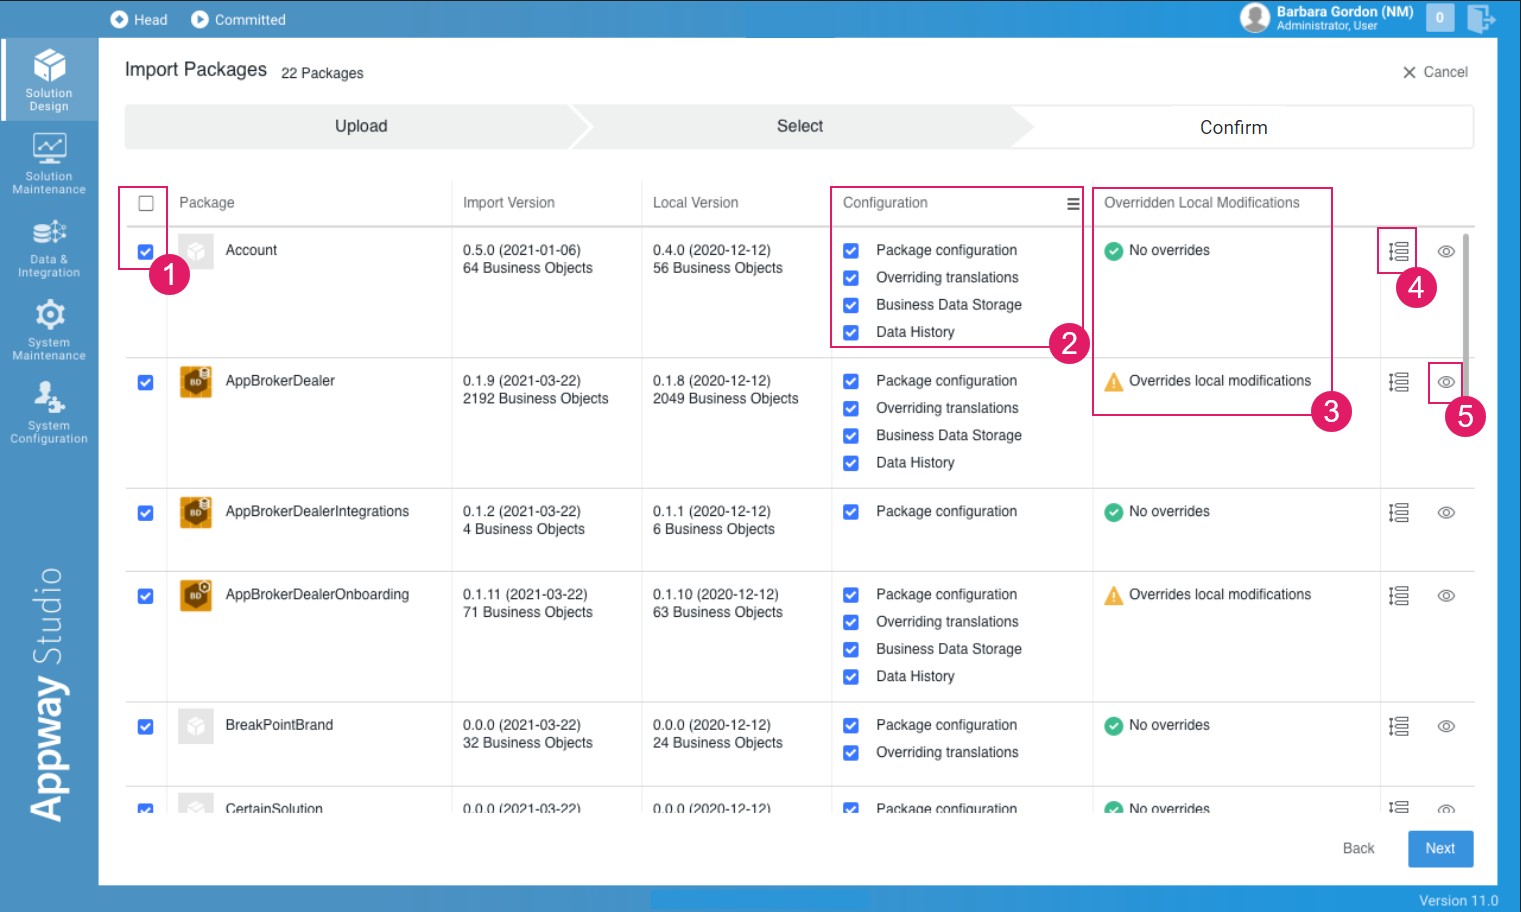
- (
1) Select or deselect Packages to be imported. By clicking on the checkbox on the top left, you can either select or deselect all Packages. - (
2) Select or deselect the Configuration Business Objects to be imported. By clicking on the menu icon, you can select or deselect the Configuration Business Objects to be included for all Packages.- Package configuration - Imports the settings determining how a Package behaves in the context of your Solution (Business Object replacement, visibility and so on).
- Overriding translations - Imports the translations defined in the Translations tab of the Package.
- Business Data Storage - Imports the Database model information (table, column names and so on) generated by the Business Data Storage.
- Data History - Imports the tracking settings created in the Data History for each Data Class.
- (
3) Verify whether the import overrides any modification performed on your local environment. The yellow warning flag Overrides local modifications, in fact, is shown if a modified version of the Package or a committed version with a newer version number are present in your local environment. - (
4) Click on the Show Version Notes icon to see the history of Version Notes for that Package (if any). - (
5) Click on the Review Business Objects (eye) icon for a complete overview of all the Business Objects included in the import (see full details in the related section).
- (
-
Click on Next to continue to the Confirmation screen (proceed to the Import Confirmation section).
Business Object Review Feature
The Business Object Review feature provides a detailed overview of the differences between the imported and local versions of each Business Object of the selected Package.
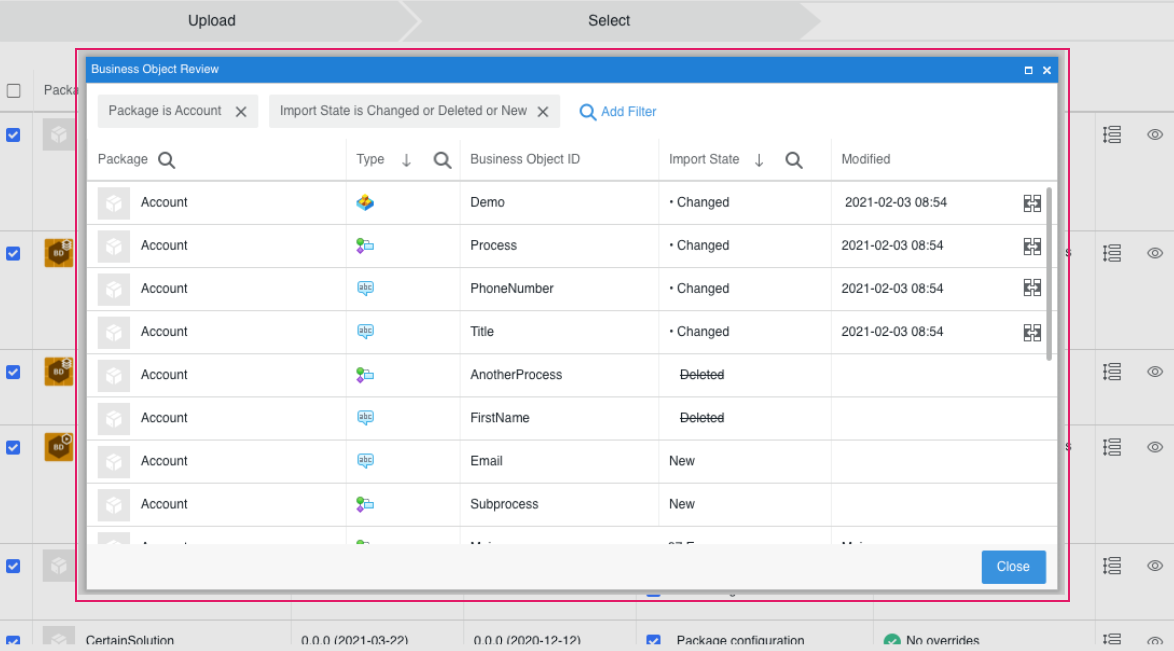
-
Click on the Review Business Objects (eye) icon to open the review table in the modal window. The table columns are:
-
Package (can be filtered)
-
Type (can be filtered)
-
Business Object ID
-
Import State (can be filtered and sorted) - Indicates the differences between the import and local versions of the Business Object:
- New (if the Business Object was not already present and has been imported as new)
- Unchanged (if the Business Object was already present and it did not change with respect to the local version)
- Changed (if the Business Object was already present and the import changed it)
- Deleted (if the Business Object exists in the local environment and is deleted in the import file)
- Import as Deleted (the Business Object does not exist in the local environment, exists in the non-modified version of the package (in the import file) and is delete and committed in the modified version in the import file)
-
Modified - Date and time at which the Business Object to be imported was changed (in case of changes).
Note: the local and imported Business Objects are considered different based on their "copy of UUID" filed. In some situations, this may cause false positivies, e.g Business Object version may be considered different even if their content is the same.
-
-
Click on the Compare Versions icon on the right to display a diff between the import and local versions of each Business Object
Import Confirmation
- The overview table allows reviewing the content of the import, namely, included Packages, Package versions, the selected Configuration Business Objects, and information on possible overrides (
1). - In the Version Notes field, you can add import comments that will be visible in the logs and in the FNZ Studio Composition Discussions tab (Solution Design), where the import information is tracked. Each import generates a message containing the import notes, the list of imported Packages, and the link to the import log file (
.zip) (2). - Click on the Import button.
- If the import is successful, Packages and Configuration Business Objects are imported in your local environment. You can download the Import Log file (
.zipfile) for tracking and compliance purposes. See the Reading the Import Log section below for details.
Reading the Import Log
The import log file is a .zip file containing three files:
import_log-header.csv- Contains a recap of the entire import operationimport_log-packages.csv- Contains the list of imported Package, and relevant import informationimport_log-business-objects.csv- Contains the list of imported Business Objects, and relevant import information
Following are the file details:
- The file
import_log-header.csvcontains the following information:- Import notes
- Source System ID
- Source System Version
- Target System ID
- Target System Version
- Import date and time
- User Id (user who performed the import
- Packages in the
.AWDEPLOYMENTfile - Selected Package (this number differs from the previous one only if there are Packages the user decided not to import)
- Import Status (overall status of the import: OK if the import was successful, error description otherwise)
- The file
import_log-packages.csvcontains the following information, for each imported Package:- Package Id
- Imported Version
- Import Version is modified (set to
trueif the import contains a modified Package version) - Local Version
- Local Version is modified (set to
trueif the local version was modified) - Business Objects in Import Versions (it does not include Package Business Objects or Configuration Business Objects)
- Business Objects in Local Versions (it does not include Package Business Objects or Configuration Business Objects)
- Package Configuration (set to 'Imported' if the Package Configuration was imported, empty otherwise)
- Overriding Translations (set to 'Imported' if the Overriding Translations Configuration was imported, empty otherwise)
- Business Data Storage Configuration (set to 'Imported' if the BDS Configuration was imported, empty otherwise)
- Data History Configuration (set to 'Imported' if the Data History Configuration was imported, empty otherwise)
- The file
import_log-business-objects.csvcontains the following information, for each imported Package:- Package Id
- Business Object Id
- Business Object Type
- Original Object Identifier (Version UUID)
- Object Identifier in AwDeployment (Version UUID)
- New Object Identifier (Version UUID)
- Package Content Identifier (Copy of UUID)
- IsCommitted (
trueif the object is committed) - IsDeleted (
trueif the object is deleted) - Last Modified (date and time of the last modification)
- Operation (the operation performed on the Business Object)
- New (if the Business Object was not already present and has been imported as new)
- Unchanged (if the Business Object was already present and it did not change with respect to the local version)
- Changed (if the Business Object was already present and the import changed it)
- Deleted (if the Business Object exists in the local environment and is deleted in the import file)
- Import as Deleted (the Business Object does not exist in the local environment, exists in the non-modified version of the package (in the import file) and is delete and committed in the modified version in the import file)
- Status (Import status of the Business Object. During the import, each Business Object goes through the following stages: Deserialized -> Inserted -> Committed -> Imported. This field contains the latest status reached for each Business Object. A successful import have all Business Objects in status Imported. In case of failures, an error message is reported. Moreover, if one among several Business Objects cannot be imported, it will display the status Skipped. Finally, the status Import not needed contains deleted and committed Business Objects not present in the Package version to be imported (and, therefore, are not imported).
Importing Other Artifacts
When importing a full Solution, you might need to import other artifacts apart from Packages and configuration Business Objects. The following sections cover the import of these artifacts.
System Configuration Import
-
If you have access to the file system: Replace the relevant files with the new version provided with the export Package. If you have a clustered setup in place, apply this action to all nodes.
Pay attention to environment related properties. These properties are set in "conf.properties". E.g: servername, server URL.
-
If you do not have access to the file system: Overwrite the relevant properties from FNZ Studio Composition (System Configuration > Configuration Properties).
The different configuration types must be updated with the content of the relevant properties file, as shown in the Export section.
Extension Import
-
If you have access to the file system: Copy all of the
.jarfiles and related configuration files of the extension to the Extensions folder. If you have a clustered setup in place, apply this action to all nodes.To activate the changes, restart the extension in FNZ Studio or FNZ Studio itself.
-
If you do not have access to the file system: Go to FNZ Studio Composition and do the following:
-
Stop the extension (for upgrade only)
-
Upload the
.jarfile -
(Optional) Update the configuration with the content of the
.cfgfile -
Start the extension
For full information on how to import extension, see: Managing Extensions..
-
BAM SLA definition import
For the Business Activity Monitoring (BAM) component, it is possible to import SLA definitions using the export file generated from a source environment. To import SLA definitions:
- Go to System Configuration > BAM Installation.
- Click on the SLA Import button and browse to the file with SLA definition.
- Proceed with the import.
License Import
The licensing assignment rules under System Configuration > Licenses > Licensing Assignment Rules must be created or updated manually in the target environment.
- To create an assignment rule, click on the menu icon next to the Assignment Rules tab, and then select New Rule:
- To update an existing rule, right-click the row of the rule to update, and then click Edit.
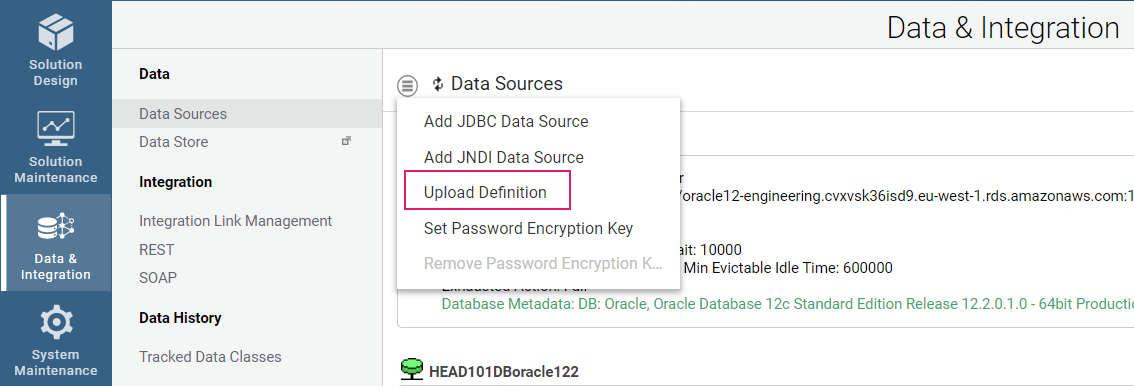
Data Source Import
It is possible to import the Data Source definition from an xml file.
-
Go to: Data & Integration > Data > Data Sources.
-
Open the menu next to the Data Sources tab, and then select Upload Definition to import a new data source definition.
If necessary, change the database server to one matching the environment you just uploaded the definition to.
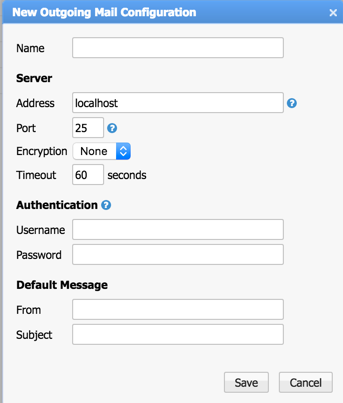
Email configuration import
The relevant email configurations are created or updated manually on the target environment. To create or update email configuration, go to System Configuration > Email Configurations.
To create an outgoing mail configuration:
- Open the context menu by clicking the menu icon next to the Email Configurations tab.
- Click Add new Outgoing Mail Configuration.
- Fill out the form with the relevant outgoing configuration parameters.
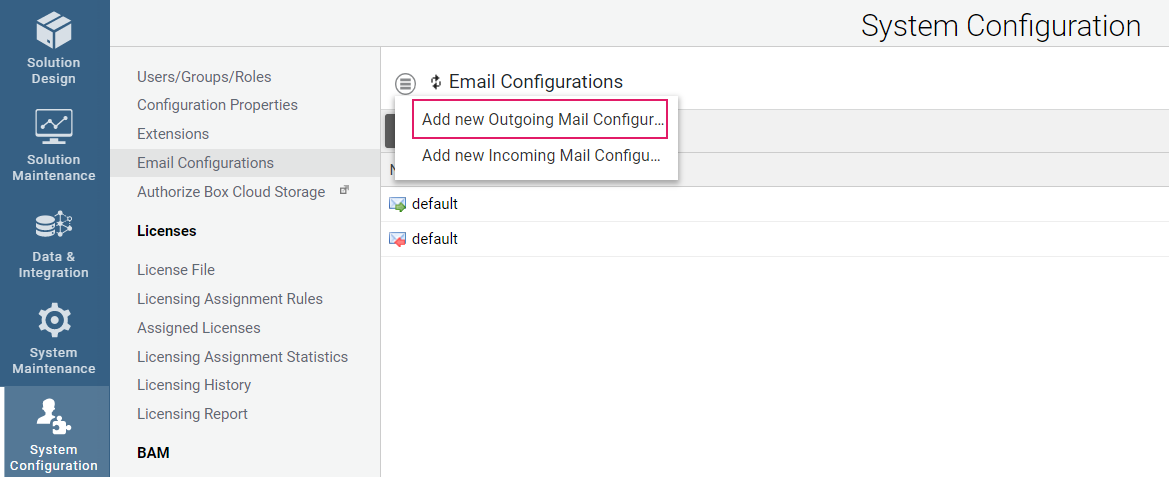
To update an existing mail configuration, right-click on the relevant entry and select the Edit button.
To create (or update) incoming mail configuration, click Add new incoming Mail Configuration entry and perform the same steps described above.
Workspace Notifications topic import
The notification topic definitions used in a Solution are created manually in the target environment. To create a new topic:
- Go to Solution Maintenance > Notification Management > Topics.
- Click the menu icon next to the Topics tab and select Create Topic.
- Provide an ID, name and description for the topic.
Message Queue import
Messages queues are created manually in the target environment. To create a new message queue:
-
Go to Solution Maintenance > Processes > Process Messages.
-
Click on the menu icon and select Add Queue.
-
Provide the details for the message queue.
Be aware that the message queue will be deleted after all the messages are consumed if the Temporary flag is set to Yes.
Deployment API
In its effort to improve deployment capabilities, starting from Appway 11.1.1, the platform supports remote deployment operations through its REST Deployment APIs.
The figure below illustrates the main flow:
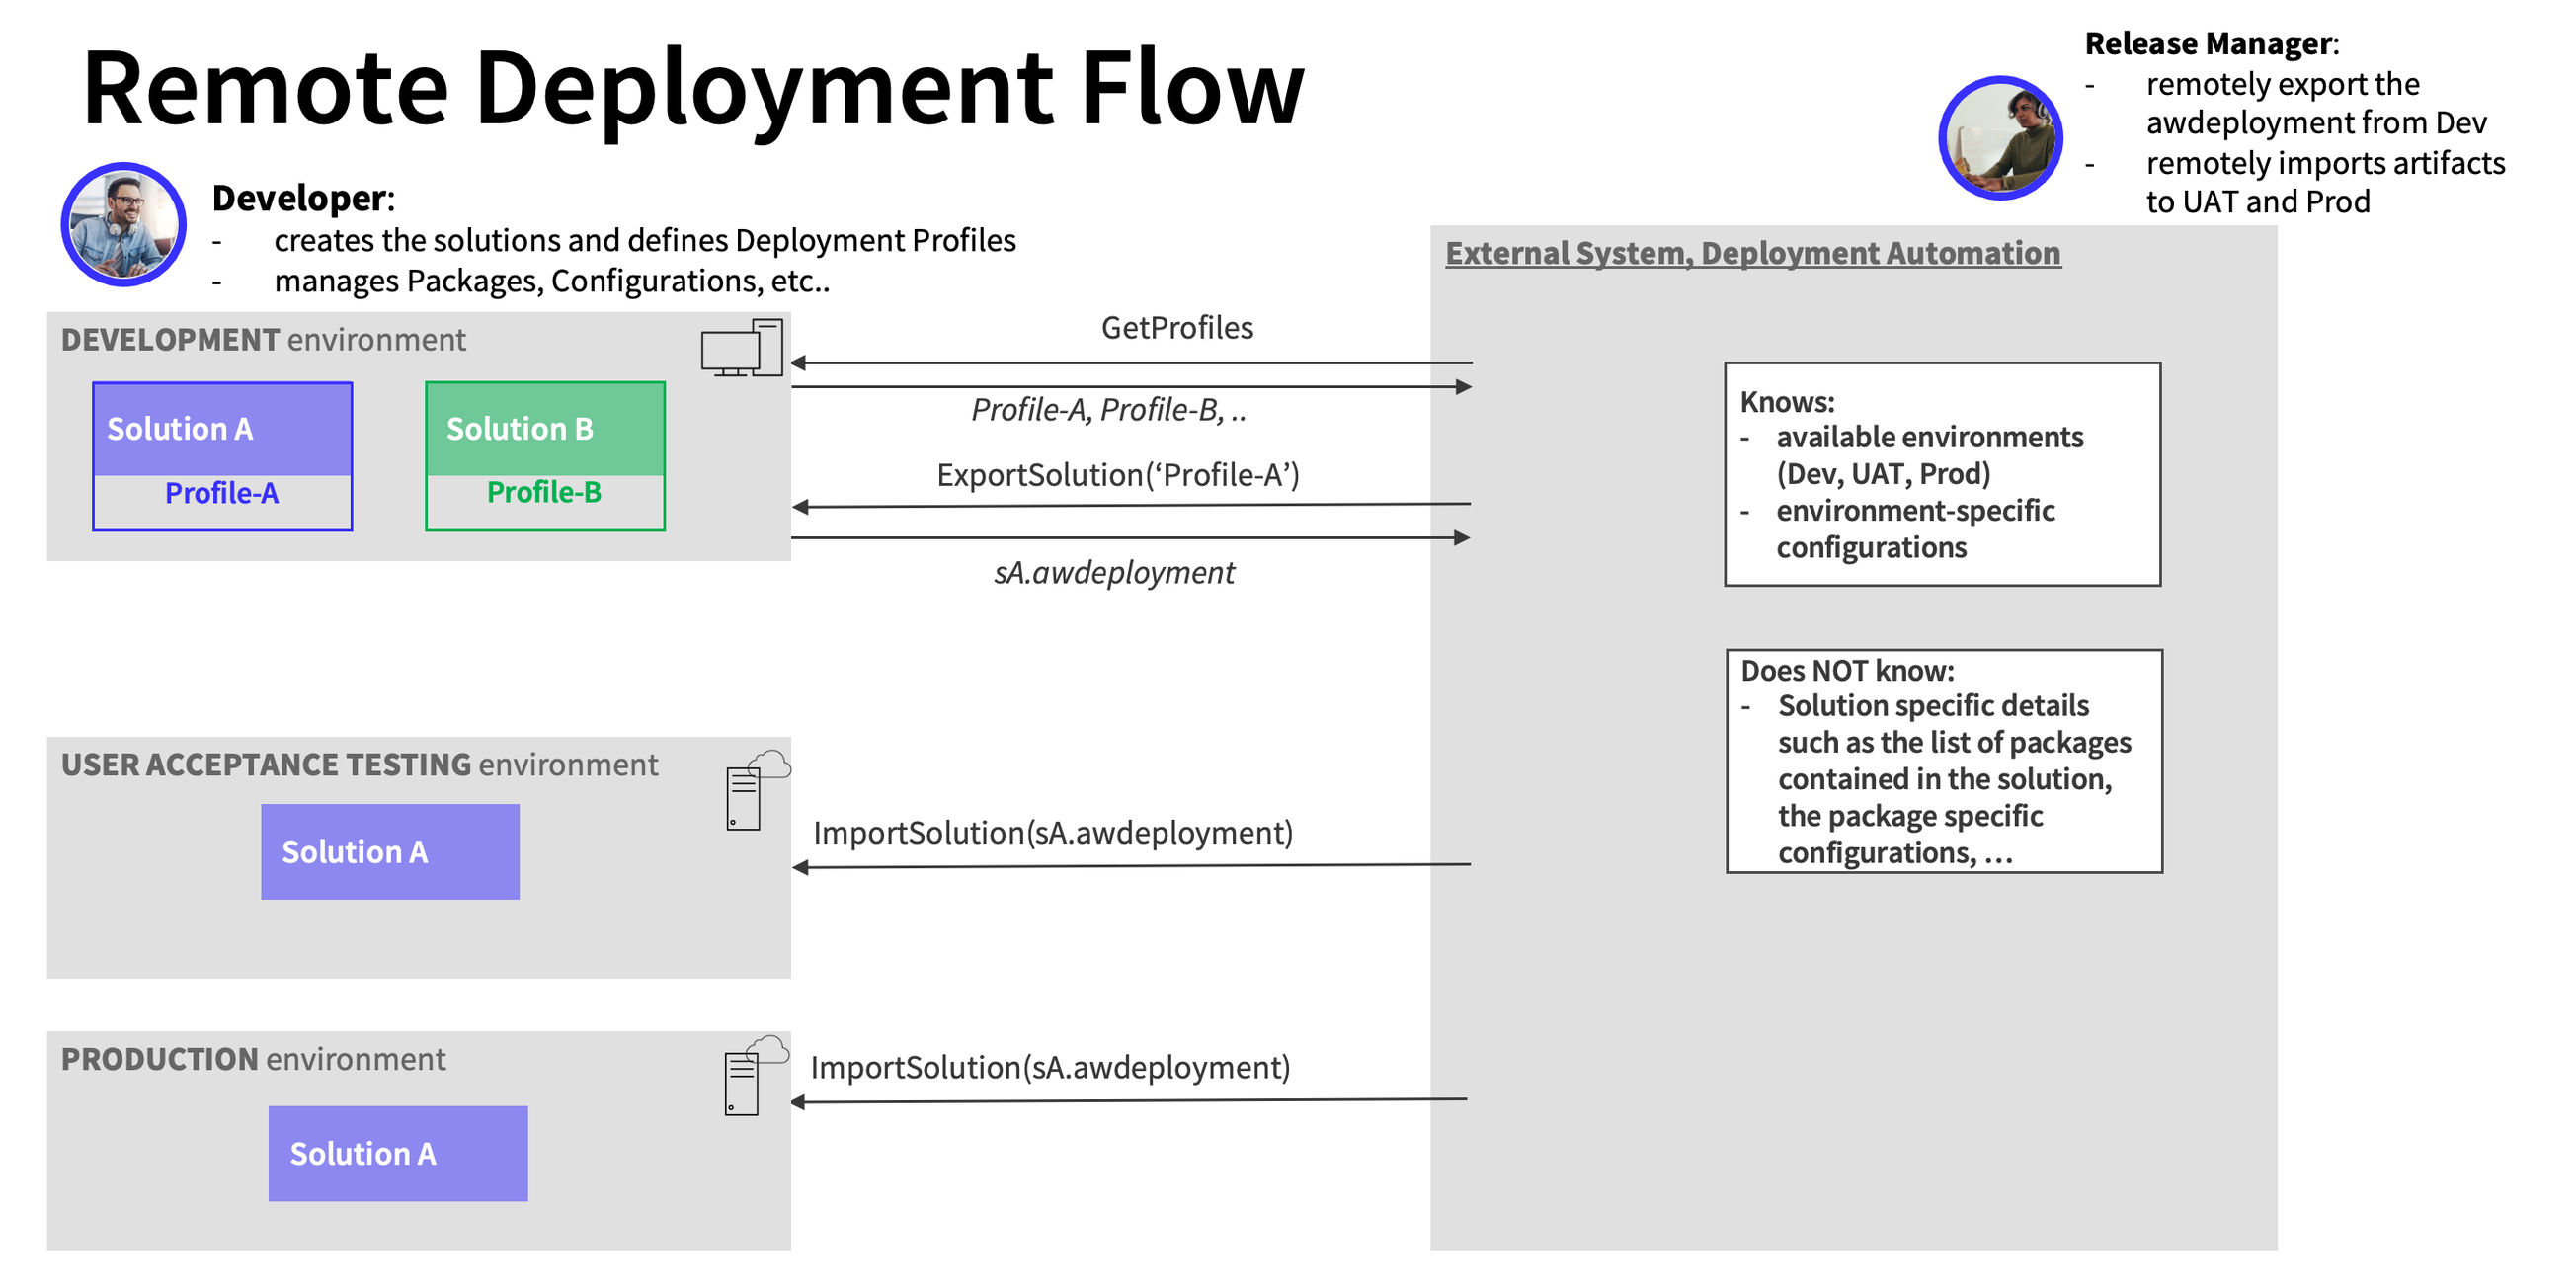
The developer is in charge of the whole Solution, including managing Packages and defining Deployment Profiles. Based on such Deployment Profiles, an external system would then be able to export the Solution, e.g., from the DEV environment and import it into the UAT and/or PROD environment.
The following sections describe:
- The authentication mechanism for Deployment APIs
- The concurrency prevention mechanism for Deployment APIs
- A description of each REST endpoint. Currently, Deployment APIs provide endpoints for the following cases:
- Retrieving Deployment Profile data
- Exporting a Solution through Deployment Profiles
- Importing an
.AWDEPLOYMENTfile - Exporting Business Objects from the Base Package
- Importing an
.AWEXPORTfile from the Base Package
Deployment API Authentication
To use Deployment API endpoints, you need the necessary authentication credentials to perform API calls.
Deployment APIs are authenticated based on a token, which can be generated through two different mechansisms:
- Resetting and retrieving the API token from Appway Studio
- Initializing the API token remotely
Resetting and Retrieving API Token from Appway Studio
When Deployment APIs are installed, Appway Studio provides a dedicated submodule (Solution Maintentance > Deployment API Token) to reset and retrieve the token.
Consider that API token can be reset by an Administrator user. However, if Advanced Studio Permissions are enabled, the access to this module is subject to the following Studio Permission to be assigned to the user: Manage Deployment API.
Initializing API Token Remotely
The second mechanism consists in initializing the API token remotely, without accessing Appway Studio. This is relevant in the case of environments that are managed remotely, where the environment setup is completely performed outside Appway.
To set a token remotely, perform the following steps:
- Create a file called
DeploymentAPI.tokencontaining the value of the token you want to set. The value must contain from 24 to 64 alphanumerical characters. The dash symbol (-) is also allowed. - Before starting the DeploymentAPI Extension for the first time (therefore when no API token has been created yet), add the
DeploymentAPI.tokenfile in the DeploymentAPI Extension path (/data/extensions/DeploymentAPI.token). - Start the DeploymentAPI Extension.
- The token is used by the extension, and the file is deleted from the system.
Note that this API token remote mechanism is allowed only at first setup. If the DeploymentAPI Extension has a token already, you need to reset and retrieve the API token from Appway Studio.
Deployment API Concurrency Prevention
With Deployment APIs, Appway introduces concurrency prevention mechanisms to ensure that import and export operations are executed with no conflicts.
Note that this is the same prevention mechanism enforced in import/exports occurring in FNZ Studio Composition
REST Endpoints
All endpoints are relative to: {protocol}://{hostname}:{port}/{context-root}/rest-api
To authenticate to each endpoint call, the following custom header must be set, with the value of the API Token: X-Appway-DeploymentAPI-API-Token.
Retrieve Deployment Profile Data
These endpoints allow retrieving the data of the Deployment Profiles available on the environment.
| Method and Endpoint | Parameters | Description |
|---|---|---|
GET /deployment/v1/deployment-profiles |
no parameters | Returns the list of Deployment Profile Ids available on the Appway environment |
GET /deployment/v1/deployment-profiles/{profileId} |
profileId = id of the deployment profile to get |
Returns the Deployment Profile definition:
|
Exporting a Solution through Deployment Profiles
These endpoints allow exporting a Solution defined through Deployment Profiles. Such profiles need to be defined on the environment where the APIs are called.
| Method and Endpoint | Parameters | Description |
|---|---|---|
POST /deployment/v1/awdeployments/exports |
|
Starts the export of a Solution defined through a Deployment Profile Id available on the environmentnReturns an Id of the export operation. |
GET /deployment/v1/awdeployments/exports/{exportId}/status |
exportId = Id of the export operation |
Returns the status and percentage of completion of an export operation in progress, given its exportId. |
GET /deployment/v1/awdeployments/exports/{exportId}/result |
exportId = Id of the export operation |
Returns the cluster node that executed the export operation and the absolute path where the .AWDEPLOYMENT file is stored. |
GET /deployment/v1/awdeployments/exports/{exportId} |
exportId = Id of the export operation |
Streams back the .AWDEPLOYMENT file returned by the export operation. |
Importing an .AWDEPLOYMENT File
These endpoints allow importing an .AWDEPLOYMENT file.
| Method and Endpoint | Parameters | Description |
|---|---|---|
POST /deployment/v1/awdeployments/imports |
|
Starts the import of an .AWDEPLOYMENT file on the environment. nThe .AWDEPLOYMENT file can be streamed in the API request body or can be taken from a path.nReturns the Id of the import operation. |
POST /deployment/v1/awdeployments/imports |
|
Starts an import of an .AWEXPORT file from a local file nReturns the Id of the import operation. |
GET /deployment/v1/awdeployments/imports/{importId}/status |
importId = Id of the import operation |
Returns the status of an import operation in progress given its importId. |
GET /deployment/v1/awdeployments/imports/{importId}/log |
importId = Id of the import operation |
Returns the log file generated for a completed import operation given its importId. |
Exporting Business Objects from Base Package
These endpoints allow exporting Business Objects from the Base Package.
| Method and Endpoint | Parameters | Description |
|---|---|---|
POST /deployment/v1/awexports/exports |
|
Starts an export for Business Objects in the Base Package, chosen via a custom list and a timestamp filter. Note: the timestamp is interpreted as "server-time relative", that is, with no timezone handling. |
GET /rest-api/deployment/v1/awexports/exports/{exportId} |
exportId = Id of the export operation |
Streams back the awexport generated by the export operation. |
GET /deployment/v1/awexports/exports/{exportId}/status |
exportId = Id of the export operation |
Returns the status of an export operation in progress given its exportId. |
Importing an .AWEXPORT File from Base Package
These endpoints allow importing an .AWEXPORT file from the Base Package.
| Method and Endpoint | Parameters | Description |
|---|---|---|
POST /deployment/v1/awexports/imports |
|
Starts an import of an .AWEXPORT file via file upload.nReturns the Id of the import operation. |
POST /deployment/v1/awexports/imports |
|
Starts the import of an .AWEXPORT file from a local file nReturns the Id of the import operation. |
GET /deployment/v1/awexports/imports/{importId}/status |
importId = Id of the import operation |
Returns the status of the import operation in progress given its importId. |
OpenAPI Specification
The detailed specification for the DeploymentAPI endpoints provided is also available through an OpenAPI yaml file. This specification can be downloaded here: DeploymentAPI1.yaml (updated as of March 2022).
Related Links
Packages (information on Package management).