Building A Docker Image
When setting up the Platform in a containerized environment, there are three main areas that need to be considered:
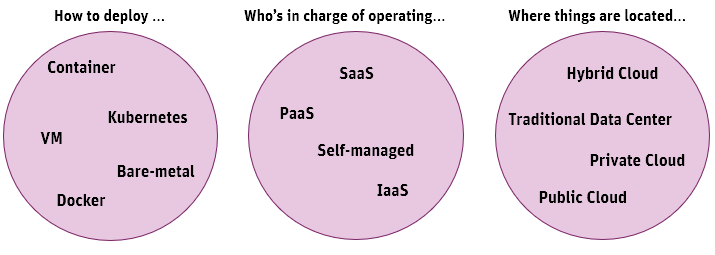
This article focuses on the "How to deploy" area, as building a Docker image and running the Platform using the image require Platform-specific instructions. The goal is to enable you to deploy and manage instances in a containerized environment.
Note: This article is valid for version 9.1 or higher.
Traditional Approach vs Containers
In comparison to a traditional deployment on virtual machines, containers are faster and consume fewer resources:
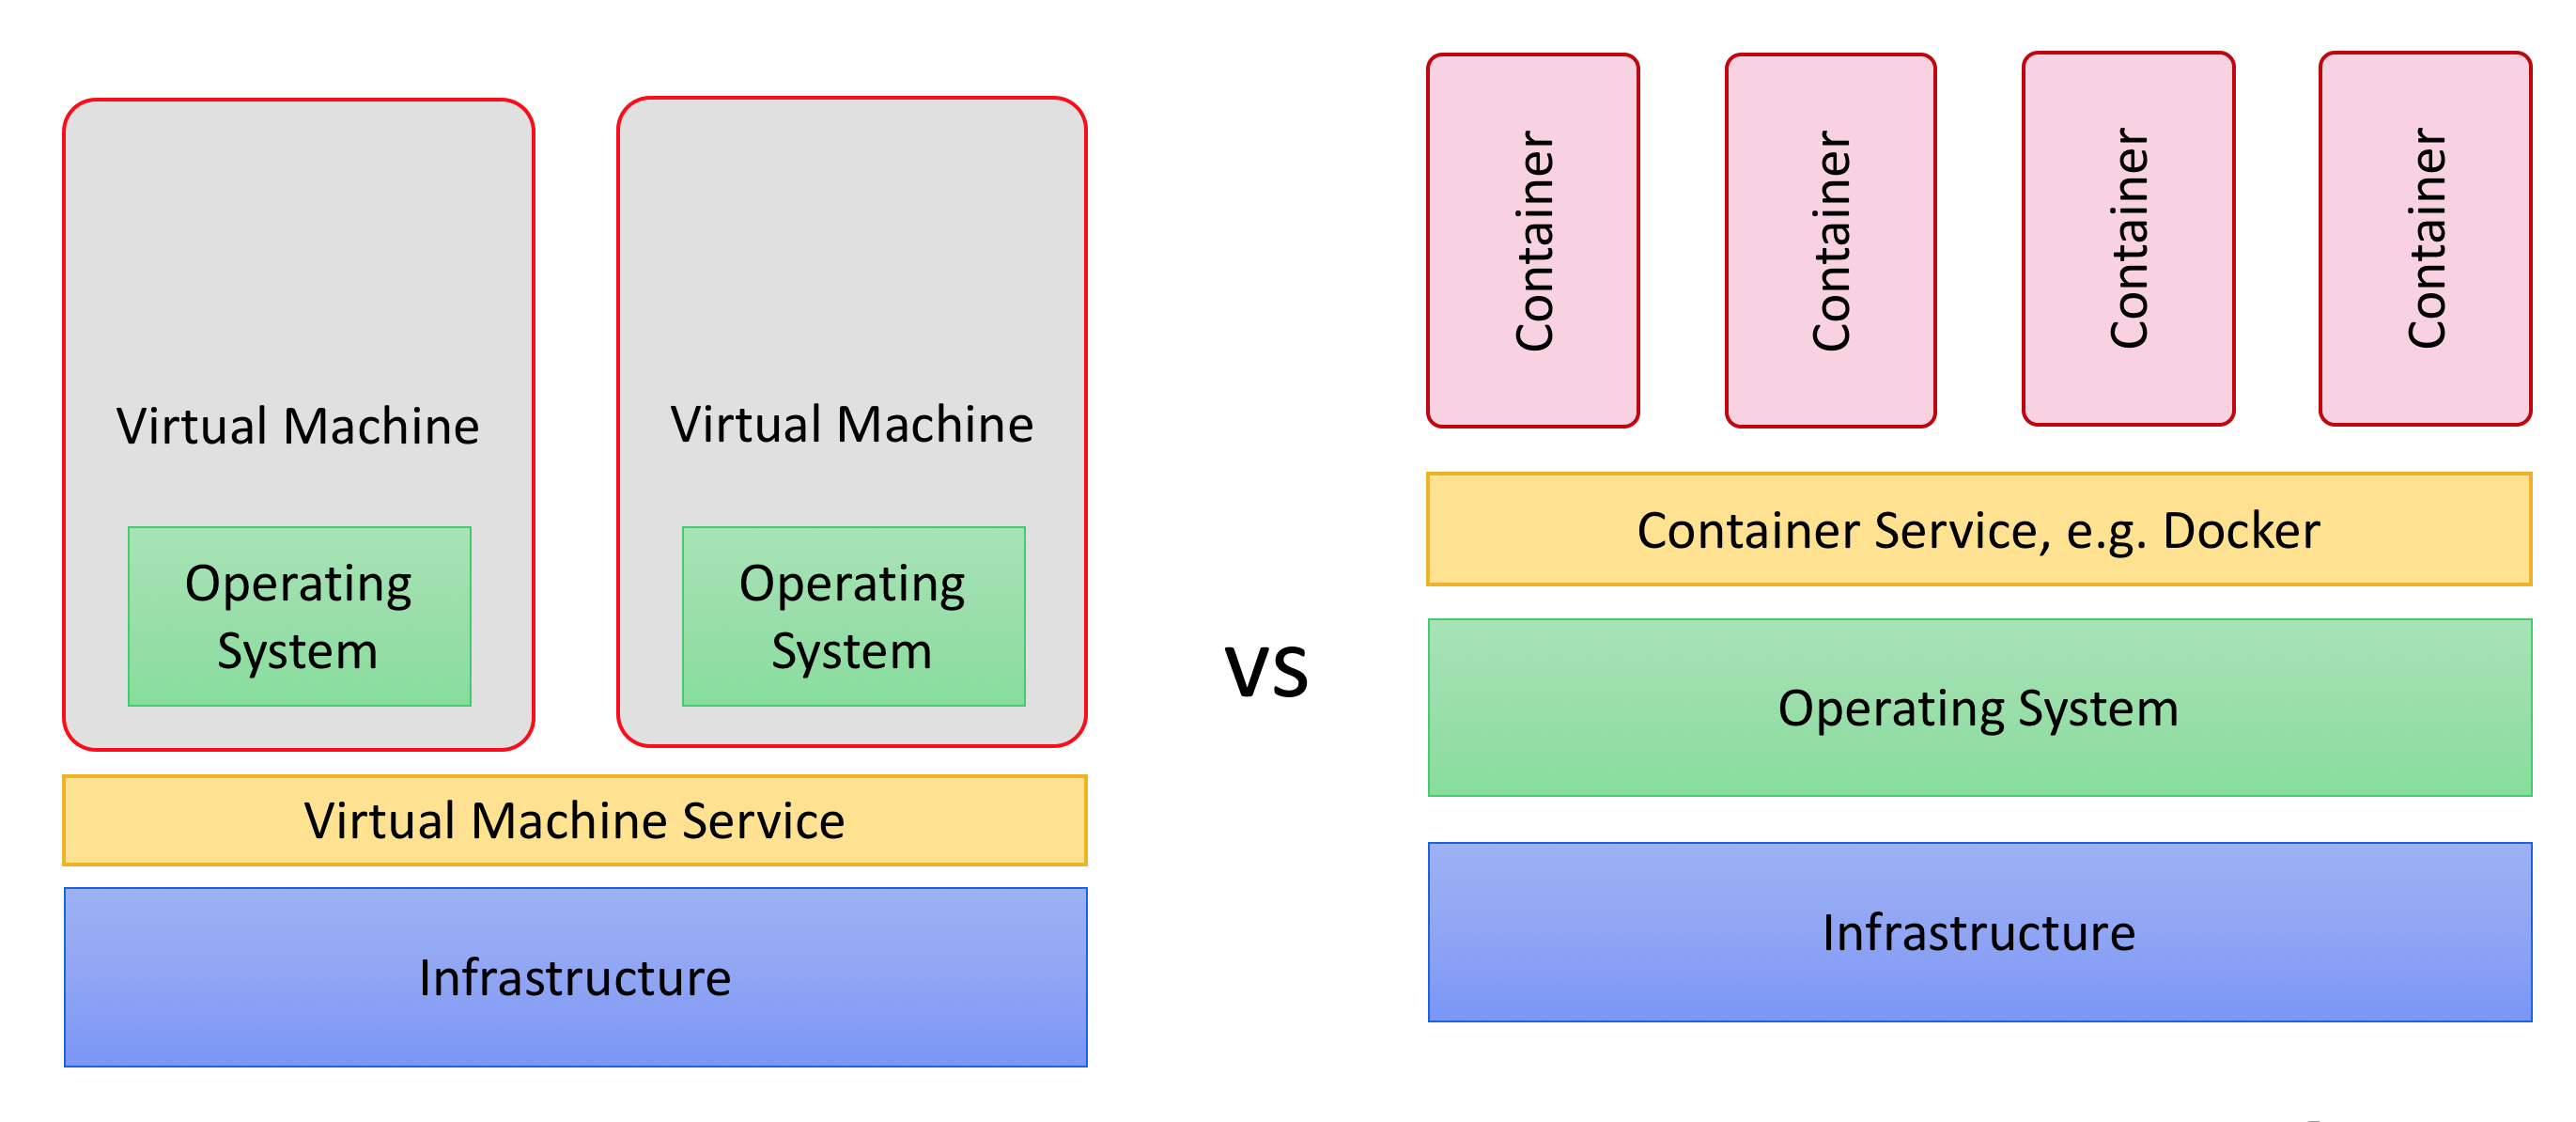
In a traditional setup, multiple virtual machines run on the same infrastructure. This provides isolation between different virtual machines. Each virtual machine runs its own operating system, which then runs a Platform instance. The downside is that virtual machines use a lot of resources, and are difficult to manage.
With an approach based on containers, your Platform instances are contained in images. These images can then be started directly on top of a container service like Docker. These running images, called containers, provide the same isolation as an approach based on virtual machines, but without the downsides.
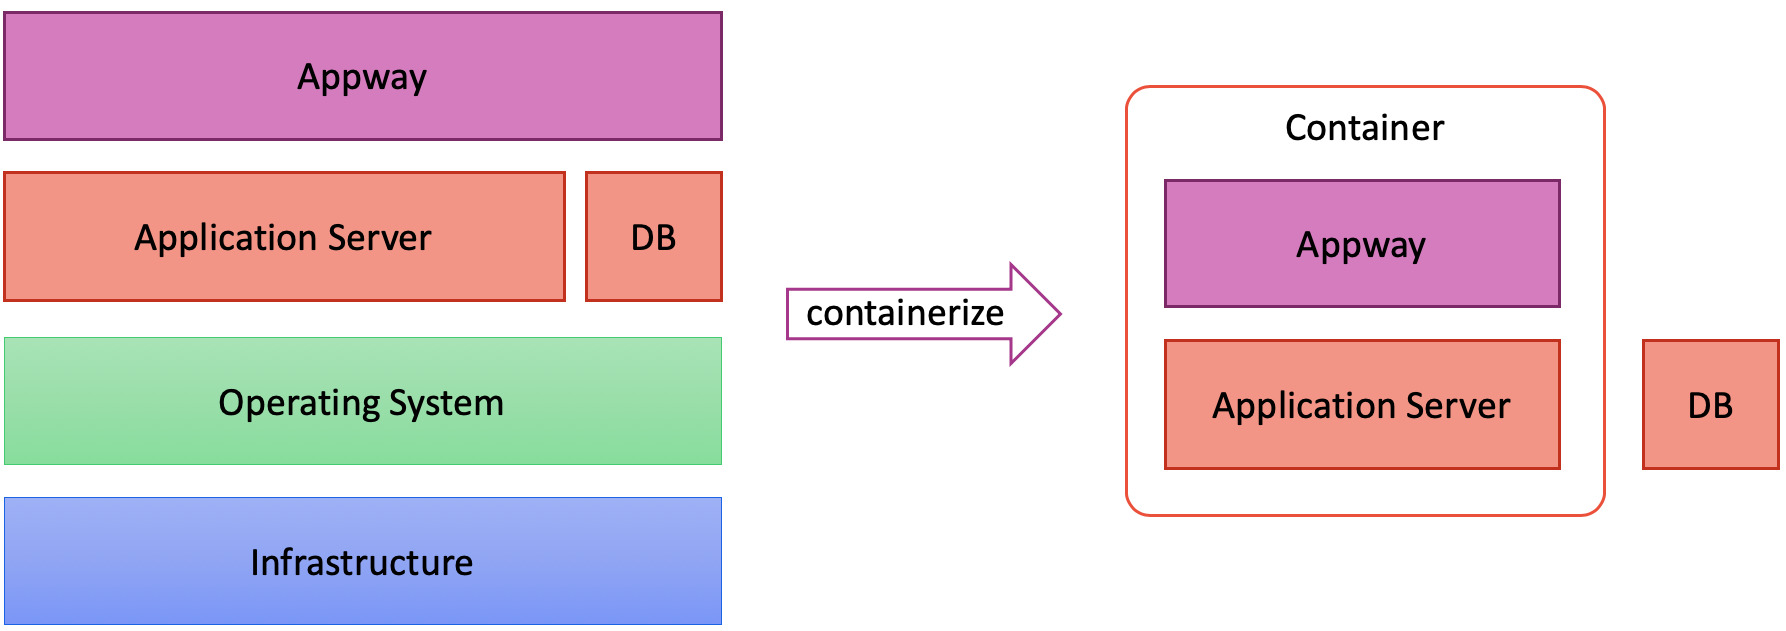
Build a Docker Image
A Docker image is a template that can be used to create one or more containers.
Note: This article assumes you are using the Tomcat application server, but the instructions are similar and can also be used for other application servers.
Resources
Before building the Docker image, ensure that you have all the software artifacts available that you want to include in the image; e.g. the WAR file, the extensions, and Packages that have to be deployed at startup.
Directory Structure
The following snippets assume you have the following directory structure which will be used to build the actual Docker image:
├── Dockerfile
├── build.sh # script to build the Appway Docker image
└── resources
├── appway-configuration # e.g. conf.properties, hazelcast.xml, etc.
├── appway-core # Appway ROOT.war file
├── appway-extensions # mandatory and additional Appway extensions
├── appway-packages # mandatory and additional Packages that have to be deployed during Appway startup
├── embedded-libs # libraries that are used to customize the application server
└── tomcat-configuration # configuration files for the application serverDiscovery Mechanisms
By default, when you run the Platform, there is no mechanism enabled that allows multiple nodes to connect to each other.
The discovery mechanism you should configure depends on how the containers will be managed.
For example, if the containers are managed using Kubernetes, then the Kubernetes Hazelcast Discovery extension has to be placed into the /resources/appway-extensions folder so that it is included in the final Docker image. The configuration.xml file has to be placed in the same folder and configured so that the extensions are automatically started. The following example contains the mandatory extensions for Appway 9:
<?xml version="1.0" encoding="UTF-8"?>
<AdapterConfig xmlns:xsi="http://www.w3.org/2001/XMLSchema-instance" xsi:noNamespaceSchemaLocation="adapters_configuration.xsd">
<!--
Extensions that are not listed in this file will not be initialized at startup.
Extension tag attributes:
- name: the name of the Extension
- state: 0 stopped (has never been started manually), 1 stopped (has been running before), 2 started
- startup: 0 preserve state, 1 do not run at startup, 2 run at startup
- priority: indicates the startup order of the adapter. For example priority="1" is started before priority="4"
-->
<Adapter name="ClusterTools" state="2" startup="2" priority="0"/>
<Adapter name="ComponentExtension" state="2" startup="2" priority="0"/>
<Adapter name="DefaultIcons" state="2" startup="2" priority="0"/>
<Adapter name="Functions" state="2" startup="2" priority="0"/>
<Adapter name="ProcessUsageTracker" state="2" startup="2" priority="0"/>
<Adapter name="StatisticsCollector" state="2" startup="2" priority="0"/>
<Adapter name="StylePackageTools" state="2" startup="2" priority="0"/>
<Adapter name="SystemHealthSensors" state="2" startup="2" priority="0"/>
<Adapter name="WorksitemFinder" state="2" startup="0" priority="0"/>
</AdapterConfig>If you use Docker Compose to run the Platform, make sure that you add a hazelcast.xml configuration file that has Multicast enabled into the appway-configuration folder:
<multicast enabled="true">
<multicast-group>224.2.2.3</multicast-group>
<multicast-port>54327</multicast-port>
</multicast>Dockerfile
The Dockerfile is a text file that contains instructions that are used to build a Docker image. The following example can be customized as needed:
ARG APP_SERVER_IMG
FROM ${APP_SERVER_IMG}
ENV APP_SERVER_HOME /usr/local/tomcat
ENV NM_DATA_HOME /appway/data-home
# set application server directory as working directory
WORKDIR ${APP_SERVER_HOME}
# clean application server directories and
# create common webapps dir
RUN rm -rf webapps && \
mkdir -p /appway/webapps
# create data home dir
RUN mkdir -p ${NM_DATA_HOME}
# create appway user
RUN groupadd appway && useradd -s /sbin/nologin -g appway appway
# set file permissions
RUN chown -R appway:appway ${APP_SERVER_HOME}/conf && \
chown -R appway:appway ${APP_SERVER_HOME}/logs && \
chown -R appway:appway ${APP_SERVER_HOME}/work && \
chown -R appway:appway ${APP_SERVER_HOME}/temp && \
chown -R appway:appway /appway/webapps && \
chown -R appway:appway ${NM_DATA_HOME}
USER appway
# copy Tomcat config (e.g. server.xml, context.xml)
COPY --chown=appway:appway ./resources/tomcat-configuration conf/
# add embedded libraries
COPY --chown=appway:appway ./resources/embedded-libs lib/
# add Appway WAR
COPY --chown=appway:appway ./resources/appway-core/ROOT.war /appway/webapps/ROOT.war
# add Appway extensions
COPY --chown=appway:appway ./resources/appway-extensions ${NM_DATA_HOME}/extensions/
# add Appway packages
COPY --chown=appway:appway ./resources/appway-packages ${NM_DATA_HOME}/packages/
# add Appway configuration
COPY --chown=appway:appway ./resources/appway-configuration ${NM_DATA_HOME}/conf/
# add Appway scripts
COPY --chown=appway:appway ./resources/appway-scripts /appway/scripts/
# start Appway
CMD ["catalina.sh", "run"]Build the Image
Add the following content to the build.sh file and run it to build the Docker image:
#!/bin/bash
tomcatVersion=9.0.17-jre8
docker build --pull -f Dockerfile \
--build-arg APP_SERVER_IMG="tomcat:${tomcatVersion}" \
-t appway \
.After the image is built, tag and push it in a private Docker registry that can be accessed to run the Platform, e.g. a repository like Artifactory.
docker tag appway [private_repository_url]/appway docker push [private_repository_url]/appway
Running the Platform
There are two alternative ways of running the Platform in a containerized environment. See the dedicated articles for details on each variant: