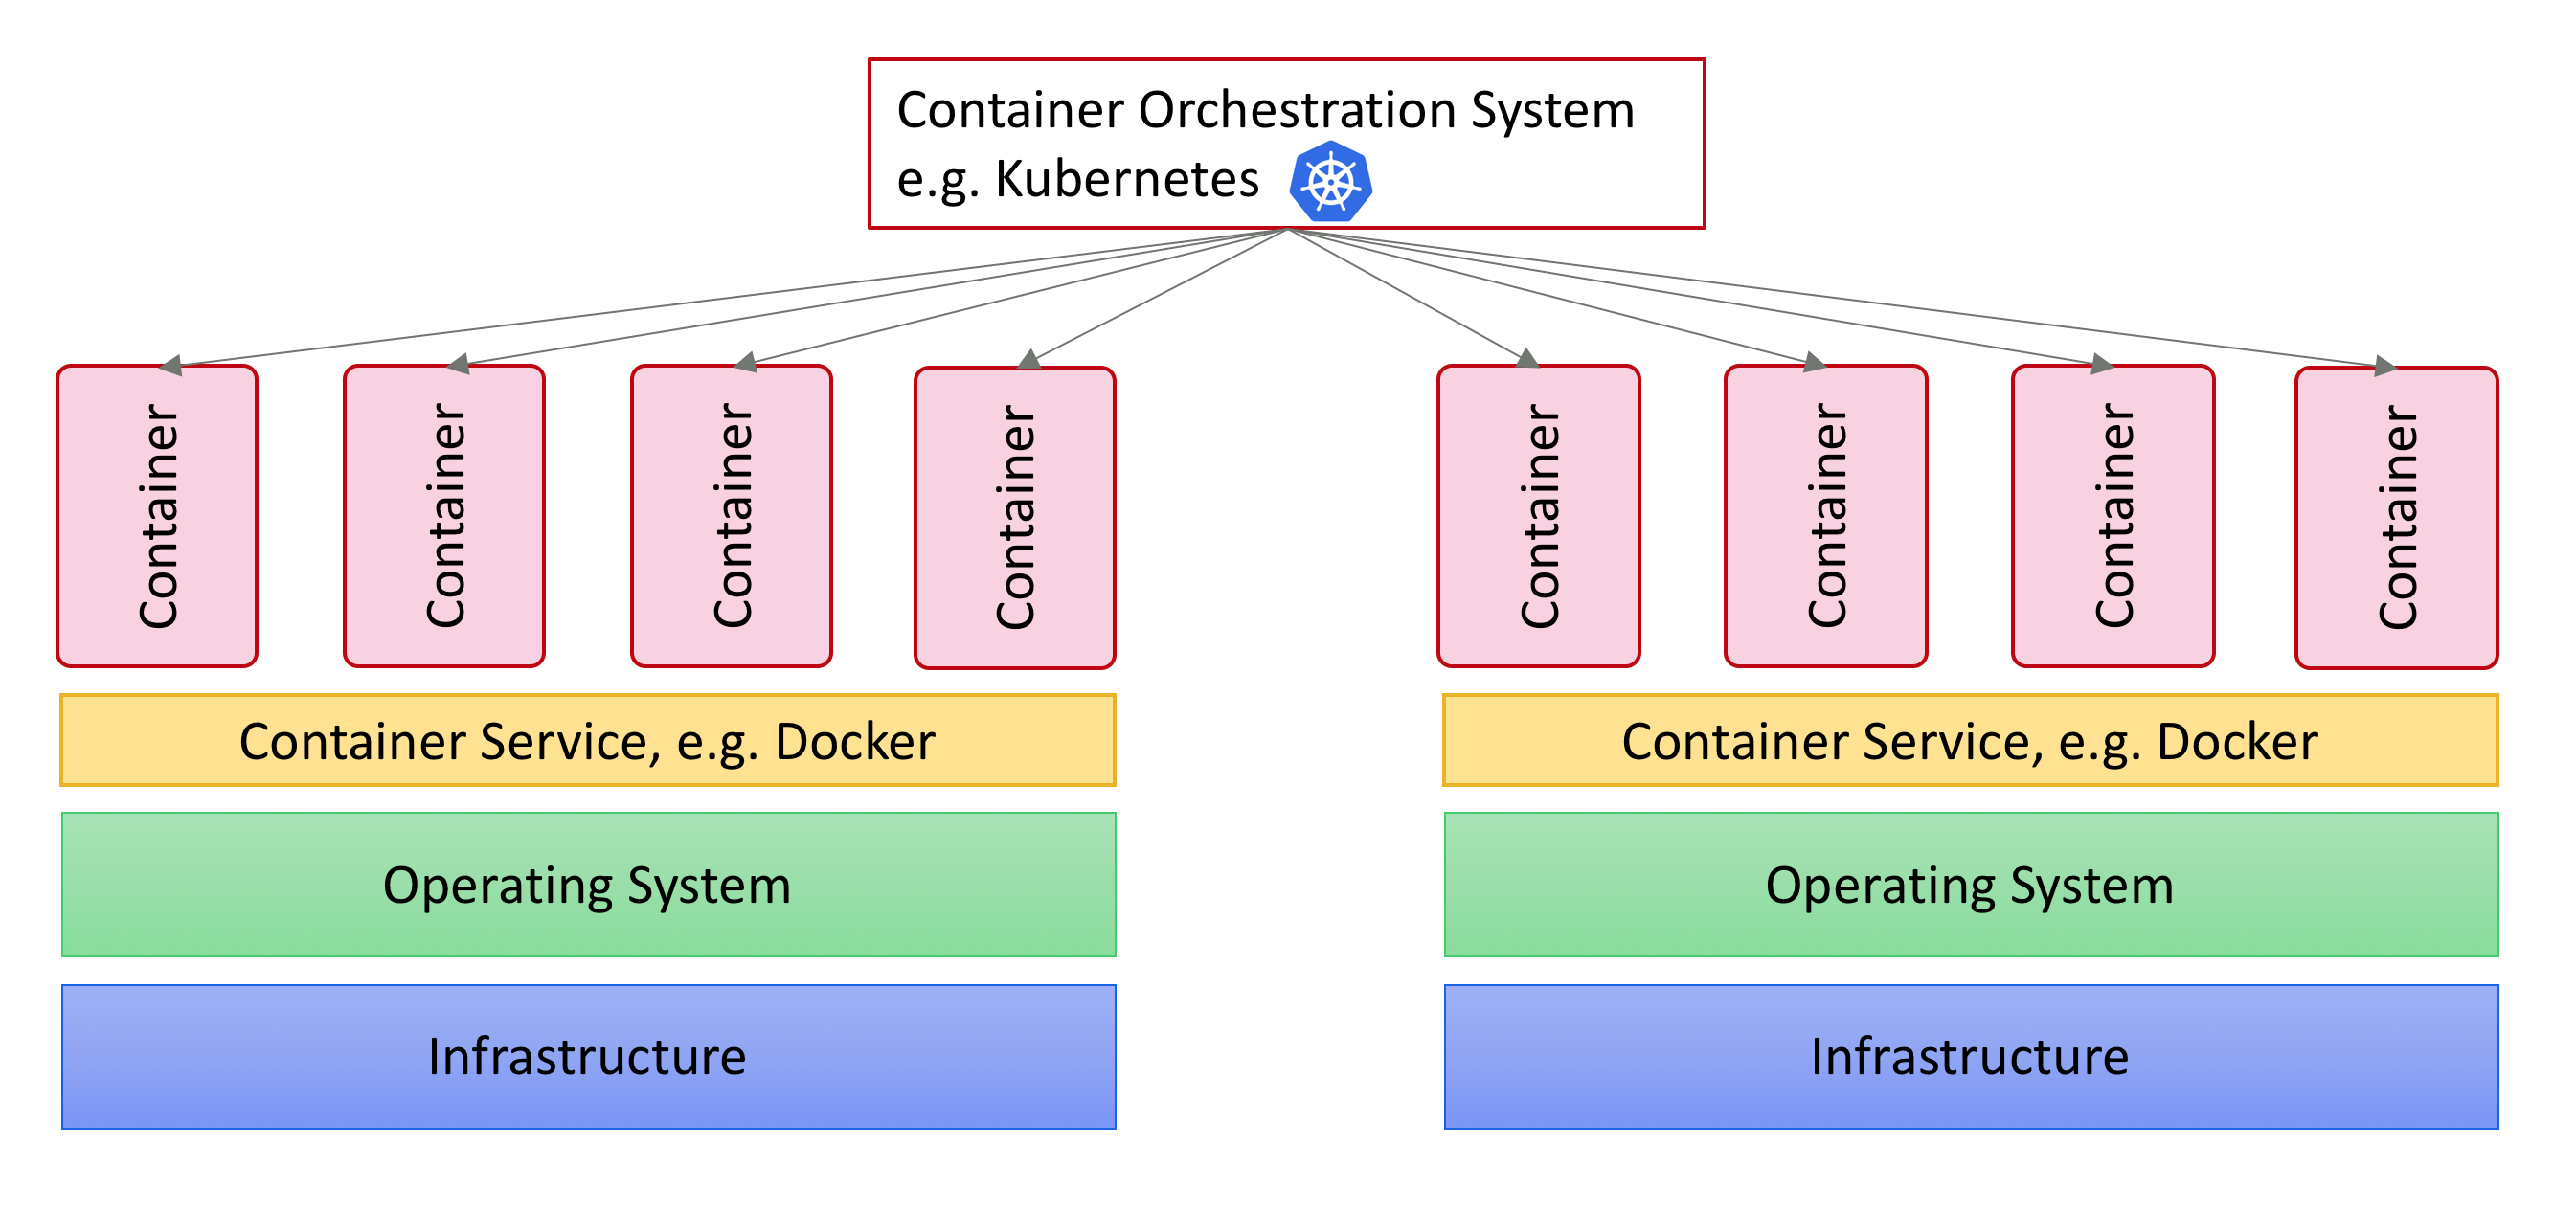
Kubernetes/Helm
Kubernetes and Helm provide the following functionality:
- Kubernetes allows you to deploy and manage containerized applications.
- Helm simplifies the management of Kubernetes resources by providing an extra layer of abstraction.
Beside installing Kubernetes and Helm, you also have to create the infrastructure where you will deploy Appway. Instructions explaining how to do this depend on where you create the infrastructure:
Helm and Kubernetes Resources
To be able to deploy and customize Appway, you need the Helm (Kubernetes) templates as well as the configuration values that are specific for each Appway environment.
It is important to separate the templates from the actual values since the same templates can be used to deploy multiple Appway environments.
The following resource examples assume you have the following directory structure (this can be customized):
├── README.md

├── appway

│   ├── Chart.yaml

│   └── templates

│       ├── NOTES.txt

│       ├── docker-image-secret.yaml

│       ├── environment-config.yaml

│       ├── license-properties.yaml

│       ├── rbac.yaml

│       ├── service.yaml

│       └── statefulset.yaml

├── appway-values-dev-env

│   ├── environment-config.yaml

│   ├── license.properties

│   └── values.yaml
All of the resources nested under 'appway' in the above schema can be packaged as a Helm chart that can be versioned and evolved based on future needs.
The examples of resources described in the following sub-sections can be used as a starting point for deploying Appway on Kubernetes.
Configuration
There are different ways to provide the configuration properties to an Appway instance. You can find more details here: Configuration Properties.
In the next example, the configuration properties are provided as environment variables. Store the environment variables outside of the Helm templates and customize them based on the needs of the Appway instance. The file with environment variables will be provided when the Appway instances are created.
Note: A configuration properties file can also be mounted as a volume if this is preferred. See the dedicated section on volumes available with the official Kubernetes documentation for more details on how to work with volumes and to understand the advantages and disadvantages of using them.
# file name: /appway/templates/environment-config.yaml


apiVersion: v1

kind: ConfigMap

metadata:

  name: environment-config

data:

# KubernetesHazelcastDiscovery config

    APPWAY_KUBERNETESHAZELCASTDISCOVERY_COM_NM_EXTENSIONS_KUBERNETESHAZELCASTDISCOVERY_NAMESPACE: {{ .Release.Namespace }}

    APPWAY_KUBERNETESHAZELCASTDISCOVERY_COM_NM_EXTENSIONS_KUBERNETESHAZELCASTDISCOVERY_SERVICENAME: appway


# other environment variables

{{ .Values.environment_config | indent 4}}
# file name: appway-values-dev-env/environment-config.yaml


# Environment variables that override the default Appway properties


# Example of properties for Appway core

NM_SYSTEM_COLOR: #000


# Example of properties for configuring extensions

APPWAY_AZUREHAZELCASTSTORE_COM_NM_EXTENSIONS_AZUREHAZELCASTSTORE_ACCOUNTNAME: cluster-storage

APPWAY_AZUREHAZELCASTSTORE_COM_NM_EXTENSIONS_AZUREHAZELCASTSTORE_ACCOUNTKEY: REDACTED
License File
The license file can be mounted directly in the Appway container. To do so, create a ConfigMap template. This template is filled with the actual license properties:
# file name: /appway/templates/license-properties.yaml


apiVersion: v1

kind: ConfigMap

metadata:

  name: license-properties

data:

  license.properties: |

{{ .Values.license_properties | indent 4}}
# file name: /appway-values-dev-env/license.properties


nm.license.accountId =

nm.license.cluster.maxsize =

# add here all the other license properties
Secret
Since the Appway image is stored in a private repository, you need to create a Secret to be able to retrieve the Appway Docker image from the private repository.
Fill the corresponding values in the next script and then run it to create the Secret:
registryServer=
dockerUsername=
dockerPassword=
dockerEmail=

kubectl create secret docker-registry regcred --docker-server=${registryServer} --docker-username=${dockerUsername} --docker-password=${dockerPassword} --docker-email=${dockerEmail}
In the following example, the data is marked as REDACTED. Replace this value with the actual Secret value which was created in the previous step and which grants access to the Appway Docker image.
# file name: /appway/templates/docker-image-secret.yaml


apiVersion: v1

data:

  .dockerconfigjson: REDACTED

kind: Secret

metadata:

  name: docker-image-secret

type: kubernetes.io/dockerconfigjson
Role Binding
Role Binding allows Hazelcast access to the Kubernetes API. This is used by the Kubernetes Hazelcast Discovery extension to discover and connect the cluster nodes:
# file name: /appway/templates/rbac.yaml


apiVersion: rbac.authorization.k8s.io/v1

kind: ClusterRoleBinding

metadata:

  name: {{ .Release.Namespace }}-rbac

roleRef:

  apiGroup: rbac.authorization.k8s.io

  kind: ClusterRole

  name: view

subjects:

- kind: ServiceAccount

  name: default

  namespace:  {{ .Release.Namespace }}
Access Service
Service to be able to access Appway:
# file name: /appway/templates/service.yaml

apiVersion: v1
kind: Service
metadata:
  name: appway
  labels:
    app: appway
spec:
  type: LoadBalancer
  sessionAffinity: ClientIP
  ports:
  - port: 8080
    targetPort: 8080
    name: appway
  - port: 8000
    targetPort: 8000
    name: metrics
  - port: 5713
    targetPort: 5713
    name: hazelcast
  - port: 5556
    targetPort: 5556
    name: jmx
  selector:
    app: appway
StatefulSet
StatefulSet that can be used to deploy multiple Appway instances:
Note: This example assumes that the Docker image you built and are using contains an Appway extension for the Cluster Storage (e.g. Azure Hazelcast Store, AWS Hazelcast Store, Cassandra Hazelcast Store, Relational Db Hazelcast Store). The credentials for these extensions can be specified using environment variables as shown above in the `environment-config.yaml` file.
# file name: /appway/templates/statefulset.yaml


apiVersion: apps/v1

kind: StatefulSet

metadata:

  name: appway

spec:

  serviceName: "appway"

  replicas: {{ .Values.appway.replicas }}

  selector:

    matchLabels:

      app: appway

  template:

    metadata:

      labels:

        app: appway

    spec:

      imagePullSecrets:

        - name: docker-image-secret

      containers:

        - image: {{ .Values.appway.repository }}/{{ .Values.appway.image }}:{{ .Values.appway.tag }}

          name: appway

          imagePullPolicy: Always

          env:

            - name: JAVA_OPTS

              value: {{ .Values.appway.java_opts }}

          envFrom:

            - configMapRef:

                name: environment-config

          ports:

            - containerPort: 8080

              protocol: TCP

              name: appway

            - containerPort: 5713

              protocol: TCP

              name: hazelcast

            - containerPort: 5556

              protocol: TCP

              name: jmx

          {{ if .Values.appway.livenessProbe.enabled }}

          livenessProbe:

            httpGet:

              path: {{ .Values.appway.livenessProbe.url }}

              port: 8080

            initialDelaySeconds: {{ .Values.appway.livenessProbe.initialDelaySeconds }}

            periodSeconds: {{ .Values.appway.livenessProbe.periodSeconds }}

            timeoutSeconds: {{ .Values.appway.livenessProbe.timeoutSeconds }}

            successThreshold: {{ .Values.appway.livenessProbe.successThreshold }}

            failureThreshold: {{ .Values.appway.livenessProbe.failureThreshold }}

          {{ end }}

          {{ if .Values.appway.readinessProbe.enabled }}

          readinessProbe:

            httpGet:

              path: {{ .Values.appway.readinessProbe.url }}

              port: 8080

            initialDelaySeconds: {{ .Values.appway.readinessProbe.initialDelaySeconds }}

            periodSeconds: {{ .Values.appway.readinessProbe.periodSeconds }}

            timeoutSeconds: {{ .Values.appway.readinessProbe.timeoutSeconds }}

            successThreshold: {{ .Values.appway.readinessProbe.successThreshold }}

            failureThreshold: {{ .Values.appway.readinessProbe.failureThreshold }}

          {{ end }}

          volumeMounts:

            - name: license-properties

              mountPath: /appway/data-home/conf/license.properties

              subPath: license.properties

      terminationGracePeriodSeconds: {{ .Values.appway.terminationGracePeriodSeconds }}

      volumes:

        - name: license-properties

          configMap:

            name: license-properties

            items:

              - key: license.properties

                path: license.properties

resources:

  requests:

    memory: {{ .Values.appway.requests.memory }}

    cpu:    {{ .Values.appway.requests.cpu }}

  limits:

    memory: {{ .Values.appway.limits.memory }}

    cpu:    {{ .Values.appway.limits.cpu }}
This StatefulSet is customized by using an external file with configuration values:
# file name: /appway-values-dev-env/values.yaml


appway:


  # Docker image

  # note: this image must contain the KubernetesHazelcastDiscovery extension

  repository: artifactory.appway.com

  image: appway

  tag: latest


  # number of Appway nodes

  replicas: 2


  # resources allocated to each Appway node (requested and limits)

  # https://kubernetes.io/docs/concepts/configuration/manage-compute-resources-container/#meaning-of-cpu

  # https://kubernetes.io/docs/concepts/configuration/manage-compute-resources-container/#meaning-of-memory

  requests:

    memory: "1024Mi"

    cpu: "1000m"

  limits:

    memory: "2048Mi"

    cpu: "2000m"


  # JAVA_OPTS property passed to JVM machine

  java_opts: "-Xmx2g -Duser.language=en -Duser.country=US -Duser.timezone=Europe/Zurich -Dfile.encoding=UTF8"


  # num seconds to wait for Appway to shut down

  # note: the Pod is terminated after this period so make sure you configure a high enough value

  # such that all the data can be saved

  terminationGracePeriodSeconds: 120


  livenessProbe:

    # enabled is a flag to used to enable liveness probe

    enabled: true

    # url which should be polled

    url: /login

    # initialDelaySeconds is a delay before liveness probe is initiated

    initialDelaySeconds: 30

    # periodSeconds decides how often to perform the probe

    periodSeconds: 10

    # timeoutSeconds decides when the probe times out

    timeoutSeconds: 10

    # successThreshold is the minimum consecutive successes for the probe to be considered successful after having failed

    successThreshold: 1

    # failureThreshold is the minimum consecutive failures for the probe to be considered failed after having succeeded

    failureThreshold: 10


  # Appway Readiness probe

  readinessProbe:

    # enabled is a flag to used to enable readiness probe

    enabled: true

    # url which should be polled

    url: /login

    # initialDelaySeconds is a delay before readiness probe is initiated

    initialDelaySeconds: 30

    # periodSeconds decides how often to perform the probe

    periodSeconds: 10

    # timeoutSeconds decides when the probe times out

    timeoutSeconds: 10

    # successThreshold is the minimum consecutive successes for the probe to be considered successful after having failed

    successThreshold: 1

    # failureThreshold is the minimum consecutive failures for the probe to be considered failed after having succeeded

    failureThreshold: 10
Helm Chart
# file name: /appway/Chart.yaml


apiVersion: v1

version: 1.0.0

name: appway

appVersion: "1.0.0"

description: Appway cluster
Deploy Appway
Before deploying Appway, install Tiller on the Kubernetes cluster. Tiller runs inside of the Kubernetes cluster, and manages the releases of the Appway charts.
helm init \

 --tiller-tls \

 --tiller-tls-verify \

 --tiller-tls-cert=certificates/cert.pem \

 --tiller-tls-key=certificates/key.pem \

 --tls-ca-cert=certificates/ca.pem \

 --service-account=appway
After Tiller has been successfully installed, you can deploy Appway:
configFolder=appway-values-dev-env


configFile=${configFolder}/values.yaml

environmentConfigFile=${configFolder}/environment-config.yaml

licenseFile=${configFolder}/license.properties

namespace=appway-ns

deploymentName=appway


helm install \

--name ${deploymentName} \

--namespace ${namespace} \

-f ${configFile} \

--set-file environment_config=${environmentConfigFile},license_properties=${licenseFile} appway
Note: You can use the` --dry-run` option of the `helm install` command to double-check the content of the actual Kubernetes files that will be deployed. Since the templates are `yaml` files, ensure that there are no extra whitespaces.
When Appway is deployed, it is deployed to a so-called Pod. A Pod is the basic execution unit of a Kubernetes application, and it is the most basic unit in the Kubernetes object model that you can deploy. A Pod encapsulates the Appway installation, a unique network IP, and options that determine how the Appway container runs.
You can use different Helm or Kubernetes commands to check the status of the Appway instances:
# Helm

helm ls


# Kubernetes

kubectl get pods -n ${namespace} -o wide

kubectl logs -f appway-0 -n ${namespace}

kubectl describe pods appway -n ${namespace}


kubectl exec -n ${namespace} -ti appway-0 /bin/bash
To access Appway, retrieve the IP of the Load Balancer:
kubectl get service appway -n ${namespace}
Note: If you don't run the instructions in a cloud environment and you don't have a Load Balancer bundled, you might have to use a different command to access the Appway instances.
For Minikube, you can use the following command to retrieve the Appway URL (depending on how many ports you are exposing, you might see multiple URLs):
minikube service appway -n ${namespace} --url
Shutdown Appway
To shut down Appway correctly, be aware of the Kubernetes procedure to terminate a Pod:
- Kubernetes sends a
SIGTERMsignal to the Appway containers in the Pod. This triggers the Appway shutdown procedure. - Kubernetes then waits for a grace period that is configurable. It is very important that you configure a sufficiently large value for the
terminationGracePeriodSecondsto allow Appway to save all the data before shutting down.
We recommend setting a grace period of 60s to begin with, but it is very important to test how long your Solution actually takes to shut down, and increase the grace period accordingly if your Solution needs more time to stop.
Note: If Appway stops before the grace period has expired, Kubernetes will not wait until the grace period expires, but will stop immediately.
- After Appway has shut down or the grace period has expired, Kubernetes sends a
SIGKILLsignal to the Pod, and the Pod is removed.
To stop the Appway cluster and clean the Helm resources that were created, you can run the following command:
helm del --purge ${deploymentName}