Catalog Business Object
Introduction
Catalog Business Objects are used as a centrally-managed data source. Catalogs restrict the input choices for users and allow them to choose only from a selected set of options, e.g., in a dropdown list. They are a data provider for Screen Components or the Script Language which consist of a Source and a number of Filters (0..n). Source data is processed by the subsequent filters, and then returned to the requester.
The Catalog concept is illustrated in the figure below:
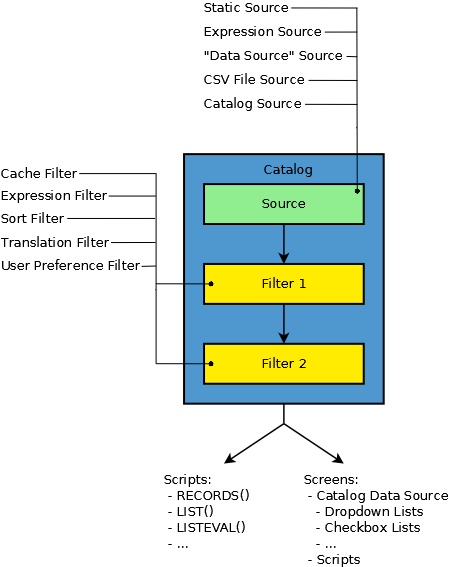
Catalogs are commonly used in specific Business Objects, as wel las in Screen Components and Scripts:
- Business Objects: Catalogs can be set as a source in the Catalog Values Rule of the Data Logic.
- Screen Components:
- Dropdown List - For displaying a list of countries or currencies, for example. All options are visible on request.
- Radiobutton List - e.g., for a simple Yes/No choice or for choosing a currency from list like USD, EUR or CHF. All options are rendered.
- Checkbox List - e.g., for multiple selection of involved departments in a project. All options are rendered.
- Scripts:
RECORDS() For iterating over all departments, for example:
Copy
          ForEach $departmentRecord In RECORDS('department') Do

                      //do something here with $departmentRecord

                      End
Catalog Editor Overview
- Catalog Properties and Variables tabs - The Catalog properties to be defined vary depending on the Catalog Source (
3). See details and links in section Catalog Properties and Variables - Source selector - A Source represents a table of data that can be entered statically or built dynamically. See details and links in section Catalog Sources
- Filter library - Filters allow building more complex data flows for your Solution by manipulating the outcome of a Catalog Source. See details and links in section Catalog Filters
Catalog Properties and Variables
The properties to be defined in the Properties tab mainly depend on the Catalog Source defined. Moreover, an additional tab named Output Columns is available when the Catalog Source is a CSV File, a Data Source, an Expression or an Integration Link.
See the Catalog Sources section for specific information on the Properties available for each Source.
Output Columns
On certain Sources (namely, CSV file, Data Source, Expression, and Integration Link) you need to define the output columns. This is necessary if it is not possible for FNZ Studio to determine which columns your Source will produce. In fact, filters may rely on the columns defined on your Source. You can add and remove columns easily. The order of columns is irrelevant.
See the Catalog Sources section for specific information on Output Columns for each Source.
Variables

As in all Business Object editors, variables may be created to "save" or "reference" values.
Moreover, in the Catalog Editor, the Variables tab also allows creating four variables used to enable the Catalog Lazy Loading option in the Catalog Values Data Rule (Data Logic Business Object). Right-click anywhere on the Variables tab area and select the option Create Lazy Loading Variables. This creates the four variables $filter, $idMatch (Indexed String by default), $start and $limit.
Catalog Sources
A Source represents a table of data (e.g., a spreadsheet) that can be entered statically or built dynamically. When defining a Catalog, it is crucial to define a Source. The Source provides the basic data needed for the possible following filters or directly for the caller. If you do not define any Filters, data is returned as produced by the Source.
While defining the Catalog, you can switch your Sources without losing your data. This history is cleared when closing the Editor.
Currently available Sources are:
- Static - Define your own columns and rows with your own static data. Content is fully versioned.
- Expression - Define data through a script function. Only the script code is versioned, produced data is not.
- Data Source - Connect to a database via a Data Source. Data is not versioned.
- CSV file - Attach a CSV file as a data provider. Data is not versioned.
- Catalog - Data is fetched from another Catalog.
- Integration Link - Connect to an Integration Link directly and make its data available.
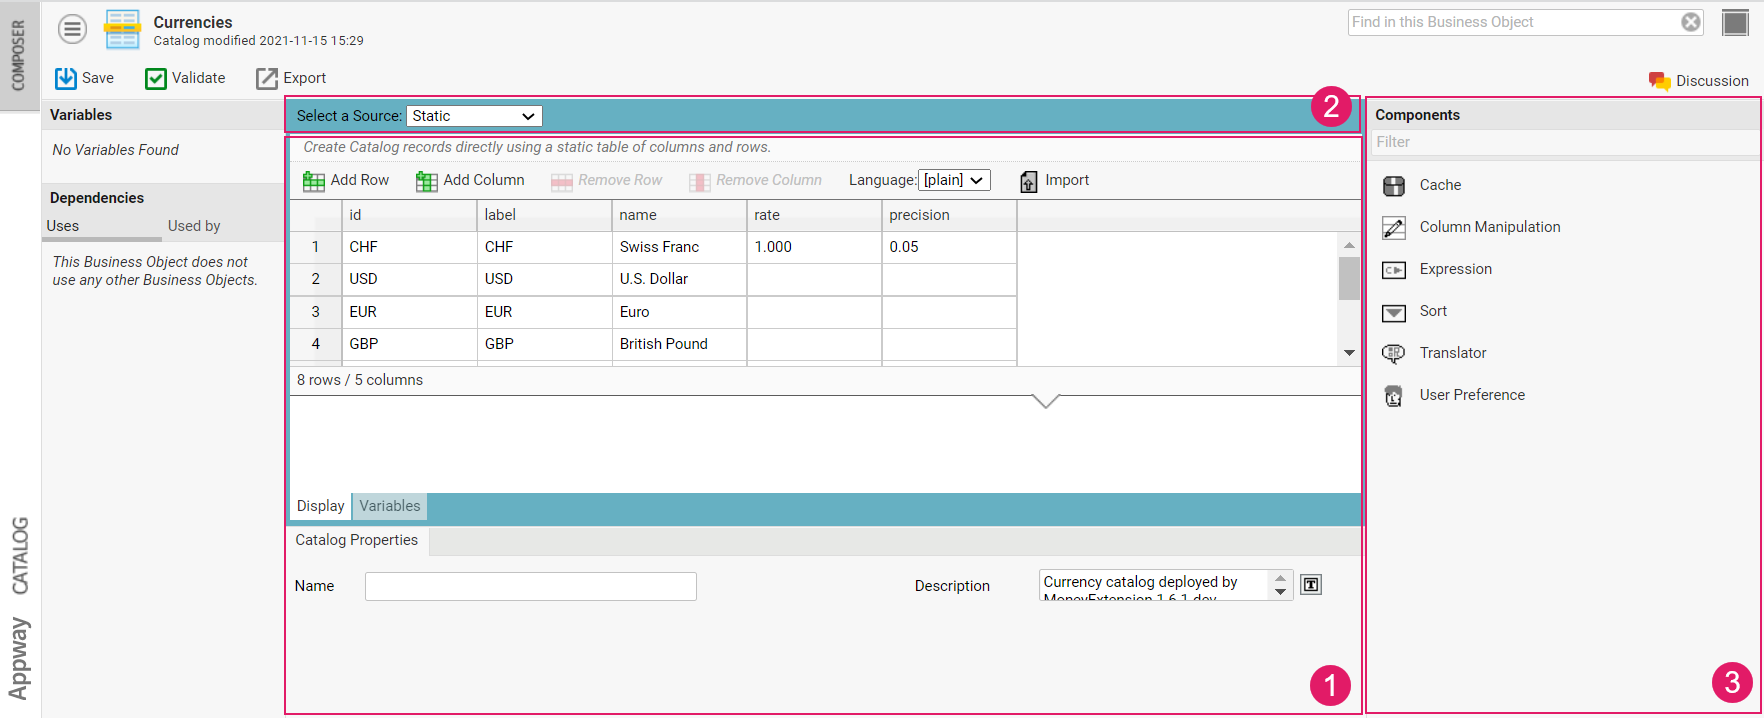
Static Source
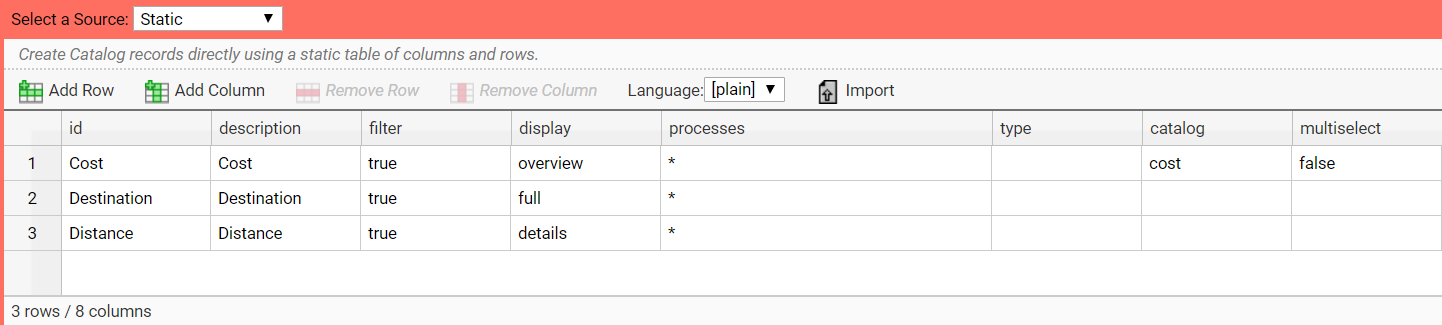
A Static Source allows you to define the number of records, and the number and name of columns. To enter data, simply press the Tab key to proceed to the next cell.
Consider the following information:
- The id column should not be removed, as it is used, e.g., for variable binding. Removing or renaming this columns triggers a validation warning. Moreover, IDs mus be unique.
- An empty cell always results in an empty string when e.g. LIST('25','test','description') is called. It is not NULL.
Creating or Editing Labels
While editing data on the Catalog, you can also create or edit Label Business Objects. To do so, right-click on a cell and click on the Label button to open the Label dialog. You can also insert Overriding Translations form this dialog directly.
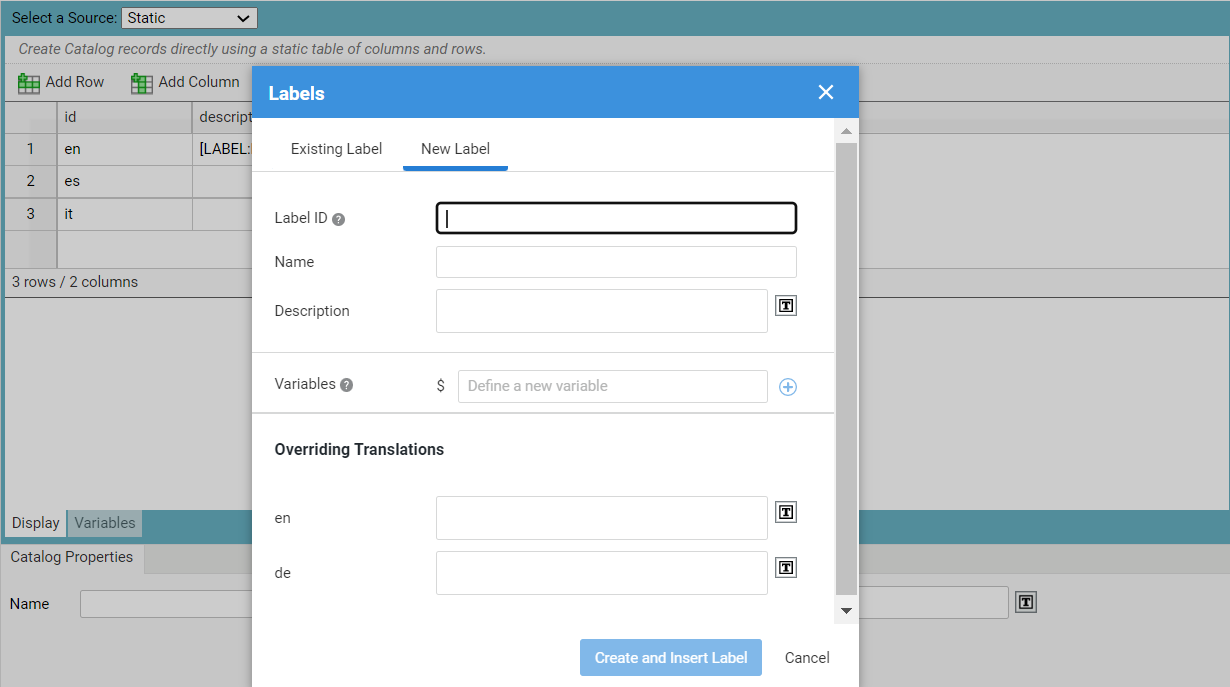
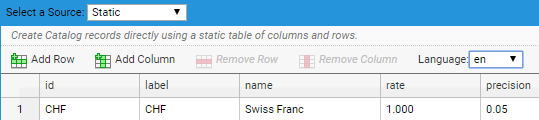
If translations are available, you can use the Language dropdown list to preview the Label in another language.
Exporting Data from a Catalog
If your Catalog uses a Static Source, you can export data into a separate file:
-
Business Object
-
Microsoft Excel (.xls)
-
Microsoft Word (.doc)
-
Separated Values (.csv).
Consider that:
- A non-compressed CSV file can be used also to re-import data.
- To prevent CSV/formula injection attacks, special characters `=`, `@`, `+` and `-` are escaped in CSV files if they show up at the beginning of a cell value.
To export Catalog data into a separate file:
- Click on the Export button on the header.
- For the CSV export, choose the encoding, field and text delimiter options.
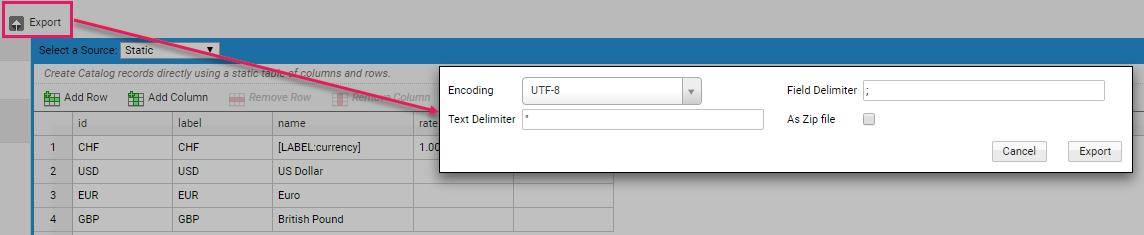
Consider that Labels are also exported. For each installed language, a separate column is created in the export file, and filled with the translated text. If you are using multiple Labels inside one cell, only the first Label is translated (one column per language).
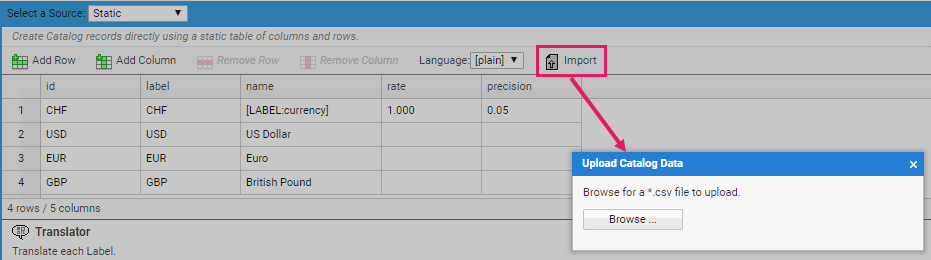
Importing Data into a Catalog
If your Catalog uses a Static Source, you can import data from an external file. The supported format is a non-compressed CSV file. To import data from a CSV file:
-
Click on the Import button and upload the CSV file.
-
Define the encoding, field and text delimiter options. Moreover, select the Create Missing Columns checkbox if you want to add missing columns to the Source definition.
-
Consider that, if you import a data file containing translation columns for a Label, those Labels are updated with the corresponding text values for each language.
When importing, existing data is overwritten. However, previous committed versions of the Catalog are still available through the versioning system.
Expression Source
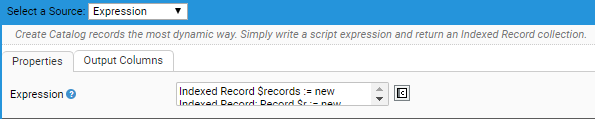
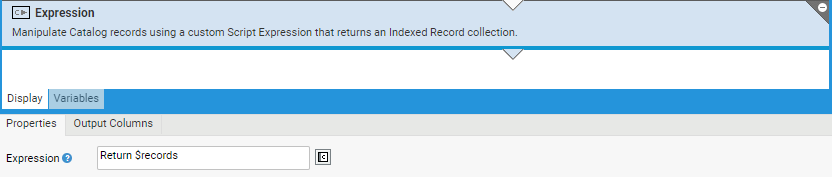
An Expression Source allows you to create Catalog records dynamically by writing an FNZ Studio script expression.
-
In the Properties tab (Expression field), enter an FNZ Studio script expression that returns an Indexed Record collection. Consider that, if there are no records available, it does not return null, but an empty collection.
-
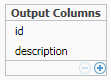
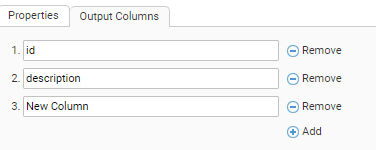
In the Output Columns tab, define the columns to be contained in the returned records. In fact, FNZ Studio cannot validate the expression outcome while building the Solution. See the following example:
CopyIndexed Record $records := new Indexed Record;
Record $r;
//
$r := new Record;
$r.setValue('id', '1');
$r.setValue('description', 'description 1');
$records.addElement($r);
//
$r := new Record;
$r.setValue('id', '2');
$r.setValue('description', 'description 2');
$records.addElement($r);
//
Return $records;
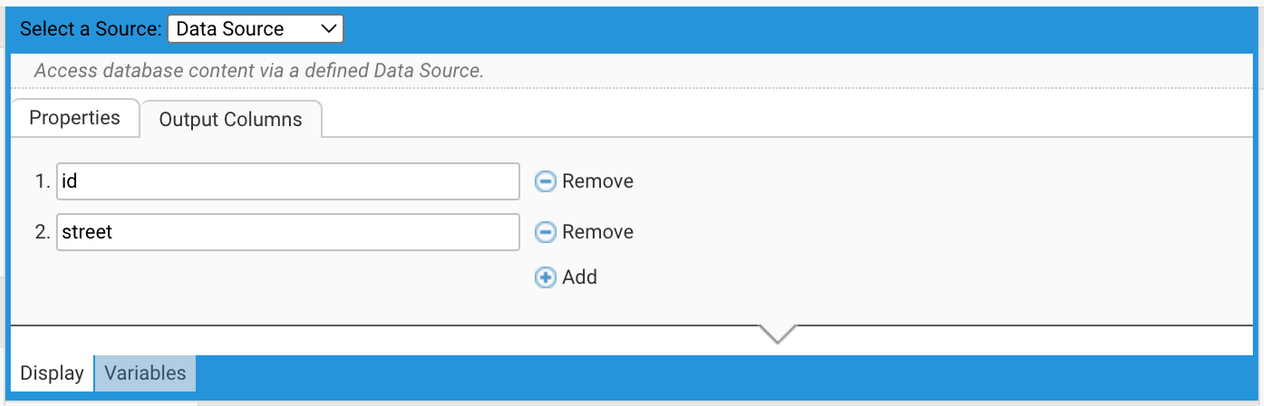
Data Source

The "Data Source" Source allows you to access database content via an FNZ Studio-defined Data Source. To set a Data Source, do the following:
-
In the Properties tab, choose an existing Data Source from the Data Source Name dropdown list. Alternatively, provide a script that returns a valid Data Source name, as in the example below:
CopyString $dsn;
$dsn := 'oracle';
Return $dsn; -
In the Output Columns tab, define the columns to be contained in the returned records. This step is necessary, since FNZ Studio only processes columns from the SQL query that are also defined in the Output Columns.
-
Back to the Properties tab, in the SQL Statement field, provide an SQL statement that will query your database and deliver the desired content. Consider that, in your statement, you can use a Prepared Statement by setting a placeholder via a '?'. This makes it unnecessary to create dynamic SQL statements that might lack in security (SQL Injection) and ensures better performance.
Depending on the underlying database it can be necessary to wrap column and table names in the SQL statement with double quotes.
See the example below:
Copy
StringBuilder $query := new StringBuilder; $query.append('SELECT d.id AS \"id\", d.value AS \"value\" FROM data d '); $query.append('FROM data d WHERE d.key = ? '); Return $query.toString();
-
If you used placeholders in the previous step, you need to fill the Attributes field with a value for each placeholder ('?'). Provide an expression that returns an indexed collection of values to be inserted into the placeholders defined in the SQL statement. The first placeholder in the query will be replaced with the value of the collections value at index 1, the second with the one of index 2, and so on.
Copy
                        //very simple collection expression
                        [$key]:Any;
Copy
                        /classic way of creating an indexed collection
                        Indexed Any $ph := new Indexed Any;
                        $ph.addElement($key);
                        Return $ph;
-
In the Max. Record Count field, define the maximum number of records to be processed by FNZ Studio. 0 means unlimited.
Starting from Appway 2022.1, a Data Source-based Catalog can be configured to be used in a Catalog Values Data Rule (Data Logic Business Object) and lazy loading can be enabled for it. See all details in the Data Logic: Lazy Loading of a Database-Sourced Catalog article.
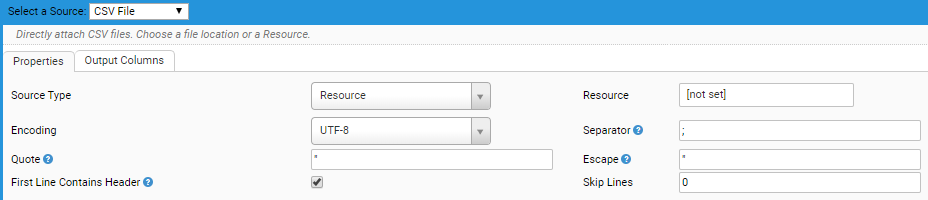
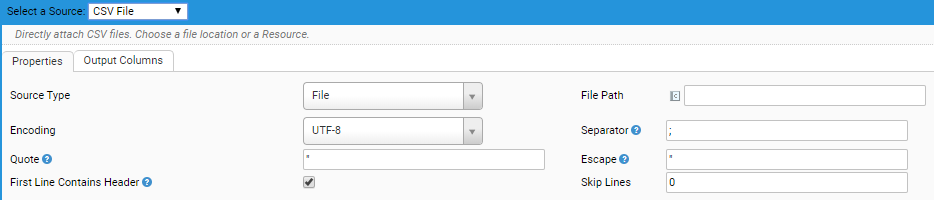
CSV File Source
With the CSV File Source you can attach CSV files to FNZ Studio directly.
In the Properties tab, select a Source Type. Depending on the Source Type you select, you need to fill different properties, as illustrated in the images below. Source Types are:
-
Resource - FNZ Studio resource BO
-
File - File located in the file system
-
Cluster File

Following is the list of properties you need to set. Depending on the source type, you need to set the file location or ID:
- Resource - (for Resource type) Select an existing FNZ Studio Resource BO.
- File Path - (for File type) Enter the file system path to your CSV file. When entering a relative path, its root will be the FNZ Studio Data Home directory.
- Cluster File ID - (for Cluster File type) Enter the ID of the cluster file (e.g.
data/input.csv).
The rest of properties to be set are common to all source types:
-
Encoding - Select the encoding of your CSV file data. You can choose from all encodings provided by the underlying Java virtual machine FNZ Studio is running on. If your desired encoding is not available, you need to encode your data in one of the available options.
-
Separator - The entry separator character used in your CSV file. Example (separator = ';', quote = '"', escape = '"'): 0;data 0;data 1 "1";"data 1";"data 2";"he said: Hello"
-
Quote - The character used for quotes in your CSV file. Example (separator = ';', quote = ''', escape = '"'): '0';'data 0';'data 0';'he said: Hello'
-
Escape - Character used for escaping a separator or quote. Example (separator = ';', quote = '"', escape = '''): "0";"data 0";"data 0";"he said: '"Hello'"'
-
First Line Contains Header - Select this checkbox if the first line of your CSV file contains a header.
If this checkbox is selected and the Skip Lines option (see below) is > 0, then the first line read must contain the header. -
Skip Lines- Set how many lines of your CSV file should be skipped.
When accessing a CSV file with a high number of entries, adding a Cache Filter to the Catalog may improve performance. This is useful when accessing single records from the CSV file, e.g. using the LIST() function.
Catalog Source
A Catalog Source refers to an other Catalog, thus allowing you to build up complex data flows.
For example, if you need to sort a list of Countries in alphabetical oder in one screen, and by currency code in another screen, you can:
-
Create a Countries Catalog that defines each country and its currency symbol.
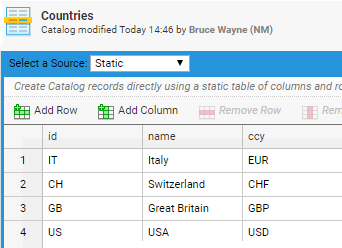
-
Create a CountriesByName Catalog that refers to the Countries Catalog and sort the entries alphabetically by their name.
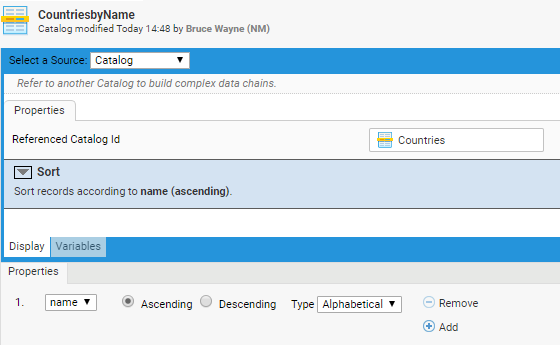
-
Create a CountryByCcy Catalog that refers to the Countries Catalog and sort its entries by currency code.

Integration Link Source

With the Integration Link Source, you can connect to an Integration Link directly and make its data available. A call to an external system via Integration Link can take some time. To avoid long response times, you can add a Cache Filter for better usability.
Catalog Filters
One or more Catalog Filters are able to manipulate the outcome of a Catalog Source. With this feature, you can build more complex data flows for your Solutions. Filters process data in a predefined order.
Currently available Filters are:
- Cache - Caches entries from previous Filters and Source.
- Expression - Filter the records with the help of a script.
- Sort - Sorts the records according the defined rules.
- Translator - Translates Labels found in records.
- User Preference - Moves the users most preferred records to the top.
- Column Manipulation - Renames, adds or removes column definitions.
Cache Filter
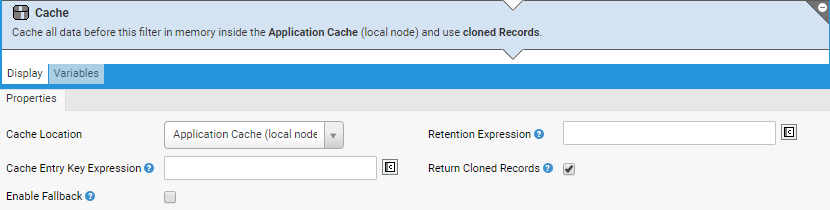
The Cache Filter makes use of FNZ Studio's Application Cache (browsable in FNZ Studio Composition under System Maintenance > Cache > Application Cache). The result of all Filters and the Source before the Cache Filter applied is stored inside the Application Cache. Technically, the Cache Filter "asks" the data chain for all records and stores them. Single record look-ups are then performed on the stored set of all records.
The Cache filter has the following properties:
-
Cache Location - The cache to be used:
- Application Cache (local node)
- Cluster Cache (distributed)
-
Retention Expression - Expression determining how long the cache entry is valid. It must return
trueas long as the entry is valid.-
If the entry becomes invalid, the cache is updated again on access (no background job).
-
If the expression is left empty, the cache is valid until the next server restart.
Consider there are also configuration properties determining the duration of an object in the cluster cache (System Configuration > Configuration Properties).
Inside the script you have access to the
$accessTimestamp(last accessed time) and$insertTimestamp. You also have access to the variable$cachedRecords, which contains the set of cached Catalog Records.Copy//example to cache for 24h
TIMEADD(TODATE($insertTimestamp), '1D').after(NOW());Copy//example which rebuilds cache if a file changed
$insertTimestamp > FIELMODIFICATIONTIME($filePath);Copy//example which checks an Appway Resource version
BusinessObject $bo := GETBUSINESSOBJECT('Resource', 'CsvData', VersionFilter());
Return $insertTimestamp > $bo.getModificationTime();Copy//example to rebuild cache if last access was 1h ago
TIMEADD(TODATE($accessTimestamp), '1h').after(NOW());Copy//example if a certain Record defines the allowed time to cache
ForEach Record $r In $cachedRecords Do
If (STRINGCOMPARE(TOSTRING($r.getValue('id')), '12') == 0) Then
Return $r != null and TIMEADD(TODATE(CAST(Long, $r.getValue('validUntil'))), '1D').after(NOW());
End
End -
-
Cache Entry Key Expression - A distinguishable key must be defined for dynamically produced content or when there is more than one Cache Filter inside one Catalog. Example: if
USERID()was used to produce an entry, the cache is also depended of that dynamic content. SoUSERID()should be reused to build a dynamic cache key. The default key used is<catalog id>-<version uuid>. The outcome of the expression is appended to the default value.The key must be ID-compatible, that is, it must match the following regular expression pattern: ^[a-zA-Z0-9_\.\-]+$.Copy
//example to make it user id dependent
USERID();
Copy
//example to make it user and language dependent
JOIN(USERID(), '-', $language); -
Return Cloned Records - If this checkbox is deselected, any modifications to records are only visible in the local node. In fact, when a Catalog is accessed a Filter can add, remove or change records. When a cache is used, instances of records are reused on different accesses. Therefore:
- The box must be selected if records are going to be manipulated.
- The checkbox can be deselected only if records are not going to be manipulated after the cache. This results in better access performance.
-
Enable Fallback - The Cache Filter caches records from the previously defined Source and Filters. At the first access, or when the Retention Expression returns false, it queries the records again from the previously defined Source and Filters. At this point:
- If Enable Fallback is deselected: When an error occurs (e.g. the Source is defined via an Integration Link and consumes a Web Service), no records are fetched, therefore no records are returned to the consumer of the Catalog.
- If Enable Fallback is selected: When an error occurs or if a custom Validation Expression returns
false, the cache continues to work with the existing (but possibly outdated) records. This prevents the end user from being affected by issues in acquiring new records. However, in this case, data will probably be outdated. Also, if the scenario occurs with the very first request, the problem is forwarded into a user's process.
Expression Filter
The Expression Filter allows you to manipulate records in any desired way. The script $records available in the Expression field contains all the records from the previous Filters and Source. An Indexed record collection must be returned by the script. If there are no records available, the expression does not return null but an empty collection.
//example which filters out every second record
Record $r;
Integer $i := 1;
//
ForEach $r In $records Do
  If MOD($i, 2) == 0 Then
    $records.removeElementWithId($r.getId());
  End
  $i := $i + 1;
End
Return $records;
For the Expression Filter, you need to define Output Columns. This is necessary since it is not possible for FNZ Studio to determine which columns your Filter will produce or omit. Possible following Filters rely on columns defined on your Filter. The order of the columns is irrelevant.
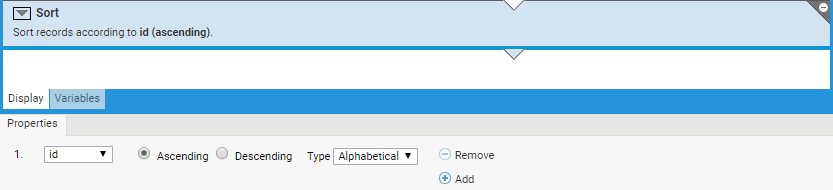
Sort Filter
The Sort Filter allows you to sort records according to their alphabetical or numeric value (ascending or descending, empty records will always be last).
Translator Filter
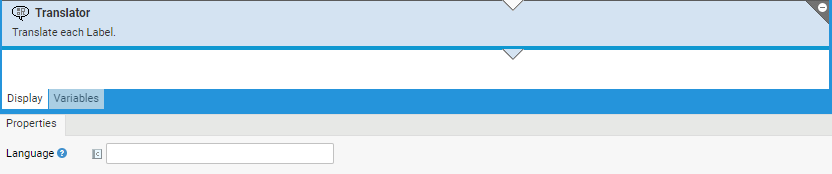
The Translator Filter translates each FNZ Studio Label into the current session language by default. Optionally, a different language can be enforced by an expression. Unless the chosen language is a static string (e.g. en), the filter is to be considered dynamic, as different users can set different languages.
The following property is available:
-
Language ?- A static string or an expression that delivers a valid locale. A locale defines a language and optional country and variant. Examples:
en,en_US,en_GB,th_TH_TH.Single record lookups by value on a column with Labels may behave unexpectedly: The filter will always first ask its predecessor for the record (general behavior) and then translate it. This means that, if a lookup with a translated Label occurs, it will never find a result, because a translated text is passed to the predecessor and not to the original `[LABEL:xxx]` value.
Example: A Static Source with columns id and description. The column description has the values `[LABEL:desc.1]` and so on. A lookup on a description value to find its id, e.g., `LIST('translated text, 'test', 'id', 'description')` will always return null.
User Preference Filter
The User Preference Filter is conceptually similar to the Sort Filter. Records are left in the same order as they were received, except for those listed in a User Preference entry. Such records are moved to the very beginning of the record list. This Filter is user-dependent.
The following properties are available:
- User Preference Key - Enter a key that matches the one set in the User Preferences (System Configuration > Users/Groups/Roles > Users > [right-click] > Preferences). The default value is
priorities.\<Catalog id>. - User Preference Separator - The User Preference key can contain a list of IDs. This property defines the separation character of multiple entries. The default value is the '|' character (FNZ Studio standard for list values).
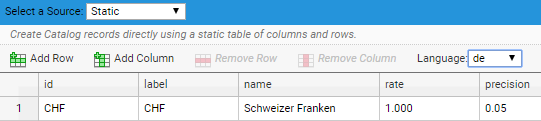
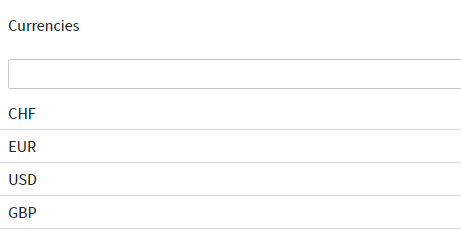
As an example, let's suppose the end user works with a Currencies Catalog but he/she mostly deals with transactions in Swiss Francs or Euro. In this case, having CHF and EUR at the top of the currency list by default could be useful. To implement this setup, do the following:
-
Drag a User Preference Filter in the Currencies Catalog and enter the desired string and separator in the Key and Separator fields, respectively (in this case,
priorities.Currenciesand '|').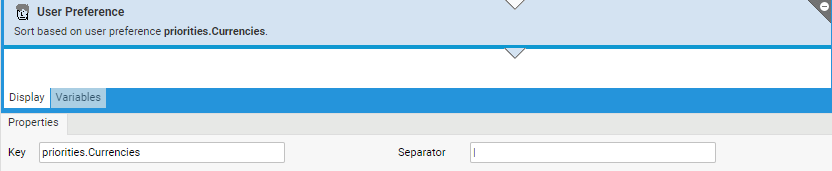
-
Open the User Preferences dialog (System Configuration > Users/Groups/Roles > Users > [right-click] > Preferences) and add a New Preference item as follows:
-
Name:
priorities.Currencies -
Value: CHF|EUR
The Values must match the ones appearing in the selected Catalog column in the Data Source tab of your Screen. See an example in the Screen Component Properties article.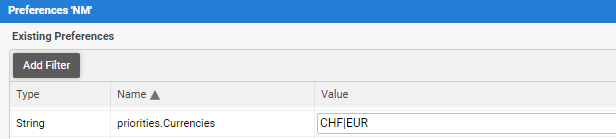
-
- Now, the Currencies Catalog displays the preferred values at the top of the list.
Column Manipulation
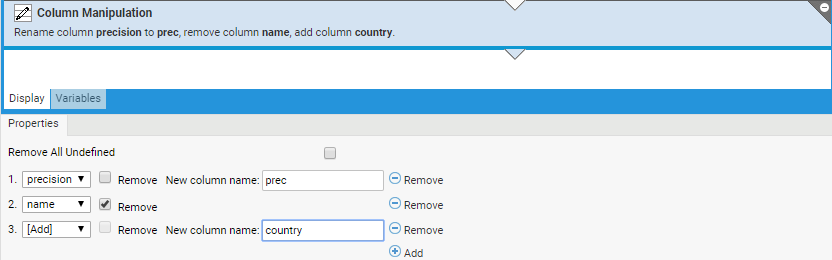
This filter allows you to rename, add or remove column definitions for consequent consumers. This means that both the column definition and the contents of a record will change in the following way:
- Removing column causes removing data from a record.
- Renaming columns preserves the original data on a record.
- Adding columns is initialized with null values.
The following properties are available:
- Remove All Undefined - If selected, all columns that do not meet any of the rules defined are removed. The following rules can be defined for each existing column:
- Renaming - Select an existing column and enter its new name in the New column name text field.
- Adding - Click on the Add button and enter the column name in the New column name text field.
- Removing - Select an existing column and click on the Remove button.
Related Sources
- Catalog-related Script Functions:
- Catalog Data Sources
- Troubleshooting and specific use cases: