Data Logic Business Object
Introduction
The Data Logic Business Object offers high-level abstraction through data and rule definition in the following ways:
- It allows defining your business logic through a data- and rule-centric approach, simplifying implementation and removing the need for extensive scripting that other Solution design practices require. The Data Logic allows the developer to specify rules that apply certain constraints to the existing data model.
- The UI is derived from the data model and is automatically generated, based on the definitions made in the Data Logic Business Object - a notion referred to as Auto-generated UI. This functionality is enabled, for example, by the Data Gathering ABC / App Task, a Data-Driven User Interface, which represents the first step in a progressive evolution of FNZ Studio Runtime into a fully Data-Driven approach. The automation of the UI accelerates development and minimizes effort regarding the visual presentation of your data and rule structure.
Examples of Data Logic and other Solution Design Approaches
The use of the Data Logic approach and other Solution design practices are not mutually exclusive, but can be combined. While practical business applications will normally prefer the Data Logic approach, more ad-hoc, manually built UIs using scripted business logic can be implemented in parallel. Following are some use cases:
- A Solution could have a form to enter Client information built with the Data Logic approach. The Data Logic Business Object is used to define the data points to be gathered and the validity constraints to be applied to such data points. The UI is fully auto-generated with no additional development effort and is integrated into the Solution a Data Gathering ABC / App Task. The same Solution could have a following step in the same Process where some documents and approvals are tracked through the Platform. This second step, not being data-centric, could be modeled using other (non-Data Logic) techniques such as Screen Components and scripted logic.
- Designing a form in the Platform using Screen Components, such as the Adaptive Flow Layout, requires a lot of manual effort and can result in slow UI performance depending on the additional logic you encode. For example, if you want to hide or disable part of a form based on the setting of a control, you have to add an Ajax Update Area, ensure everything is configured properly, and then you probably need to add a Screen Cache or Phase Control Screen Component to your Screen to make the interaction smooth. Instead of building the form manually and enforcing constraints by adding logic to hide/disable parts of the form, you can use a Data Logic Business Object. Here, you can define the content of your form and the data constraints (as Data Rules). This approach requires much less effort, is far less error-prone as the set-up is less complex, and the end result is faster for users.
Data Logic Business Object
The Data Logic Business Object allows configuring the Controls and Data Rules which define the desidered business logic around data. Controls represent the UI controls (input fields, checkboxes and so on) that are rendered in auto-generated UIs, while Data Rules represent the validation rules to be applied to data in order to ensure that it is business-compliant.
The Data Engine is the engine that processes the Data Logic Controls and Data Rules behind the scenes. The set of data that is processed according to the settings in the Data Logic is referred to as Data Context. The Data Context contains the value of the variables defined in the Data Logic.
Technical Notes on the Data Engine
Please, read the following list of technical recommendations carefully:
- Named or Indexed Collections - Whenever the Data Engine encounters a Named or Indexed Collection that is null, it always initializes it to an empty collection in order to process it correctly. This changes the content of the Value Store containing the variables assigned to the Data Logic. Therefore, when using Data Logic functionalities, do not rely on the difference between null and empty collections for any business logic.
- Data Context and Script Language - When using Data Logic, it is important that no changes are applied to the data contained in the Data Context using the Script Language, unless such changes are executed by the Update Function set on either Primitive or Collection Controls, or by the Post-Load Update Function set in a Search Data Rule. For example, Collection elements should never be added or removed in Scripts that are invoked by the Data Logic such as Sentries, bindings or Data Rule expressions; similarly, no property should be set or edited with such scripts. Follow this recommendation to avoid issues and unexpected behavior.
- Data Context and Assigned Variables - All data that needs to be part of the Data Context must be assigned explicitly to the Data Logic using Assigned Variables. For example, Data Class instances that need to be part of the Data Context should not be loaded from a Database in Scripts that are invoked by the Data Logic: this loading logic should be executed outside of the Data Logic while initializing its Assigned Variables. Follow this recommendation to avoid issues and unexpected behavior.
Note on Terminology and Renaming
Some items in the Data Logic Business Objects have either been replaced, or renamed (and, in some cases, deprecated). In the current article, such items are referred to with the latest terminology. Make reference to the attached Data Logic Renaming Table(PDF) in case of doubt. Note that renaming has no functional impact.
Data Logic Editor Overview
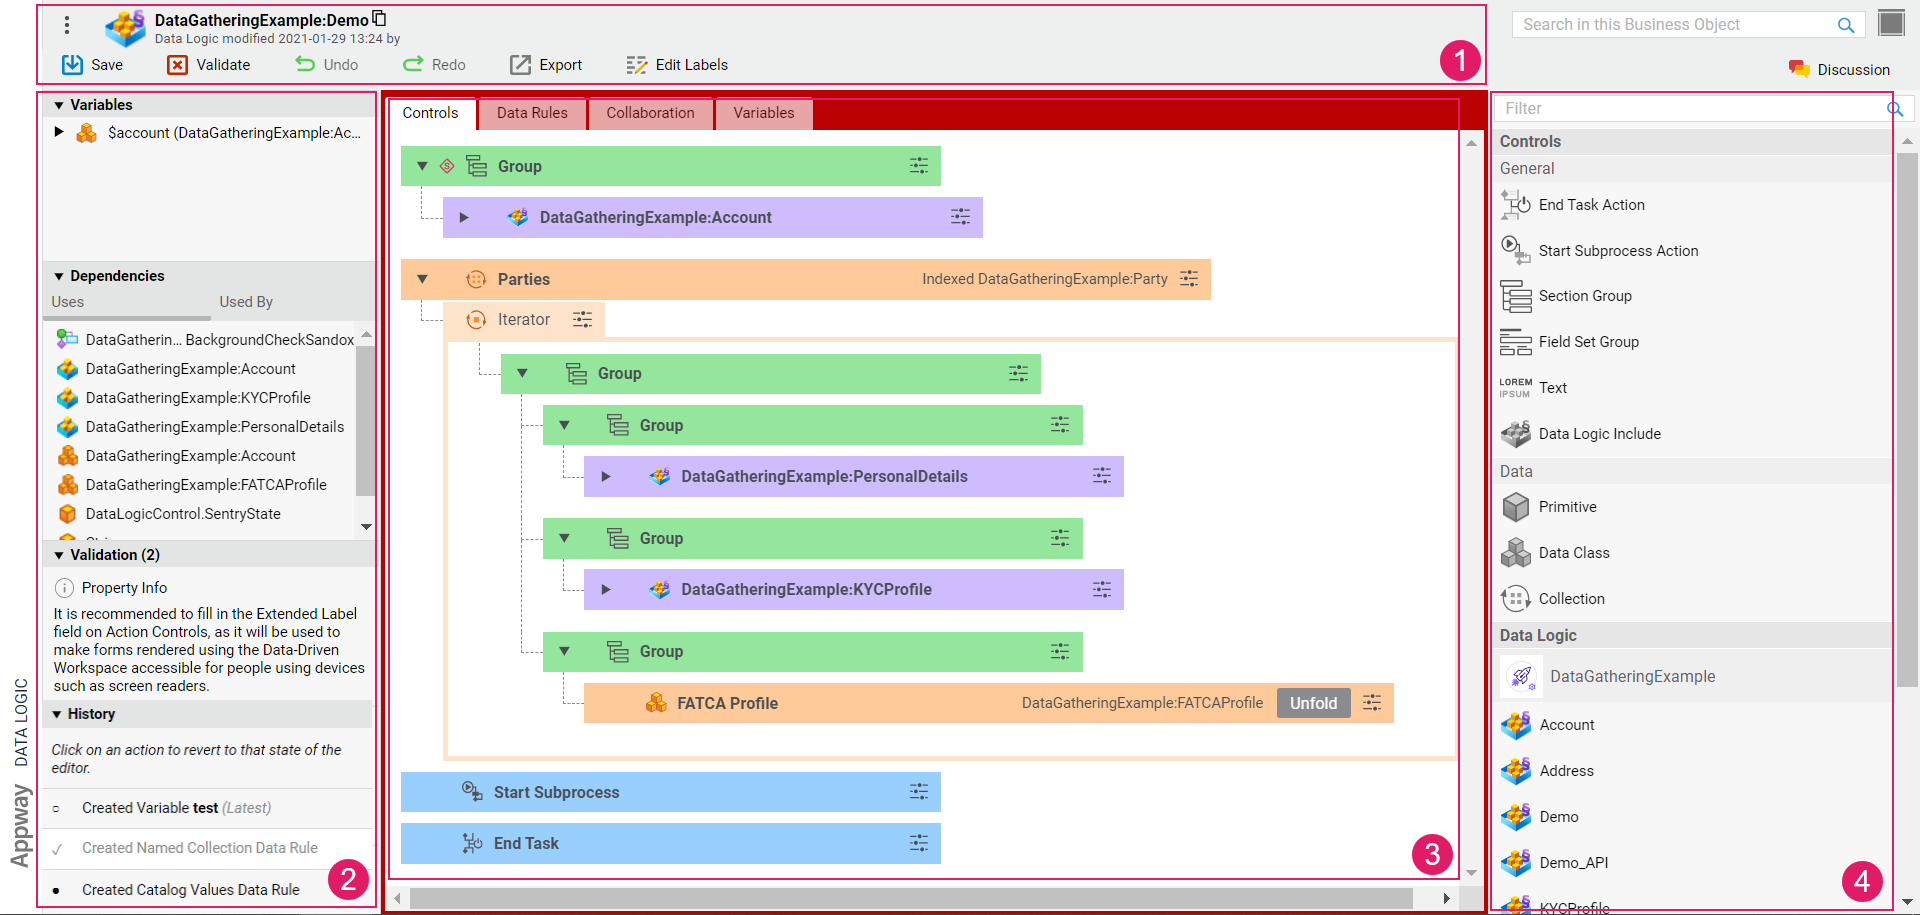
The Data Logic Editor is composed of different areas:
- Header: The header background color indicates whether you are in edit mode (gray) or read-only mode (red). When hovering the Data Logic BO id, a copy icon is displayed, which allows copying the BO id. Various actions are possible, including:
- Validate: Allows validating your edits on the Data Logic. The Validate icon is instantly updated upon your changes, thus providing immediate validation feedback (see Validation details below):
- red: highlights an error, the Data Logic or part of it is invalid.
- yellow: highlights a warning, the Data Logic is still valid but action is required.
- green: the Data Logic is valid.
- Undo/Redo: Allow undoing/re-doing the latest operation performed. Ctrl+Z and Ctrl+Y shortcuts are also supported.
- Edit Labels: Allows displaying an overview and further editing the Labels used in the current Business Object through the Translations tool. It also shows Label dependencies.
- Validate: Allows validating your edits on the Data Logic. The Validate icon is instantly updated upon your changes, thus providing immediate validation feedback (see Validation details below):
- Left sidebar: Contains Variables, Dependencies, Validation and History information.
- The Validation section contains validation messages for the current Data Logic. The Data Logic Editor supports instant validation: every time an action that triggers a validation issue is performed, the panel is updated with the corresponding information to allow quicker response. The Validation header indicates the total number of validation messages in the Data Logic. Types of message are:
- Error: (red icon) the issue requires immediate action, and makes the Data Logic (or part of it) invalid.
- Warning: (yellow icon) the issue requires immediate action, but the Data Logic can be still used to create a working Data Model.
- Info: (gray icon) the issue does not require immediate action, but consider fixing it to have a Data Logic that complies with best practices.
- The Dependencies section lists the Business Objects that depend (Used by section) on the current Data Logic and viceversa (Uses section). Dependencies are updated instantly whenever you perform any changes.
- The History section shows a list of (up to 100) operations performed in the Editor. The first state in the History section is always Opened, and it refers to when the editor was first opened. Note that the list of operations disappears once you close the Editor. By clicking on any operation in the list, you revert it to its previous state, and a message is displayed containing the details of the operation. Moreover, by clicking on the View button, the change is highlighted in the editor. Note the following icons:
- Tick: Current Data Logic Editor state
- Full circle: Operation that has been performed on the Data Logic Editor
- Empty circle: Operation that has been undone
- The Validation section contains validation messages for the current Data Logic. The Data Logic Editor supports instant validation: every time an action that triggers a validation issue is performed, the panel is updated with the corresponding information to allow quicker response. The Validation header indicates the total number of validation messages in the Data Logic. Types of message are:
- Central area: Modeling area, containing the content of the Data Logic. The central area of the Data Logic Editor is composed of a filtering field, and four tabs:
- Controls represent the UI controls (input fields, checkboxes and so on) that are rendered in auto-generated UIs. Controls can be moved on the editor by drag and drop. Multiselection is also available both for moving and deleting multiple Controls.
- Data Rules define the Rules that data must fulfill to be business-compliant.
- Variables
- Right sidebar: Library containing the items that can be added to the selected tab in the case of Controls and Data Rules.
Labels and Translations
The Data Logic Editor provides language and translation-related features in line with our effort toward Internationalization. Such features allow creating Label Business Objects on the fly for all text-related fields, as well as producing and storing translations for such texts.
Selecting a Label for Controls and Data Rules
Label Business Object selectors are available for text-related properties in Controls and Data Rules.
Controls:
- Label property - Text displayed in the auto-generated UI to provide basic information for the end user. For Data Controls, this field is populated (where applicable) with a default label corresponding to the Data Class or property name, respectively:
- Data Class:
{PackageId}:aw.DataClass.{DataClassId} - Property:
{PackageId}:aw.DataClass.{DataClassId}.{propertyName}The Label suggested by the system can be changed and a custom label can be selected. For other Controls, the Label property is empty by default.
- Data Class:
- Extended Label property - Text displayed in the auto-generated UI to provide additional information for the end user on how to fill a certain field (e.g., a full sentence or a question under the field). Note that this text is shown while the end user is editing the field. It can be left empty.
- Information Label property - (for Data Controls) Text displayed in the auto-generated UI to provide additional information for the end user on how to fill a certain field (e.g., a tooltip). Compared to the Extended Label, this property is not shown while the end user is editing the field. It can be left empty.
- Add Button Label - (only for Collection Controls) Allows customizing the Label used in FNZ Studio Runtime for the button that allows adding an element to a collection of Data Class instances. The field is prefilled with the Label
aw.DataLogic.addToCollection(available in the Base Package). Moreover, the Label already has the assigned variableelementTypeLabel. - Text property of the Text Control.
Data Rules:
- Message property - This property cannot be left empty. For some Data Rules (Catalog Values, Mandatory Fields, Eligible Types), a default Label Business Object is selected. The Label suggested by the system can be changed with a custom Label.
- Type Selection Label property of the Eligible Types) Data Rule - This property cannot be left empty. A default Label Business Object is selected, but it can be changed with a custom Label.
Creating a New Label and Defining Variable Assignments
The Label Business Object selector allows selecting an existing Label from the current or other Package. However, it also allows creating a new Label Business Object on the fly.
Using the Translations Tool
The Data Logic Editor allows displaying an overview and further editing the Labels used in the current Business Object through the Translations tool. Specifically, this tool allows:
-
Checking translated and untranslated Labels
-
Editing translations and variable assignments
-
Creating missing Label Business Objects
-
Generate English texts automatically for demo purposes
See full information in the Language, Labels and Translations article.
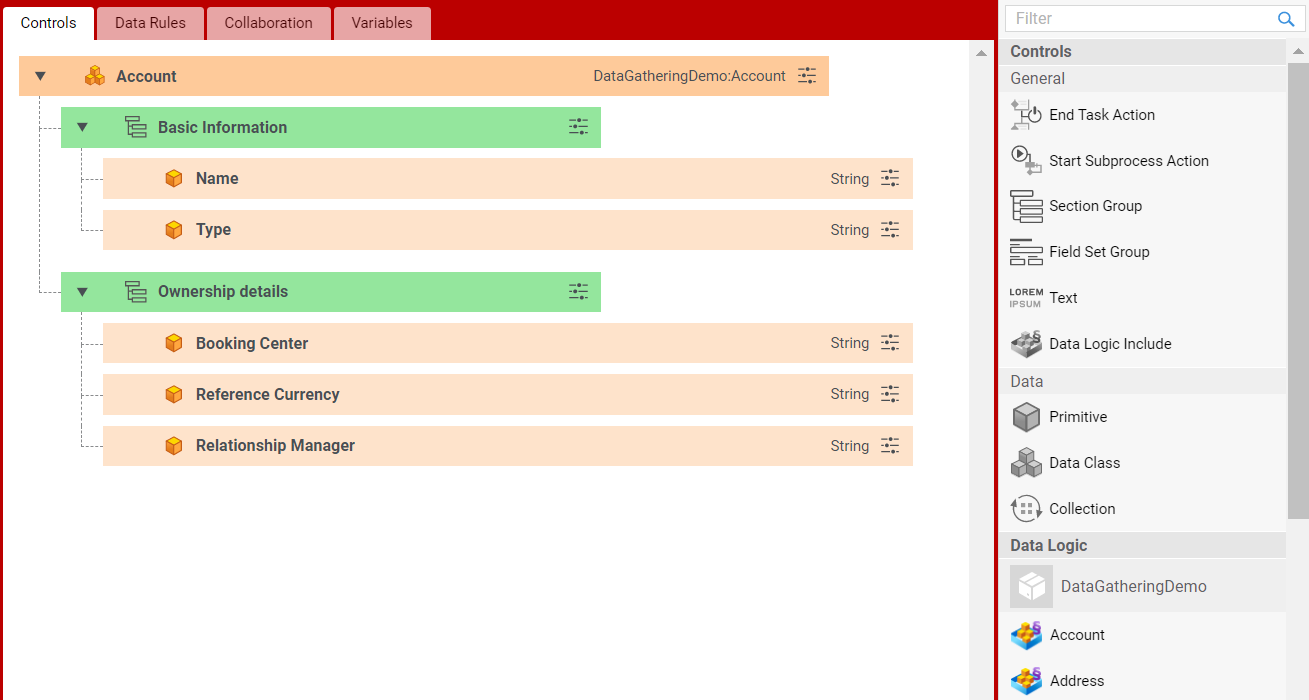
Controls Tab
The Controls tab allows defining Data Logic Controls. Data Logic Controls represent the UI controls (input fields, checkboxes and so on) that are rendered in auto-generated UIs, such as the ones generated through the Data Gathering ABC / App Task. In addition, Data Logic Controls can be used to limit the user's course of action by defining Sentries (see details below). To create a Data Logic Control, drag it into the Control area (from the Variables panel on the left or the Controls panel on the right).
The context menu for Controls now allows the following options: Copy Control, Paste Before, Paste After, Delete. These are also supported by shortcut keys.
Data Logic Controls are divided into two groups (see sections below for full details):
- Data Controls:
- Primitive
- Data Class
- Collection
- General Controls:
Section Group
Field Set Group
Text
Image (FNZ projects only)
Video (FNZ projects only)
Data Logic Include
Note on Data Classes used as bindings in Controls - Consider that only Data Classes with static functions used in scripts are replaceable. See the Replacing Business Objects section.
Control Properties - Note on Sentry
All Data Logic Controls share the Sentry property (accessed via the Properties icon  ).
).
Sentry defines the conditions which govern the state/availability of the Control for users in the auto-generated UI: enabled, disabled, hidden. The Sentry Example snippet can be used as a starting point when writing sentry expressions. Open the Script Editor for the sentry and select Snippet from the menu to access it.
Copy-paste options are available from the context menu for copying sentry values among Controls (Copy sentry, Paste sentry).
Moreover, consider the following additional information on the Sentry property:
- The script defining conditions that govern the Control state/availability must resolve to one of the following three expressions:
DataLogicControl.SentryState.ENABLED()(default if no expression is defined for a top-level Sentry)DataLogicControl.SentryState.DISABLED()DataLogicControl.SentryState.HIDDEN()
- Sentries set for parent Controls propagate to their children according to this logic:
- If the Sentry setting for a child element is empty or returns null, or does not return anything, it inherits the setting of its direct parent.
- If the parent is set to hidden, all child elements are hidden, regardless of their Sentry settings. This is the only scenario in which parent settings override child settings. In all other situations, the settings set for children are applied.
Data Controls
Data Controls are bound to variables and are used to specify which data should be shown and/or edited in the UI. Data Controls can be created in two ways:
- By dragging variables from the left side Variables panel to the Controls tab (valid locations for dropping are indicated by a blue background when hovering). The Binding field is set accordingly.
- By dragging the Control from the right side Data panel to create an Unnamed Control. Set the value for the Binding field manually through one of the following approaches:
- Use the same syntax as for automatically generated Controls, e.g.
$variableor$variable.property. - Use an arbitrary Script expression which returns the data point to be used as a binding. For example, the Script expression
$client.addresses['secondary']points to a specific element in a Collection.
- Use the same syntax as for automatically generated Controls, e.g.
Three types of Data Control types are available:
- Primitive
- Data Class
- Collection
Primitive
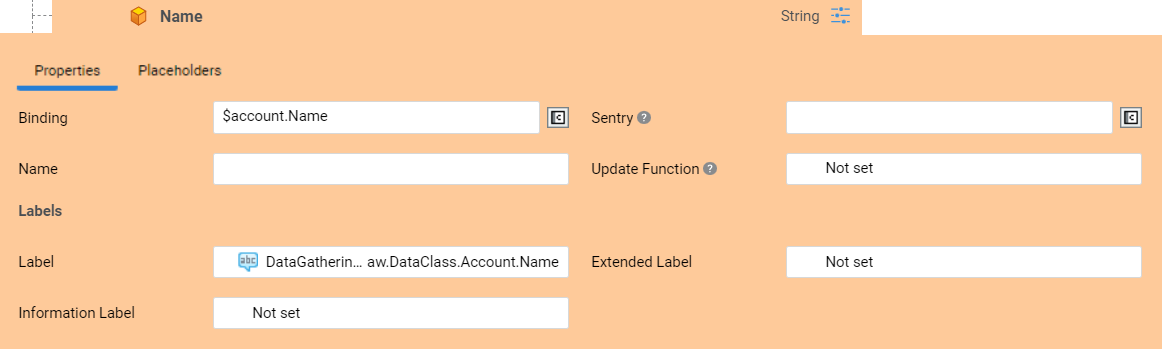
A Primitive Control is created for single-element variables which are Primitive Types.
-
To create a Primitive Control, drag it from the Controls section in the right-side library.
-
Set the binding (see binding details at the beginning of this section).
-
Set the sentry (see the note on sentry for details).
-
Set the Label, Extended Label, and Information Label properties (see the Labels and Translation) section for details).
-
In the Update Function field, you can specify a logic to be executed when changes are made on the Control in FNZ Studio Runtime. Select a Script Function Business Object: this is executed when the value of the Control is updated in FNZ Studio Runtime. Consider the following information:
-
When an Update Function script changes a value on another field, the Update Function script is not executed on that field, meaning that each Update Function needs to be self-sufficient and execute all the necessary changes by itself.
-
The Update Function is executed even if there are validation messages on the field.
-
The Update Function must be simple and lightweight: heavy functions may have a highly negative impact on performance. Moreover, Integration Calls (database queries, Web Services call and so on) should be avoided. In general, we recommend using this setting only when strictly necessary, so as not to affect Solution maintainability.
The System Health Sensor Data Logic Update Function Execution Time checks the average execution time of Update Functions defined in Data Logic Business Objects to ensure optimal UX. See full information.
-
-
The Expected Length setting (available for String and numeric Primitive Controls) allows specifying the expected size of the field content. Available options are: Default, Small, Medium, Large. The selected option is used by FNZ Studio Runtime to enhance the user experience by providing appropriately sized input fields for different data types. For example, this setting can influence the size of the column corresponding to the field in case it is displayed on a table.
-
Primitive Controls may also display the Placeholders tabs, which allows linking to a Data Layout Business Object.
This feature is available for FNZ projects only. Internal documentation is available.
Data Class
A Data Class Control governs the complete Data Class, e.g. if you define a Sentry, it is valid for the entire Data Class (all properties).
-
To create a Data Class Control, drag it from the Controls section in the right-side library.
You can open the selected Data Class by double-clicking on the Control, or by right-clicking on it and then selecting the Open Data Class button. Moreover, the context menu includes the Remove, Keep Children option, which allows removing the main Data Class control while keeping its children (if any). -
If necessary, set the Active if binding is a property (see all details in the section below).
-
Set the Label, Extended Label, and Information Label properties (see the Labels and Translation) section for details).
-
Consider the following information on the Unfold option before unfolding the control. When a Data Class Control is folded, the underlying Data Class is responsible for the structure rendered by the auto-generated UI. Any change made to this Data Class (adding properties, removing properties, changing the property type etc.) is immediately reflected when the auto-generated UI renders the output of the Data Class Control. Unfolding a Data Class Control means that you become responsible for the structure, through the settings you make in the Data Logic.
-
After considering the information above, click on the Unfold button to access the properties of a Data Class Control (a nested, separate Control with a fixed binding is created for each property).
-
Set Sentries for individual properties (see the note on sentry), rearrange the properties nested below the Data Class Control, or remove properties which are not needed. The only changes made to the underlying Data Class that have an immediate effect in the auto-generated UI when rendering the output of an unfolded Data Class Control are: removing a property from the Data Class and changing the type of a property of the Data Class.
Notes:
- If you remove the Control for a property after unfolding a Data Class Control, you can add it back by selecting Add Data Property from the right-click menu of an unfolded Data Class Control.
- You can refold a Data Class Control by selecting Re-fold Control from the right-click menu of an unfolded Data Class Control. Refolding an unfolded Data Class Control means that the responsibility is returned to the Data Class: All settings made in the Data Logic editor for properties of the Data Class Control are discarded, making refolding a disruptive action.
-
Data Class Controls may also display the Layout and Placeholders tabs, which allow linking to a Data Layout Business Object.
This feature is available for FNZ projects only. Internal documentation is available.
'Active if binding is a' Property
This option is enabled when other Data Classes inherit from the Data Class defined in the Data Class Control. If the Data Class Control is folded, you can select the underlying Data Class (default) or any of its children Data Classes in the selector. Your selection determines if and how this Control is rendered by the auto-generated UI: the Control is only considered if the instance found at runtime is of the type selected in the Active if binding is a option or is null.
Note: When you unfold the Data Class Control, Controls for all properties of the Data Class selected in Active if binding is a are created. After unfolding, Active if binding is a cannot be modified.
The Active if binding is a property is automatically updated when the binding of the Control is set, updated, or removed. Specifically:
- When the binding is set: If there is one single compatible Data Class, such Data Class is preselected.
- When the binding is updated:
- If the selected Data Class is still compatible, such Data Class is kept;
- If the selected Data Class is no longer compatible, and there are more compatible Data Classes, the Business Object selector is displayed;
- If the selected Data Class is no longer compatible, and there is one single compatible Data Class, such Data Class is selected.
- When the binding is removed: The Active if binding is a property is unset.
To understand the exact implications of setting Active if binding is a, consider the following scenario: A Data Class 'Party', containing the property description has a child Data Class called 'LegalEntity', with the properties name and vatId. Depending on your settings, the behavior is as follows:
| Variable Type | Runtime Type | Active if Setting | Rendered Data |
|---|---|---|---|
| Party | Party | Party | Party properties |
| Party | Party | LegalEntity | Nothing |
| Party | LegalEntity | Party | Party properties |
| Party | LegalEntity | LegalEntity | Party and LegalEntity properties |
Collection
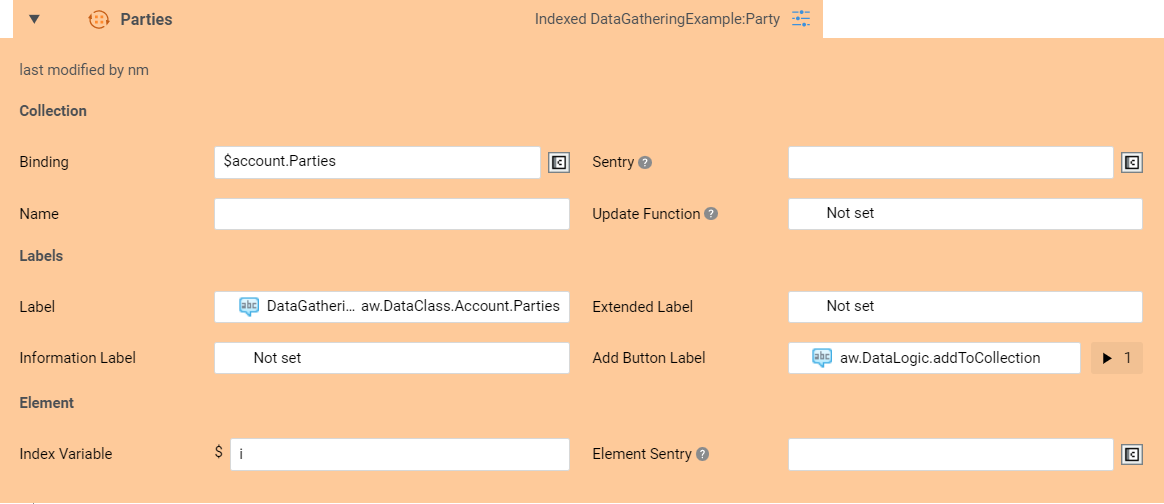
A Collection Control is created for an indexed or named collection. A Collection Control defines an iteration over the items inside the collection. You can add/remove items contained inside as needed.
-
To create a Collection Control, drag it from the Controls section in the right-side library. Expand and collapse the elements inside the Collection Data Control using the 'Expand' arrow icon on the left side of the Control. Two sections are available. Collection and Element.
-
In the Element section, the Index Variable or Name Variable field (for Indexed Collections and Named Collections, respectively) allow specifying the variable that refers to the current element of the iteration. A default is provided, but can be overridden if necessary.
-
Define sentries (see also the note on sentries section above):
- In the Collection section, you can configure the Sentries for the collection as a whole.
- In the Elements section you can configure the Sentries for each element of a collection individually (this setting is available only for Collection of Data Class instances, not for Collections of Primitive types) by providing: an Index Variable for Indexed Collections; a Name Variable for Named Collections. Use this Sentry to define which elements of a Collection can be removed. Consider the following combinations for the Collection Sentry (C) and the Element Sentry (E):
- C= Enabled & E = Enabled (Elements can be added and removed)
- C= Enabled & E = Disabled (Elements can be added but not removed)
- C= Disabled & E = Enabled (Elements can be removed but not added)
- C= Disabled & E = Disabled (Elements cannot be added nor removed)
-
You can set the Label, Extended Label, Information Label, and Add Button Label properties (see the Labels and Translation) section for details).
Note: The Label and Extended Label properties shown for the previous Iterator Control (no longer available starting from Appway 11.1) are now located in the Elements section of the Collection Control. These are only shown if a value was previously set for them, otherwise they are not displayed. -
In the Update Function field, you can specify a logic to be executed when changes are made on the Control in FNZ Studio Runtime. Select a Script Function Business Object: this is executed when elements are added or removed from the Collection in FNZ Studio Runtime. In the Variable Assignments expand section for the selected Script Function, the two implicit variables described below are available (if the Collection type is a Data Class). Note that only one of the two variables is populated at runtime (depending on the type of operation that was executed), while the other is null. The variable type corresponds to the Data Class type. Use these two variables whenever the Update Function logic must access or modify the added/removed object.
$addedInstance: Contains the Data Class instance that was added to the Collection during the update, if the update was an Add operation.$removedInstance: Contains the Data Class instance that was removed from the Collection during the update, if the update was a Remove operation.
Consider the following additional information on the Update Function:
-
When an Update Function script changes a value on another field, the Update Function script is not executed on that field, meaning that each Update Function needs to be self-sufficient and execute all the necessary changes by itself.
-
The Update Function is executed even if there are validation messages on the field.
-
The Update Function must be simple and lightweight: heavy functions would have a highly negative impact on performance. Moreover, Integration Calls (Database queries, Web Services call and so on) should be avoided. In general, we recommend using this setting only when strictly necessary, so as not to affect Solution maintainability.
The System Health Sensor Data Logic Update Function Execution Time checks the average execution time of Update Functions defined in Data Logic Business Objects to ensure optimal UX. See full information.
-
Select the Create/Edit Element Inline checkbox if the user should be able to create/edit a Collection element inline in the runtime form. If deselected (default option), the element creation/editing is done in a modal window instead (see point below).
Notes: 1. This feature only applies to Collection Controls created in FNZ Studio 2024 LTS or later for compatibility reasons. 2. This feature is fully functional for Tables (see details ), where both element creation and editing are available (including for Disabled tables). For other Collections, only element creation is available.
-
(Optional) If you opted for creating/editing Collection elements in a modal window, you can customize the content of such modal window by selecting a different Data Logic Business Object in the Modal Data Logic selector. Note that you can only select Data Logic BOs that have at least one assigned Variable of a type which is compatible with the current Collection. In the Variable Assignments expand section, use the Index Variable defined in the corresponding field of the Collection Control to access the current element. If no Data Logic is set, the modal window will use the normal content of the Collection Control.
Important note: When setting your Modal Data Logic, consider that all the settings of the chosen Data Logic BO are applied, including both Controls and Data Rules. This overrides the properties set in the Data Logic BO containing the collection control. Therefore, check your Data Logic BO settings carefully. -
Collection Controls may also display the Layout and Placeholders tabs, which allow linking to a Data Layout Business Object.
This feature is available for FNZ projects only. Internal documentation is available.
General Controls
Create these Controls by dragging the according object from the Controls panel on the right. The following General Controls are available: 3. Section Group 4. Field Set Group 5. Text 6. Data Logic Include 7. Image (FNZ projects only) 8. Video (FNZ projects only)
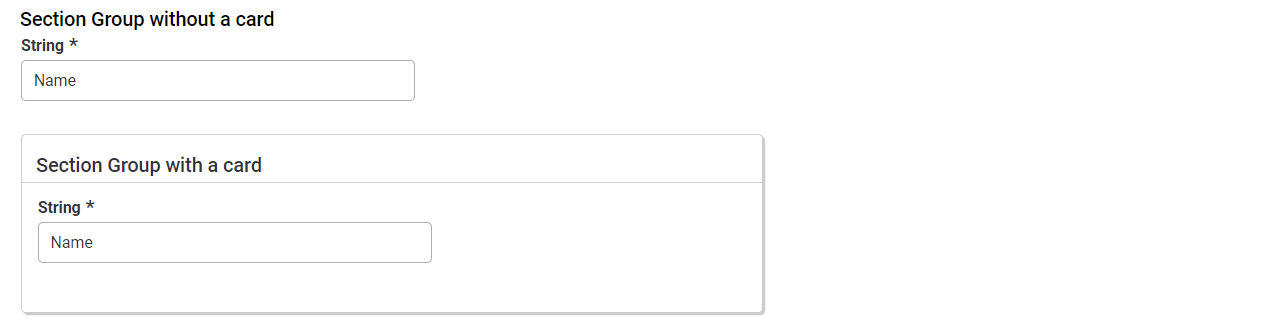
Section Group / Field Set Group
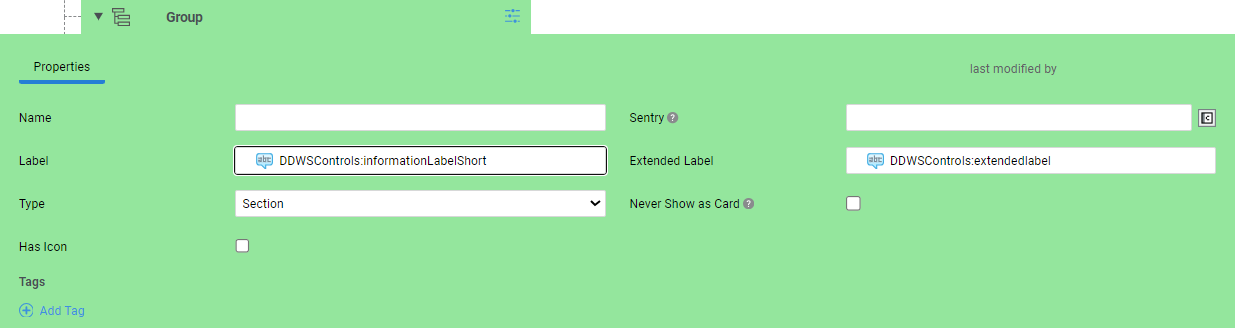
The Section Group and Field Set Group Controls allow the end user to group other Data Logic Controls:
-
The Section option is used when defining an element of the navigation structure in FNZ Studio Runtime.
-
The Field Set option is used when indicating that some fields are closely related and should, therefore, be shown close to each other, for example the street name and street number fields of an address.
The context menu includes the Remove, Keep Children option, which allows removing the main Group control while keeping its children (if any).
-
Drag a Section Group or Field Set Group Control into the main editing area. A Group Control is created with the Type property set to Section or Field Set, respectively. Set its properties:
-
(Only for Section Groups), Optionally, select the Never Show as a Card option if you wish to have borderless sections instead of cards in FNZ Studio Runtime UI for this specific Data Logic BO.
-
Optionally, set the Has Icon / Icon Type property. It is possible to specify an icon for this Control by selecting the Has Icon checkbox. An icon can be chosen from the set of default icons provided by the Platform or by selecting a Resource Business Object. The custom icon is displayed next to the Control in the editing area for easier visual identification. If no custom icon is selected, the default icon for that Control is displayed.
-
Group Controls may also display the Layout and Placeholders tabs, which allow linking to a Data Layout Business Object.
This feature is available for FNZ projects only. Internal documentation is available.
Text

The Text Control allows showing read-only text in FNZ Studio Runtime. The text can be dynamic, that is, it can be the result of a calculation.
-
Drag a Text Control into the main editing area.
-
In the Text field, select the Label Business Object corresponding to the text to be displayed (see more information in the Label section).
-
In the Type field, select the type of text to be displayed (Information , Alert , Plain Text or Success). These result in different styling of the text in FNZ Studio Runtime (see details).
-
Optionally, fill the Read More URL (enter any valid URL) and/or Read More Label (select a Label Business Object) fields to provide the end user with a link to get further information (e.g. a link to some knowledge base, tax authority page or government website).
-
Text Controls may also display the Placeholders tab, which allows linking to a Data Layout Business Object.
This feature is available for FNZ projects only. Internal documentation is available.
Data Logic Include
Data Logic Include Controls allow including Controls defined in another Data Logic Business Object. Such Controls are included in the location of the Data Logic Include Control at runtime (when the Data Logic is evaluated by the Data Engine).
To create a Data Logic Include Control:
-
Drag your desired Data Logic Business Object from the right-side library into the Controls tab, and fill the Variable Assignments fields that are displayed.
-
Alternatively, drag a Data Logic Include Control from the Controls section in the right-side library, then select the Data Logic, and fill the Variable Assignments fields that are displayed.
You can open the selected Data Logic by double-clicking on the Control, or by right-clicking on it and then selecting the Open Data Logic button. -
Note that, unlike other Controls, the Data Logic Include Control does not have Name, Label and Extended Label settings, since it is replaced by its content at runtime. Click on the "Expand" arrow icon on the left of the Control header to display a preview of the Control.
You can include the current Data Logic using a Data Logic Include Control to represent cyclic data models.
-
Data Logic Include Controls may also display the Placeholders tab, which allows linking to a Data Layout Business Object.
This feature is available for FNZ projects only. Internal documentation is available.
Image
The Image Control allows showing images in FNZ Studio Runtime.
Video
The Video Control allows showing videos in FNZ Studio Runtime.
Data Rules Tab
The Data Rules tab defines the rules data must comply with to be business-compliant. In other words, if all the Rules in the Data Rules tab are fulfilled, a Data Context is considered valid according to business logic. There are different types of Rules with different purposes, e.g., checking if a person has a required minimum age, or if the provided ZIP code is valid with respect to the standard of the selected country of residence. To create a Data Logic Rule, drag it into the Data Rules area from the panel on the right.
The context menu for Controls allows the following options: Copy Rule, Paste Rule, Delete. These are also supported by shortcut keys.
Consider the following information on the Data Rules Editor:
- Order - In the editor, Rules are shown in the order in which they were added. However, you can reorder them according to your preferences (by type, by property, and son on) through drag-and-drop. Such order has no influence on the evaluation of the Rules themselves.
- Asterisk - Mandatory properties for Data Rules are marked with an asterisk (as well as reported in the Validation panel on the left). If such properties are not filled, the Rule being set is not executed. See also specific information on String Rules.
- Icon color - Each Rule is represented by an icon, and the icon color indicates whether all the mandatory values for that Rule are set. Specifically, the icon is:
- Gray when one or more mandatory values are not set yet, and the Rule cannot be executed by the Data Engine.
- Colored when all the mandatory values are set, and the Rule can be executed by the Data Engine. This is especially useful when you have a series of folded Rules in the editing area.
These are the types of Data Rules that you can define (see details in the sections below):
- Property Rules
- Mandatory Fields
- Catalog Values
- String
- Phone Number
- Link
- Number
- Date
- Single Property Expression
- Collection Rules
- Named Collection Keys
- Collection Size
- Collection Property Expression
- Data Class Rules
- Eligible Types
- Multiple Properties Expression
- Data Context Rules
- Cross-Data Class Expression
- Search
- Other
Data Logic Include
Note on Data Classes used as bindings in Data Rules - Consider that only Data Classes with static functions used in scripts are replaceable. See Replacing Business Objects.
Mandatory Fields
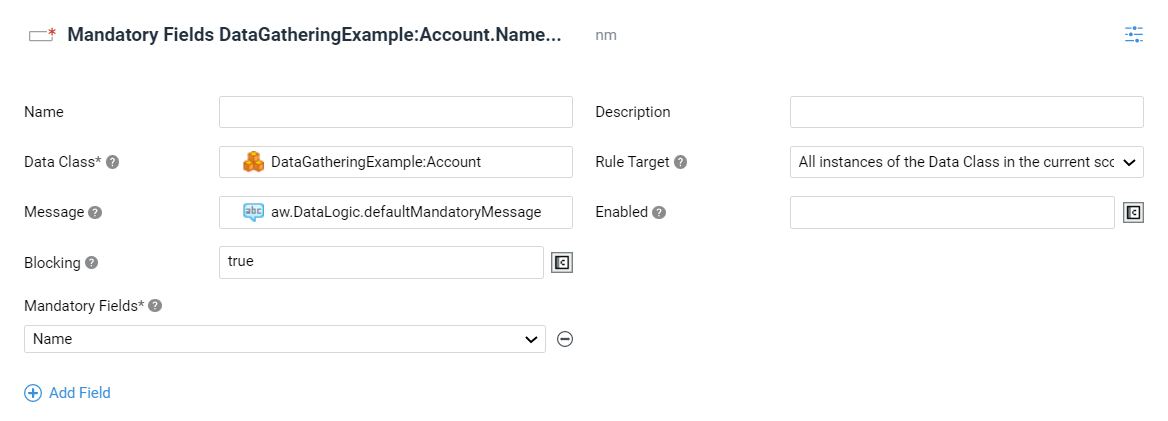
The Mandatory Fields Data Rule allows defining the list of properties in a Data Class that must be filled in by the FNZ Studio Runtime user.
To create a Mandatory Fields Data Rule:
- Drag the Mandatory Fields Rule from the Data Rules panel on the right side. Select the Data Class for which mandatory fields are being defined from the Data Class selector.
- The Rule Target dropdown allows selecting the set of Data Class instances the Data Rule should be applied to:
- All instances of the Data Class in the current scope - The Data Rule is applied to all Data Class Instances of the selected Data Class type available in the current scope.
- Specific instance of the Data Class - The Data Rule is applied only to the Data Class Instance that you specify in the Binding field. The binding should then return a Data Class Instance of the selected Data Class type (or one of its sub-types) which is part of the current scope.
- In the Message field, select a Label Business Object. Its text is displayed in FNZ Studio Runtime to mark the mandatory fields. Optionally, to provide more contextual information in the message, use the implicitly defined and automatically set the
$instancevariable to access the instance of the Data Class to which the Rule is being applied. A default message ("This field is required") is provided in the Labelaw.DataLogic.defaultMandatoryMessagelocated in the Base Package. - Define the set of mandatory properties of the selected Data Class. Add them in the Mandatory Fields section by clicking on the Add Field button and selecting them one by one from the dropdown list. Only properties of type Single Element can be selected. Selecting a property of type Single Data Class is only relevant when a Search or an Eligible Types Data Rule is defined on the same Data Class property and, therefore, the property can be empty (null).
- Optionally, in the Enabled field, specify under which circumstances the Rule must be evaluated (e.g. only for foreign Clients). The expression should return false when the Rule must not be evaluated (default is true, meaning it is always enabled). Optionally, use the implicitly defined and automatically set
$instancevariable to access the instance of the Data Class to which the Rule is being applied. - Optionally, in the Blocking field, specify under which circumstances a violation of this Rule should be considered blocking for the execution of Process Actions. The expression should return true when a violation of the Rule should prevent the execution of selected Process Actions (default is
false, meaning it is never blocking). Optionally, use the implicitly defined and automatically set$instancevariable to access the instance of the Data Class to which the Rule is being applied.
Catalog Values
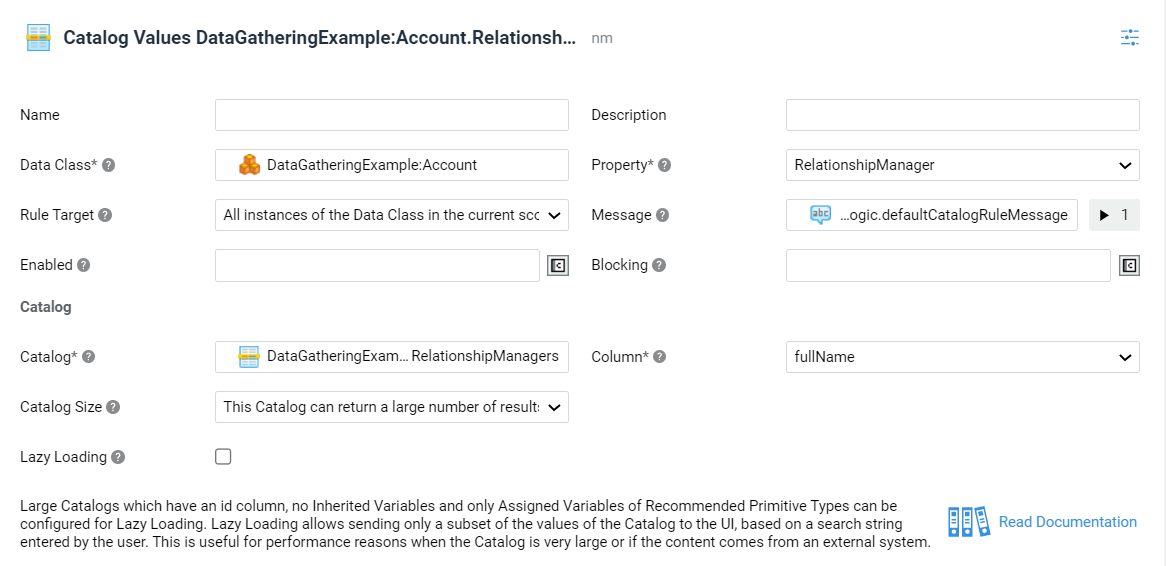
A Catalog Values Rule defines the set of valid values that a field can contain. The values are taken from a Catalog Business Object. FNZ Studio Runtime may use this Rule to change how it renders controls, for example to render a dropdown list instead of a plain text field, forcing the user to select a valid value.
To create a Catalog Values rule:
-
Drag the Catalog Values Rule from the Data Rules panel on the right side.
-
Select the desired values from the Data Class and Property selectors. They represent the Data Class and the properties whose valid values are being defined. In case of collections, the Rule is applied to each element. Note also that only properties of supported Primitive Types (String, Long, Integer, Boolean, Date, Money) can be selected. See the complete list of supported values for the
idcolumn and its compatibility matrix with the property type in the attached document (PDF).You can open the selected Data Class by right-clicking on the Rule, and then selecting the Open Data Class button. -
The Rule Target dropdown allows selecting the set of Data Class instances the Data Rule should be applied to:
- All instances of the Data Class in the current scope - The Data Rule is applied to all Data Class Instances of the selected Data Class type available in the current scope.
- Specific instance of the Data Class - The Data Rule is applied only to the Data Class Instance that you specify in the Binding field. The binding should then return a Data Class Instance of the selected Data Class type (or one of its sub-types) which is part of the current scope.
-
In the Catalog selector, select the Catalog Business Object to be used as a source for the valid values. The id column of the Catalog is used as a source of the values, therefore its content must be compatible with the type of the selected property. Then, from the Column dropdown list, select the column of the Catalog from which to take the display values. The content of this column must be a String.
Note that, if the Data Class Property is set to Boolean, the selected Catalog must contain exactly two records and their id columns must be set to
trueandfalse, respectively. -
The Catalog Size dropdown allows specifying whether the Catalog returns a small or a large number of results. This setting is used by FNZ Studio Runtime to provide a user-friendly, fast experience. For example, the Data Gathering App Task can determine to show controls connected to large Catalogs as a searchable dropdown list, and use a static checkbox list, instead, for small Catalogs.
This property has been designed to be used specifically with the Data Gathering App Task. -
In the Message field, select a Label Business Object. Its text is displayed if the property value is not among the valid properties defined by the Catalog. Optionally, to provide more contextual information in the message, use the implicitly defined and automatically set
$instancevariable to access the instance of the Data Class to which the Rule is being applied, and the$valuevariable to access the current value being evaluated by the Rule. A default message is provided in the Labelaw.DataLogic.defaultCatalogRuleMessagelocated in the Base Package. -
If applicable, you can define Variable Assignments and use the implicitly defined and automatically set
$instancevariable, which provides access to the instance of the Data Class where the Rule is applied. %%Variable Assignment Example: When a user selects the country of their address, the cities dropdown list for selecting a city should only contain the cities of the selected country. This can be achieved by assigning the selected value of the country ($instance.country) to the Catalog that contains all cities. The Catalog can then be filtered by the country selected by the user to restrict the set of cities.%% -
Optionally, in the Enabled field, define an expression that specifies under which circumstances the Rule must be evaluated (e.g. only for foreign Clients). The expression should return
falsewhen the Rule must not be evaluated (default istrue, meaning it is always enabled). Optionally, use the implicitly defined and automatically set$instancevariable to access the instance of the Data Class to which the Rule is being applied. -
Optionally, in the Blocking field, specify under which circumstances a violation of this Rule should be considered blocking for the execution of Process Actions. The expression should return
truewhen a violation of the Rule should prevent the execution of selected Process Actions (default isfalse, meaning it is never blocking). Optionally, use the implicitly defined and automatically set$instancevariable to access the instance of the Data Class to which the Rule is being applied, and the$valuevariable to access the current value being evaluated by the Rule.Note that the situation in which multiple Catalog Values Rules are enabled at the same time for a given field is treated as an error.
Catalog Lazy Loading
Large Catalogs that satisfy the requirements listed below can be configured for lazy loading. Lazy loading allows sending only a subset of Catalog records to the UI, based on a search string entered by the user. This is useful for performance reasons when the Catalog is very large or when its content comes from an external system.
This option is only available when a Catalog satisfies the following requirements:
- It must have an id column
- It must not have Inherited Variables
- It must not have Assigned Variables whose type is not a Recommended Primitive Type (see the Recommended and Unrecommended Primitive Types in the Platform and the Best Practice Analyzer documents for more information).
- In the Catalog Values Data Rule, the Catalog Size option must be set to The Catalog can return a large number of results.
If these conditions are satisfied, the Catalog Values Data Rule displays the additional Lazy Loading option. If this checkbox is selected, lazy loading is enabled and must be further configured. The developer, in fact, needs to select the inputs provided to the selected Catalog so that its results are filtered according to the search performed by the user in FNZ Studio Runtime (see example below). This filtering relies on a set of inputs that are provided to the Catalog through automatically populated Assigned Variables.
The Catalog Values Data Rules provides selectors for four Assigned Variables:
- Filter Variable - The Assigned Variable defined in the selected Catalog is automatically populated with the search string entered by the user in FNZ Studio Runtime. This value must be used in the Catalog to return only the records that match the search string based on the desired filtering logic. The variable must be of type String. For example, if the Catalog Values Data Rule is used to let the user choose among a list of Countries and the Lazy Loading option is enabled, when the user enters the letters "uni", the variable selected in the Filter Variable option contains the String "uni" and the Catalog must use it to return only countries whose name or code (depending on the desired logic) contains or starts with (depending on the desired logic) "uni" (e.g., "United States", "United Kingdom", and so on). If the Catalog source is a database, this logic can be implemented in the Catalog using a query with a LIKE clause, for example (See also Data Logic: Lazy Loading of a Database-Sourced Catalog).
- ID Match Variable - The Assigned Variable defined in the selected Catalog is automatically populated with the collection of Catalog record IDs to be checked for validity. This collection can contain one or more values and must be used in the Catalog to return only the records whose Id matches exactly one of the IDs provided in the collection. The variable must be an Indexed Collection of type String, Long, Integer, Boolean, Date or Money, depending on the type of the property selected for this Data Rule. Continuing with the example of the Countries Catalog above, this Variable is populated when rendering existing options in FNZ Studio Runtime, such as "UK" or "US" country codes, to check whether they are valid or not. In this situation, the variable selected in the ID Match Variable option of the Data Rule contains Strings "UK" and "US", and the Catalog must use it to return only the records corresponding to those IDs, if found. If the Catalog source is a database, this logic can be implemented in the Catalog using a query with an exact match "=" check, for example (See also Data Logic: Lazy Loading of a Database-Sourced Catalog).
- Start Variable - The Assigned Variable defined in the selected Catalog is automatically populated with the index of the next unloaded record of the Catalog that the user has scrolled to, or 0 if the user has not scrolled through results yet. This value must be used in the Catalog to return only the records starting from the position specified in the variable. The variable must be of type Integer.
- Limit Variable - The Assigned Variable defined in the selected Catalog is automatically populated with the number of results that should be returned by the Catalog. This value must be used in the Catalog to define the number of records to be returned. The variable must be of type Integer.
Moreover, consider the following configuration information:
- All four Assigned Variables must be selected in order to properly configure Catalog lazy loading.
- The four Assigned Variables can be created either manually or automatically in the Catalog Business Object editor by right-clicking anywhere in the Variables tab and selecting the option Create Lazy Loading Variables, which creates the four variables
$filter,$idMatch(Indexed String by default),$startand$limit. If these variables exist in the Catalog selected in the Catalog Values Data Rule (Catalog dropdown), they are automatically populated when the Lazy Loading option is enabled. Consider that these variables cannot be assigned manually using the Variable Assignments option displayed next to the Catalog dropdown.
Catalog Lazy Loading: Runtime Cases
Since the user interacts with selectors in FNZ Studio Runtime, two cases are possible:
- Case 1: The user enters a search text and scrolls through matching results
- Case 2: One or more values have been previously set in the selector and must be validated by the Data Rule
See details for the two cases below:
- Case 1: The user enters a search text and scrolls through results.
In this case, the four Assigned Variables selected in the Catalog Values Data Rule have the following values:
- Filter Variable: the search text entered by the user
- ID Match Variable: null (not relevant)
- Start Variable: 0 for the first load of the result or the offset based on the scrolling position if the user is scrolling through the results (positive number)
- Limit Variable: the number of records to be returned by the Catalog, defined by the UI. The Catalog must return only the records that match the search text provided in the Filter Variable (according to the desired logic), and must also limit results based on the provided start and limit values. Make sure that the sorting of the returned records is stable and consistent across invocations of the Catalog, so that scrolling behaves correctly (for example in case of a database-backed Catalog, use an ORDER BY clause in the SQL Query to sort the rows). The results are used in FNZ Studio Runtime to render the list of matching options.
- Case 2: Values have been set in the selector and must be validated by the Data Rule.
In this case, the four Assigned Variables selected in the Catalog Values Data Rule have the following values:
- Filter Variable: null (not relevant)
- ID Match Variable: list of current property values to be checked for validity (can be empty)
- Start Variable: not relevant
- Limit Variable: not relevant The Catalog must return only the records whose ID matches one of the values provided for the ID Match Variable. Results are used in FNZ Studio Runtime to render the existing values and validate them. If the Catalog does not return a result for one of the values provided for the ID Match Variable, that value is considered invalid and reported as such in FNZ Studio Runtime. If the property selected for the Data Rule is a Single Element, Id Match Variable contains a single value; if it is a collection, it can contain multiple values. If no value is currently set in the property, it contains an empty collection and the Catalog must not return any result.
Note: When using App Tasks: Common Configuration only these two runtime cases must be supported in the Catalog. For example, Filter Variable and ID Match Variable are never populated at the same time.
String
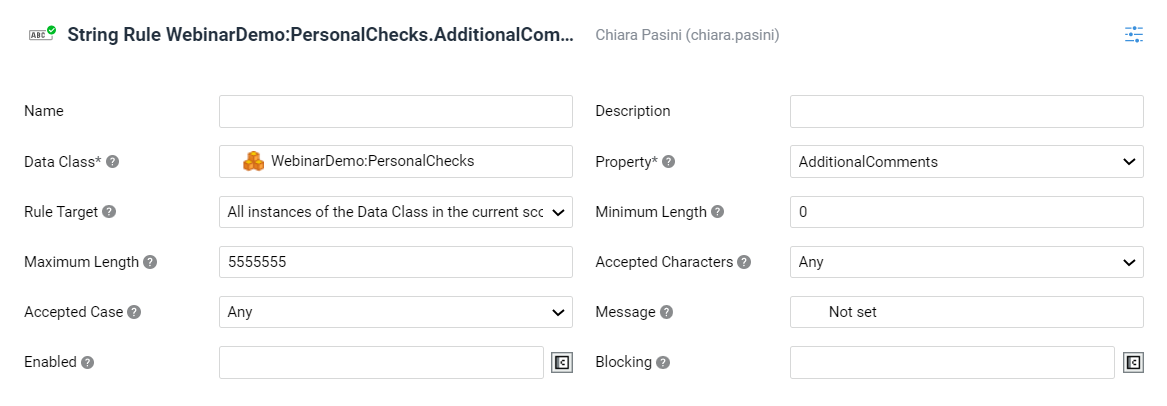
A String Rule allows defining constraints on a Data Class property of type String, such as the maximum and minimum size of the String. String Data Rules are not evaluated on empty fields. Moreover, consider that you can apply multiple String Rules on a property (see section below).
To create a String Data Rule:
-
Drag the String Rule from the Data Rules panel on the right side.
-
From the Data Class selector, select the Data Class whose String property constraints are being defined.
Tip: You can open the selected Data Class by double-clicking on the Rule, or by right-clicking on it and then selecting the Open Data Class button. -
From the Property selector, select the property of the Data Class whose constraints are being defined. Note that only String properties can be selected. In case of collections, the Rule is applied to each element.
-
-
The Rule Target dropdown allows selecting the set of Data Class instances the Data Rule should be applied to:
- All instances of the Data Class in the current scope - The Data Rule is applied to all Data Class Instances of the selected Data Class type available in the current scope.
- Specific instance of the Data Class - The Data Rule is applied only to the Data Class Instance that you specify in the Binding field. The binding should then return a Data Class Instance of the selected Data Class type (or one of its sub-types) which is part of the current scope.
-
Define the constraint(s) to be applied to the selected String property using the settings:
You need to set at least one of these constraints for the rule to have effect.- Minimum Length: the minimum allowed length for the String contained in the Data Class property (default value is 0).
- Maximum Length: the maximum allowed length for the String contained in the Data Class property (default value is unlimited).
- Accepted Characters: the characters that are accepted inside the String contained in the Data Class property.
- Accepted Case: the case types (lower case, UPPER CASE) that are accepted inside the String contained in the Data Class property.
-
In the Message field, select a Label Business Object. The text of the Label (e.g. "This text must be longer than 10 characters") is displayed in FNZ Studio Runtime to guide the user in entering a correct value for the field. Optionally, in order to provide more contextual information in the message, use the implicitly defined and automatically set
$instancevariable to access the instance of the Data Class to which the Rule is being applied. -
Optionally, in the Enabled field, specify under which circumstances the Rule must be evaluated (e.g. only for foreign Clients). The expression should return
falsewhen the Rule must not be evaluated (default istrue, meaning it is always enabled). Optionally, use the implicitly defined and automatically set$instancevariable to access the instance of the Data Class to which the Rule is being applied. -
Optionally, in the Blocking field, specify under which circumstances a violation of this Rule should be considered blocking for the execution of Process Actions. The expression should return
truewhen a violation of the Rule should prevent the execution of selected Process Actions (default isfalse, meaning it is never blocking). Optionally, use the implicitly defined and automatically set$instancevariable to access the instance of the Data Class to which the Rule is being applied, and the$valuevariable to access the current value being evaluated by the Rule.
Multiple String Data Rules
As mentioned above, it is possible to define multiple String Data Rules on the same property. In this case, the following principles apply:
-
Minimum Length: the highest value defined in the various Rules for the property is used to check the validity of the String.
-
Maximum Length: the lowest value defined in the various Rules for the property is used to check the validity of the String.
-
Accepted Characters: the most restrictive option defined in the various Rules for the property is used to check the validity of the String (e.g. if at least one Rule is set to Numbers Only, that constraint applies).
-
Accepted Case: the most restrictive option defined in the various Rules for the property is used to check the validity of the String (e.g. if all Rules are set to Any and one is set to lower case, the lower case constraint applies).
Tip: If you have at least two String Data Rules on the same property, we recommend that each Data Rule defines only one constraint. This ensures that a violation always results in a precise Message.
The Email Rule is a special type of String Data Rule that allows defining additional constraints on a String Data Class property which contains an email address. FNZ Studio Runtime may use this Rule to change how it renders the corresponding input control, for example to provide the email keyboard for input on mobile devices.
The steps required to add and configure an Email Rule are the same as for the String Data Rule (see section), with the following specific features:
- Email Rules automatically validate that the property value is in the format
a@b.cwhereaandbare any sequences of characters without white spaces andcis any sequence of at least 2 characters without white spaces. - The Minimum Length constraint is set to 6 and cannot be modified.
- The Accepted Characters constraint is set to Any and cannot be modified.
- The Message field contains the default Label
aw.DataLogic.defaultEmailRuleMessagelocated in the Base Package. - In case of multiple Email Data Rules, some principles apply. See details.
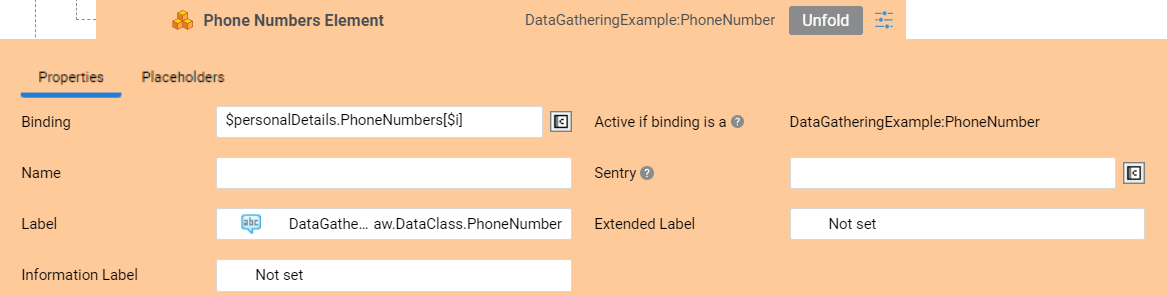
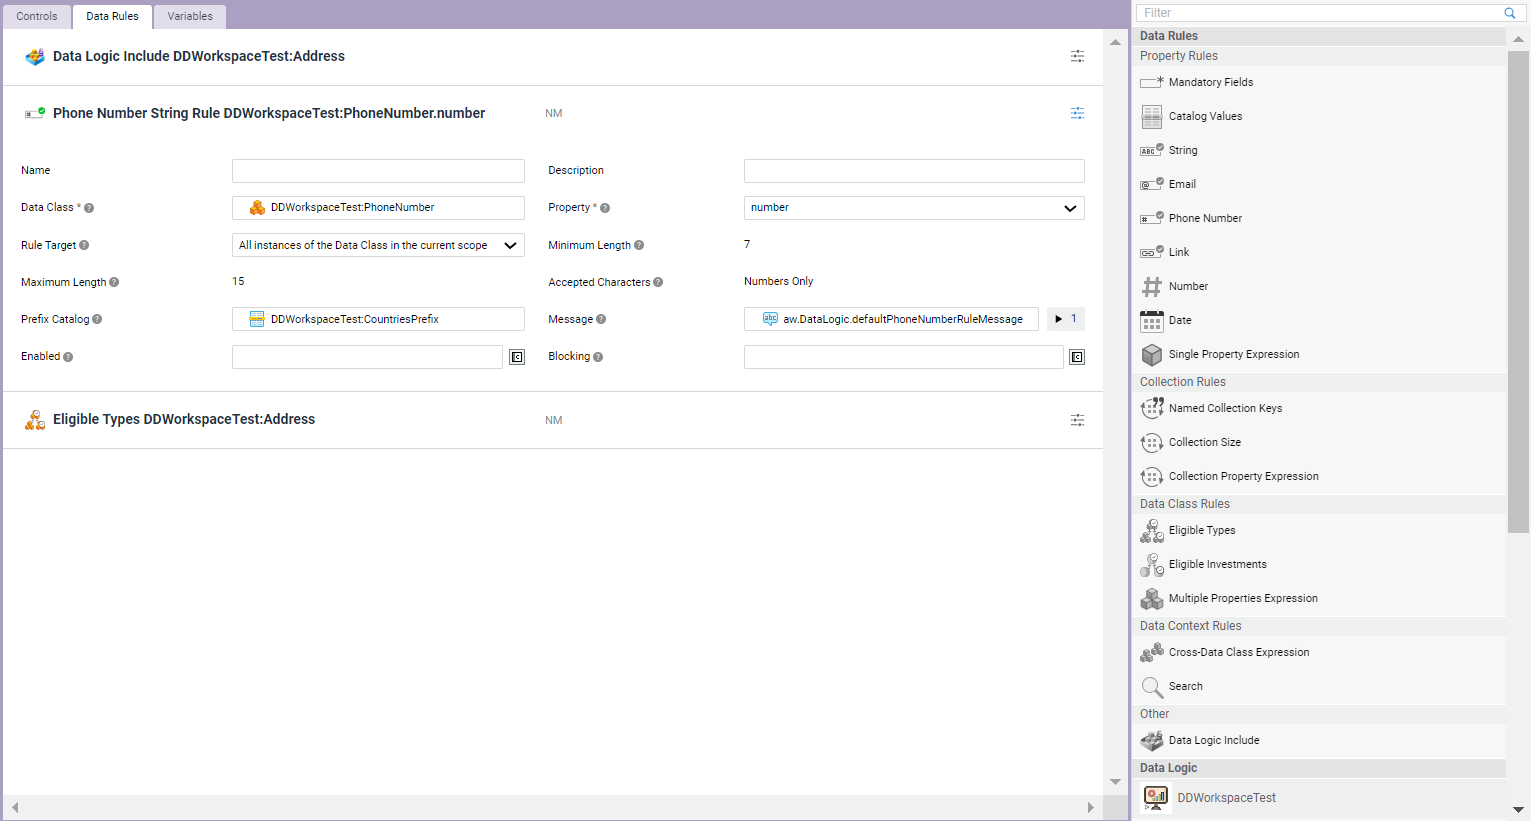
Phone Number
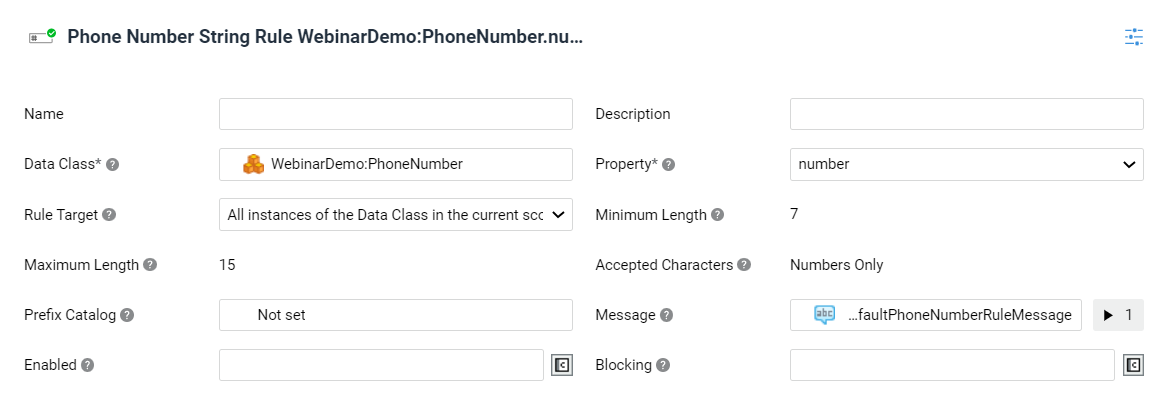
The Phone Number Rule is a special type of String Data Rule that allows defining additional constraints on a String Data Class property which contains a phone number. FNZ Studio Runtime may use this Rule to change how it renders the corresponding input control, for example to provide a dropdown selector for the prefix.
The steps required to add and configure an Phone Number are the same as for the String Data Rule (see section), with the following specific features:
-
The Prefix Catalog selector (optional) allows selecting a Catalog Business Object as a source for the valid phone number prefixes. The Catalog must contain these columns:
Prefix(must start with+, e.g.,+39),CountryCode(e.g.,IT),CountryName(e.g.,Italy).-
Phone Numbers stored in the property are validated against the selected Catalog, making sure that they start with one of the valid prefixes. Note that Phone Numbers starting with
00instead of+are also accepted. -
If applicable, you can define Variable Assignments for the Catalog Business Object and use the implicitly defined and automatically set
$instancevariable, which provides access to the instance of the Data Class where the Rule is applied. -
By default, the Catalog
DataGathering:Countriesis used.Note on the `DataGathering:Countries` Catalog: This Catalog is automatically deployed on the DataGathering extension startup. Consider that this Catalog is just an example, and that the actual Catalog should be created based on your Solution. We recommend that you wrap the Country Description in a Label Business Object. The flag associated to the country is retrieved using the country code.
-
-
The Minimum Length constraint is set to 7 and cannot be modified.
-
The Maximum Length constraint is set to 15 and cannot be modified.
-
The Accepted Characters constraint is set to Numbers Only and cannot be modified (note that
+is accepted for prefixes). -
The Message field contains the default Label
aw.DataLogic.defaultPhoneNumberRuleMessagelocated in the Base Package. -
In case of multiple Phone Number Number Data Rules, some principles apply. See details.
-
Two built-in Script Functions allow accessing the country code corresponding to the prefix set for a field associated with a Phone Number Data Rule:
DataRules:GetPhoneNumberCountryreturns the value set as a country code for the given path (e.g.,$client.phoneNumber), if available. The country code corresponds to the flag selected by the user in the UI and it is one of the values of theCountryCodecolumn in the Prefix Catalog. This is useful when you need to know the exact country that was selected, for example when writing the data back to a storage system.DataRules:SetPhoneNumberCountrysets the provided country code for the given path (e.g.,$client.phoneNumber). Once set, the value is shown as country flag in the UI. The country code must be one of the values of theCountryCodecolumn in the Prefix Catalog and must be consistent with the content of the Phone Number String. This is useful, for example, when populating a phone number field of a Data Class instance using data read from a storage system which provides country information.
Link
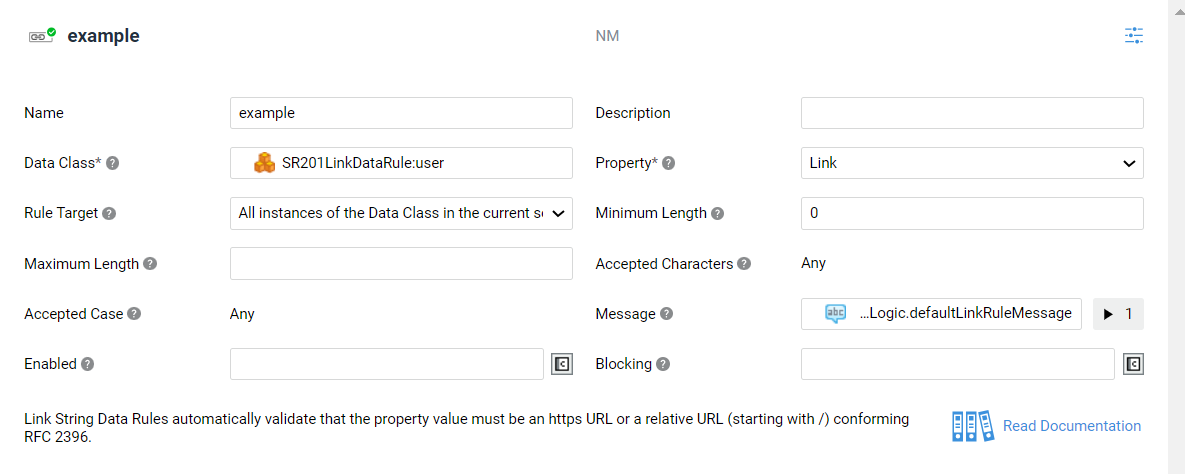
The Link Rule is a special type of String Data Rule that allows defining constraints on a String Data Class property that contains a link. The UI may use this Link Data Rule to change how it renders the corresponding input control, for example to make the link clickable.
The steps required to add and configure a Link Rule are the same as for the String Data Rule (see section), with the following specific features:
- Link Rules automatically validate that the property value is an
httpsURL or a relative URL (starting with/) according to the RFC 2396 standard. - The Accepted Characters and Accepted Case constraints are set to Any and cannot be modified.
- The Message field contains the default Label
aw.DataLogic.defaultEmailRuleMessagelocated in the Base Package. - In case of multiple Link Data Rules, some principles apply (see details).
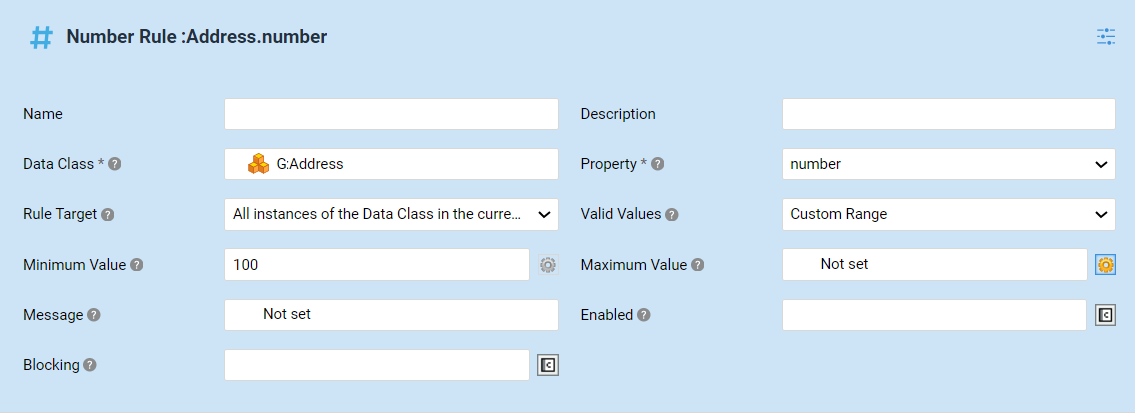
Number
A Number Data Rule allows defining constraints on a Data Class property of numeric type (Integer, Long, Float, Double, BigInteger, BigDecimal), such as an accepted number range. Consider that you can apply multiple Number Rules on a property (see below).
To create a Number Data Rule:
-
Drag the Number Rule from the Data Rules panel on the right side.
-
From the Data Class selector, choose the Data Class containing the numeric property being configured.
Tip: You can open the selected Data Class by double-clicking on the Rule, or by right-clicking on it and then selecting the Open Data Class button. -
From the Property selector, choose the specific Data Class numeric property being configured. Note that you can only select properties of type: Integer, Long, Float, Double, BigInteger, BigDecimal. In case of collections, the Rule is applied to each element.
-
The Rule Target dropdown allows selecting the set of Data Class instances the Data Rule should be applied to:
- All instances of the Data Class in the current scope - The Data Rule is applied to all Data Class Instances of the selected Data Class type available in the current scope.
- Specific instance of the Data Class - The Data Rule is applied only to the Instance that you specify in the Binding field. The binding should then return a Data Class Instance of the selected Data Class type (or one of its sub-types) which is part of the current scope.
-
In the Valid Values setting, define the constraint(s) to be applied to the selected numeric property:
- Number cannot be negative option - The minimum accepted value for the property is 0.
- Custom Range option - This option meets specific requirements not covered by the predefined option above. In this case, use the following fields to specify the constraints:
- Minimum Value - Select the minimum value accepted for the numeric property. Switch to Script to enter a custom expression, if necessary. In this case the selected Script Function must return a single value whose type is the same as the selected property. If multiple Number Rules are defined on the same Data Class property, the highest value defined in the various Rules for the property is used to check number validity.
- Maximum Value option - Select the maximum value accepted for the numeric property, if any. Switch to Script to enter a custom expression, if necessary. In this case the selected Script Function must return a single value whose type is the same as the selected property. If multiple Number Rules are defined on the same Data Class property, the lowest value defined in the various Rules for the property is used to check number validity
-
In the Message field, select a Label Business Object. The text of the Label is the message to be displayed if the number contained in the Data Class property does not satisfy the specified constraints. Optionally, in order to provide more contextual information in the message, use the implicitly defined and automatically set
$instancevariable to access the instance of the Data Class to which the Rule is being applied and the$valuevariable to access the current value being evaluated by the Rule. -
(Optional) In the Enabled field, specify under which circumstances the Rule must be evaluated (e.g., only for foreign Clients). The expression should return
falsewhen the Rule must not be evaluated (default istrue, meaning it is always enabled). Optionally, use the implicitly defined and automatically set$instancevariable to access the instance of the Data Class to which the Rule is being applied. -
(Optional) In the Blocking field, specify under which circumstances a violation of this Rule should be considered blocking for the execution of Process Actions. The expression should return
truewhen a violation of the Rule should prevent the execution of selected Process Actions (default isfalse, meaning it is never blocking). Optionally, use the implicitly defined and automatically set$instancevariable to access the instance of the Data Class to which the Rule is being applied.Tip: If you have at least two Number Data Rules on the same property, we recommend that each Data Rule defines only one constraint. This ensures that a violation always results in a precise Message.
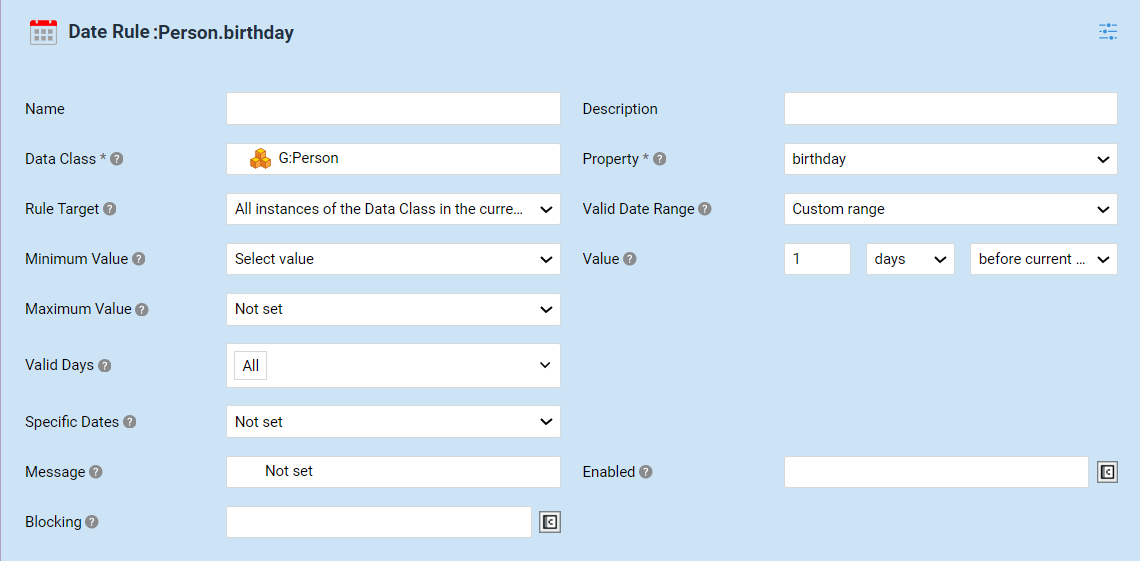
Date
A Date Data Rule allows defining constraints on a Data Class property of Date type, such as an accepted date range, or specific accepted/excluded days. Consider that you can apply multiple Date Rules on a property (see subsection below).
To create a Date Data Rule:
-
Drag the Date Rule from the Data Rules panel on the right side.
-
From the Data Class selector, select the Data Class containing the Date property being configured.
Tip: You can open the selected Data Class by double-clicking on the Rule, or by right-clicking on it and then selecting the Open Data Class button. -
From the Property selector, select the specific Data Class date property being configured. In case of collections, the Rule is applied to each element.
-
The Rule Target dropdown allows selecting the set of Data Class instances the Data Rule should be applied to:
- All instances of the Data Class in the current scope - The Data Rule is applied to all the Instances of the selected Data Class type available in the current scope.
- Specific instance of the Data Class - The Data Rule is applied only to the Instance that you specify in the Binding field. The binding should then return a Data Class Instance of the selected Data Class type (or one of its sub-types) which is part of the current scope.
-
The following fields, define the constraint(s) to be applied to the selected Date property. In the Valid Date Range field, specify a minimum and/or maximum value for the date:
- Date must be in the future option - The minimum accepted value for the property is tomorrow.
- Date must be in the past option - The maximum accepted value for the property is yesterday.
- Custom Range - This option meets specific requirements not covered by the predefined options above. In this case, use the following fields to specify constraints:
- Minimum Value - Select the minimum value accepted for the Date property. Chose Script to enter a custom expression. Note that the Script Function must return a single value of type Date. Alternatively, chooseSelect Value to set up a custom value such as "one week from now". In this case, enter the number of days, weeks, months or years representing the minimum value for the Date property, and whether they are in the past (before the current date option) or in future (after the current date option) with respect to the time at which the rule is executed. For example, you can choose 3 days before the current date or 5 weeks after the current date.
- Maximum Value - Select the maximum value accepted for the Date property. The same options as the Minimum Value field apply.
-
In the Valid Days field, enter the days of the week to be considered valid for the Date property, if necessary. The default option is All. Deselect one or more days to treat them as invalid.
-
Use the Specific Dates field to consider only a certain set of dates as valid, or if a given set of dates should be considered invalid (for example public holidays).
- Accept only specific dates - In this case, in the Accepted Dates field, select the Catalog Business Object which returns the list of dates to be considered valid. All other dates are considered invalid.
- Exclude specific dates - In this case, in the Invalid Dates field, select the Catalog Business Object which returns the list of dates to be considered invalid, for example public holidays. In both cases, the list of dates must be specified in the id column of the Catalog; if specified as a String, the date must follow one of the defined Date Format Patterns. The selected Catalog must not have inherited variables and it must not have assigned variables whose type is not a recommended primitive.
-
In the Message field, select a Label Business Object. The text of the Label is the message to be displayed if the date contained in the Data Class property does not satisfy the specified constraints. Optionally, in order to provide more contextual information in the message, use the implicitly defined and automatically set
$instancevariable to access the instance of the Data Class to which the Rule is being applied and the$valuevariable to access the current value being evaluated by the Rule. To format dates in messages (Label assignment) we recommend using scriptSHORT($date, User:Get().getPreference('format_language'))(where$dateis the date to be formatted) to achieve coherent formatting with the rest of the page. -
(Optional) In the Enabled field, specify under which circumstances the Rule must be evaluated (e.g., only for foreign clients). The expression should return false when the Rule must not be evaluated (default is true, meaning it is always enabled). Optionally, use the implicitly defined and automatically set
$instancevariable to access the instance of the Data Class to which the Rule is being applied. -
(Optional) In the Blocking field, specify under which circumstances a violation of this Rule should be considered blocking for the execution of Process Actions. The expression should return
truewhen a violation of the Rule should prevent the execution of selected Process Actions (default isfalse, meaning it is never blocking). Optionally, use the implicitly defined and automatically set$instancevariable to access the instance of the Data Class to which the Rule is being applied.
Multiple Date Data Rules
As mentioned above, it is possible to define multiple Date Data Rules on the same property. In this case, the following principles apply:
-
Valid Date Range field - Date validity is checked based on 1) the highest minimum value and 2) the lowest maximum value defined for the various Rules.
-
Valid Days field - Only the days that are selected in all Data Rules are considered valid.
-
Accepted Dates and Invalid Dates Catalogs - Only one Data Rule for each property can specify the Accepted Dates Catalog or Invalid Dates Catalog. If multiple Rules have a Catalog set, an error is returned.
Tip: If you have at least two Date Data Rules on the same property, we recommend that each Data Rule defines only one constraint. This ensures that a violation always results in a precise Message.
Single Property Expression
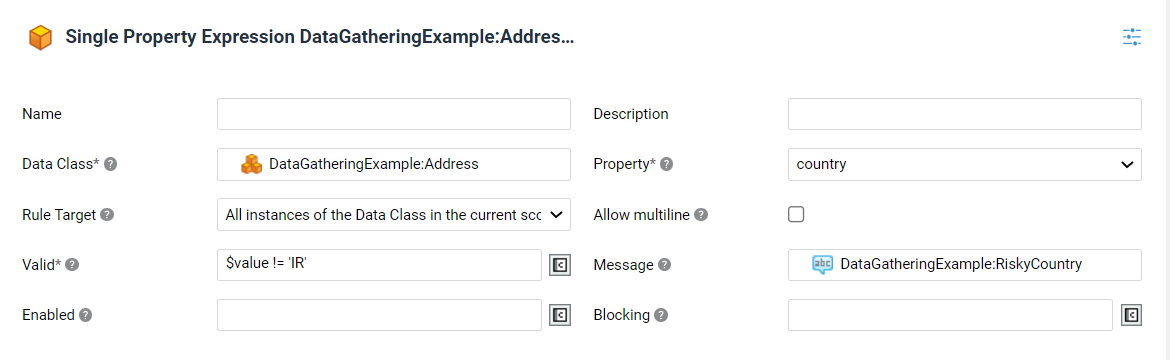
A Single Property Expression Rule validates a Data Class property of Primitive type. In case the Rule is violated, the property is highlighted in FNZ Studio Runtime. These Data Rules are not evaluated on empty fields.
To create a Single Property Expression:
-
Drag the Single Property Expression Rule from the Data Rules panel on the right side.
-
Select the desired values from the Data Class and Property selectors. These represent the Data Class and property to which the Rule applies. Note that only primitive type properties of a Data Class can be selected. In case of collections, the rule is applied to each element.
Tip: You can open the selected Data Class by double-clicking on the Rule, or by right-clicking on it and then selecting the Open Data Class button. -
The Rule Target dropdown allows selecting the set of Data Class instances the Data Rule should be applied to:
- All instances of the Data Class in the current scope - The Data Rule is applied to all Data Class Instances of the selected Data Class type available in the current scope.
- Specific instance of the Data Class - The Data Rule is applied only to the Data Class Instance that you specify in the Binding field. The binding should then return a Data Class Instance of the selected Data Class type (or one of its sub-types) which is part of the current scope.
-
In the Valid field, enter the expression that specifies the conditions under which the property value is accepted by the Rule. The expression should return
truewhen the value is accepted andfalsewhen it is not. Note that this type of Rule is not applied to empty values. Use the implicitly defined and automatically set$valuevariable to access the current value being evaluated by the Rule. Optionally, use the$instancevariable to access the instance of the Data Class to which the Rule is being applied. Example: To check if the format of an email address corresponds to RFC 5322, use:MATCH($value, '^[a-zA-Z0-9\\.\\-\\_]+@[a-zA-Z0-9\\.\\-]+$'). When checking the validity of the phone number of a client, verify that the number starts with +41 if the client is from Switzerland by using:CopyIf EQUAL ($instance.country, 'CH') Then
Return STARTSWITH($value, '+41');
End
Return true; -
In the Message field, select the Label Business Object whose text should be displayed if the property value is not accepted according to the Valid expression. Optionally, in order to provide more contextual information in the message, use the implicitly defined and automatically set
$instancevariable to access the instance of the Data Class to which the Rule is being applied and the$valuevariable to access the current value being evaluated by the Rule. -
Optionally, select the Allow multiline checkbox this field can contain text with multiple lines or paragraphs. This allows FNZ Studio Runtime to show an appropriate control, e.g. by displaying a text area instead of a text field. This option is only available for String properties.
If the Data Rule is used only to specify the Allow multiline setting, leave the Valid, Message and Blocking properties empty.
-
Optionally, in the Enabled field, specify under which circumstances the Rule must be evaluated (e.g. only for foreign Clients). The expression should return false when the Rule must not be evaluated (default is true, meaning it is always enabled). Optionally, use the implicitly defined and automatically set
$instancevariable to access the instance of the Data Class to which the Rule is being applied. -
Optionally, in the Blocking field, specify under which circumstances a violation of this Rule should be considered blocking for the execution of Process Actions. The expression should return true when a violation of the Rule should prevent the execution of selected Process Actions (default is
false, meaning it is never blocking). Optionally, use the implicitly defined and automatically set$instancevariable to access the instance of the Data Class to which the Rule is being applied, and the$valuevariable to access the current value being evaluated by the Rule.Note that it is possible to define multiple Single Property Expression Rules on the same field.
Named Collection Keys
A Named Collection Keys Data Rule allows defining constraints on Named Collection Data Class properties, such as the set of valid values for the keys of the collection, taken from a Catalog Business Object.
-
Drag the Named Collection Rule from the Data Rules panel on the right side.
-
Select the desired values from the Data Class and Property selectors. They represent the Data Class and the properties whose valid values are being defined.
-
The Rule Target dropdown allows selecting the set of Data Class instances the Data Rule should be applied to:
- All instances of the Data Class in the current scope - The Data Rule is applied to all Data Class Instances of the selected Data Class type available in the current scope.
- Specific instance of the Data Class - The Data Rule is applied only to the Data Class Instance that you specify in the Binding field. The binding should then return a Data Class Instance of the selected Data Class type (or one of its sub-types) which is part of the current scope.
-
In the Collection Keys Catalog selector, select the Catalog Business Object to be used as a source for the valid values of keys in the Collection. The id column of the Catalog is used as a source of the values, therefore its content must be of type String. Then, from the Catalog Label Column dropdown list, select the column of the Catalog from which to take the display values. The content of this column must be a String.
You can open the selected Catalog by double-clicking on the Rule, or by right-clicking on it and then selecting the Open Catalog button. -
The Catalog Size dropdown allows specifying whether the Catalog returns a small or a large number of results. This setting is used by FNZ Studio Runtime to provide a user-friendly, fast experience. For example, an App Task can determine to show controls connected to large Catalogs as a searchable dropdown list, and use a static checkbox list, instead, for small Catalogs.
This property has been designed to be used specifically with App Tasks. -
In the Message field, select a Label Business Object. Its text is displayed if the property value is not among the valid ones defined by the Catalog. Optionally, to provide more contextual information in the message, use the implicitly defined and automatically set
$instancevariable to access the instance of the Data Class to which the Rule is being applied, and the$valuevariable to access the current value being evaluated by the Rule. A default message is provided in the Labelaw.DataLogic.defaultCatalogRuleMessagelocated in the Base Package. -
Optionally, in the Enabled field, define an expression that specifies under which circumstances the Rule must be evaluated (e.g. only for foreign Clients). The expression should return
falsewhen the Rule must not be evaluated (default istrue, meaning it is always enabled). Optionally, use the implicitly defined and automatically set$instancevariable to access the instance of the Data Class to which the Rule is being applied. -
Optionally, in the Blocking field, specify under which circumstances a violation of this Rule should be considered blocking for the execution of Process Actions. The expression should return
truewhen a violation of the Rule should prevent the execution of selected Process Actions (default isfalse, meaning it is never blocking). Optionally, use the implicitly defined and automatically set$instancevariable to access the instance of the Data Class to which the Rule is being applied, and the$valuevariable to access the current value being evaluated by the Rule.
Collection Size
A Collection Size Data Rule allows defining the minimum and maximum number of elements of a Collection. Consider that you can apply multiple Collection Size Data Rules on a property (see below).
To create a Collection Size Data Rule:
-
Drag the Collection Size Rule from the Data Rules panel on the right side.
-
From the Data Class selector, choose the Data Class whose Collection property constraints are being defined.
Tip: You can open the selected Data Class by double-clicking on the Rule, or by right-clicking on it and then selecting the Open Data Class button. -
From the Property selector, choose the property of the Data Class whose constraints are being defined. Only properties of type Collection can be selected.
-
The Rule Target dropdown allows selecting the set of Data Class instances the Data Rule should be applied to:
- All instances of the Data Class in the current scope - The Data Rule is applied to all Data Class Instances of the selected Data Class type available in the current scope.
- Specific instance of the Data Class - The Data Rule is applied only to the Data Class Instance that you specify in the Binding field. The binding should then return a Data Class Instance of the selected Data Class type (or one of its sub-types) which is part of the current scope.
-
Define the constraint(s) to be applied to the size of the Collection using the Valid Size setting
- At least one element option - The minimum accepted size for the Collection is 1.
- Custom Size option - Select it if the predefined option above does not match your requirements. In this case, use the following fields to specify the constraints:
- Minimum Size - The minimum size accepted for the Collection, if any. Switch to Script to enter a custom expression, if necessary. In this case, the selected Script Function must return a single Integer value. If multiple Collection Size Rules are defined on the same Data Class property, the highest value defined in the various Rules for the property is used to check the validity of the Collection size.
- Maximum Size - The maximum size accepted for the Collection, if any. Switch to Script to enter a custom expression, if necessary. In this case the selected Script Function must return a single Integer value. If multiple Collection Size Rules are defined on the same Data Class property, the lowest value defined in the various Rules for the property is used to check the validity of the Collection size.
-
In the Message field, select a Label Business Object. The text of the Label is the message to be displayed if the size of the Collection does not meet the specified constraints. Optionally, to provide more contextual information in the message, use the implicitly defined and automatically set
$instancevariable to access the instance of the Data Class to which the Rule is being applied, and the$collectionvariable to access the Collection being evaluated by the Rule. -
In the Information Message field, select a Label Business Object. The text of the Label is an informative message to be displayed when the Rule is not violated, but you wish to guide the user while populating the Collection. Optionally, in order to provide more contextual information in the message, use the implicitly defined and automatically set
$instancevariable to access the instance of the Data Class to which the Rule is being applied and the$collectionvariable to access the Collection being evaluated by the Rule. -
Optionally, in the Enabled field, specify under which circumstances the Rule must be evaluated (e.g., only for foreign Clients). The expression should return
falsewhen the Rule must not be evaluated (default istrue, meaning it is always enabled). Optionally, use the implicitly defined and automatically set$instancevariable to access the instance of the Data Class to which the Rule is being applied. -
Optionally, in the Blocking field, specify under which circumstances a violation of this Rule should be considered blocking for the execution of Process Actions. The expression should return
truewhen a violation of the Rule should prevent the execution of selected Process Actions (default isfalse, meaning it is never blocking). Optionally, use the implicitly defined and automatically set$instancevariable to access the instance of the Data Class to which the Rule is being applied, and the$collectionvariable to access the Collection being evaluated by the Rule.Tip: If you have at least two Collection Size Data Rules on the same property, we recommend that each Data Rule defines only one constraint. This ensures that a violation always results in a precise Message.
Collection Property Expression
A Collection Property Expression Rule allows specifying the validity expression for a Data Class property of type Collection.
To create a Collection Property Expression Data Rule:
-
Drag the Collection Property Expression Rule from the Data Rules panel on the right side.
-
From the Data Class selector, choose the Data Class whose Collection property is being validated.
Tip: You can open the selected Data Class by double-clicking on the Rule, or by right-clicking on it and then selecting the Open Data Class button. -
From the Property selector, choose the property of the Data Class being validated. Only properties of type Collection can be selected.
-
The Rule Target dropdown allows selecting the set of Data Class instances the Data Rule should be applied to:
- All instances of the Data Class in the current scope - The Data Rule is applied to all Data Class Instances of the selected Data Class type available in the current scope.
- Specific instance of the Data Class - The Data Rule is applied only to the Data Class Instance that you specify in the Binding field. The binding should then return a Data Class Instance of the selected Data Class type (or one of its sub-types) which is part of the current scope.
-
In the Valid field, select a Script Function that defines the conditions under which the property content is accepted by the Rule. The Script Function should return
truewhen the content is accepted andfalsewhen it is not. Use the implicitly defined and automatically set$collectionvariable to access the Collection being evaluated by the Rule. Optionally, use the$instancevariable to access the instance of the Data Class to which the Rule is being applied. -
In the Message field, select a Label Business Object. The text of the Label is the message to be displayed if the Collection is not accepted according to the Valid expression above. Optionally, to provide more contextual information in the message, use the implicitly defined and automatically set
$instancevariable to access the instance of the Data Class to which the Rule is being applied, and the$collectionvariable to access the Collection being evaluated by the Rule. -
Optionally, in the Enabled field, specify under which circumstances the Rule must be evaluated (e.g., only for foreign Clients). The expression should return
falsewhen the Rule must not be evaluated (default istrue, meaning it is always enabled). Optionally, use the implicitly defined and automatically set$instancevariable to access the instance of the Data Class to which the Rule is being applied. -
Optionally, in the Blocking field, specify under which circumstances a violation of this Rule should be considered blocking for the execution of Process Actions. The expression should return
truewhen a violation of the Rule should prevent the execution of selected Process Actions (default isfalse, meaning it is never blocking). Optionally, use the implicitly defined and automatically set$instancevariable to access the instance of the Data Class to which the Rule is being applied, and the$collectionvariable to access the Collection being evaluated by the Rule.
Collection Element Expression
A Collection Element Expression Data Rule allows validating the elements contained in a property of type Collection. In case the Rule is violated, the invalid Collection elements are highlighted in FNZ Studio Runtime.
To create a Collection Element Expression Data Rule:
-
Drag the Collection Element Expression Rule from the Data Rules panel on the right side.
-
From the Data Class selector, choose the Data Class whose Collection property is being validated.
Tip: You can open the selected Data Class by double-clicking on the Rule, or by right-clicking on it and then selecting the Open Data Class button. -
From the Property selector, choose the property of the Data Class being validated. Only properties of type Collection can be selected.
-
The Rule Target dropdown allows selecting the set of Data Class instances the Data Rule should be applied to:
- All instances of the Data Class in the current scope - The Data Rule is applied to all Data Class Instances of the selected Data Class type available in the current scope.
- Specific instance of the Data Class - The Data Rule is applied only to the Data Class Instance that you specify in the Binding field. The binding should then return a Data Class Instance of the selected Data Class type (or one of its sub-types) which is part of the current scope.
-
In the Element Valid field, select a Script Function that defines the conditions under which a Collection element is accepted by the Rule. The expression should return
truewhen the element is accepted andfalsewhen it is not. Use the implicitly defined and automatically set$itemvariable to access the element being evaluated and the$indexor$keyvariable for the position of the element in the Collection. Optionally, use the$collectionvariable to access the collection being evaluated by the Rule, and the$instancevariable to access the instance of the Data Class to which the Rule is being applied. -
In the Message field, select a Label Business Object. The text of the Label is the message to be displayed if one or more elements in the Collection are not accepted according to the Element Valid expression above. In order to provide more contextual information in the message, use the implicitly defined and automatically set
$invalidIndexesor$invalidKeysimplicit variables, which contain the positions of the invalid elements. Optionally, use the$instancevariable to access the instance of the Data Class to which the Rule is being applied, and the$collectionvariable to access the Collection being evaluated by the Rule. -
Optionally, in the Enabled field, specify under which circumstances the Rule must be evaluated (e.g., only for foreign Clients). The expression should return
falsewhen the Rule must not be evaluated (default istrue, meaning it is always enabled). Optionally, use the implicitly defined and automatically set$instancevariable to access the instance of the Data Class to which the Rule is being applied. -
Optionally, in the Blocking field, specify under which circumstances a violation of this Rule should be considered blocking for the execution of Process Actions. The expression should return
truewhen a violation of the Rule should prevent the execution of selected Process Actions (default isfalse, meaning it is never blocking). Optionally, use the implicitly defined and automatically set$instancevariable to access the instance of the Data Class to which the Rule is being applied, and the$collectionvariable to access the Collection being evaluated by the Rule. -
Optionally, use the Affected Fields section to specify the set of Data Class properties of the Collection which cause the violation. If Affected Fields are specified, these specific properties (instead of the whole element) are highlighted in FNZ Studio Runtime when the Rule is violated.
Eligible Types
Given a Data Class hierarchy where one or more child Data Classes inherit from a parent Data Class, an Eligible Types Rule defines the subset of Data Class types that can be instantiated and stored in a variable, property or collection element of the parent Data Class type. For example, given Data Classes NaturalPerson and LegalEntity inheriting from Person, this rule allows defining that a collection of type Person can contain only instances of NaturalPerson and LegalEntity, but not Person itself.
To create an Eligible Types Data Rule:
-
Drag the Eligible Types Rule from the Data Rules panel on the right side.
-
Select the target Data Class for the Rule. The Rule is applied to all variables, properties and collection elements whose type is the selected Data Class, and restricts which Data Classes can be instantiated and stored in the variable, property and collection element.
Tip: You can open the selected Data Class by double-clicking on the Rule, or by right-clicking on it and then selecting the Open Data Class button. -
Define one or more children Data Classes as eligible in the Eligible Types section. Select a Data Class from the dropdown list and click on Add to define it. For each Data Class, specify the Label that should be used in FNZ Studio Runtime when selecting which Data Class type to instantiate.
-
The Type Selection Label field determines the label of the selector displayed in FNZ Studio Runtime when selecting which Data Class type to instantiate. A default text is provided in the Label
aw.DataLogic.defaultEligibleTypesRuleTypeSelectionlocated in the Base Package. -
In the Message field, select a Label Business Object. Its text is displayed if an instance whose Data Class type is not among the eligible ones is found in the Data Context. Optionally, to provide more contextual information in the message, use the implicitly defined and automatically set
$instanceTypeLabelvariable to access the default Label Id corresponding to the Data Class Instance to which the Rule is being applied (default Labels are in the format[LABEL:{PackageId}:aw.DataClass.{DataClassId}]). A default message is provided in the Labelaw.DataLogic.defaultEligibleTypesRuleMessagelocated in the Base Package. -
Optionally, in the Enabled field, specify under which circumstances the Rule must be evaluated (e.g. only for foreign Clients). The expression should return false when the Rule must not be evaluated (default is true, meaning it is always enabled).
-
Optionally, in the Blocking field, specify under which circumstances a violation of this Rule should be considered blocking for the execution of Process Actions. The expression should return
truewhen a violation of the Rule should prevent the execution of selected Process Actions (default isfalse, meaning it is never blocking).
Multiple Properties Expression
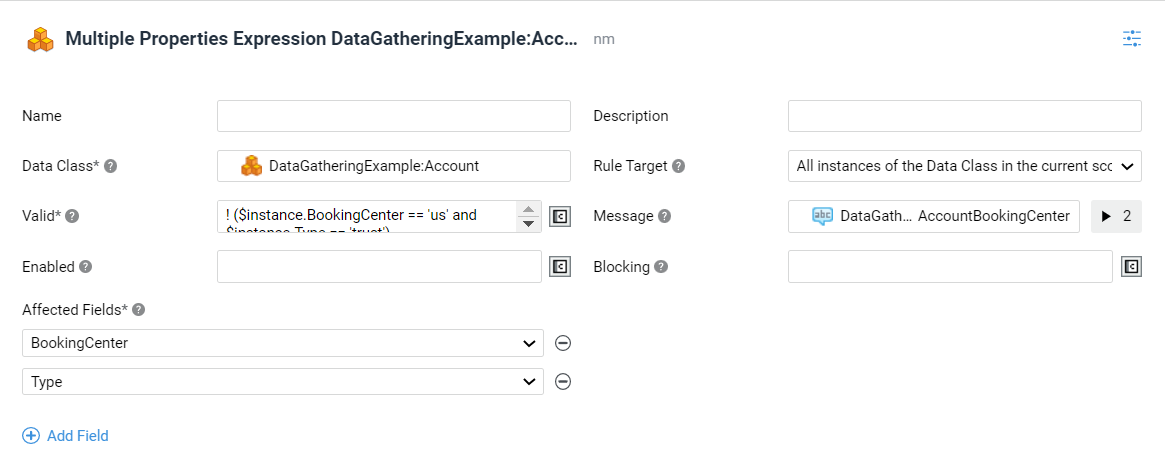
A Multiple Properties Expression Rule validates multiple properties of the same Data Class. In case the Rule is violated, all such properties are highlighted in FNZ Studio Runtime. The rule is evaluated for every instance of that Data Class, including the instances inside collections.
To create a Multiple Properties Expression Rule:
-
Drag a variable (Data Class) from the left side Variables panel into the Data Rules tab. The Data Class is selected automatically. Alternatively, create a new Multiple Properties Expression Rule manually by dragging it from the Data Rules panel on the right side and select the Data Class the rule applies to.
You can open the selected Data Class by double-clicking on the Rule, or by right-clicking on it and then selecting the Open Data Class button. -
The Rule Target dropdown allows selecting the set of Data Class instances the Data Rule should be applied to:
- All instances of the Data Class in the current scope - The Data Rule is applied to all Data Class Instances of the selected Data Class type available in the current scope.
- Specific instance of the Data Class - The Data Rule is applied only to the Data Class Instance that you specify in the Binding field. The binding should then return a Data Class Instance of the selected Data Class type (or one of its sub-types) which is part of the current scope.
-
In the Valid field, enter the expression that evaluates whether the properties selected as Affected Fields are accepted by the Rule. The expression should return
truewhen the values are accepted andfalsewhen they are not. Use the implicitly defined and automatically set$instancevariable to access the instance of the Data Class to which the Rule is being applied. Example: Rule: A credit card owner must be 18 or older. Written as a validity expression for a Multiple Properties Expression Rule:CopyReturn TIMEDIFF($instance.dateOfBirth, TODAY(), 'y') >= 18 -
In the Message field, select the Label Business Object whose text should be displayed in the auto-generated UI if the values of the properties selected as Affected Fields are not accepted according to the Valid expression. Optionally, to provide more contextual information in the message, use the implicitly defined and automatically set
$instancevariable to access the instance of the Data Class to which the Rule is being applied. -
Define one or more Affected Fields by clicking on the Add Field button and selecting them one by one from the dropdown list. Affected Fields determine the properties that are highlighted in FNZ Studio Runtime when the Rule is violated.
Note: If you created the Multiple Properties Expression Rule by dragging in a property of a Data Class, that property is already defined as an Affected Field.
-
Optionally, in the Enabled field, enter an expression that specifies the circumstances under which the Rule must be evaluated (e.g. only for foreign clients). The expression should return
falsewhen the Rule must not be evaluated (default istrue, meaning it is always enabled). Optionally, use the implicitly defined and automatically set$instancevariable to access the instance of the Data Class to which the Rule is being applied. -
Optionally, in the Blocking field, specify under which circumstances a violation of this Rule should be considered blocking for the execution of Process Actions. The expression should return
truewhen a violation of the Rule should prevent the execution of selected Process Actions (default isfalse, meaning it is never blocking). Optionally, use the implicitly defined and automatically set$instancevariable to access the instance of the Data Class to which the Rule is being applied.
Cross-Data Class Expression
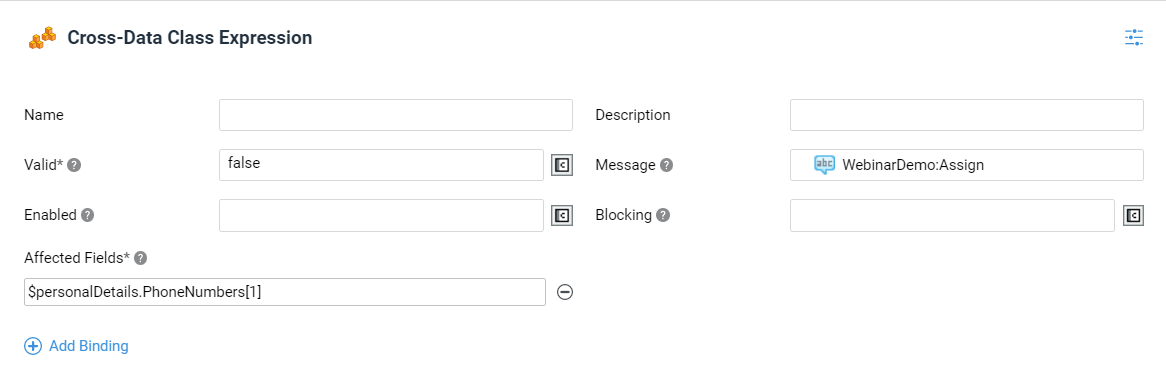
A Cross-Data Class Expression Rule validates multiple properties of different Data Classes. In case the Rule is violated, all such properties are highlighted in FNZ Studio Runtime. Properties inside collections are not supported, you can only set a Rule for the collection as a whole. Use this type of Rule when it is not possible to use a Multiple Properties Expression Rule, for example when a rule affects fields of multiple, separate Data Classes.
To create a Cross-Data Class Expression Rule:
- Drag the Cross-Data Class Expression Rule from the Data Rules panel on the right side.
- The Valid field, enter the expression that evaluates whether the values of the bindings selected as Affected Fields (see below) are accepted by the Rule. The expression should return
truewhen the values are accepted andfalsewhen they are not. - In the Message field, select the Label Business Object whose text should be displayed in the auto-generated UI if the values of the bindings selected as Affected Fields are not accepted according to the Valid expression.
- To define one or more Affected Fields, click on Add Binding and enter the bindings to be validated (e.g.,
$client.name) one by one. Affected Fields define the fields that are highlighted in FNZ Studio Runtime when the Rule is violated. - Optionally, enter an expression in the Enabled field. This specifies under which circumstances the Rule must be evaluated (e.g. only for foreign Clients). The expression should return
falsewhen the Rule must not be evaluated (default istrue, meaning it is always enabled). - Optionally, in the Blocking field, specify under which circumstances a violation of this Rule should be considered blocking for the execution of Process Actions. The expression should return
truewhen a violation of the Rule should prevent the execution of selected Process Actions (default isfalse, meaning it is never blocking).
Search
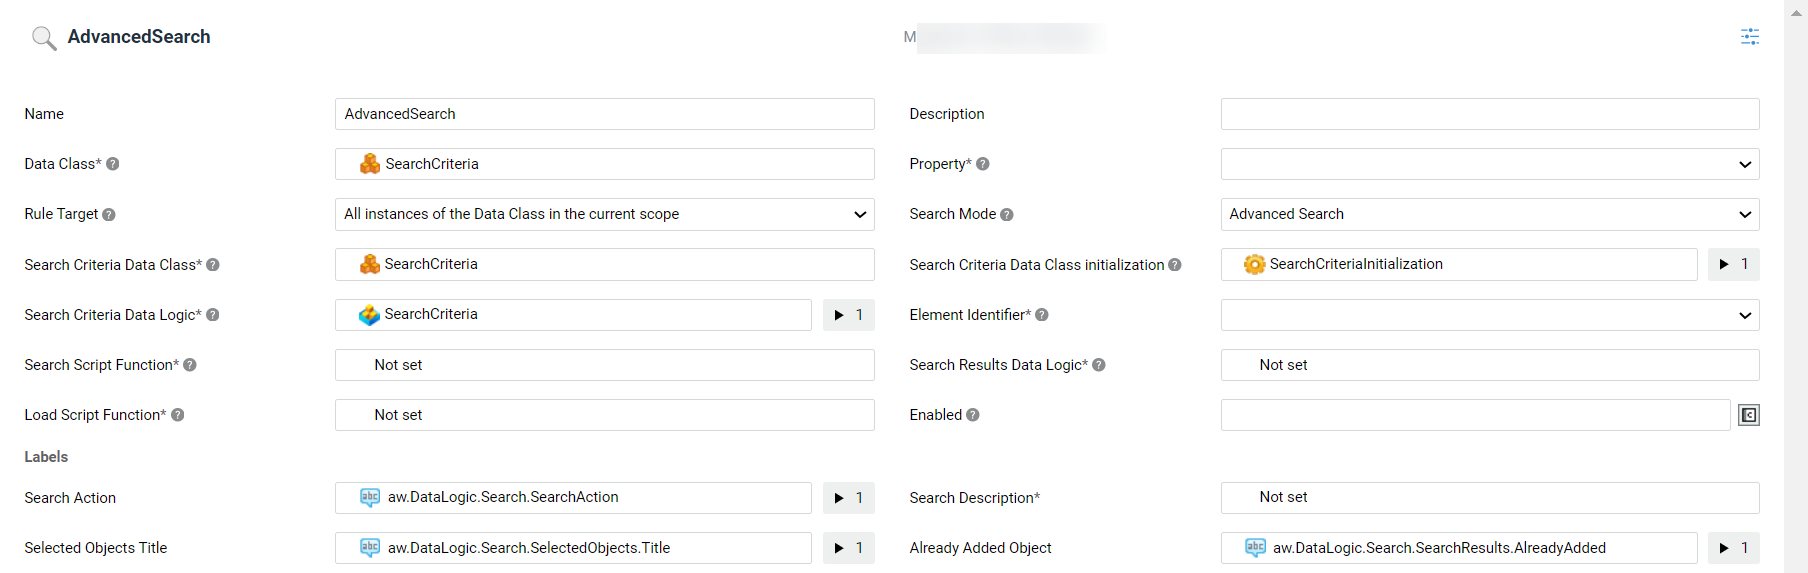
A Search Data Rule defines all the settings necessary to allow searching for existing objects in a source (typically an external system) and adding them to a Single Element or Collection property. In case of Collection, the rule ensures that the same object is not added to the Collection twice. The Search Data Rule also provides options to configure an advanced search mode, which allows specifying custom search criteria modeled using a Data Class and rendered using a Data Logic.
The search operation itself (e.g., invoking external systems- APIs to load search results) is configurable with a Script Function (Search Script Function setting), therefore logic to load data is fully customizable. The Search Script Function receives, as input, the search criteria entered by the user in the UI and the pagination parameters, and returns paged results (only the current page being displayed). The results returned by the Script Function must contain the id coming from the source system they are loaded from (Element Identifier setting), which is used to identify them. Search results are saved only temporarily (they are not persisted to the Value Store); they are shown in the UI in table format, and this is configured using a Data Logic Business Object (Search Results Data Logic setting). The end user can pick one or more elements among the search results to add them to the target property. Typically, the search API method offered by source systems only returns a subset of object data (the data to be shown in the search results UI), while there is a separate load API method returning the full object. This second method is invoked using another configurable Script Function (Load Script Function setting), which relies on the Element Identifiers of the objects to be loaded, thus making this aspect fully customizable.
To create a Search Data Rule:
-
Drag the Search Rule from the Data Rules panel on the right side.
-
Select the desired values from the Data Class and Property selectors. The property contains the target Collection that objects will be added to in case of Collections, or the object to be selected in case of a Single Element. For example, if the Data Class
MyPackage:AccountOpeningand its propertyclientsof type IndexedMyPackage:Clientare selected, it will be possible to search and add clients to the clients Collection. Note that for the Property selector, only properties whose type is a Single Element or Indexed Collection of Data Class instances with the Summary Behavior (or Relationship Definition Object Behavior in case of Relationship Definition App Tasks) can be selected. -
The Rule Target dropdown list allows selecting the set of Data Class instances the Data Rule should be applied to:
- All instances of the Data Class in the current scope - The Data Rule is applied to all Data Class Instances of the selected Data Class type available in the current scope.
- Specific instance of the Data Class - The Data Rule is applied only to the Data Class Instance specified in the Binding field. The binding should then return a Data Class Instance of the selected Data Class type (or one of its sub-types) which is part of the current scope.
-
In the Search Mode field, select the type of search criteria to be shown in the runtime UI:
- Basic Search provides two built-in search criteria: a type selector and a free-text search field;
- Advanced Search allows specifying custom search criteria (e.g., multiple filter criteria) modeled using a Data Class BO and rendered using a Data Logic BO (specified below) for further search flexibility.
-
(Only for Advanced Search) In the Search Criteria Data Class field, select the Data Class BO that contains the advanced search criteria (e.g. Name, Surname Strings); This Data Class must extend
DataLogic:SearchCriteria. -
(Optional - Only for Advanced Search) In the Search Criteria Data Class initialization field, select a Script Function that initializes the search criteria, for example by setting default values. This Script Function must return an initialized instance of the Search Criteria Data Class selected above.
-
(Only for Advanced Search) In the Search Criteria Data Logic field, select the Data Logic BO which contains the structure of the search criteria to be rendered in FNZ Studio Runtime. In the variable assignments of this Data Logic BO, use the implicit variable
$searchCriteriato access the Search Criteria Data Class instance to be used to bind the Data Logic Controls. This instance contains the object returned by the Search Criteria Data Class initialization Script, or an empty initialized object if the Script is not set. The instance is available to the Search Script function in thesearchCriteriaproperty of theDataLogic:SearchParameterData Class instance. -
In the Element Identifier field, select the String property that contains the unique identifier of the object in the source the object was loaded from. This is used to identify objects and verify if two objects represent the same entity (client, account etc.). The selector shows the String properties of the Data Class compatible with the target Property (selected in the Property field). In the example above, the selector shows String properties of Data Class
MyPackage:Client; in this case, the Element Identifier must contain the external id of clients. -
In the Search Script Function field, select the Script Function that performs the search operation on the source.
- Use the implicitly defined
$searchParametersvariable in assignments to the Script Function to access the search parameters (search criteria and pagination) described by theDataLogic:SearchParameterData Class. When the UI triggers the search, the$searchParametersvariable is populated with the filters entered by the user and the paging information; the engine then calls the Search Script Function. TheDataLogic:SearchParameterData Class contains:DataLogic:SearchCriteria, which contains the search criteria specified by the end user in the UI. At runtime, this property contains an instance of the Data ClassDataLogic:BasicSearchCriteriawith the following properties:String type: the object type selected by the end user in the Type dropdown in the UI (if available). Its value is located in the id column of the Type Catalog selected in the Search Data Rule.String text: the search text entered by the end user in the UI.
Integer start: the index of the first object returned by search results, or 0 if starting from the first result. This is used for pagination: when loading a page different from the first one, the property should contain the index of the first result in the page.Integer limit: the number of results to be returned, must be greater than 0. This is also used for pagination, to control the number of results per page.
- The Script Function must return an instance of the
DataLogic:SearchResultsData Class, which contains the properties:Indexed Any results, which must contain the search results, that is, the collection of objects read from the source which match the search parameters. Note that this Collection must contain objects that are compatible with the target property selected in the Data Rule (same type or children Data Classes). In the example above, the results property of theDataLogic:SearchResultsData Class must contain instances compatible with the Data ClassMyPackage:Client.Integer total, which must contain the total number of results available in the source which match the search criteria (ignoring pagination). Note that the content of the DataLogic:SearchResults Data Class instance is not saved in the Value Store, but only used temporarily when displaying the search results in the UI.
- Use the implicitly defined
-
In the Search Results Data Logic field, select the Data Logic Business Object that describes the structure of the search results. This is used in the UI to render the search results list. Only Primitive Controls and Data Rules of type Catalog Values, Email, Phone Number and Link are considered. In the variable assignments of the Data Logic, use the implicit variable
$searchResultto access the result item being displayed. -
In the Load Script Function field, select the Script Function that loads one or more objects from the source once they have been selected among the search results. Use the implicitly defined
$elementIdentifiersvariable in assignments to the Script Function to access the list of Element Identifiers of objects to be loaded and the$selectedSearchResultsto access the list of selected search results. The engine populates the$elementIdentifiersand the$selectedSearchResultsvariables with the information received from the UI and invokes the Load Script Function; it then adds the objects returned by the Script Function to the target property. The Script Function must return an Indexed Collection of Data Class Instances whose type is compatible with the target property selected in the Data Rule (same type or children Data Classes). In the example above, the Load Script Function must return instances compatible with Data ClassMyPackage:Client. In the case of a Single Element target property, the Collection returned by the Script Function must contain one single object. -
(Optional) In the Post-Load Update Function field, select a Script Function that specifies the logic to be executed after the selected Objects are added to the target Property (if any). Use the implicitly defined
$loadedObjectsvariable in assignments to the Script Function to access the list of loaded Objects. This Script Function is allowed to perform changes on the data contained in the Data Context. -
(Only if the target property is a Collection) If selected, the Allow Object Creation checkbox allows creating a new object to be set into the target property selected in the Data Rule. By clicking on the gear icon, you can enter a Script Function to implement dynamic object creation behavior. Otherwise, deselect the checkbox to prevent creating a new object. If deselected, the user will only be able to choose among the objects returned by the search. This results in the following combinations:
- Collection sentry is enabled / Search Data Rule is not available: It is possible to create and add new elements to the Collection
- Collection sentry is enabled / Search Data Rule is available / Allow Object Creation=false: It is possible to search for existing elements to be added to the Collection
- Collection sentry is enabled / Search Data Rule is available / Allow Object Creation=true: It is possible to create and add new elements to the Collection and search for existing elements to be added to the Collection
- Collection sentry is disabled: It is possible to create and add new elements to the Collection and search for existing elements to be added to the Collection, but buttons are disabled.
-
(Optional - Only for Basic Search) In the Type Catalog field, select the Catalog Business Object to be used as a source for the content of the Type dropdown in the search criteria UI. The
idanddescriptioncolumns are used. The value (id) selected by the user in the dropdown is used to populate the Type property in theDataLogic:BasicSearchCriteriaData Class. If no Catalog is selected, the Type dropdown is not shown in the search criteria UI. -
(Only when the target property is a Collection) In the Message field, select a Label Business Object. Its text is displayed if the target Collection property contains two objects whose Element Identifier property is set to the same value. Optionally, to provide more contextual information in the message, use the implicitly defined and automatically set
$instancevariable to access the instance of the Data Class to which the Rule is being applied and the$duplicatedElementIdentifiervariable to access the id of the duplicated element which causes the violation of the Data Rule. -
(Optional) In the Enabled field, specify under which circumstances the Rule must be evaluated. The expression should return false when the Rule must not be evaluated (default is true, meaning it is always enabled). Optionally, use the implicitly defined and automatically set
$instancevariable to access the instance of the Data Class to which the Rule is being applied. -
(Optional - Only if the target property is a Collection) In the Blocking field, specify under which circumstances a violation of this Rule should be considered blocking for the execution of Process Actions. The expression should return true when a violation of the Rule prevents the execution of selected Process Actions (default is false, meaning it is never blocking). Optionally, use the implicitly defined and automatically set
$instancevariable to access the instance of the Data Class to which the Rule is being applied. -
In the Labels section, you can configure specific Label Business Objects to be shown in the UI. The list below describes the Labels that can be configured in the Search Data Rule, where they usually appear in the UI, and the corresponding Label IDs:
Note that other, non-configurable, Labels related to the Search are contained in the `AppTask` Platform Package which is deployed when the related App Task extensions are started for the first time. Such Labels can be changed using the Overriding Translations feature. See App Tasks: Common Configuration documentation for generic information on localization, and check FNZ Studio Products for a full list of additional Labels for each version.
Labels are:
- Search Action field (optional): Button to trigger the search. Label is
aw.dataLogic.Search.SearchAction. - Search Description field (mandatory): Explanatory text above search criteria, provides instructions on how to perform the search. Label is empty by default (depends on the specific implementation).
- Selected Objects Title field (optional - only if target property is a Collection): Title of temporary list of selected objects. Label is
aw.dataLogic.Search.SelectedObjects.Title. - Already Added Object field (optional - only if target property is a Collection): Message shown when a search result was already added. Label is
aw.dataLogic.Search.SearchResults.AlreadyAdded.
- Search Action field (optional): Button to trigger the search. Label is
Data Logic Include
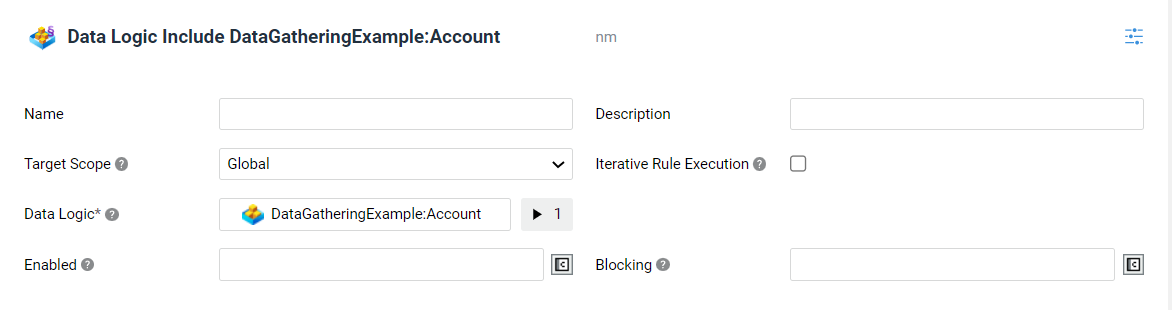
Data Logic Include Rules allow including Data Rules defined in another Data Logic Business Object. The included Rules are evaluated in addition to the Rules defined in the current Data Logic.
To create a Data Logic Include Rule:
-
Drag an existing Data Logic Business Object from the right-side library (Data Logic section) into the Data Rules tab and fill the Variable Assignments fields that are displayed.
-
Alternatively, drag in a Data Logic Include Rule from the Data Rules section in the right-side library, then select the Data Logic, and fill the Variable Assignments fields that are displayed.
You can open the selected Data Logic by double-clicking on the Rule, or by right-clicking on it and then selecting the Open Data Logic button. -
The Target Scope dropdown allows defining the set of Data Class instances that the included Data Rules should be applied to:
-
Assigned - (default value) the Data Rules are applied only to the Data Class Instances contained in the Variables that are assigned to the included Data Logic (together with the Data Class Instances contained in their properties, at any level).
-
Global - Data Rules are applied to all the Data Class Instances contained in the Data Context, even if they are not explicitly assigned to the included Data Logic.
Note that Rules created in Appway 10 and lower are set to Global by default, as this was the standard behavior in previous versions.
-
-
Select the Iterative Rule Execution checkbox if you want to execute the included Data Rules for each element of a Collection. For example, given an Account Data Model which contains a list of Parties, and each Party has a dateOfBirth and a KYC object, you can use this setting so that the included Data Rules for the KYC object are enabled only if the Party is a not a minor. In this case, enter the following:
-
Collection - The collection for whose elements the Data Rules should be executed.
-
Variable - name of the variable that refers to the current element of the Collection. It can be used in the Variable Assignments of the Data Logic whose Data Rules should be included in the current Data Logic.
Technical note: Variable assignments of Data Logic Include Rules cannot use temporary variables defined in the Controls tab, such as Index Variables of Collection Controls.
-
-
Optionally, define an Enabled expression that specifies in which circumstance the included Data Rules must be evaluated (e.g. only for foreign Clients). The expression should return
falsewhen the included Data Rules must not be evaluated (default istrue, meaning that the Enabled setting of each included Rule is used). The setting is propagated to the included Data Rules as follows:- If the Enabled expression of a Data Logic Include Rule returns
false, all included Data Rules (recursively) are not evaluated. - If the Enabled expression of a Data Logic Include Rule returns
trueor is not set, the Enabled setting of included Data Rules is used.
- If the Enabled expression of a Data Logic Include Rule returns
-
Optionally, in the Blocking field, specify under which circumstances a violation of included Data Rules should be considered blocking for the execution of Process Actions. The expression should return
truewhen a violation of the included Data Rules should prevent the execution of selected Process Actions (default isfalse, meaning that the Blocking setting of each included Rule is used). The setting is propagated to the included Data Rules as follows:- If the Blocking expression of a Data Logic Include Rule returns
true, all included Data Rules (recursively) are considered blocking. - If the Blocking expression of a Data Logic Include Rule returns
falseor is not set, the Blocking setting of included Data Rules is used.
- If the Blocking expression of a Data Logic Include Rule returns
Technical Notes for the Data Logic Include Control and the Data Logic Include Rule Included Controls/Rules use the same Data Context as the Data Logic that is including them. However each Data Logic Include Control/Data Logic Include Rule has its own Variable Scope, containing all variables defined in the Included Data Logic. The Variable Scopes corresponding to Data Logic Include Controls/Data Logic Include Rules are re-initialized at each run of the Data Engine.
In general, input data is provided to Data Logic Include Controls/Data Logic Include Rules using Variable Assignments. The content of variables that are assigned from the "root" Data Logic down to Included Data Logic Business Objects is in general part of the Data Context. However, note that the following Data Entities are not part of the Data Context:
- Data Entities that are only pointed to by Default Expressions of Local Variables defined in included Data Logic Business Objects.
- Data Entities that are only pointed to by Default Expressions of Assigned Variables defined in included Data Logic Business Objects.
- Data Entities that are only pointed to by Variable Assignment Expressions of Data Logic Include Controls/Data Logic Include Rules.
- Assigned variables of Simple Type (Primitive Type, Single Element) defined in included Data Logic Business Objects.
As a result, such entities reside only in the Variable Scope corresponding to the Included Data Logic and they are re-initialized at each run of the Data Engine. Moreover, binding Controls pointing to such Data Entities are not returned in the result of the Data Engine and Rules are not applied to those Data Entities, since they are not part of the Data Context.
Local Variables outside of the Data Context and Assigned Variables of Simple Type in Included Data Logic Business Objects can, therefore, only be used during the run of the Data Engine for temporary calculations and checks.
Example Given the following Data Logic Business Objects and corresponding Variable definitions:
Data Logic 1 - Variables:
- Assigned Person
$person
Data Logic 2 - Variables:
- Assigned Person
$person - Assigned Address
$address - Local Address
$secondAddresswith default expression$person.address - Assigned Address
$thirdAddress - Local Contract
$contractwith default expression new Contract;
Given that Data Logic 1 includes Data Logic 2 and assigns:
- Value
$personto the$personvariable in Data Logic 2 - Value
$person.addressto the$addressvariable in Data Logic 2 - Value
new Address; to the$thirdAddressvariable in Data Logic 2
the following behavior applies to the variables defined in Data Logic 2:
- The content of
$personand$addressare part of the Data Context since the value is assigned from the "root" Data Logic (Data Logic 1). - The content of
$secondAddressis also part of the Data Context since, even though the variable is Local, it references something that is already part of the Data Context. - The content of
$thirdAddressis not part of the Data Context since, even though the variable is Assigned, the Variable Assignment expression does not reference something that is already part of the Data Context. - The content of
$contractis not part of the Data Context, since the variable is Local and it does not reference something that is already part of the Data Context.
Shortcut Keys in the Data Logic Editor
The following table provides and overview of the shortcut keys (or shortcut key behaviors) specific to the Data Logic Editors.
| Tab | Item | Shortcut | Operation |
|---|---|---|---|
| Controls | All | Backspace/Delete key | Delete Control |
| Controls | All | CTRL-V | Pastes after selected items or at the bottom, if none selected |
| Controls | All | CTRL-Z | Undoes the latest operation performed |
| Controls | All | CTRL-Y | Re-does the latest operation performed |
| Controls | All | D | Delete Control |
| Controls | All | Shift | Selects multiple adjacent Controls |
| Controls | Data Class | A | Add Data Property |
| Controls | Data Class | O | Open Data Class |
| Controls | Data Class | R | Re-fold Control |
| Controls | Data Logic Include | O | Open Data Logic |
| Controls | Start Subprocess Action | O | Open Process |
| Data Rules | All | Backspace/Delete key | Delete Data Rule |
| Data Rules | Al | CTRL-V | Paste Data Rule at the bottom |
| Data Rules | All | CTRL-Z | Undoes the latest operation performed |
| Data Rules | All | CTRL-Y | Re-does the latest operation performed |
| Data Rules | All | D | Delete Data Rule |
| Data Rules | All | Shift | Selects multiple adjacent Data Rules |
| Data Rules | Data Logic Include | O | Open Data Logic |
| Data Rules | Eligible Types | O | Open Data Class |
| Data Rules | Mandatory Fields | O | Open Data Class |
| Data Rules | Multiple Properties Expression | O | Open Data Class |
| Data Rules | Single Property Expression | O | Open Data Class |
| Variables | All | Backspace/Delete keys | Delete Variable |
| Variables | Variable | A | Copy All Variables Definitions |
| Variables | Variable | C | Copy "" |
| Variables | Variable | CTRL-C | Copy "" |
| Variables | Variable | CTRL-V | Paste "" |
| Variables | Variable | CTRL-Z | Undoes the latest operation performed |
| Variables | Variable | CTRL-Y | Re-does the latest operation performed |
Multiple selection is possible for items in the Variables tab.
Script Function Reference
The following Script Functions are available for retrieving Data Rule information.
-
DataLogic:EvaluateDataRulesRuns the Data Engine once using the Data Logic with the given ID and the given variable assignments. Returns the result of Data Rules evaluation.Parameters (String) The Data Logic Reference or ID (Named Any, Optional) The variable assignments for the Data Logic
Return (
DataRules:DataRulesInfo) Rule information resulting from the Data Engine run. -
EvaluateFilteredDataRulesRuns the Data Engine once by using two provided Data Logic Business Objects containing Data Rules and Controls, respectively. It returns the result of the evaluation of the first Data Logic Business Object (containing Data Rules) considering only those Data Rules that have a corresponding visible Control returned by the second Data Logic Business Object (containing Controls).Parameters
- (String)
$dataRulesDataLogicId. The Reference or ID of the Data Logic containing the Data Rules to be evaluated. Example:AccountOpening:ClientDataRules - (Named Any)
$dataRulesVariableAssignments. The variable assignments for the Data Rules Data Logic. Example:{'var' = 'value'}:Any - (String)
$controlsDataLogicId. The Reference or ID of the Data Logic containing the Controls to be used for filtering Data Rule information. Example:AccountOpening:ClientControls - (Named Any)
$controlsVariableAssignments. The variable assignments for the Controls Data Logic. Example:{'var' = 'value'}:Any
Return Returns
DataRules:DataRulesInfo. Rule information resulting from the Data Engine run. - (String)
-
DataLogic:HasDataRuleViolationsRuns the Data Engine once using the Data Logic with the given ID and the given variable assignments and evaluates the Data Rules specified by the given filter. Returns true if there is at least one violation in the filtered Data Rules.Parameters
- (String)
$dataLogicId. The Reference or ID of the Data Logic to be used Example:AccountOpening:ClientDataRules - (Named Any, Optional)
$variableAssignments. The variable assignments for the Data Logic Example:{'var' = 'value'}:Any - (
DataRules:Filter, Optional)$dataRulesFilter. The filtering criteria that define the subset of Data Rules to be evaluated Example:$dataRulesFilter
Return (
DataRules:DataRulesInfo) True if there is at least one violation in the filtered Data Rules, false otherwiseExample
CopyDataRules:Filter $filter := new DataRules:Filter;
$filter.evaluateNonBlocking := true;
$filter.ruleTypes := [DataRules:Type.mandatoryFields()]:DataRules:Type;
DataLogic:HasDataRuleViolations(DataLogic:NewReference('Laura:Client'), {'client'=new Laura:Client}:Any, $filter); - (String)
-
DataLogic:EvaluateControlsForPDFRuns the Data Engine once using the given Data Logic and variable assignments. Returns the result of Control evaluation meant for generating read-only PDFs. The output of the Function can be used to populate a PDF Output Table Business Object that renders the content of the Data Logic.Parameters
- (DataLogic:Reference)
$dataLogic. Data Logic to be used - (Named Any, Optional)
$variableAssignments. Variable assignments for the Data Logic - (String, Optional)
$language. Id of the language to be used to translate Labels
Return (
DataLogicToPDF:ControlInfo) Control information resulting from the run of the Data Engine. - (DataLogic:Reference)