Languages, Labels and Translations
Language Business Object
Solutions built in FNZ Studio support a finite, specified list of languages. Language Business Objects are used to control the list of available languages for all Business Objects or elements that need language control.
Examples:
-
The available translation languages for Label Business Objects are defined via the Language Business Object: for each language which is defined, you can add a translation.
Note: To determine which language is displayed in a user's web browser, FNZ Studio considers many different language configuration possibilities, see Language Priority for details. -
For PDF Output Business Objects, the languages from which you can select when defining their Language property depend on the Language Business Objects defined for the FNZ Studio instance.
Each Language Business Object has the following properties:
-
ID - The language ID. When creating Languages in FNZ Studio, it is good practice to set the ID of the Language Business Object to the two-letter country code defined by the
ISO 3166-1standard, such as en for English or fr for French.Note: To specify regional variants of languages, use the underscore character '_' as a delimiter. For example: en_US for American English.
-
Name - The name of the language.
-
Description - A description, if needed.
Note: Defined Languages are valid for the whole FNZ Studio instance. For this reason, the Language Business Object is available only in the Base Package.
Label Business Object
Label Business Objects are used to translate text shown in your FNZ Studio Solution in the Workspace into different languages.
We highly recommend assigning Labels instead of entering text directly in text input fields in your Screen, Catalog, or other component:
- Labels, in fact, can contain translations to different languages, therefore, they are translated to the user's language on-the-fly when the user accesses the Solution in the Workspace if the according translation is available.
- The usage of Labels helps keep the terminology used in your Solution consistent, as Labels can be reused in multiple locations.
Creating Labels
There are various places in the FNZ Studio Composition where you can create Label Business Objects. Moreover, you can also assign variables to such Labels (see all details in the sections below):
- In the Label Business Object editor, from the context menu.
- In most text fields of Business Object editors, from their context menu.
- In some fields of the Data Logic and Data Class editors, from the Label selector.
- In the Translations Tool accessible from Business Object editors (currently available for the Data Logic, Data Class, and Process editors) through the Edit Labels button.
Creating Labels from the Label Business Object Editor
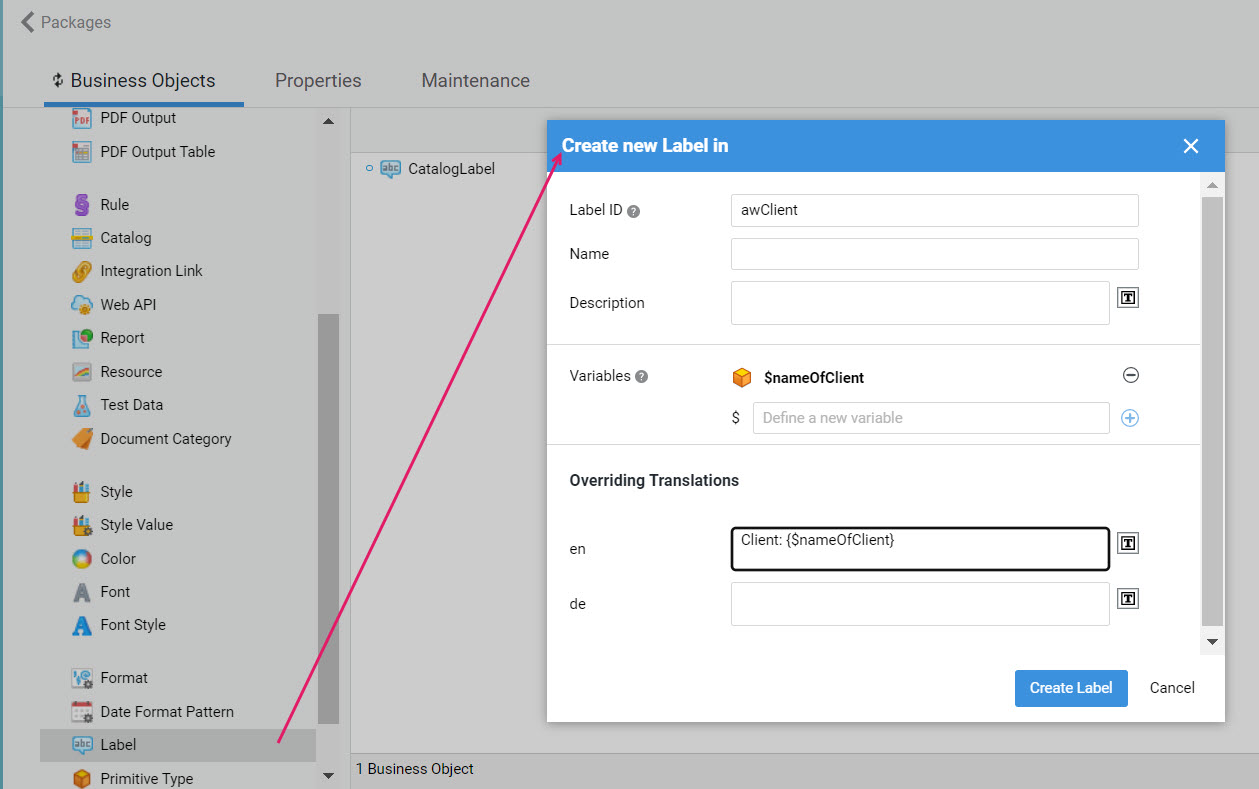
- In the Business Object library, right-click on the Label Business Object and select New Label.
- Click on the Create New button to open the Create new Label dialog, and fill the necessary fields. Consider the following:
- Label ID: (mandatory) See the Reference: Label ID Best Practices section below for recommendations on Label IDs.
- Variables (optional): Define one or more variables of type String for texts that may contain any changing content, such as Assign task to {$firstName} {$lastName}. Such variables can then be used in label translations by typing {$firstName} {$lastName} in the text, where necessary.
- Translations (optional): You can add translations for all languages available (e.g. en for English and de for German) on your FNZ Studio instance (according to the defined Language Business Objects). Consider that translations are saved as Overriding Translations as they do not modify the Label Business Object itself, and are available in the Package Overview page (Solution Design > Translations).
- Click on Create Label.
Creating Labels from the Text Field Context Menu
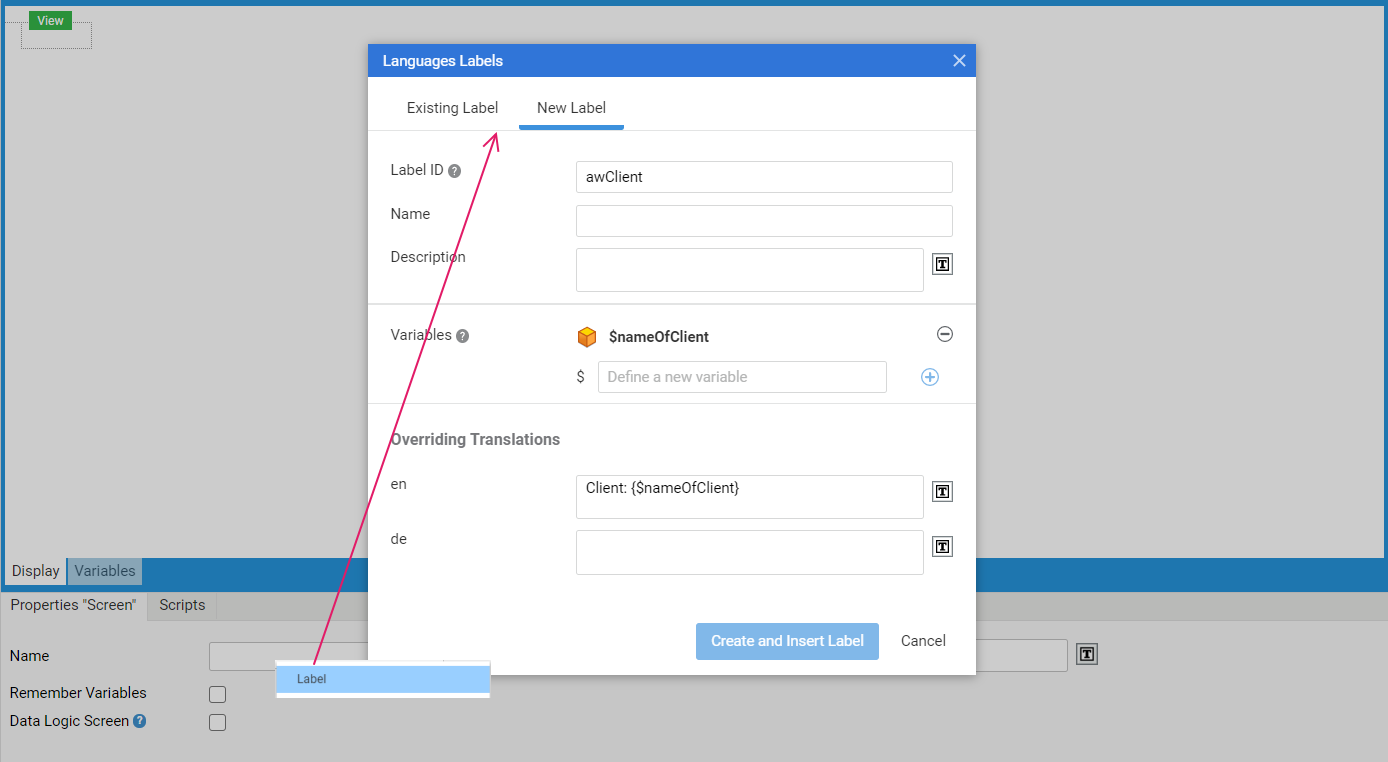
Most text fields displayed in Business Object editors (e.g. the Name and Description fields for Catalogs, Screens, Processes and so on) allow selecting an existing Label or creating a new one contextually instead of entering text manually. This is a highly recommended approach.
- Right-click on the text field where you want the Label to be inserted (e.g. on the Name field of your Screen) and click on the Label option from the context menu. A dialog called [Package Name] labels is displayed.
- To select an already existing Label, select the Existing label tab, and then click on the Select Label field to open the Label selector. You can use the Filter to narrow down your search.
- Click on the Create New button to open the Create new Label dialog. and fill the necessary fields. Consider the following:
- Label ID: (mandatory) See the Reference: Label ID Best Practices section below for recommendations on Label IDs.
- Variables (optional): Define one or more variables of type String for texts that may contain any changing content, such as Assign task to {$firstName} {$lastName}. Such variables can then be used in label translations by typing {$firstName} {$lastName} in the text, where necessary.
- Translations (optional): You can add translations for all languages available (e.g. en for English and de for German) on your FNZ Studio instance (according to the defined Language Business Objects). Consider that translations are saved as Overriding Translations as they do not modify the Label Business Object itself, and are available in the Package Overview page (Solution Design > Translations).
- Click on the Create and Insert New Label button to create the Label Business Object and insert it in the Label field directly.
- If any variables were defined, the number of such assigned variables is displayed next to the label field. Click on the arrow icon next to the number to open the Variable Assignments editor, where you can actually assign a specific value to each defined variable.
Creating Labels from the Label Selector
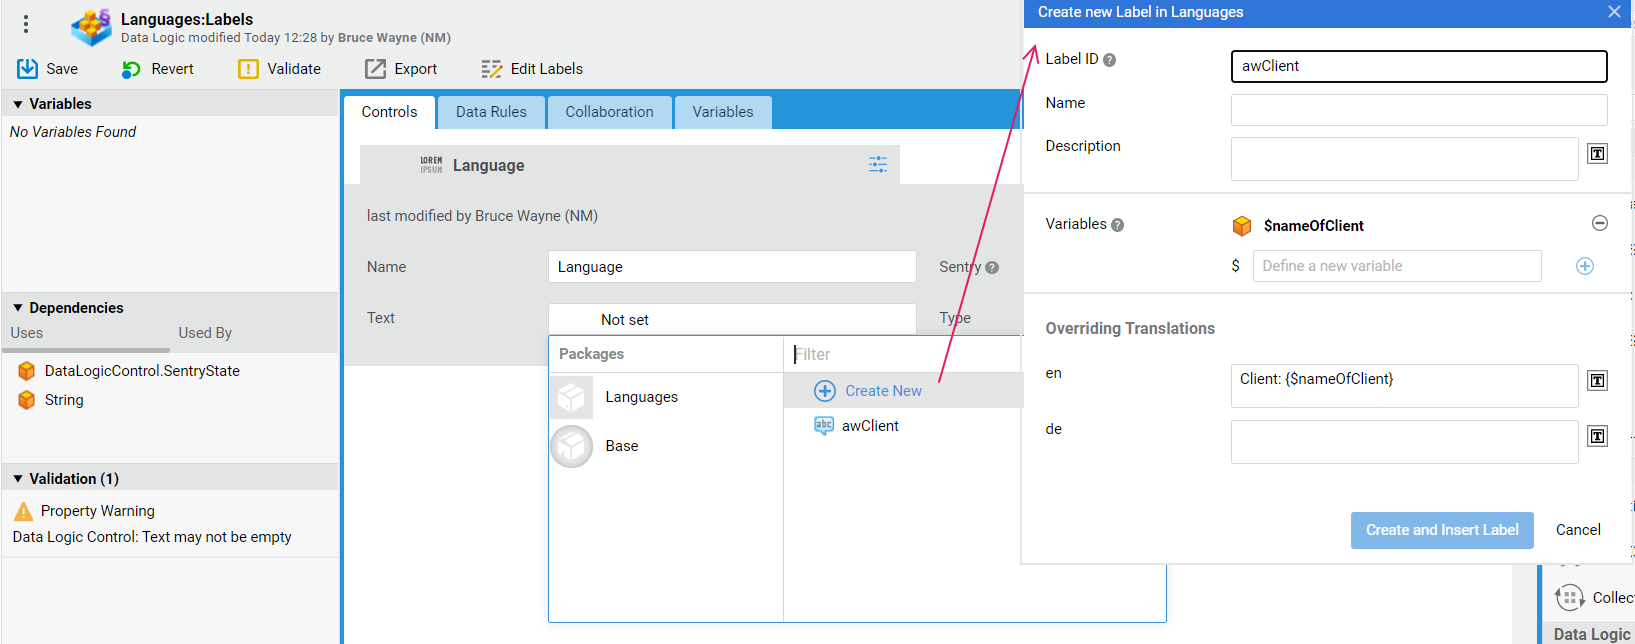
A Label Business Object selector is available for some fields in the Data Logic and Data Class editors. The editor allows selecting an existing Label from the current or other Package. However, it also allows creating a new Label Business Object on the fly. To do so:
-
Click on the Label field (or other field allowing Label selection) to open the Label Business Object selector.
-
Click on the Create New button to open the Create new Label dialog, and fill the necessary fields. Consider the following:
- Label ID: (mandatory) See the Reference: Label ID Best Practices section below for recommendations on Label IDs.
- Variables (optional): Define one or more variables of type String for texts that may contain any changing content, such as Assign task to {$firstName} {$lastName}. Such variables can then be used in label translations by typing {$firstName} {$lastName} in the text, where necessary.
- Translations (optional): You can add translations for all languages available (e.g. en for English and de for German) on your FNZ Studio instance (according to the defined Language Business Objects). Consider that translations are saved as Overriding Translations as they do not modify the Label Business Object itself, and are available in the Package Overview page (Solution Design > Translations).
-
Click on Create and Insert New Label to create the Label Business Object and insert it in the Label (or other) field directly.
-
If any variables were defined, the number of such assigned variables is displayed next to the label field. Click on the arrow icon next to the number to open the Variable Assignments editor, where you can actually assign a specific value to each defined variable.
Note: Variable assignments are also visible (in read-only mode) from the Package overview page (Solution Design > Translations).
Creating Labels from the Translations Tool
The Data Logic, Data Class, and Process Editors allow displaying an overview as well as editing the Labels used in the current Business Object through the Translations tool. Specifically, this tool allows:
- Checking translated and untranslated Labels
- Editing translations and variable assignments
- Creating missing Label Business Objects
- Generate English texts automatically for specific Labels for demo purposes
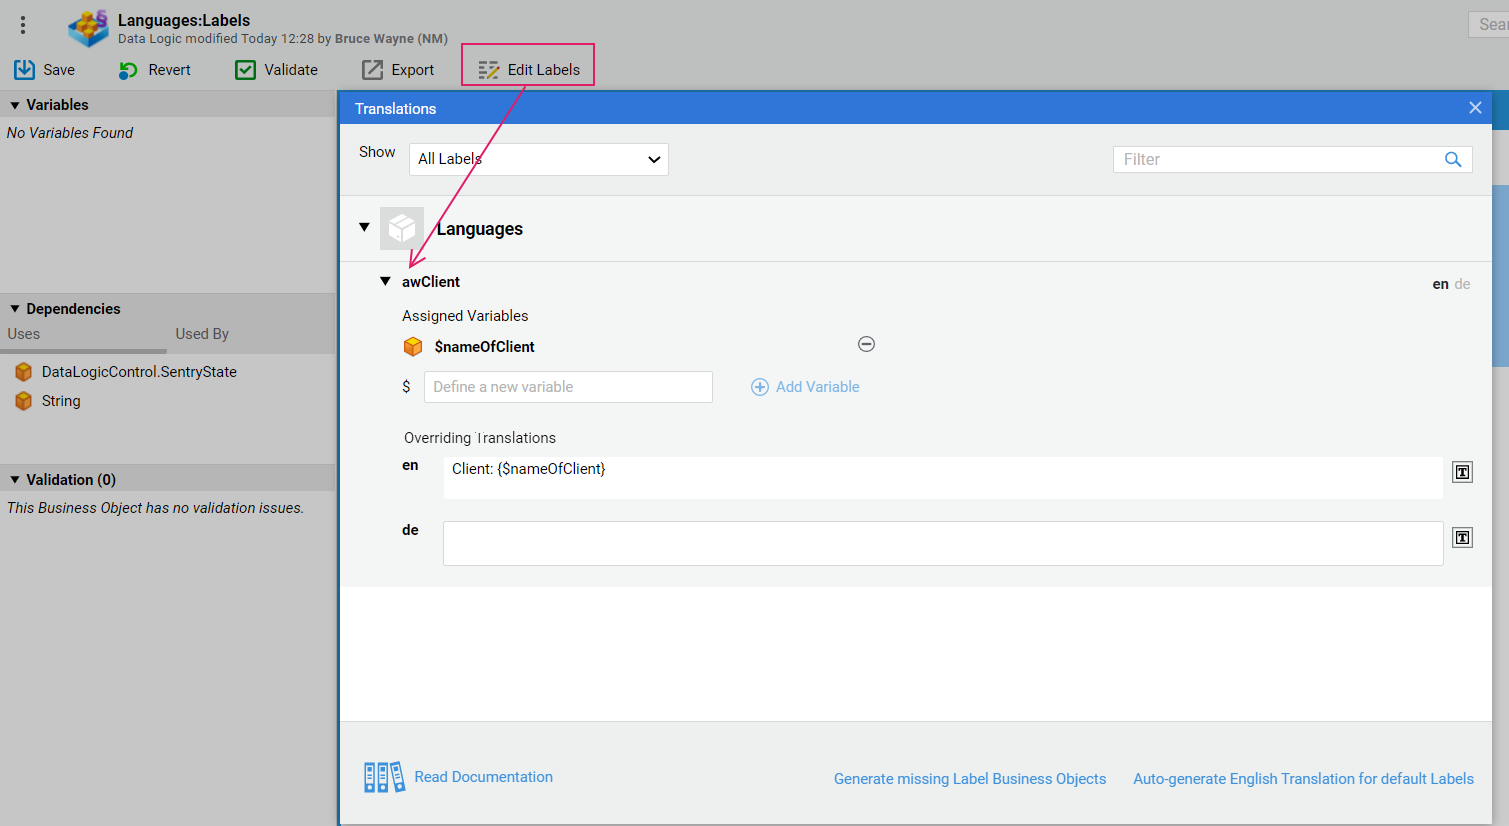
- To access the tool, click on the Edit Labels button on the Editor header.
- In the Show dropdown, select one of the available options to narrow down the Labels displayed (All Labels is selected by default). Use the Filter field (insert Label ID, or the translated text) to apply further filtering.
- Click on the arrow icon next to the Package name to display the collapsed list of Labels. Those Labels whose translation in one of your translation languages (defined via the Language Business Object) is missing are marked by the Untranslated red text. For translated labels, the translation in the default platform language is displayed.
- Click on the arrow icon next to a specific Label to display more information and perform further actions, such as:
- Defining one or more variables of type String for texts that may contain any changing content, such as Assign task to {$firstName} {$lastName}. Such variables can then be used in label translations by typing {$firstName} {$lastName} in the text, where necessary.
- Adding translations for all languages available (e.g. en for English and de for German) on your FNZ Studio instance (according to the defined Language Business Objects). Consider that translations are saved as Overriding Translations as they do not modify the Label Business Object itself, and are available in the Package Overview page (Solution Design > Translations).
- The Translations Tool provides two additional features:
It generates the corresponding Label Business Objects directly, by clicking on the Generate Missing Label Business Object button. At this point such labels are visible in Studio, under Design System > Translations (and can be exported, e.g., to be translated externally). This is the case, e.g. in the Data Logic Editor, of those properties populated with a default Label based on a Data Class or property name, where the Label Business Object is not created until a translation or variable is added (see more details).
It fills English translations automatically based on the Label Ids by clicking on the Auto-generate English Translations for default Labels button. Consider that automatic translation is only applied to default Labels corresponding to Data Class or Property names (respectively
{PackageId}:aw.DataClass.{DataClassId}and{PackageId}:aw.DataClass.{DataClassId}.{propertyName}). This feature can be used, e.g., for demo purposes, when you need to show readable texts in your UI. Consider that these texts are generated automatically and may need to be revised.Automatic translation is only applied to default Labels corresponding to Data Class or property names (respectively `{PackageId}:aw.DataClass.{DataClassId}` and `{PackageId}:aw.DataClass.{DataClassId}.{propertyName}`).
Reference: Label ID Best Practices
The following recommendations can help you create a consistent naming scheme for Labels in FNZ Studio:
- The Label ID should provide information on what the Label contains and what its purpose is, so that Developers can easily identify existing Labels and external translation providers can work on Labels even without having the context of the screens the labels are embedded into.
Example: For a text like "Next Page", an appropriate Label ID could be
next.page. - Define one language as a meta language (this will usually be English). Use this language consistently for all Label IDs. This means that the language you use in the Label IDs should always be the same, and should be the language most common to your development team.
Example: If your meta language is English, use the ID
button.nextrather thanbutton.weiter. - If the Label is intended for a specific Screen Component, specify this "technical" aspect in the Label ID, e.g. use the ID
button.nextfor a Label which is used for Button Screen Components. - Separate the logical parts of the Label ID by a period '.', e.g. the reference to a Screen Component from the reference to the Label content as in
button.next. Labels used for more generic purposes can omit the "technical" qualifier. - Avoid adapting existing Labels when the wording changes, create a new Label instead.
Example: If you have the Label
[LABEL:next]containing the English translation "Next" and then get a change request to alter the wording from "Next" to "Proceed", create a new Label[LABEL:proceed]instead of changing the wording in the existing Label. This approach is more maintainable in the long run. In addition, changing the content of a Label that is used in many places could create issues. The new text could be inappropriate for some use cases (e.g. if the text becomes too long for a Button).
Assigning Labels
To assign a Label, e.g. to a text field, you can reference it using the following syntax:
- For a Label located in the Base Package:
Copy
[LABEL:myLabelID] - For a Label located in a Custom Package:
Copy
[LABEL:PackageID:myLabelID]
Verifying Label Use
As already mentioned, using Labels instead of hard-coded text in your Solution is a highly recommended approach. The Preview tab of the Screen editor allows you to check that all text in your Screen is represented by Labels:
- In the Screen editor, select the Preview tab (available at the top left of the editor).
- Select None in the Language field and ensure only Labels are displayed.
- Select other languages in the Language field to ensure the translations are available.
Editing Label Translations
A translation can be defined for a Label when such Label is created. However, you have several options to edit a translation at a later point:
- Open the Label Business Object in the library directly.
- In the Catalog editor, double-click on a Label value to access the Label editor.
- In the Screen editor, click on Edit Labels in the toolbar to open an editable list of all Labels used in the Screen.
- Modify Label translations in a Screen directly from the Workspace, while a Process is running, using the Label Manager. Users require the according privileges to access this option.
- Finally, you can also export a CSV file with all Labels, add or change the translations in the CSV file, and import the CSV file back in to FNZ Studio. See the following section for all details.
Importing and Exporting Labels
You can export Labels in different file formats. If you export in the CSV format, you can add/change translations in the file (see section above), or add new Labels, and then import all changes back to FNZ Studio.
Consider that, in order to prevent CSV/formula injection attacks, special characters `=`, `@`, `+` and `-` are escaped in CSV files if they show up at the beginning of a cell value.
To export all Labels in the given Package:
- Open any Label in the Business Object Library.
- Click on the Export All Labels... button, available in the Properties panel.
- Define the export settings:
Export Format - CSV, XLS or DOC
Note: Only CSV files can be imported later, e.g. after adding missing translations.Whether to compress the file in the ZIP format
Encoding (CSV only)
Field and Text Delimiters (CSV only)
To import a CSV file containing Labels:
- Select any Label in the Business Object Library.
- Click on the Import Labels... button, available in the Properties tab of the Label.
- Select the CSV file you want to import, and define the Encoding as well as the Field and Text Delimiters.
- Click on Import. The number and names of changed and new Labels are displayed, allowing you to understand the scope of the import.
- To complete the import, click on Import.
Overriding Translations for Labels
The Overriding Translations functionality allows you to manage translations efficiently from a central location in situations where you want to customize the UI text of your Solution. As mentioned above, UI text can be provided as a translation in a Label Business Object directly. However, this approach entails two challenges:
- When parts of your Solution are composed of sealed Packages, e.g. when using Business Components, then Label Business Objects cannot be modified. Therefore, you can neither adapt the existing UI texts that come with the Labels themselves, nor can you add UI texts for additional languages.
- In cases where the Package is not sealed, changing the Label Business Object directly is possible, but doing so makes it difficult to upgrade the Package without overwriting custom changes to the Label Business Objects.
Using Overriding Translations addresses both of these challenges, as overriding a translation does not change the Label Business Object itself, but defines an alternative translation customized for your Solution. We recommend always using Overriding Translations for Labels to avoid any issues with direct Label editing.
Overriding Translations are stored as part of the Package Configuration of the Package in which the related Label Business Object resides. This makes it easy to retain Overriding Translations when deploying a new version of the Package (see Overriding Translations and Package Deployment).
Working With Overriding Translations
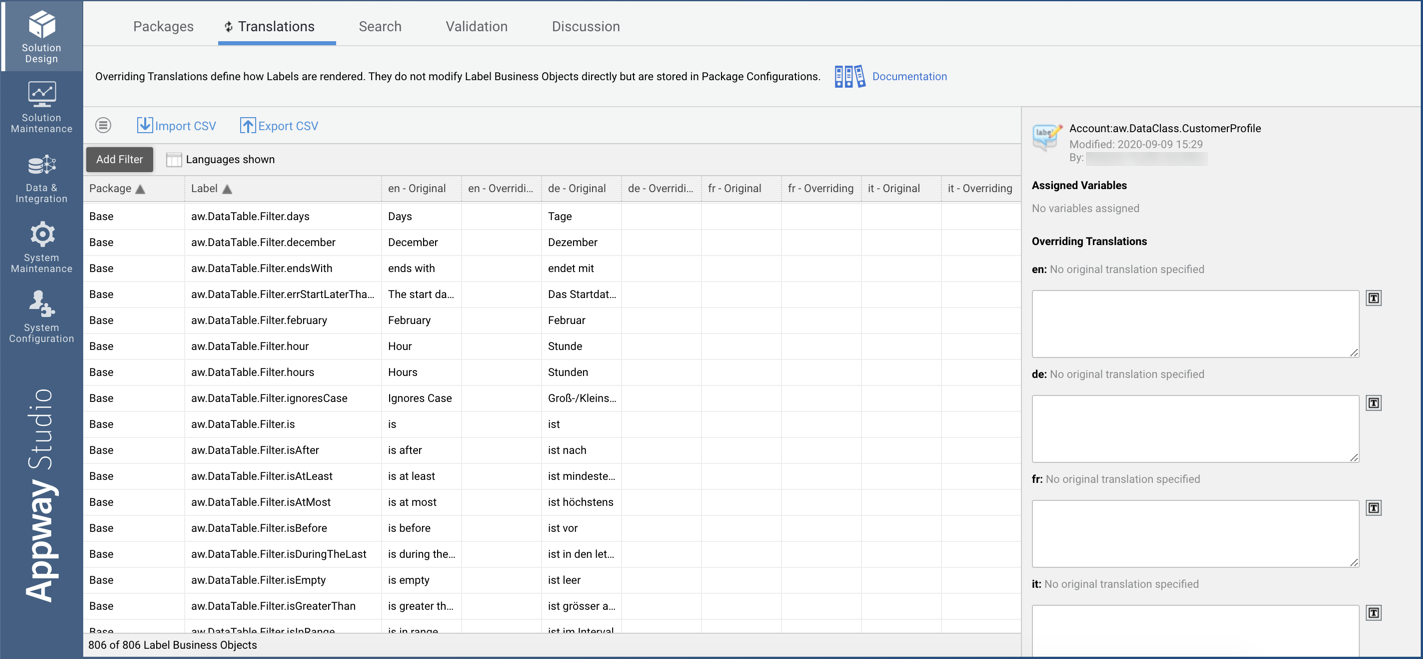
Overriding Translations can be defined at Solution Design > Translations in the Studio. The Translations table available there allows you to:
- Get an overview of all Labels and their original and overriding translations, for all Packages available on your FNZ Studio instance. This allows working efficiently with Labels in cases where Labels are spread across several Packages on your FNZ Studio instance. In addition, the Translations table can be filtered and you can customize which languages are shown (use Languages shown).
- Define Overriding Translations that replace the original translation of a Label on your instance of FNZ Studio. To do so, select the Label in the Translations table and define the Overriding Translation in the Properties panel on the right side. See the Exporting and Importing Overriding Translations section for information on how to apply bulk changes.
- Check if there are any Assigned Variables for a specific label. To do so, select the Label in the Translations table and check the information on the Properties panel on the right side. Assigned Variables are shown in read-only mode in this tab. For more information on variable assignment, see the Creating Labels section.
Overriding Translations: Important Notes
Important characteristics of Overriding Translations to be aware of are:
-
You cannot define Overriding Translations for Labels located in the Base Package
-
Changes are auto-committed, no explicit Save or Commit action is necessary. Note when commits happen:
- When leaving the Translations tab, translation changes for all Packages are committed
- When closing modal windows that modify Overriding Translations (Translations Tool, or Create new Label dialog), only the changes for the Package with changed Labels are committed.
- When versioning a Package, the translations for that Package are committed.
-
Versioning is applied, i.e. a Process Instance will use the version of the Overriding Translations that matches the version filter used when the Process Instance is started.
-
You can delete all Overriding Translations displayed in the Translations table (active filters set on the table are considered) using the Delete all Overriding Translations functionality available through the Menu
 icon.
icon. -
If needed, you can access the original Label Business Object from the Translations table: right-click on the according row in the table and select Open Label in Editor from the context menu.
Note: Global Search (available at Solution Design > Search) currently does not search through Overriding Translations.
Overriding Translations and Package Deployment
Starting from version 11 of the platform, you can select whether to export Overriding Translations together with your Package. See all details in the One-Click Deployment document.
Exporting and Importing Overriding Translations
You can export Overriding Translations in a CSV file, alter the Overriding Translations, and import them back to FNZ Studio using the Import CSV functionality. This process is useful if the Overriding Translations are defined by a third party without access to FNZ Studio, e.g. a translation agency.
Consider that, in order to prevent CSV/formula injection attacks, escape special characters `=`, `@`, `+` and `-` are escaped in CSV files if they show up at the beginning of a cell value.
Exporting Labels
Follow these steps:
- (Optional) Customize the information which will be available in the CSV file by:
- Applying filters to the Translations table
- Defining which languages are shown in the Translations table (use the Languages shown button)
- Click on the Export CSV button to export a CSV file containing all Label information currently listed in the Translations table. Exported CSV files use the following file format:
- Field delimiter - comma (,)
- Text delimiter - double-quote (")
- Encoding - UTF-8
Importing Labels
Follow these steps:
- Click on the Import CSV button and select the CSV file containing Overriding Translations you want to import.
- FNZ Studio checks the CSV file you are importing and sets the correct encoding as well as field and text delimiters. Click on the Next button to continue.
- FNZ Studio analyzes the content of your file, displays information on how many objects will be changed and any warnings, if applicable (see the below list of Import Restrictions for more information on potential warnings). The warnings are summarized on the left side of the window, the right side provides a detailed report of the warnings listing every single Label that is affected. You can copy this information to provide it to someone who does not have access to FNZ Studio and needs to fix the CSV file.
- Click on the Import button to confirm the import after reading the change and warning information provided by FNZ Studio.
Import Restrictions
When importing a CSV file with Overriding Translations to FNZ Studio, restrictions apply:
-
If you add Labels to the CSV that do not exist on your FNZ Studio instance, the defined Overriding Translations are imported, but the relevant new Label Business Object is not created automatically.
-
If you defined Overriding Translations for a language that is not available on your FNZ Studio instance, the Overriding Translations for this language are not imported. To import these Overriding Translations, first create the according Language Business Object in the Base Package of your FNZ Studio instance.
-
If you define Overriding Translations for Labels located in the Base Package, these will not be imported. The Override Translations functionality is not supported for Labels located in the Base Package, Labels from the Base Package are included in the Translations table in the Studio and the CSV file only for informational purposes.
-
If you make changes to the original translations and/or description of a Label, these values will not be imported, as the actual Label Business Object cannot be modified by importing a CSV file on the Translations tab. The original translations and the description are included in the file only for informational purposes.
Note: To change the original translation of Label Business Objects, edit the Labels directly or use the Label import/export functionality available from the Label editor.
Language and Translation Functions
The functions described in the following sections are frequently used in the context of Languages and Labels in FNZ Studio.
Label:Translate
The Label:Translate function allows you to translate a Label Business Object and to assign variables to it, when relevant. This function returns the text of the translated Label (String). It accepts three parameters, only one of which is mandatory:
- (Mandatory) The Label Reference to the Label Business Object that needs to be translated.
Example:
Label:NewReference('MyPackage:MyLabel') - (Optional) The list of Variable Assignments for that Label Business Object (if not specified, no Variable Assignment is set).
Example:
{'varName1'='value', 'varName2'='another value'}:String - (Optional) The target language for translation (if not specified, the target language from the system is set).
Example:
deorde_CH
Example:
Label:Translate(Label:NewReference('MyPackage:MyLabel'), {'varName1'='value'}:String, 'de')
LANGUAGE
This function returns the current translation language.
Example:
LANGUAGE() = 'fr'