Process Business Object
All Solutions created with FNZ Studio are controlled by Processes.
A Process can be defined as a series of actions undertaken to achieve a particular outcome for a customer. These actions need to be organized and connected, and they occur within a defined period in a specific order.
On top of this, the user can initiate multiple instances of a Process multiple times. Running an application created with FNZ Studio means running a Process Instance.
Process Model
The FNZ Studio Process editor is based on the BPMN (Business Process Model and Notation) standard.
Token Model
To explain how Processes are executed, the Token Model needs to be introduced. Tokens are used to visualize how different Process Components influence the Process execution. A Process Token can be seen as a game token on a board game where the Process Model specifies the board layout.
A Process Token can be visualized as follows:
There are actually many different boards (one for every running Process Instance). Since Processes can contain parallel activities, there may be multiple Tokens on a board at the same time. There can even be multiple Tokens on the same position in the Process Model. The set of all Tokens in a given Process Instance is called Token Set.
Tokens can "flow" from Component to Component using the Connections between them. To be precise, Tokens flow in a first step from an Component onto the Connection and in a second step from the Connection to the target Component. This is important, because some Components prevent Tokens from flowing to them until certain conditions are satisfied. In these situations, Tokens remain on the Connection. There are to types of Connections:
- Connections which lead to a Component are called Incoming Connections of this Component. Tokens on these Connections are therefore called Incoming Tokens.
- Connections which lead away from an Component are called Outgoing Connections and the Tokens on them are the Outgoing Tokens.
Process Start
When a new Process Instance is started, a Token is placed on every Start Event in the Process Model. If there is no Start Event, a Token is placed on every Component that doesnot have any incoming Connections. If a Process Model neither contains a Start Event nor a Component without incoming Connections, it is not a valid Process Model.
Token Flow
The Process Engine is a background service that "moves the Tokens on the board". Whenever a Process Instance has to be updated (e.g. because an Activity has been completed), the Process Engine inspects all Components within the Process Model.
- For every Component, the Process Model checks the incoming Tokens. How incoming Tokens are handled depends on the type of Component. By default, every incoming Token is allowed to flow to the Component without restrictions. However, there are exceptions to this rule. Gateways, for instance, can be used to merge some or all incoming Tokens into a single Token. A Token on a Component remains there until the Component has served its purpose.
- The Token can then leave the Component. In order to do this, the Process Engine has to "activate" outgoing Connections. Which Connections get activated depends on the type of Component and the types of outgoing Connections. There are three different types of Connections with different semantics on whether a Token may flow on it or not:
If exactly one Connection is activated, the Token flows on this Connection.
If there is more than one Connection being activated, the Token is split according to the number of activated Connections, and every Connection gets its own Token.
If no Connection is activated, or if the Component does not have outgoing Connections at all, the Token is deleted (this is usually called "consuming the token").
See more information on- Suspended Tokens and how to recover them
- Loading of Value Stores by the Process Engine
Process End
A Process Instance is alive as long as there is at least one Token in the Token Set. In the "board game" metaphor, the game ends when there are no more game tokens remaining on the board. If the Process Instance is completed, it is destroyed along with all the data it contains.
Process Design
Process Editor Overview
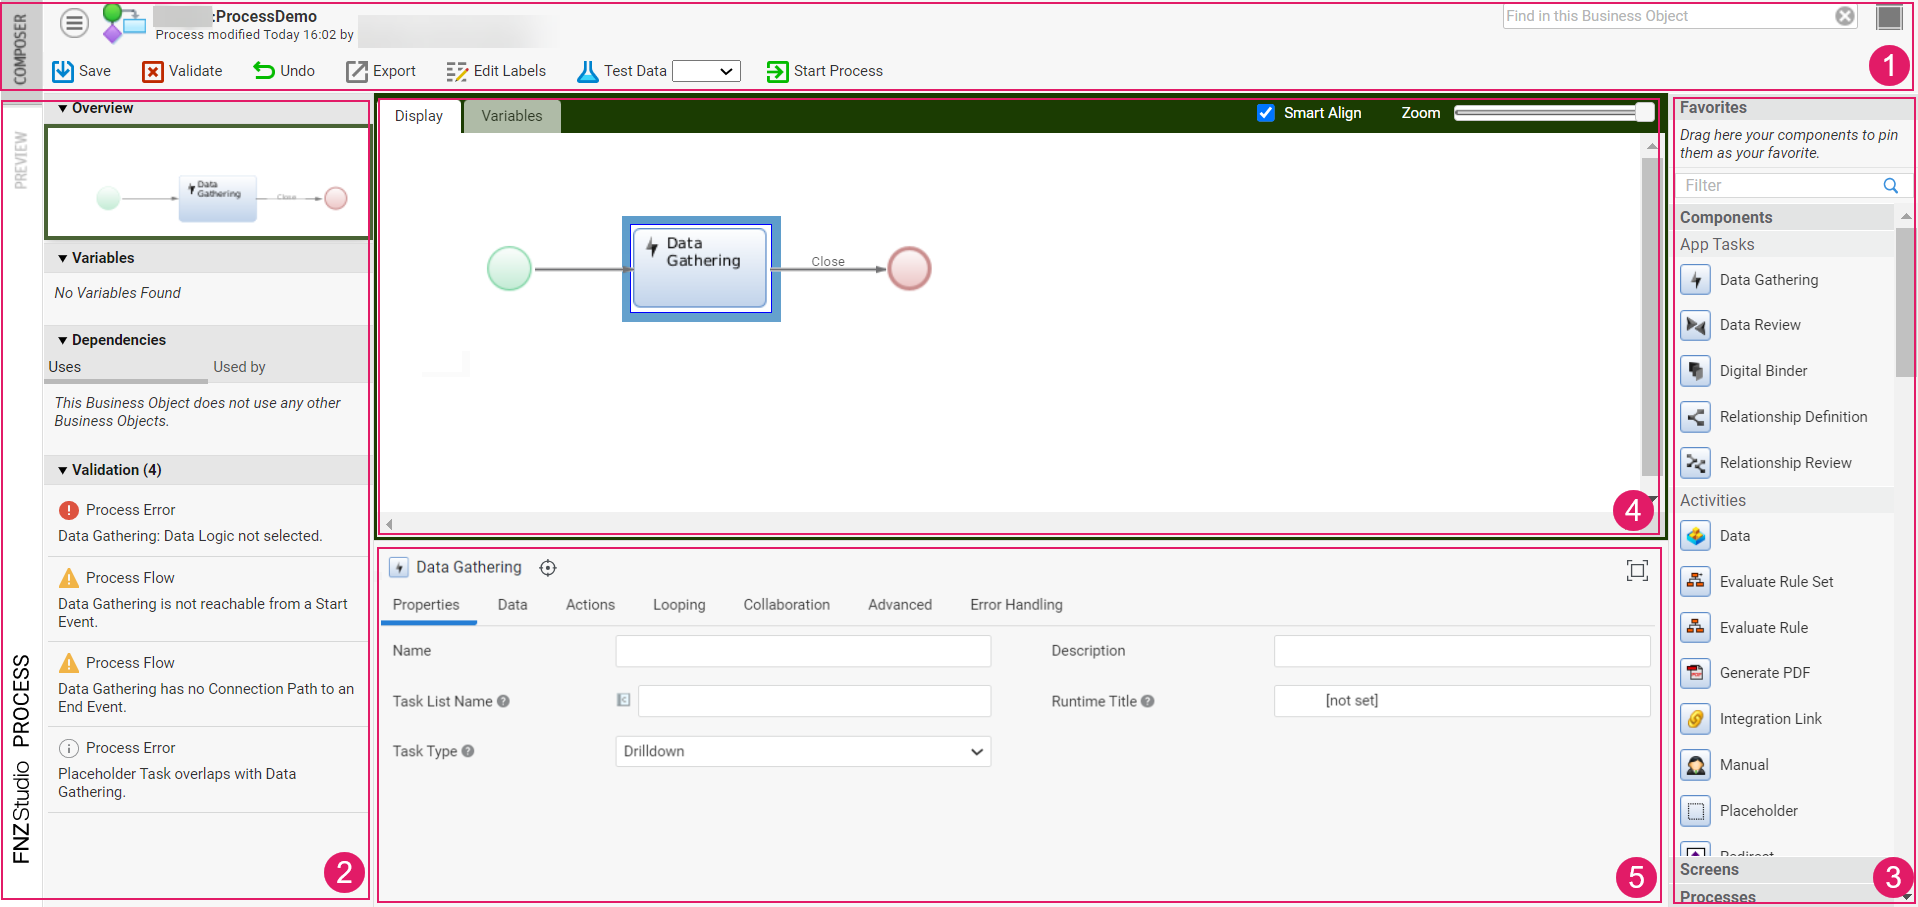
The Process Editor is composed of different areas:
- Header: The header background color indicates whether you are in edit mode (gray) or read-only mode (red). It allows performing various actions, including:
- Validate: allows validating your edits on the Process. The Validate icon is instantly updated upon your changes, thus providing immediate validation feedback (see also the Validation section below):
- red: highlights an error, the Process or part of it is invalid
- yellow: highlights a warning, the Process is still valid but action is required
- green: the Process is valid
- Undo: allows undoing your latest action
- Redo: allows redoing your latest action.
- Edit Labels: allows displaying an overview and further editing the Labels used in the current Business Object through the Translations Tool.
- Validate: allows validating your edits on the Process. The Validate icon is instantly updated upon your changes, thus providing immediate validation feedback (see also the Validation section below):
- Left sidebar: contains Dependencies and Validation information.
- Right sidebar (also referred to as Components Library): library containing all the items that can be added to the central modeling area.
- Central area: modeling area, containing the content of the Process.
- Property panel for the currently selected component/s. The name of the component is displayed for easier identification. Moreover:
The Highlight button next to the component name marks the selected component in the modeling area. If no component is selected, the Process properties are shown.
The Expand button at on the right expands the panel to maximize the editing area (the Ctrl+P shortcut is also available). This is useful when working on extensive configuration in the properties panel such as App Task Actions.
The Process Editor allows using several other keyboard shortcuts. See full list in the related document.
Dependencies and Validation Sidebar
The left sidebar of the Editor contains details about the relations between the current Process Business Object and other Business Objects in the Solution, as well as validation information. The two sections can be expanded and collapsed.
The Dependencies section displays the dependencies among Process Business Objects:
-
The Uses section lists the Business Objects on which the current Process depends.
-
The Used by section lists the Business Objects that depend on the current Process.
Note that, starting from Appway 2022.1, Label Business Objects are no longer shown as dependencies in the Process Editor. You can see Label dependencies from the Label Business Object library.
The Validation section contains validation messages for the current Process. The Process Editor supports instant validation: every time an action that triggers a validation issue is performed, the panel is updated with the corresponding information to allow quicker response.
The header indicates the total number of validation messages in the Process. Type of messages are:
- Error: (red icon) the issue requires immediate action, and makes the Process (or part of it) invalid.
- Warning: (yellow icon) the issue requires immediate action, but the Process can be still used to create a working Data Model.
- Info: (gray icon) the issue does not require immediate action, but consider fixing it to have a Process that complies with best practices.
Components Library
The right sidebar (also referred to as Components Library) contains the elements that can be used to compose the Process. Use the Filter search field to find the desired element.
-
To add a new Component to a Process, drag and drop it from the list to the right. You can search for the Component you're looking for using the Filter text field. Instead of adding a Process or Sub-Process Component, you can also drag an existing one right from the list.
-
To create copies of Components, select the Component/s (CTRL key) you want to duplicate and press Ctrl-D.
There are different categories of Components:
- Activities: Actions that need to be performed during Process execution (e.g., Evaluate Rule, Redirect, and so on). Activities (and Components in general) are linked by Connections.
- Events: Elements that start, interrupt or end Processes.
- Gateways: Items that split or join execution paths in the Process.
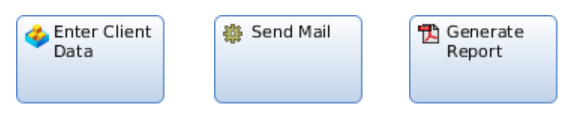
- App Tasks : Categories of Process Tasks that come with their own User Interface (UI) built as a single-page application. See Application Business Components (ABCs).
- Trackpoints: Specific points in the Process used to retrieve only a subset of changes performed on a Data Class instance/ collection. Trackpoints are used in Data History. See Data History.
- Others: Other elements used in Process design, such as Phases and Groups, Swimlanes and Notes.
Activities
Activities are actions that need to be performed during Process execution.
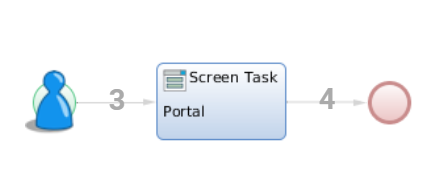
For example, if you add a Screen activity in the Process design, when you start an instance and the token lands on that activity, a Screen BO tied to it is shown. You have an App Task activity, then an App Task such as Data Gathering is shown.
Activities may be:
-
Automatic/Inline: They are executed by the Process Engine directly (Script, Evaluate Rule Set or Generate PDF). When the Process reaches such an Activity, it is executed in line and the Process continues immediately.
-
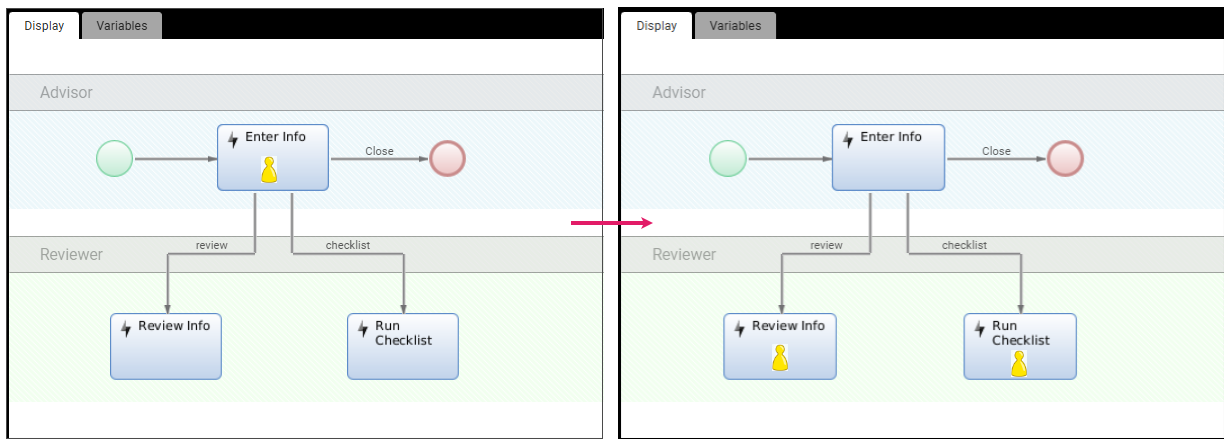
Manual/Participant: They are performed manually by a Participant. An Activity is assigned to a Participant by moving the Activity component into the Participant's Swimlanes. Activities to be performed by a Participant are prepared for execution by the Process Engine.
Connections
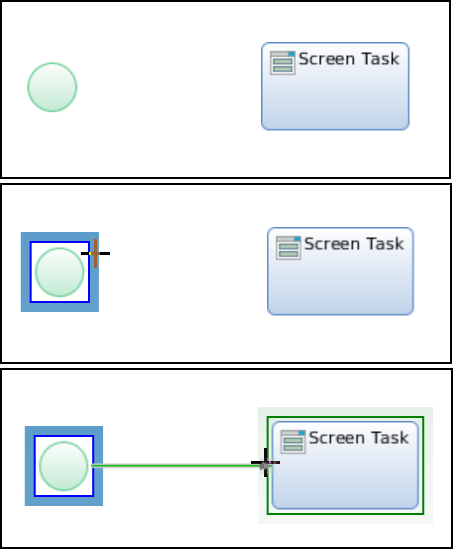
Connections are used to link Components. To add a Connection between Components:
- Click on the first Component to display a frame around it. Places the cursor on the fame to display the plus icon, indicating the place where the connection can start.
- Start dragging the Connection element towards the second Component. When the second element frame is displayed and the is plus icon is shown, you can release the mouse button.
Connections have Properties: to edit them, right-click on the Connection (Connections are easiest to hit when you aim for the start or end part, or for the label) and select Properties from the context menu.
Types of Connections
There are different types of Connections:
- Unconditional (or None Connections): It creates a token for every outgoing connection. Tokens usually flow on such connection without restrictions.
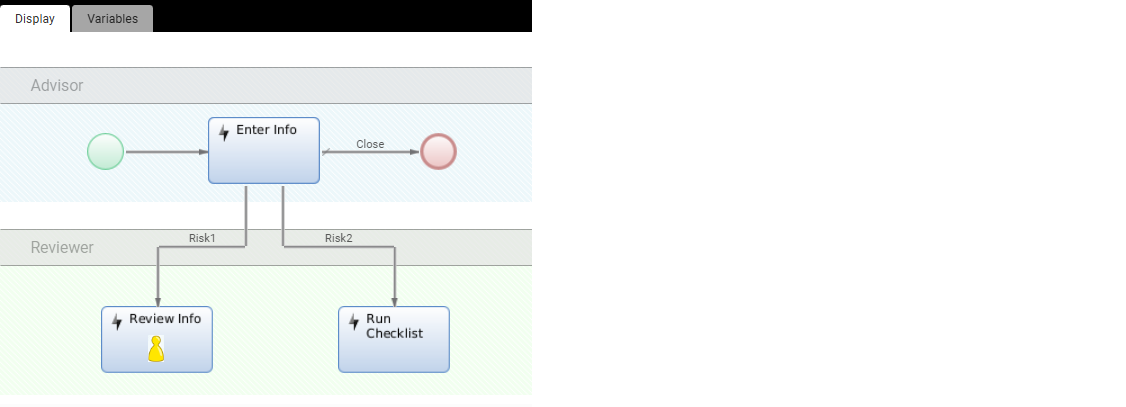
- Conditional (or Expression Connections): Tokens may flow on a connection only if the boolean condition defined on the connection itself thorough a Script Expression (e.g.,
$risk == 1istrue) is satisfied. Connections of this type can be used to introduce a decision within the Process Model.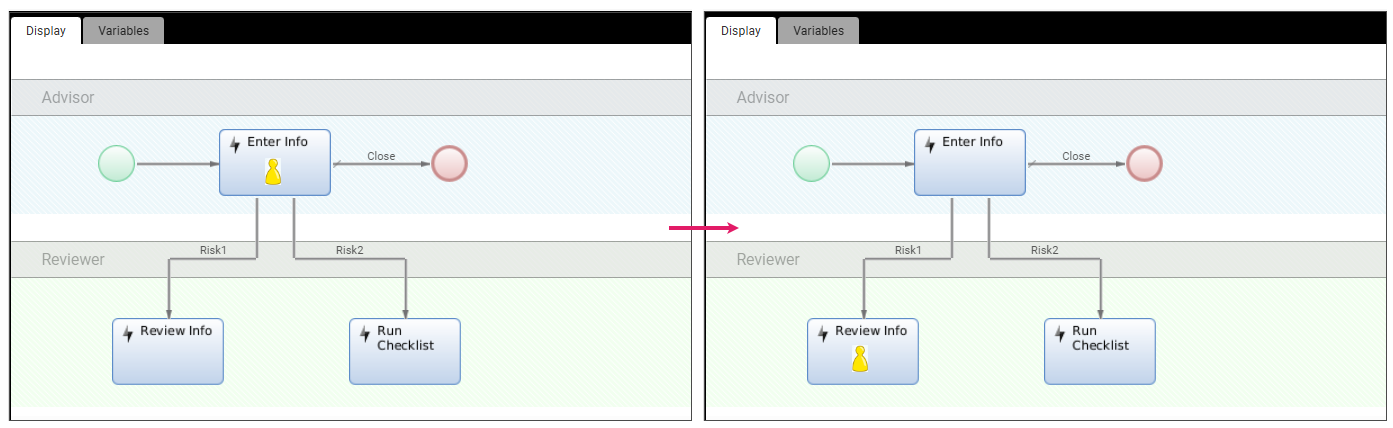
- Default: This connection are activated if no other connection is. For example, if all Conditional Connections return false, the Default connection is enforced.
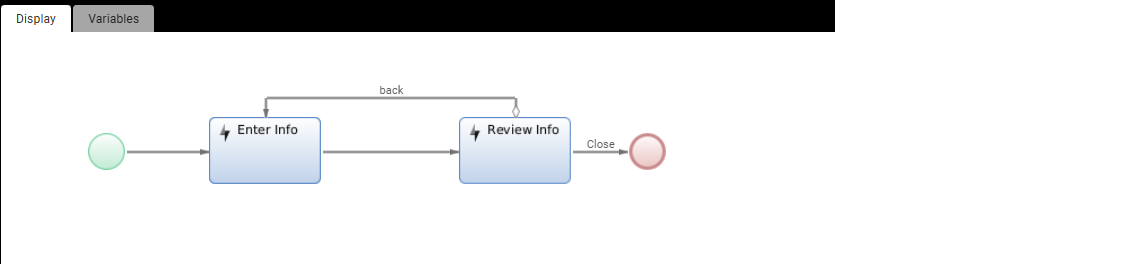
- Label: It is a simplified Conditional Connection that relies on a String Variable called
$action. The system checks if the content of the variable matches the name of the Connection. In the example below, if$action== Label Name (back), the token will move to the previous task.
For full information, see Activities and Connections.
Events
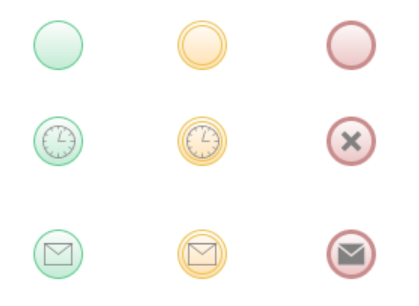
Events are used to start, interrupt or end Processes. There are three main types of event:
- Start Events (green icons) only allows outgoing connections, and represent different ways to start a Process Instance.
- Intermediate Events (yellow icons) allow outgoing and incoming connections. They represent events that occur during the process flow, such as interruptions, delays or triggers that affect the process flow.
- End Events (red icons) only allow incoming connections, and represent different ways to end a Process Instance.
These main categories have subtypes differentiated by specific icons. For example, a subtype for all three categories is Send Message, while Timer is a subtype for both the Start and Intermediate Events.
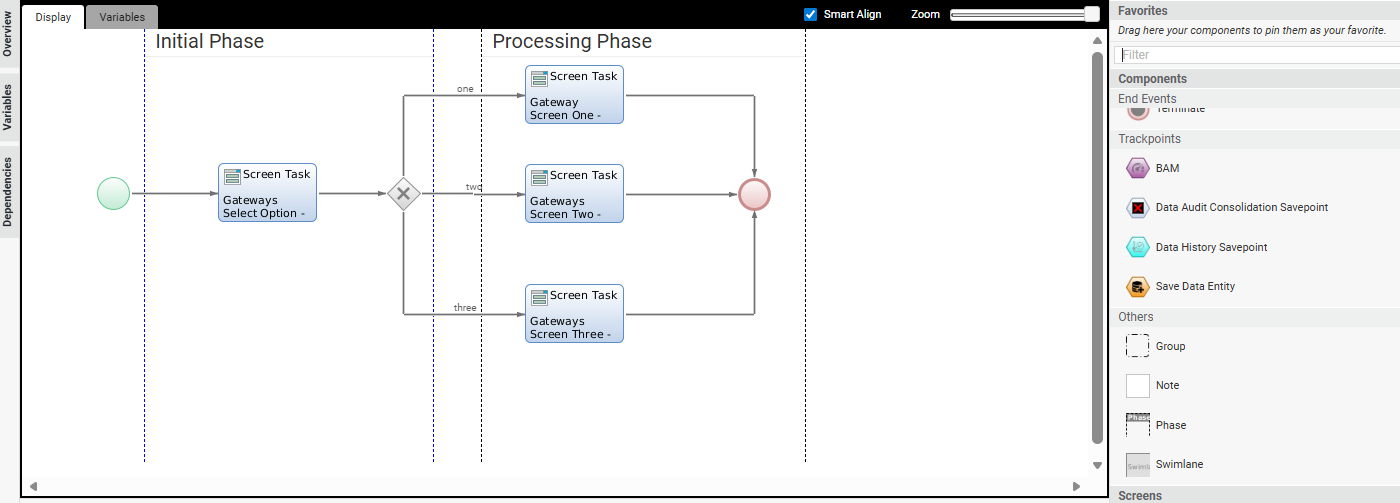
Gateways
Gateways are used to specify a conditional logic in the Process flow, e.g. to split or join execution paths (tokens). There are different types of Gateways:
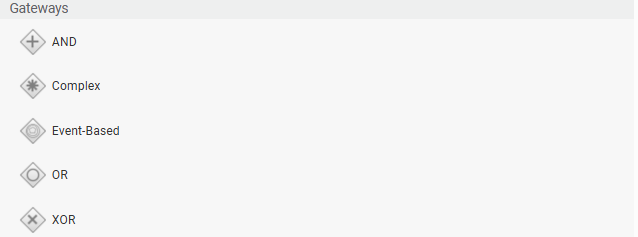
- AND (or parallel) gateways allow the execution of activities in parallel.
- XOR (or exclusive) gateways allow following only one of the possible execution paths. The XOR Gateway can activate only one outgoing Connection.
- OR (or inclusive) gateways allow the execution of activities in parallel but follow only the chosen execution path. Outgoing Tokens can be split by OR Gateways. Depending on the types of the outgoing Connections, there may be zero, one or more Connections being activated
- Complex gateways allow fine-grained customization in handling incoming and outgoing connections.
- Event-Based gateways handle multiple outcomes of an activity.
Gateways do not have additional properties besides the common Component properties.
For full information, see Gateways.
Phases and Groups
The Phase and Group components can be found the Components library of the Process editor.
A Phase allows breaking the Process into various pieces, thus providing feedback to the user on how to proceed for the overall execution. In Ad-Hoc Sub-Process, for example, Phases are used to indicate that you must complete steps 1, 2, 3 and 4 to finalize Process execution.
A Group allows gathering elements in the Process editor for easier visualization and to be able to move them together. Note that a Group is a design element with no functional impact on a Process.

Swimlanes
A Swimlane allows defining Access Control over Process Tokens. Through a Swimlane, you can choose which Participants are allowed to access the Tokens placed on the components contained in the Swimlane itself. A Swimlane Participant can be either a single User, a Group, or Role (see Users, Groups and Roles). The Participant value can also be determined at runtime through a script. Moreover, a Sentry expression can be added to enforce Access Control conditions that cannot be expressed via a single User, Group or Role.
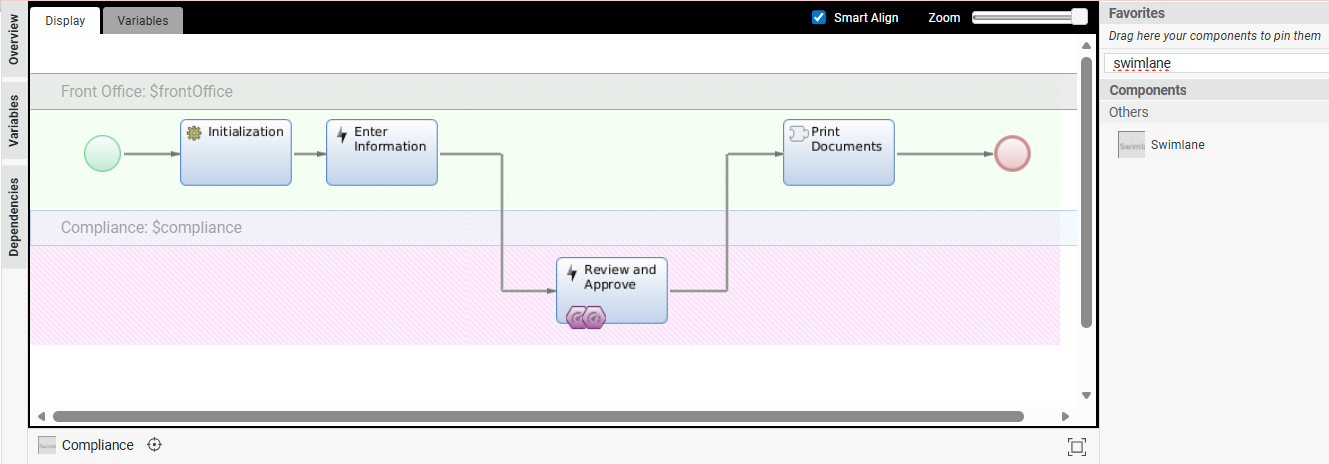
See full information in Swimlanes.
Notes
A Note can be used to add comments to a Process. Connections to Notes have no influence on the Sub-Process meaning and will appear as dashed lines. Use Connections to Notes to show which Component a Note applies to.
In order to enter text into a Note, click inside the Note and start typing. The Note will grow vertically if the text reaches a certain length.
Note properties are:
| Field | Description |
|---|---|
| Background Color | The Note color (default: White). |