Data Cleanup
Introduction
The amount of data generated and managed by an Appway platform grows year on year. Most of this data is loaded in memory – which can affect the performance and stability of your system in the long term. To ensure that your system continues to perform well after various years, it's important to follow some good practices in terms of process design and maintenance. This article covers the various tasks you should carry out to keep your system performant and stable in the long term.
The FNZ Studio platform comes with a set of maintenance jobs that clean up unused data from the system. However, further maintenance activities are required to keep your system healthy. Certain activities must be carried out while your solution is being designed. Other activities must be executed on your solution on a regular basis.
-
Section Solution Design presents good practices to follow when designing your solution.
-
Section Administrative Tasks focuses on maintenance activities that should be run on a regular basis in order to keep the system in a healthy state.
-
Section Cleanup Jobs describes maintenance scheduled jobs provided out-of-the-box with the platform.
Solution Design
Main Process
Process Instances and Value Stores in FNZ Studio contain all the data managed in the process and states. All this data takes up space on a disk (if a filesystem is used as persistent storage) or takes up space in a database. As the amount of data increases, so does the space required to store it. At some point, you would want to free up space by removing data that is no longer relevant. However, having very old Process Instances in your system prevents you from running the obliteration operation used to delete old Business Object versions.
In order to save memory and disk space, it is therefore important to ensure that the Process Instances started in your system are terminated after a fixed amount of time. This must be defined in your process model at design time.
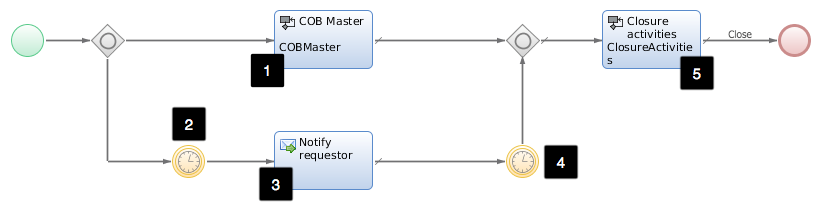
Figure 1: Main process design example
Figure 1 shows an example of a process model with a maximum instance duration set up.
Description of the model items :
- The main process, "COB Master".
- A timer ("Timer 1") set with a duration corresponding to a warning threshold. Example: If the warning threshold is set to 80% for a maximum duration of 90 days, a warning is sent to the requestor 72 days after the creation of a process.
- A message ("Notify requestor") sends a warning to the requestor or to any other relevant user that the process maximum duration is close to being reached.
- A second timer ("Timer 2") set for the remaining duration. The Process Instance is terminated when this timer expires. Example: In our case, the Process Instance lasts another 18 days.
- The process ("Closure activities") contains activities performed both in normal terminations and in automatic terminations triggered by Timer2 (that is, when the maximum duration of the process has been reached).
Recommendation:The maximum duration of a Process Instance should be less than six months.
Portal Process
Consider the following information about the Portal Process:
- It is the main entry point to FNZ Studio solutions.
- It is transient, which means that the instances are deleted when the user session is terminated.
- If it is not designed correctly, a new Process Instance is created whenever the portal screen is displayed.
- Even though the Portal Process and the related Value Store are relatively small (~100Kb), having too many could impact the solution performance in a negative way.
Example: If 100 users connect to your system daily, and each user has 50 Portal Processes, 5000 Process Instances are generated. For Value Stores with a size of 100Kb, this still takes about 500MB of persistent storage, and about 150MB of memory.
The process pattern shown in Figure 2 must be used when designing Portal Processes. This ensures that only one Portal Process instance is created per user session.
Description of the Process: If a Portal Process Instance is found for the current user:
- Delete that (old) Instance
- Save the current Process Instance ID to the current user's preferences
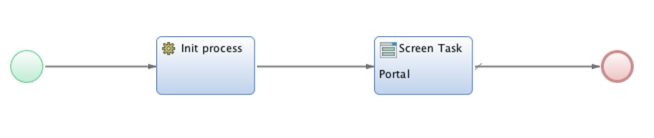
Figure 2: Portal Process design
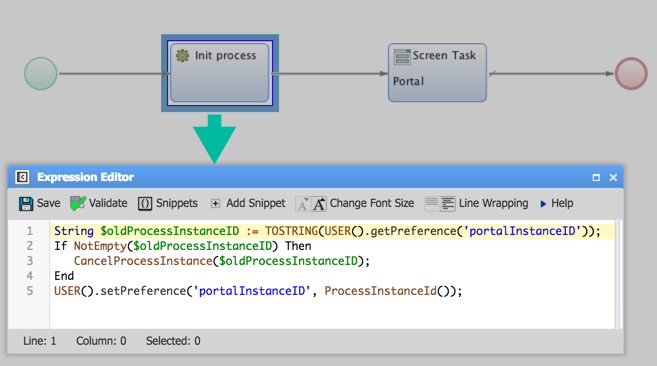
Figure 3: Portal Process initialization
Cluster Files
Cluster File Design
The primitive type object ClusterFile is used for storing cluster-wide files shared among all the nodes of your system.
An identifier (equivalent to the path of the Cluster File) is required for any ClusterFile object created. Because there is no implicit relation between a Cluster File and the Process Instance where it is created, it is important to link a Cluster File to the Process Instance where it originated. This allows you to delete the relevant files when the Process Instance is terminated.
The link can be built by adding the ID of the Process Instance as a prefix to the Cluster File identifier.
Example:
node31465800967971/Sample/ClusterFiles/
Cluster File Deletion
The Cluster Files are not deleted by default when Process Instances are terminated. In order to get rid of unused Cluster Files from the system, you need to have cleanup activities for processes that create Cluster Files. Deletion is done at the end of the process, before the process terminates.
The following code snippet shows how to delete Cluster Files for the current Process Instance.
Function deleteProcessClusterFiles() : Nothing Begin
    ForEach String $cfPath In GetProcessClusterFilePaths() Do
        DELETECLUSTERFILE($cfPath);
    End
End
You need to implement a script function, GetProcessClusterFilePaths(), returning the paths of all Cluster Files used in your process model.
Recommendations:n
- Implement deletion strategies for processes managing Cluster Files
- Use a batch job to clean up orphaned Cluster Files
Workspace Collaboration
Discussion Messages
When using the WorkspaceCollaboration Extension, you should be able to identify and purge all the discussion messages related to a process instance. The purge usually happens at the end of the process before the Process Instance is terminated.
To identify and purge all the discussion messages related to a Process Instance, include the Process Instance ID in the context of all the discussion messages related to a Process Instance.

Figure 4: Discussion message component properties
The following script shows an example of discussion message deletion for Process Instance.
DiscussionMessageFilter $processMessagesFilter :=
DiscussionMessageFilter.contextFilter('processID', ProcessInstanceId());
DeleteDiscussionMessages($processMessagesFilter);
Chat Messages
When using the WorkspaceCollaboration Extension, make sure that all the chats related to a specific Process Instance include the Process Instance ID in the chat ID.
The Process Instance ID is necessary to clean up chat messages once the Process Instance has terminated.
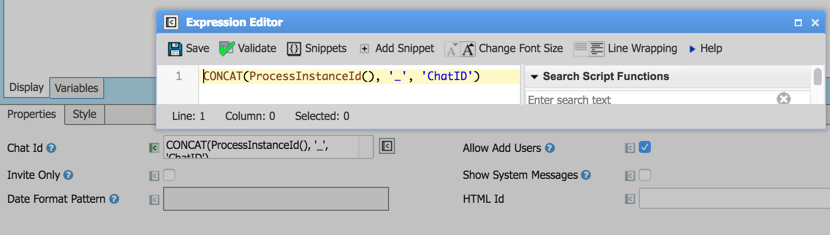
Figure 5: Chat component properties
The DeleteChatMessages function is used to delete chat messages.
String $chatId := CONCAT(ProcessInstanceId(), '_', 'ChatId');
DeleteChatMessages($chatId);
Process Messages and Signals
Process Messages can be generated from Integration Links in the following ways:
-
The 'Notify Process Queue' component
-
The 'Send Message' event in a process model
-
The
SendProcessMessagefunction -
When generated from an Integration Link, the message lifetime is automatically set to a default value of 7 days.
-
When generated using the 'Send Message' event, a custom lifetime for the message can be set. The range of possible values that can be entered in the Life Time field goes from 1 minute to 7 days. Examples: 1m, 3h 30m, 6d
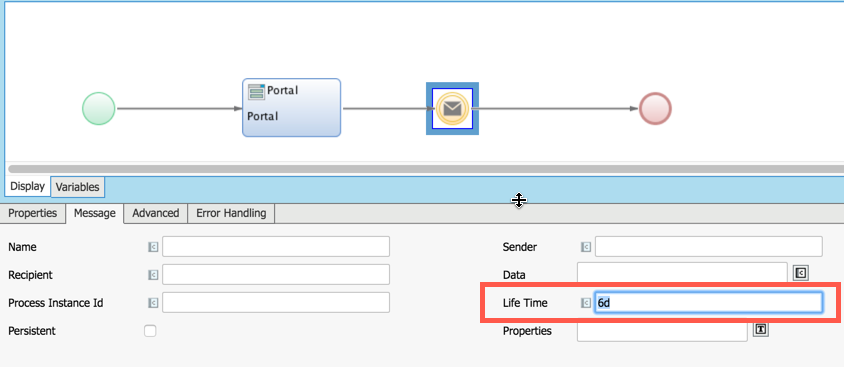
Figure 6: Set Custom lifetime
-
With the
SendProcessMessagefunction, the message lifetime must be set in the message passed to the function. A Process Message is deleted if not consumed after the specified lifetime. Process Messages can also be deleted directly at Solution Maintenance > Processes > Process Messages in FNZ Studio Composition.
Signals
Signals are a specific type of Process Message. Signals do not have any message payload, and are published in a dedicated process queue called "Signals".
A signal can be generated using the SetProcessSignal Script Function or by using the intermediate event 'Send Signal' from a Process.
Administrative Tasks
Obliteration
FNZ Studio provides a powerful versioning system for managing the versions of all Business Objects. However, it is important to remove old and unused object versions: in environments where new versions of solutions are committed or imported regularly, the number of versions managed in FNZ Studio increases significantly. All these Business Object versions occupy disk space and memory, and are also loaded in memory during system startup. This can have a negative impact on the performance of your system.
To avoid this situation, it is important to remove old and unused object versions using the Obliterate tool in FNZ Studio Composition under Solution Maintenance > Repository > Obliteration.
The obliteration functionality is used to delete old and unused versions of Business Objects. The candidates for deletion are selected based on a date filter. A default date filter is calculated automatically by the system, and is based on the oldest Process Instance.
The following rules apply to the deletion procedure:
- It does not delete the last committed version of any object unless it is marked as deleted. If you have only one committed version of an object, that version is not deleted.
- It does not delete Head Object versions. The Business Objects that are still ‘work in progress’ are not affected.
- It does not delete any object version whose timestamp is later than the specified filter date.
- It does not delete the last committed version before the specified filter date unless it is marked as deleted.
Recommendations:n
- Business Object obliteration must be run once a month.
- Get rid of Business Object versions older than 6 months.
For more information on the Obliterate feature, see: Obliteration.
Unused Object Deletion
Business Objects and their related versions take up disk space and memory. You should regularly delete unused Business Objects. Be aware that Business Objects declared as Visible in a Package are not considered to be unused by Validation, even if they are not actually used in another Package (see Packages).
To find unused Business Objects, you have two options:
- In the context of a Package:
- Navigate inside the Package.
- Go to the Maintenance tab, select Validate Package, and click on the Validate button.
- In the Error Type column, unused Business Objects are identified by the Unused Business Object status.
- In the global context of the Solution:
- Go to global validation available at Solution Design > Validation.
- Select the appropriate Validation Type and Version and click on the Validate button.
- In the Error Type column, unused Business Objects are identified by the Unused Business Object status.
Note: The list of unused objects is to be interpreted as a suggestion. Analyze your solution before deleting any object. Delete only Business Objects defined in your solution, especially for primitive types. Carry out a global search on the object that you are planning to delete to ensure that there are no hidden dependencies.
Recommendation: Unused objects must be deleted in your development environments before releasing any new version of the solution.
Suspended Process Instances
When an error is encountered by your Process Instance during execution, the default exception handling is to suspend the related token.
The suspended Process Instances must be checked regularly.
- Fix the errors of the suspended Process Instances containing fixable errors.
- Cancel the suspended Process Instances containing non-fixable errors.
To see the list of suspended Process Instances from FNZ Studio Composition, go to Solution Maintenance > Processes > Process Instances.
For more information, see: Process Handling.
BAM Data Archive
Use the BAM administration tool to remove old Process Instances from the BAM database. To clear old Process Instances in Studio, follow these steps:
- Go to System Configuration > BAM > BAM Installation
- The date filter is automatically pre-filled with the current day and month and the previous year. If today is 2016-12-17, then the filter is prefilled with this date: 2015-12-17. Change this filter date as required.
- Click the Clear Old button to remove data related to Process Instances older than the date specified on screen
For more information, see: Business Activity Monitoring (BAM)
Data Store Data Archive
The DataStore Extension is used for storing data managed in your Process Instances to a database.
We advise that you archive the data created by the Data Store extension on a regular basis. As this is done outside of the FNZ Studio platform, we cannot recommend any specific archiving tool. Choose the tool that best suits your needs.
Note: Consider that the lifetime of data in the live database depends on the type of information that you are storing and on its usage.
Process Audit Trail Data Archive
The ProcessAuditTrail Extension stores data related to token movements in Process Instances.
We advise that you archive the data created by the Process Audit Trail extension on a regular basis. As for the Data Store extension, this is done outside of the FNZ Studio platform and, therefore, we cannot recommend any specific archiving tool. Choose the tool that best suits your needs.
Recommendations:n
- Run the archive procedure every month.
- Archive all the Process Audit Trail data older than six months.
Custom Folder Cleanup
Custom files are usually used in FNZ Studio for integration with third-party applications or devices. For example, the documents signed by a client can be scanned and sent to a shared folder, and then attached to a Process Instance in FNZ Studio.
Always ensure that there is enough storage space on disk, regardless of whether the drives hosting the custom folders are on the FNZ Studio server or on a different server.
Failure to provide enough disk space breaks the integration, potentially leading to information loss.
Recommendations:n
- Purge custom folders regularly to help free up space on disk. This can be done manually, or via a scheduled job.
- Create alerts for utilization of the drives hosting custom folders.
Unused User Cleanup
When users are synchronized from an external directory, your solution can end up with "extra" users who have no role on the FNZ Studio platform, and have no access rights to the solution.
Recommendations:Run a weekly job to remove all users without a role from your Appway platform.
Unused Data Handle Cleanup
Data Handles store binary content used in Business Objects. They can accumulate over time, causing the datahandles directory in the Cluster Storage to grow to a large size. To optimize the space occupied by Data Handles, you can remove the Data Handles which are no longer used.
The approach for cleaning up unused Data Handles depends on if you are evicting Data Handles or not (Eviction Policies):
- If you are using eviction for Data Handles (enabled by default), use the provided script to remove unused and evicted Data Handles.
- If you have disabled eviction (both related configuration properties are set to 0), use the Data Handles Maintenance job available in FNZ Studio. This job automatically detects unused Data Handles and allows removing them (this job only considers non-evicted Data Handles).
See the following sub-sections for details on both approaches.
Recommendations:nClean up unused Data Handles on an annual basis.
Cleaning Up Unused Data Handles (Eviction Enabled)
Follow these steps to remove unused Data Handles if eviction for Data Handles is enabled:
- Ensure the cluster is in a stable state, for example that there are no ongoing changes in network topology or network issues.
- Set the following configuration property to
trueto enable the removal of Data Handles:Copynm.datahandlecleanup.removal.enabled = true - Run the below script in the Interactive Script Editor. The script performs the following actions:
- Removes unused, evicted Data Handles from Cluster Storage.
- Prints the number of Data Handles in the distributed map and in the Cluster Storage, before and after the cleanup.
$batchSize variable. In the below example, the batch size is set to 100, providing a good balance between execution speed and memory consumption. If you want to adjust the setting, keep in mind that while a larger batch size increases the execution speed, it also means more Data Handles are being loaded into memory, increasing memory consumption on the node where the script is executed.
```

    Integer $confMaxIdle := TOINTEGER(CONF('nm.cluster.eviction.datahandles.maxidle'));

    Integer $confMaxSize := TOINTEGER(CONF('nm.cluster.eviction.datahandles.maxsize'));

    PRINTLN('Configuration: maxidle=' & $confMaxIdle & ', maxsize=' & $confMaxSize);

    If $confMaxIdle <= 0 && $confMaxSize <= 0 Then

       Return 'Eviction for Data Handles is not enabled, exiting.';

    End

    com.hazelcast.core.IMap $dataHandlesMap := CONTEXT().getClusterService().getMap('dataHandlesMap');

    PRINTLN('Stats (before):');

    PRINTLN('Number of Data Handles in distributed map = ' & $dataHandlesMap.size());

    PRINTLN('Number of Data Handles in Cluster Storage = ' &     CONTEXT().getClusterService().getMapKeys('dataHandlesMap', false).size());

    java.util.Set $dhKeys := CONTEXT().getClusterService().getMapKeys('dataHandlesMap', false);

    java.util.Iterator $dhKeysIter := $dhKeys.iterator();

    Integer $numDHs := $dhKeys.size();

    Integer $batchSize := 100;

    For Integer $i := 0 Condition $i < $numDHs Step $i := $i + $batchSize Do

       For Integer $j := $i Condition ($j < $i + $batchSize) && ($j < $numDHs) Step $j := $j + 1 Do

          String $dhKey := TOSTRING($dhKeysIter.next());

          $dataHandlesMap.get($dhKey);

       End

       LOGGER('WARN', 'Progress: ' & $i & '/' & $numDHs);

       PAUSE(3000);

       DELETECLUSTERFILE('data-handle-clean-up-job/candidates.txt');

       com.nm.utils.DataHandleCleanupJob $job := NewObject('com.nm.utils.DataHandleCleanupJob');

       $job.execute(null);

       $job.execute(null);

       $dataHandlesMap.evictAll();

    End

    PAUSE(10000);

    PRINTLN('Stats (after):');

    PRINTLN('Number of Data Handles in distributed map = ' & $dataHandlesMap.size());

    PRINTLN('Number of Data Handles in Cluster Storage = ' &   CONTEXT().getClusterService().getMapKeys('dataHandlesMap', false).size());

```
- Set the configuration property back to
false(default) to avoid any unintended removal of Data Handles:Copynm.datahandlecleanup.removal.enabled = false - Verify that the files were deleted from the
datahandlesdirectory in the Cluster Storage.
Cleaning Up Unused Data Handles (Eviction Disabled)
Follow these steps to remove unused Data Handles if eviction for Data Handles is not enabled:
-
Ensure the cluster is in a stable state, for example that there are no ongoing changes in network topology or network issues.
-
Trigger the Data Handle Maintenance job in the Studio. To do so, go to System Maintenance > System Overview > Job Scheduling, find the Data Handle Maintenance job in the table, and right-click on it and select Trigger Now.
-
Trigger the Data Handle Maintenance job in the Studio again. The result of the first run is compared with the result of the second run. In the log you will now find WARN messages like:
Copyx unreferenced Data Handles found: ... -
Review the Data Handles listed in the log to ensure you want to remove them.
-
Set the following configuration property to
trueto enable the removal of Data Handles:Copynm.datahandlecleanup.removal.enabled = true -
Trigger the Data Handle Maintenance job in the Studio again, this time to remove all non-evicted, unused Data Handles.
-
Set the configuration property back to
false(default) to avoid any unintended removal of Data Handles:Copynm.datahandlecleanup.removal.enabled = false -
Verify that the files were deleted from the
datahandlesdirectory in the Cluster Storage.
Tuning Eviction Policies
FNZ Studio objects are stored in distributed maps and in a node's local cache. This translates into faster access, and boosts the performance of your application.
The objects created in a distributed map remain in that map. However, unused objects can be deleted to free some space in memory. Use FNZ Studio's eviction policies to delete these objects automatically.
For more information on eviction policies, see: Eviction Policies.
Cleanup Jobs
The FNZ Studio platform comes with a set of maintenance jobs for cleaning up unused data from the system. Each job has a default schedule which can be customized to fit your needs.
Note: All the times indicated in the schedule are in the time zone of your application server (for example, Tomcat).
To change the schedule, follow these steps:
- In Studio, go to System Maintenance > System Overview > Job Scheduling.
- Right-click on <Maintenance Job Name>.
- Click Edit.
- Change the schedule as required.
Note: Custom maintenance job schedules are reset to default values after the system is restarted.
Data Table Model Unregistering
The Data Table models used in the solution are stored in a cache in order to improve performance when loading the Data Table.
The Data Table Model Unregistering job cleans up Data Table models from the cache.
Default schedule: Every 5 minutes
Filesystem Directory Cleanup
A file system can be used as persistent storage for your FNZ Studio solution. In this case, the objects managed in the solution are stored in map folders in the cluster home directory.
The Filesystem Directory Cleanup job removes all empty subfolders from the map folders. Note that the distributed map folders themselves are never deleted.
Default schedule: Daily at 11:24 pm (in the time zone of your application server).
Notification Cleanup Job
FNZ Studio provides a notification feature for publishing messages to topics. Messages published by the system are stored in persistent storage. This job frees up space by cleaning up old messages.
The maximum age of persisted messages is defined with the following configuration property: nm.usermessaging.notification.ttl_days.
As an example, nm.usermessaging.notification.ttl_days = 7 means that the job deletes all messages older than 7 days.
Default schedule: Every hour at minute 1.
Orphaned Value Stores Cleanup
In FNZ Studio, Value Stores contain all business data collected during the process. Every Process Instance is associated with exactly one Value Store.
When a Process Instance is terminated normally, the associated Value Store is deleted. However, there may be situations when the Value Store is not deleted during Process Instance termination. Such Value Stores (without any related Process Instance) are called Orphaned Value Stores.
The Orphaned Value Stores Cleanup job cleans up Orphaned Value Stores.
Default schedule: Every day at 23:34.
Portal Work List Cache Cleanup
Portal Work List columns can be cached within FNZ Studio. When enabling caching for a column, cache validity is provided in minutes. After the time period specified, the cache expires.
The PortalWorkList Cache Cleanup job cleans the expired cache of Portal Worklist entries.
Default schedule: Every 10 minutes.
Process Job Cleanup
The Timer intermediary event in FNZ Studio is used to suspend the execution of a process until a certain date and time has been reached.
During process execution, a Process Job trigger is created whenever the Timer event is triggered.
When the target date and time are reached, the process execution is resumed and the related Process Job trigger is deleted. However, when the process is terminated abnormally, Process Job triggers are not deleted.
The Process Job Cleanup job deletes all the Process Job triggers related to terminated (non-existing) Process Instances.
Default schedule: Every 4 hours.
Process Message Maintenance
FNZ Studio provides a message queue system for exchanging information between different components of the solution.
Every message published has an expiration date. Please refer to section 2.5 Process Messages and Signals for more details about the Process Messages expiration date.
The Process Messages Maintenance job deletes expired messages.
Default schedule: Every 5 minutes.
Temporary File Maintenance
The DATA_HOME/work/tmp and DATA_HOME/work/output directories are used to store temporary files generated during Process execution (such as PDFs generated for preview).
By default, the Temporary Files Maintenance job deletes all the files and folders in these two directories that are older than 24 hours.
You can configure the time span to wait before deleting files and folders using the nm.tempcleanup.threshold configuration property, in minutes (default value 1440, which equals 24 hours).
Default schedule: Every hour at minute 30.
User Session Registry Maintenance
The User Session Registry Maintenance job removes inactive and expired user sessions from the user session registry.
Default schedule: Every 20 minutes (at minutes 03, 23 and 43).
Virtual File Maintenance
The temporary PDF documents generated in FNZ Studio are stored in the filesystem in the folder DATA_HOME/work/output by default. However, it is also possible to store PDFs in memory as virtual files (Data Management) instead of using the filesystem.
The Virtual File Maintenance job deletes expired virtual files.
Default schedule: Every 5 minutes
Workflow Token Lookup Cache Cleanup
FNZ Studio keeps the mapping between Process Token IDs (also known as Workflow Token IDs) and Process Instance IDs (also known as Workflow Instance IDs) in memory. This improves performance when looking up a Process Token ID.
The Workflow Token Lookup Cache Cleanup job deletes cache records related to terminated Process Instances.
Default schedule: Every hour
Logging
Depending on your logging strategy, log files can become very large. Large log files take up a large amount of disk space, and make it difficult to find relevant information in the log files when troubleshooting.
When using logs in your FNZ Studio solution, make sure to log only relevant information, and get rid of all debug log entries.
Recommendation: Run a weekly job to remove all users without a role from your FNZ Studio platform.
The default FNZ Studio logger (com.nm) is defined with a WARN level. The logger uses the appenders described below. Keep the WARN level for the FNZ Studio default logger in your production environments.
Default Logger Appenders
Clusterlog
Consolidates the logs from all FNZ Studio nodes. These logs are not persisted and stay in memory only for a limited time. The lifetime of a Cluster Log entry is defined using the nm.cluster.log.eviction.ttl configuration property.
Dbglog
The logs are written to the {DATA_HOME}/logs/debug.log file of FNZ Studio node. This logger uses the "RollingFileAppender" rolling strategy.
The maximum file size is set to 4MB. It is possible to have up to 4 log files: this means that, once the fourth file has reached 4 MB in size, the first one is overwritten with new data.
Errlog
The logs are written to the {DATA_HOME}/logs/error.log file of FNZ Studio node. This logger uses the "DailyRollingFileAppender" rolling strategy.
Recommendation: Once a month, purge all the error files older than 6 months. Use a scheduled job if possible.
Stdlog
The logs are written to the system standard output. The appender uses the log4j "ConsoleAppender" rolling strategy.
Custom logging configuration
There are two options for providing a custom logging configuration:
-
Provide a custom configuration file in the
{DATA_HOME}/conf/folder (Example: /conf/log4j.properties). This configuration overwrites the default FNZ Studio logging configuration. -
Provide an additional logging configuration file
{DATA_HOME}/conf/log4j-additional.properties. This allows you to define specific parameters. If a configuration appears inlog4j.propertiesand inlog4j-additional.properties, the configuration defined in theadditional.propertiesfile is used.
Recommendation:Use the `log4j-additional.properties` file if you have to customize some logging configurations.nThis ensures that the new logging configurations (if any) coming with new FNZ Studio releases will be available in your system by default.
Application server logs
Catalina.log
The logs from the stdlog appender are written to your application server standard output. Example: If you are you are using Tomcat’s application server, the logs are written to catalina.logs.
Make sure to define a proper rolling strategy for your Catalina logs. Without a proper log rolling strategy, you could end up with a Catalina log file several gigabytes in size.
Access logs
If the access logs are activated in your application server, make sure to configure a proper rolling strategy and purge old log files regularly.
Recommendation :Use a scheduled job for purging old access log files, if possible.