Digital Binder ABC / App Task
Introduction to Digital Binder v5 and higher
An Application Business Component (ABCs) is a pre-fabricated software product that serve as a Solution building blocks. It solves recurring business problems out-of-the-box, can be used for a wide range of business scenarios thanks to powerful configurations, and comes with continuous evolution that is taken care of by FNZ Studio.
The Digital Binder ABC, in particular, acts as a central hub for accessing and managing documents through pre-defined document workflows. There are multiple use cases for Digital Binder, it can be the core of a process - for example, back-office automation, or part of a larger process such as onboarding. Each use case requires different types of documents, with different document workflows and different actions to be performed per document - with Digital Binder this is easy to do.
Digital Binder v5 introduces significant changes with respect to the previous versions. It is designed and implemented as an App Task, following the principles of the new Data Model-driven configuration approach and the user interface is entirely generated based on Data Class and Data Logic Business Objects.
Installation and Upgrade
Installation
Ingredients and Installation Steps
Digital Binder consists of the following basic ingredients:
- AppTask Extension (included in FNZ Studio (Core) installations)
- AppTaskAPI Extension (included in FNZ Studio (Core) installations)
- DigitalBinder Extension
Technical Requirements
Make sure you check the following:
- You are on a compatible FNZ Studio Core version. See the Digital Binder Product page for compatibility information.
- Your FNZ Studio installation includes all other mandatory extensions (in addition to AppTask and AppTaskAPI) and Packages. See See System Upgrade section.
Upgrading to Digital Binder 2025
When upgrading to the latest available Relationship Definition 2025 release (2025.x) from a lower version, you may need to consider the following information:
The following Labels have been added in Digital Binder to the Platform Package specified in the Label with default English texts. You can add and edit translations for such Labels (in Solution Design> Translations tab):
-
AppTask:ValidationConfirmationModal.MessageSingular -
AppTaskValidationConfirmationModal.MessagePlural -
AppTask:ValidationConfirmationModal.SeeErrors -
AppTask:ValidationConfirmationModal.Continue -
AppTask:ValidationConfirmationModal.Hide
General Properties
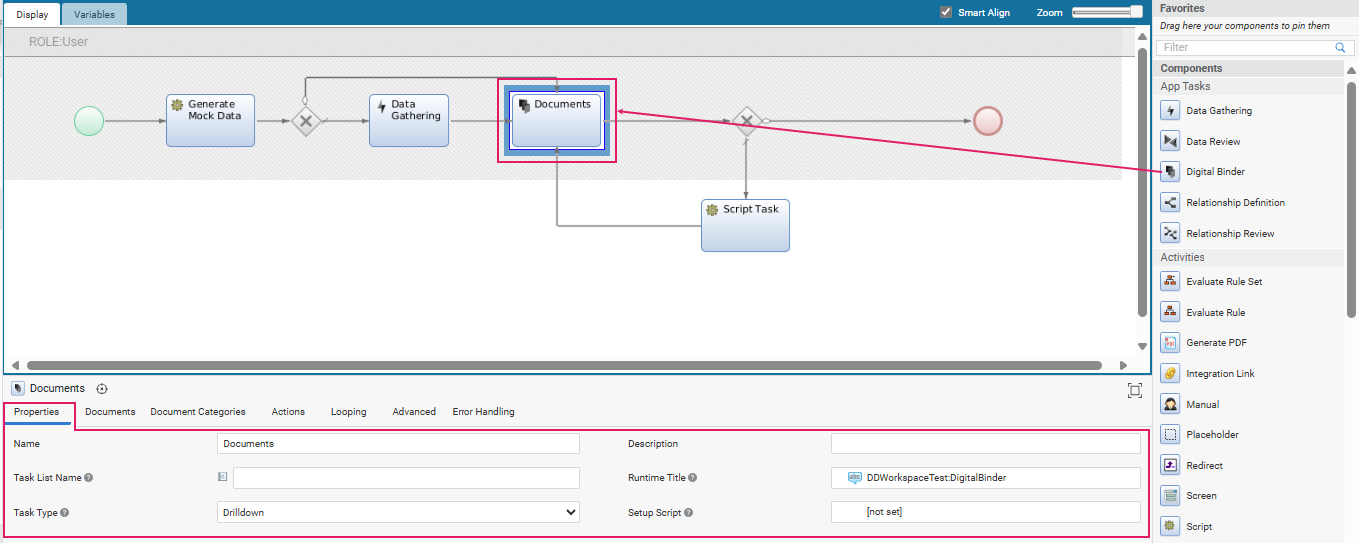
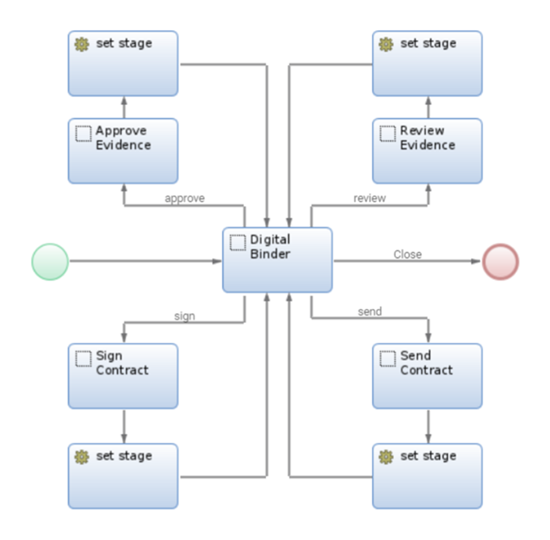
After following the installation steps described above, the Digital Binder App Task will be available in the Process Editor. You can drag and drop it into the central composition area, as shown in the image below. Drag a Digital Binder App Task into your Process and configure it.
 Digital Binder App Task in the Process Editor
 Digital Binder App Task in FNZ Studio Runtime
Process Properties
Most of the general properties of the App Tasks (title, type, and so on) can be set in the Process Editor, as illustrated in the table below.
| Property | Description | Configuration |
|---|---|---|
App Task Title (Process Editor)(1)
|
Name of the App Task in the Process Editor (Documents in the first image above). | Process Editor Properties tab > Name field. |
Page Title (UI) (2) |
Name of the App Task page in FNZ Studio Runtime | Process Editor Properties tab > Runtime Title field (Documents in the second image above). You need to select a Label Business Object. In case the property is not set, it shows 'FNZ'. This property is mandatory for App Tasks included in Ad-Hoc Sub-Processes, in which case, the page title is displayed at the top of the content area (if the Tab Bar is not visible). |
App Task Title (Task List) (3) |
Name of the page on a Task List (backend) Process Editor. | Properties tab > Task List Name field. You can select a Label Business Object or enter a text. Set the name of the page, as it should appear on a Task List (it may contain a Label or not). |
Type of App Task (4) |
Type of navigation pattern to use inside the App Task | Properties tab > Task type dropdown. Select the Task pattern between Sequential (tasks form a linear sequence, where users navigate through each Task step-by-step, and can typically only move forward or backward) and Drill Down (multiple different Sub-Tasks can be opened from one main Task). This influences navigation. |
App Task initialization (5) |
Logic to be executed when initializing the App Task | (optional) Properties tab > Setup Script field. Specify the Script Function Business Object that contains the logic to be executed when initializing the context of the App Task (if any). This can be used, e.g., to set any necessary Process Instance or Token Attribute. The script is executed once for each token when it becomes Active. |
Home Button
The Home button is rendered as the logo on the top-right of the FNZ Studio Runtime page.
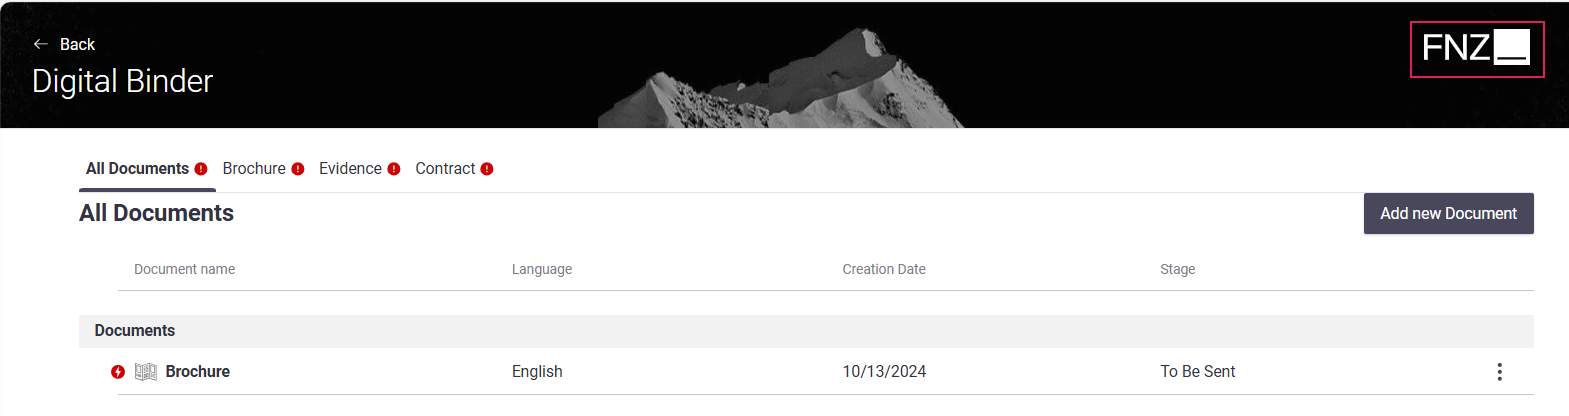
The Home button is not configured in the App Task, instead it is managed by the global configuration property nm.window.start. If you do not set this property, the FNZ logo is shown by default.
Feature Overview
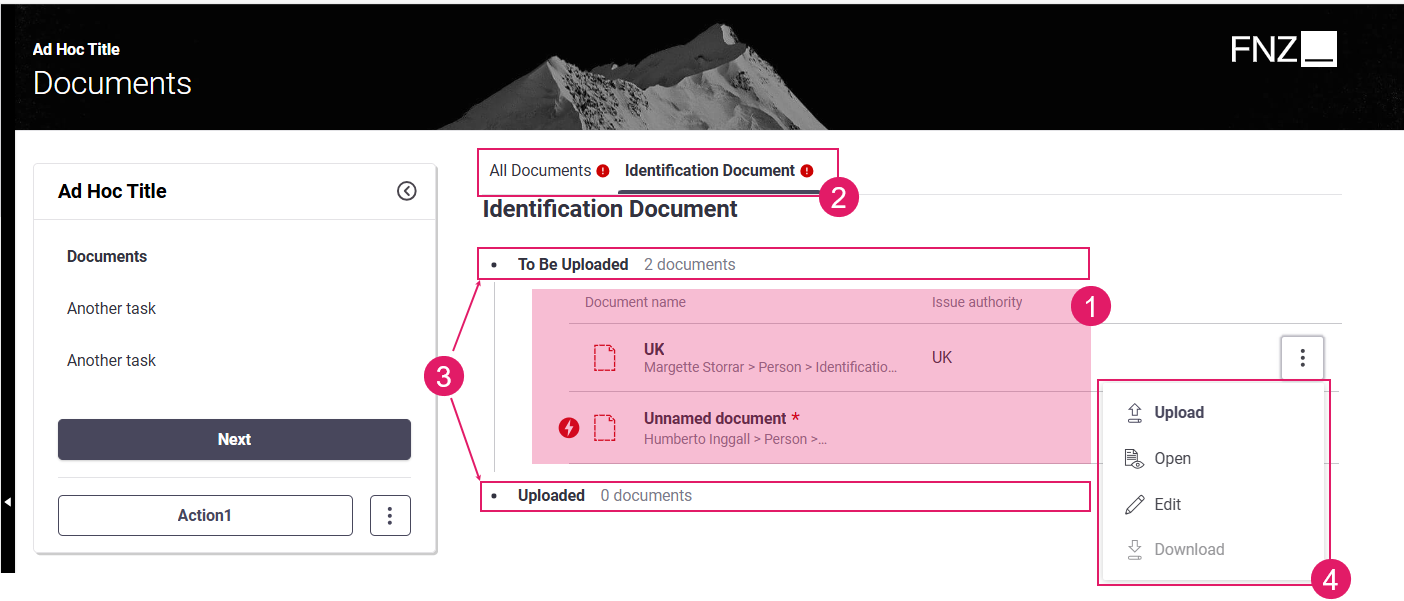
Following is an overview of the main Digital Binder features. The sections below will provide detailed information on each feature and how they are configured.
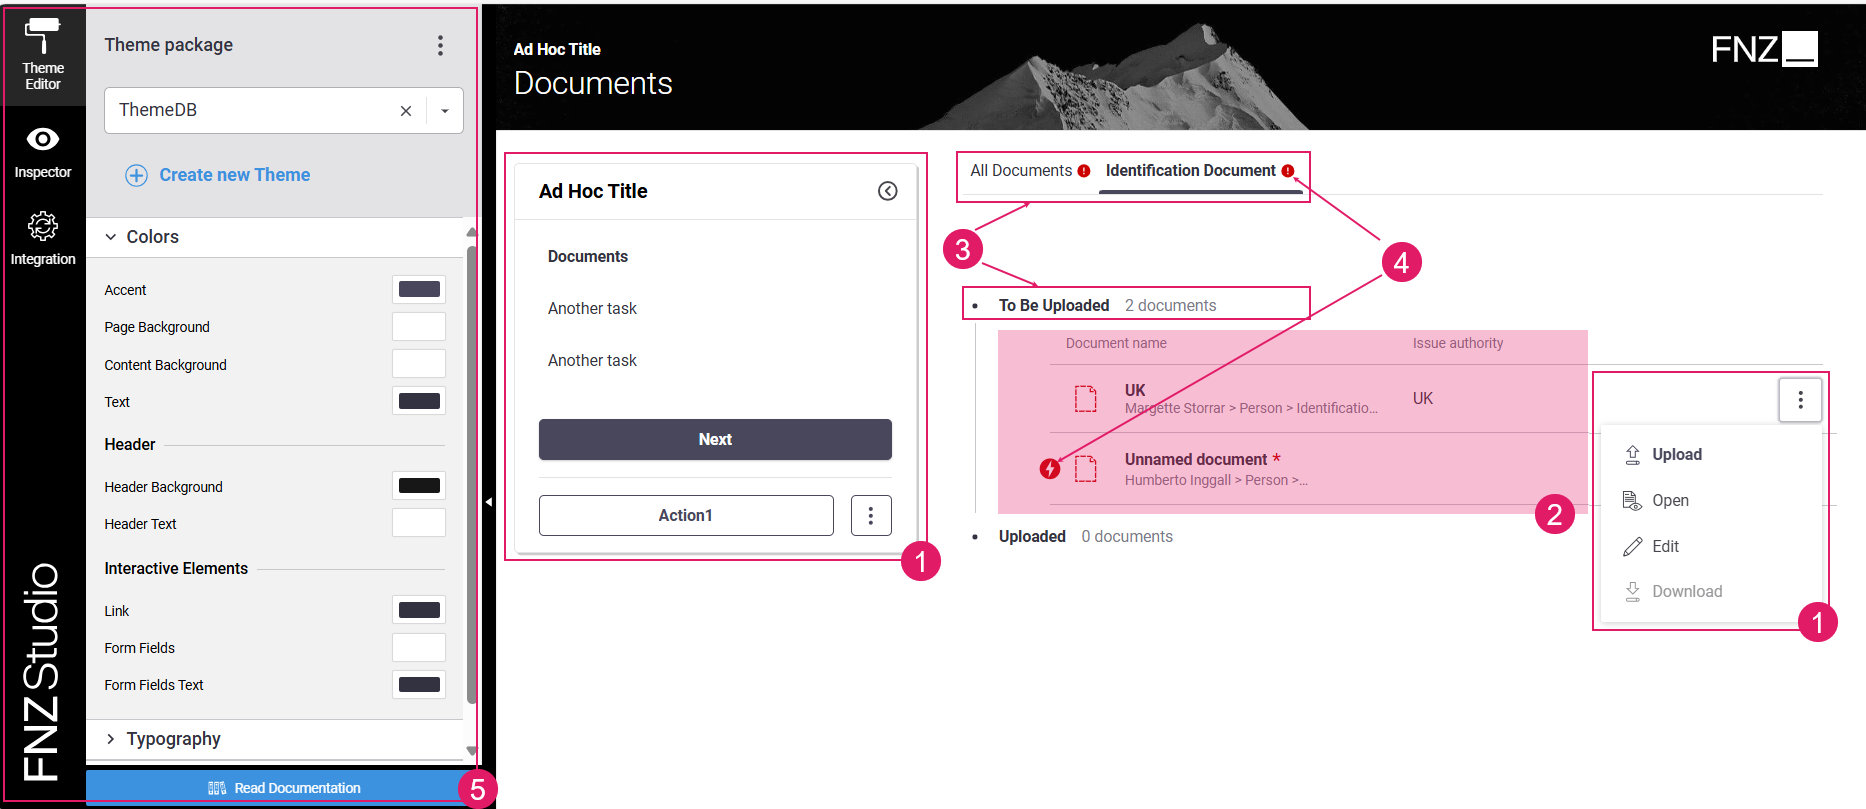
- Navigation and Actions (
1) — A bird-eye overview of the page structure allows you to find fields easily. Moreover, actions allow going back or forward in the process, deleting items or move to a different task, among others. See Navigation and Actions section - Content Area (Documents) (
2) — The main content area shows documents in a configurable table view with the possibility to analyze them or execute actions on them. See Content Area: Documents section. - Content Structure (Document Categories) (
3) — Documents can be organized in Categories to support the user in handling large amounts of Documents. Categories are sets of Documents processed following the same steps. Such steps are referred to as Stages. See Content Structure: Document Categories section. - Information framework (validation) (
4) — Continuous feedback and annotations are provided on blocking issues and warnings, as long as suggestions on how to fix them. See the Information Framework: Validation section. - Developer Toolbar (
5) — The Developer Toolbar provides three main tools: the Theme Editor, which allows styling your Solution; the Inspector Tool, used to navigate to the Business Objects where the elements of the current page in FNZ Studio Runtime are configured and fixed any issues; the Integration Console, which shows all the integration calls performed for easier contextual debugging. See the Developer Toolbar section.
Main Concepts and Terminology
Following is an overview of specific Digital Binder terminology mentioned throughout this document.
- Documents — (
1) A document represents a collection of files and properties. For example, a document could be a contract with multiple files (pages), or a passport with two files (a scan of the front and a scan of the back). In Digital Binder, the list of records are Documents that may contain zero or many files. - Document Categories — (
2) Categories represent a collection of documents that have the same workflow. For example, Contracts are documents that need to be sent out to the end user, signed and then sent back, Evidences are documents that need to be received from the end user and uploaded (e.g., ID documents), while Brochures (including terms and conditions and info sheets) are documents that are sent out to the end user, but do not need to be tracked nor sent back. You also have the option not to use categories if it does not add value to your specific use case. Configuration allows you to create categories specific to your use case. - Stages — (
3) Stages represent the different points in the document category workflow that a document needs to go through. For example, a contract that needs to be sent to the client, signed and returned could have the following stages: unspecified signature method, to be sent via e-signature, sent for signature, and received. - Document-Level Actions — (
4) Actions are specific to each stage. The primary action next to each document represent the action required to progress a document through its workflow to the next stage. Secondary actions are included in the three-dot menu. A few native actions are supported out of the box, but you can create custom actions to meet your use case.
Navigation
Feature Overview
A bird-eye overview of the page structure allows you to find fields easily.
Navigation in Digital Binder is based on the following elements:
- Page Structure (Sidebar and Action position): Page structure determines the way the Digital Binder page is organized (whether there is a sidebar or not) and where Actions are positioned on the page itself. Page structure is configured through a combination of the following elements:
- Task Type: The Task Type property (Sequential or Drill-Down) set at Process level determines where Actions are positioned on the page.
- Ad-Hoc Sub-Process: If a Digital Binder App Task is contained in an Ad-Hoc Sub-Process Component, a navigation sidebar may be displayed. With the Sidebar, users are constantly provided with an overview of the steps that are needed to reach the end of the process. They can either follow a predefined path or jump to a specific step directly by clicking on any task.
- Content Navigation (Tab Bar): The Tab Bar allows users to navigate through different types of document. This type of navigation is specific to Digital Binder and is configured through Document Categories (Content Structure: Document Categories).
Page Structure
Configuration
As mentioned above, the way the Digital Binder page is structured and the position of Actions on the page depends on a combination of the following elements:
- Task Type: Sequential or Drill-Down. This property is set in the Digital Binder Process Properties.
- Ad-Hoc Sub-Process: The Digital Binder App Task (and other Process Components, if any) may be contained in an Ad-Hoc Sub-Process. In this case, each Process Component included in the Ad-Hoc Sub-Process may be rendered as an item in a navigation sidebar. See Ad-Hoc Sub-Process configuration details.
There are four types of page structure depending on each configuration type, as illustrated in the images below:
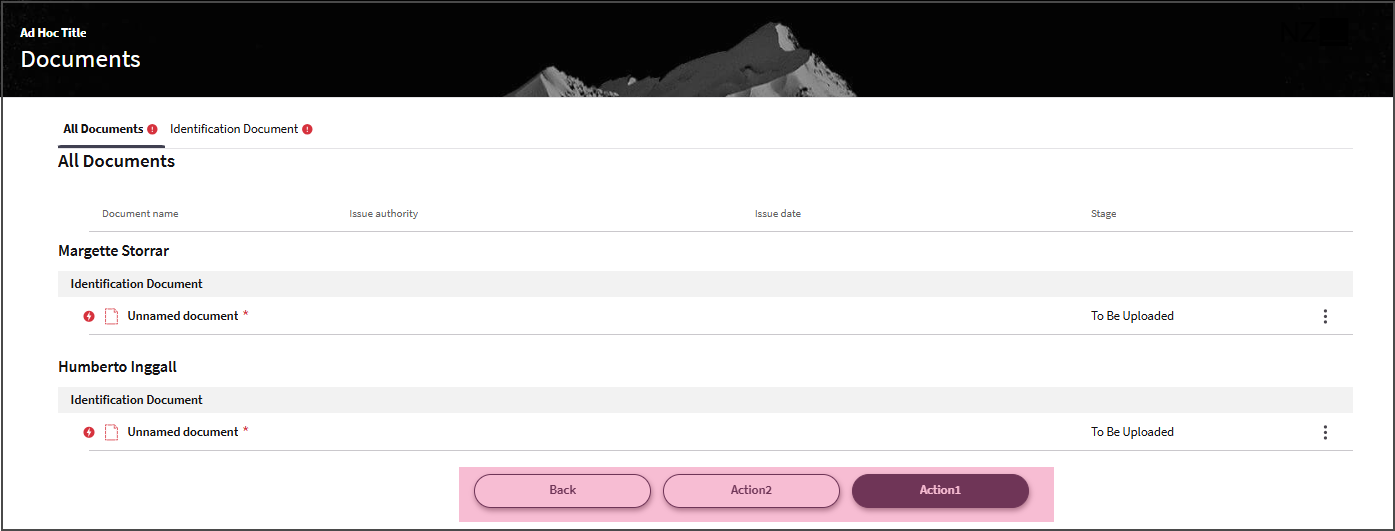
Mode 1: No sidebar is shown; all Actions are displayed at the bottom center of the page.
- Task Type: Drill Down
- Digital Binder App Task inside an Ad-Hoc Sub-Process
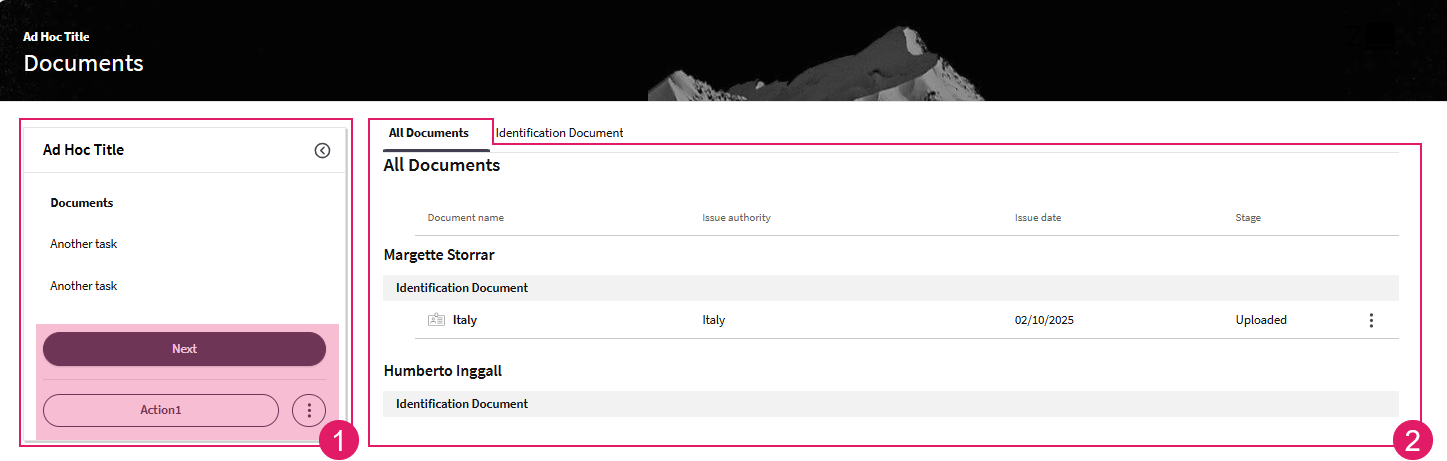
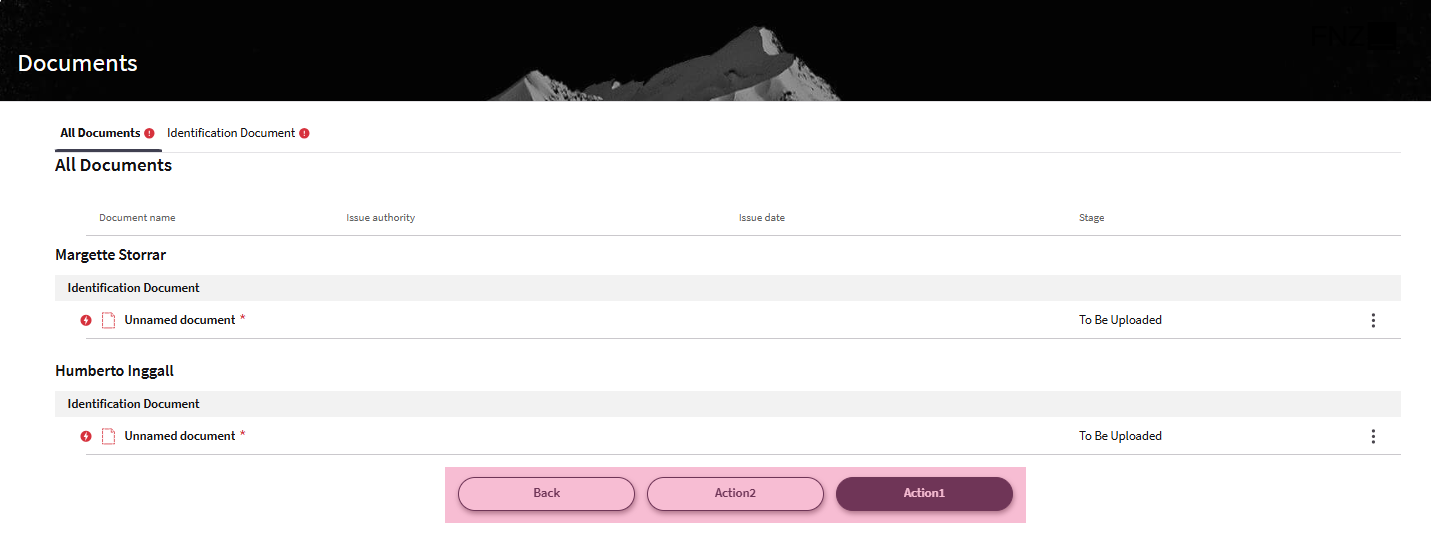
Mode 2: Sidebar is shown; all Actions are displayed in the sidebar.
- Task Type: Sequential
- Digital Binder App Task inside an Ad-Hoc Sub-Process
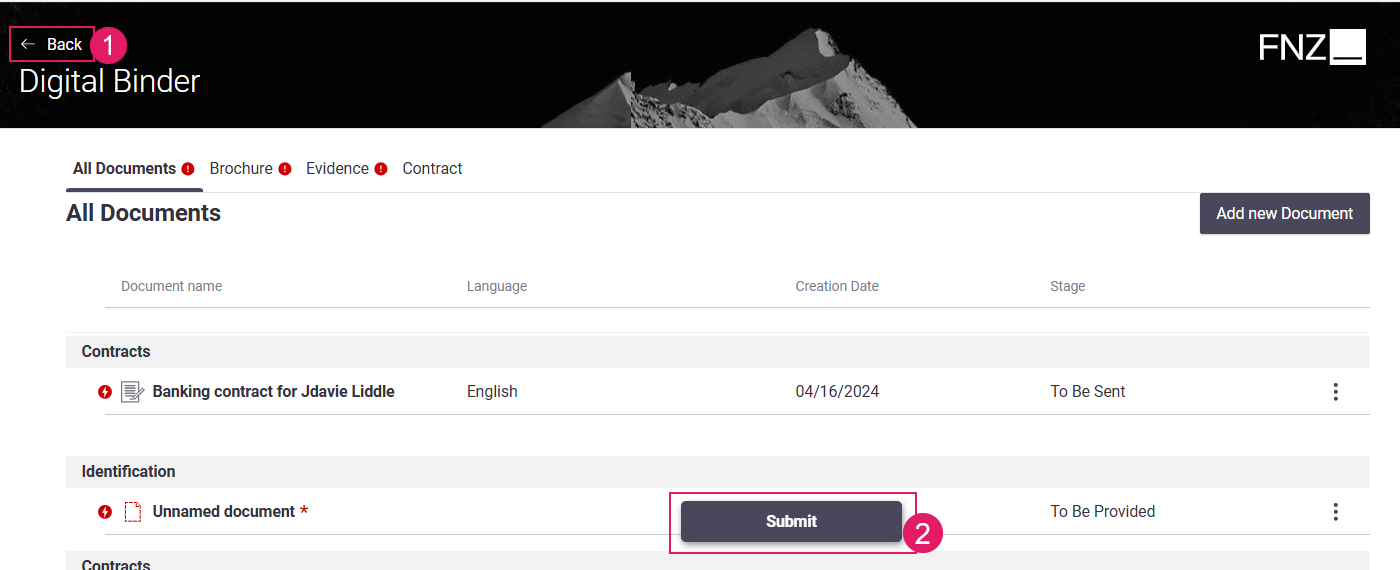
Mode 3: No sidebar is shown;Back Action is displayed at the top left of the page, Custom Actions are displayed at the bottom center of the page.
- Task Type: Drill Down
- Digital Binder App Task outside an Ad-Hoc Sub-Process
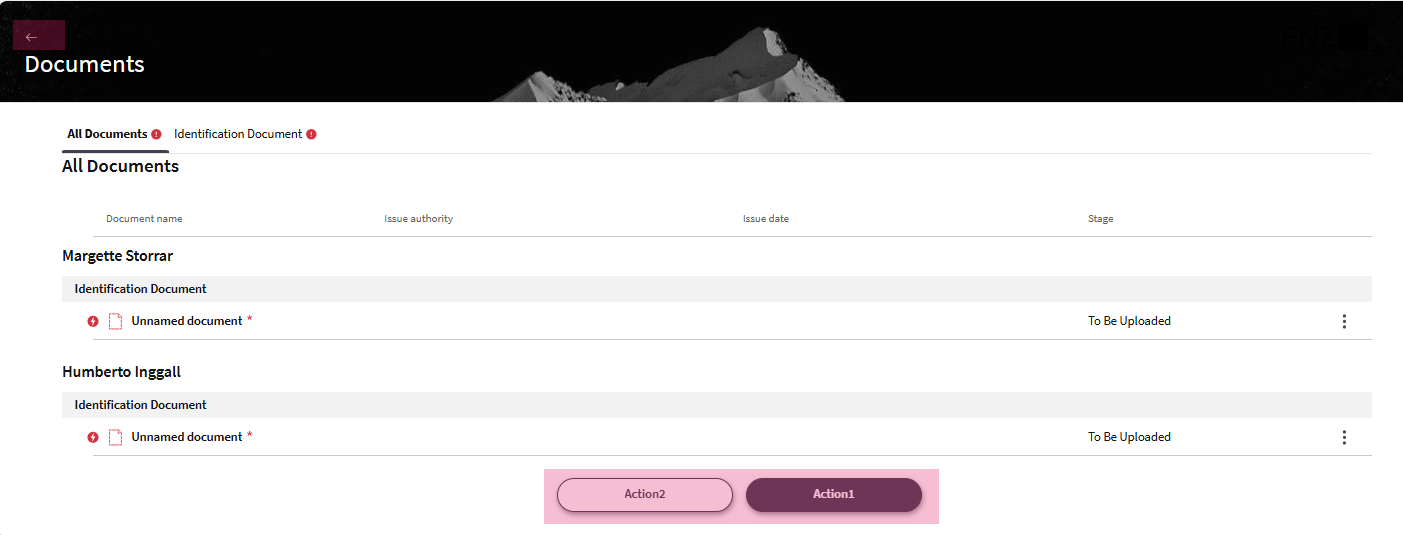
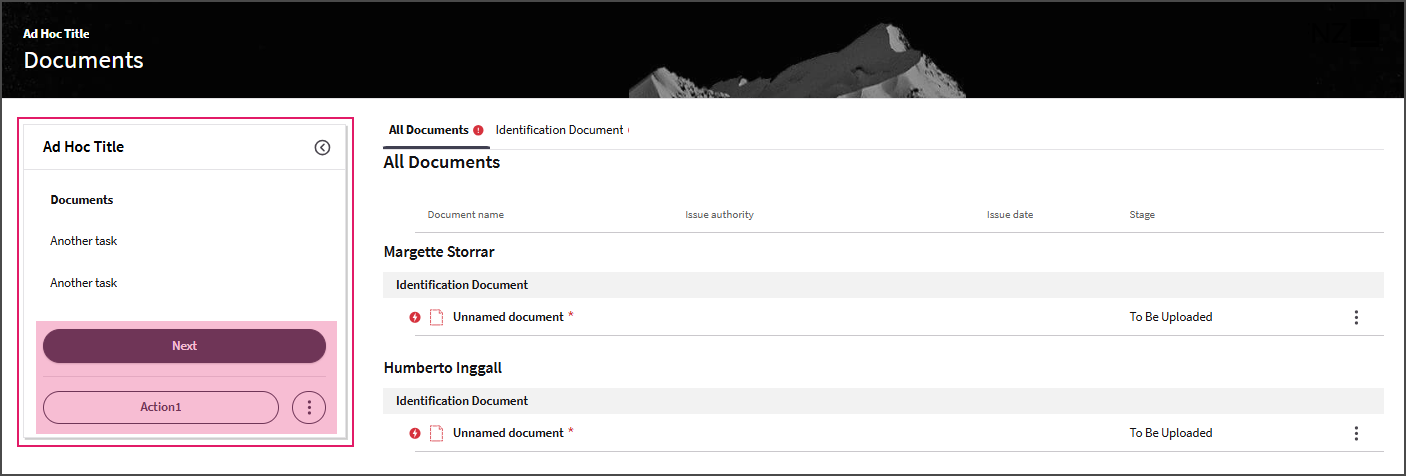
Mode 4: No sidebar is shown; all Actions are displayed at the bottom center of the page.
- Task Type: Sequential
- Digital Binder App Task outside an Ad-Hoc Sub-Process
Actions
App Task Actions allow developers to define all aspects of an Action in the Process editor directly. This allows reusing the same Data Logic in different situations, and with different actions. Moreover, only the Process Business Object is altered when actions need to be added, removed, or updated. Digital Binder features two types of actions:
- Global Actions, applied to the whole App Task
- Document-level Actions, applied for each document or set of documents
Global Actions
Feature Overview
Digital Binder features two types of Global Actions (applied to the whole App Task, such as Submit or Reassign), which are common to all App Tasks:
- Back Action (Predefined)
- Custom Actions
Configuration
| Action | Description | Configuration |
|---|---|---|
Back Action (1) |
Back button. Depending on the type of type of App Task, it may be visible at the at the top left or at the bottom center of the page. | This is a predefined, static Action, which allows ensuring a consistent developer experience across different solutions. It is configured in the Digital Binder App Task Editor (Actions tab > Global Actions > Back option). See Actions. |
Custom Action (2) |
Any kind of Action applied to the Process (e.g., Go to documents, Ask for help) | This Action is entirely defined by the developer. It is configured in the Digital Binder App Task Editor (Actions tab > Global Actions > Custom Actions option). Two types of Custom Actions are available: Process (impacting the Process flow by moving the token) and Script Actions (reload/update actions with no impact on the Process flow). See Custom Actions. |
Document-Level Actions
Feature Overview Document-Level Actions are applied to specific documents, e.g., Upload File or Send for Signature. These Actions are executed on one or a set of Documents and allow moving Documents through the available Stages, depending on their Document Category (if defined).
At UI level, Document-Level Actions may be:
- Primary actions — They are specific to each stage and represent the main action required to progress a document through its workflow to the next stage. The primary action per stage is shown on each document.
- Secondary actions — They are available in the three-dot menu. Secondary actions can include custom actions that you have built for your specific use case.
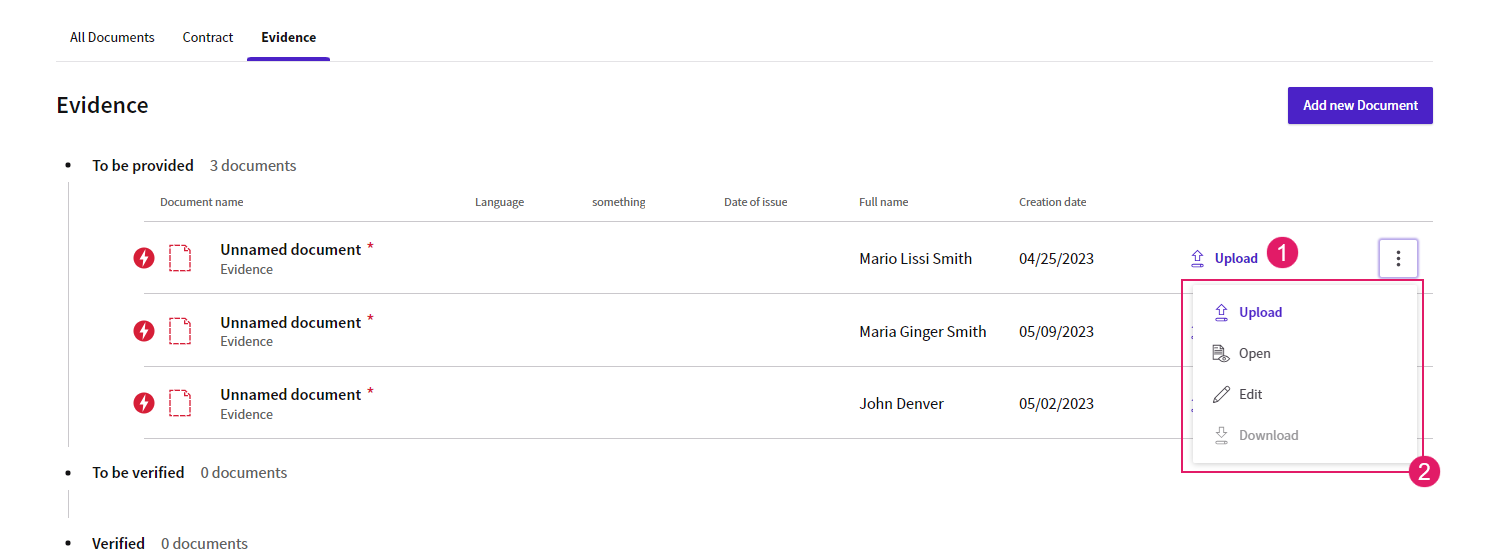
Actions can be performed on one or more documents at a time across categories and stages. For example, you can use actions to select multiple documents and send for e-signature, or select multiple documents and set the preferred language.
Configuration Overview
In order to move Documents through Stages in the Digital Binder, perform the following configuration steps:
-
In the Digital Binder App Task, define the Actions that are available for each Stage (for example if a Document has not been signed yet, the Action Send for Signature is available). Each Action corresponds to an
$actionvalue (see configuration details in the next section). Document-level Actions are defined for each Content Structure: Document Categories. These Actions are available in the UI for each applicable Document, e.g., Documents currently located in a given Stage (based on the Stage Id property selected in the Summary Mode (Summary Behavior) ) will have Actions defined for that Stage. The Document Categories selected in the Document Categories tab of the App Task are listed as sections of the Actions tab, and their Stages are listed as subsections. When you click on the three-dot menu next to the Custom Actions header (left tab), a dropdown list is displayed where you can chose the type of Custom Action you want to add. There are three types of Document-Level Actions available:- File Upload Action — These Actions allow uploading a file for the Document. For each Stage, you can set only one File Upload Action. See details in the sections below.
- Process Action — These Actions have an impact on the Process flow, either by ending the App Task and moving further in the Process, or by creating a new activity. For each Stage, you can set one or more Process Actions. See details in the sections below.
- Script Action — These Actions allow executing a Script Function with no impact on the Process Flow (no token is moved or created). They can be used when an update or calculation logic triggered by the user is necessary in the context of the current App Task with immediate reload/update. For each Stage, you can set one or more Script Actions. See details in the sections below.

-
In the Digital Binder App Task Editor, define the steps corresponding to the available Actions by modeling them with outgoing connections from the Digital Binder App Task to follow-up Tasks (Scripts, other App Tasks, Integration Tasks and so on).
-
When an Action is executed, if necessary, update the Stage in the selected property of the Document instance using a Script in the Process.
Note: Stages can also be updated in the Document instance using the Update Function field available for Data Logic Controls (Controls Tab). For example, if a Document should move to Stage "Uploaded" after
Blob:Fileis uploaded to the Platform, it is possible to set the Update Function on theBlob:FileData Logic Control to update the Stage.
File Upload Action
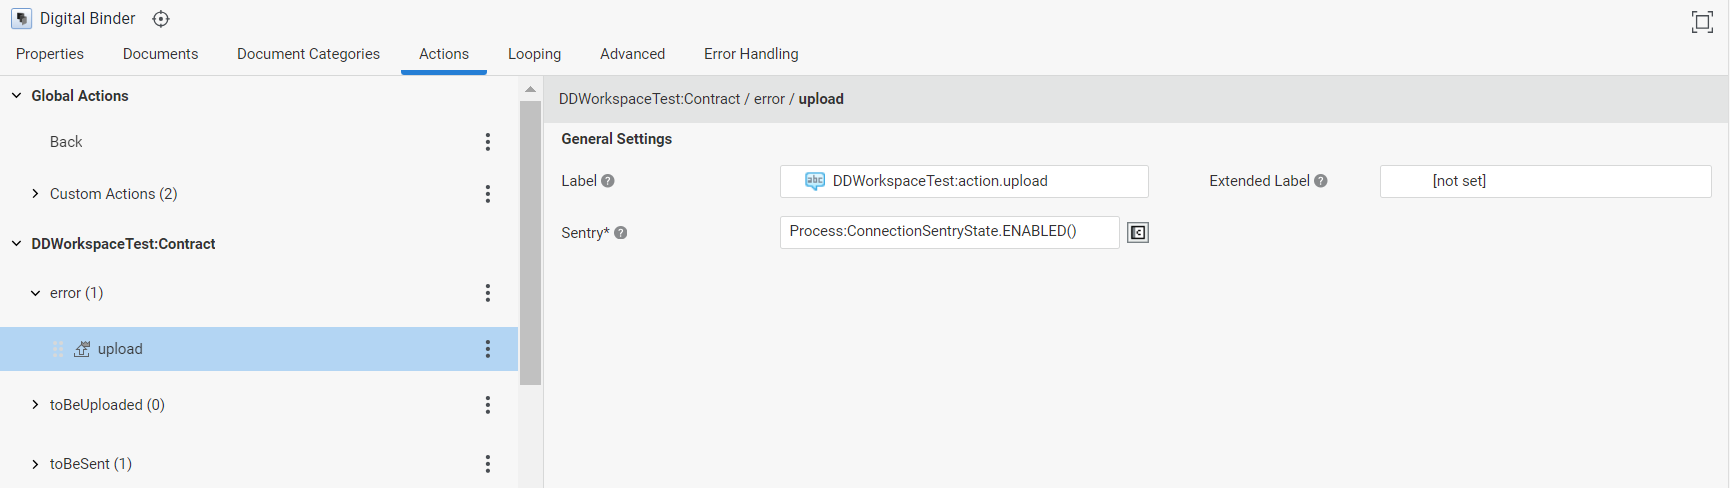
The File Upload Action is a predefined Action that allows the user to upload a file for the Document; it is not a Process Action (it does not move the Process Token). You can set one File Upload Action for each Stage. The File Upload Action has the following properties:
- Label — Label of the Upload button
- Extended Label — Tooltip of the Upload button
- Sentry — Script determining whether the File Upload Action is currently shown as enabled, disabled, or hidden altogether for the Document. The Sentry script must return one of the following values:
Process:ConnectionSentryState.ENABLED(),Process:ConnectionSentryState.DISABLED()orProcess:ConnectionSentryState.HIDDEN(). The script has access to the predefined variable$document, which represents the Document for which the File Upload Action should be enabled/disabled/hidden.
Process and Script Actions
Process and Script Actions are Solution-specific, custom Actions available for a given Document. You can set one or more Process or Script Actions for each Stage. They have the following properties (Digital Binder Process Action configuration is very similar to the configuration of Custom Actions available for other App Tasks, see Custom Actions Types: Details):
General Settings (common to Process and Script Actions):
- Name — Define a name for the current Action to make it easier to identify it during configuration
- Type — Custom Actions can have three types (see details below):
- Submit for actions that submit the current form, i.e. they trigger a Process step that cannot be undone.
- Destructive for actions that have destructive effects, such as deleting an object from a collection.
- Other for all other actions.
- Label — The button label
- Extended Label — The button tooltip
- Confirmation Mode — (for Actions of Type Submit or Destructive):
- Proceed but allow cancelling: The Action is executed immediately, but the user can cancel execution if needed (default setting for Actions created in ABC 2025.2 and lower).
- Confirm before proceeding: The user is asked to click a confirmation button before the Action is executed (default setting for Actions created in ABC 2025.3 and higher). In this case, two additional fields are available:
- Yes Button Label: Label Business Object containing the text to be shown on the button to confirm Action execution.
- No Button Label: Label Business Object containing the text to be shown on the button to cancel Action execution.
- Confirmation Label — The message to be shown when confirming a Submit or Destructive Action.
- Sentry — A script determining whether the button is currently shown as enabled, disabled, or hidden altogether. The Sentry script must return one value among the following:
Process:ConnectionSentryState.ENABLED()Process:ConnectionSentryState.DISABLED()Process:ConnectionSentryState.HIDDEN()
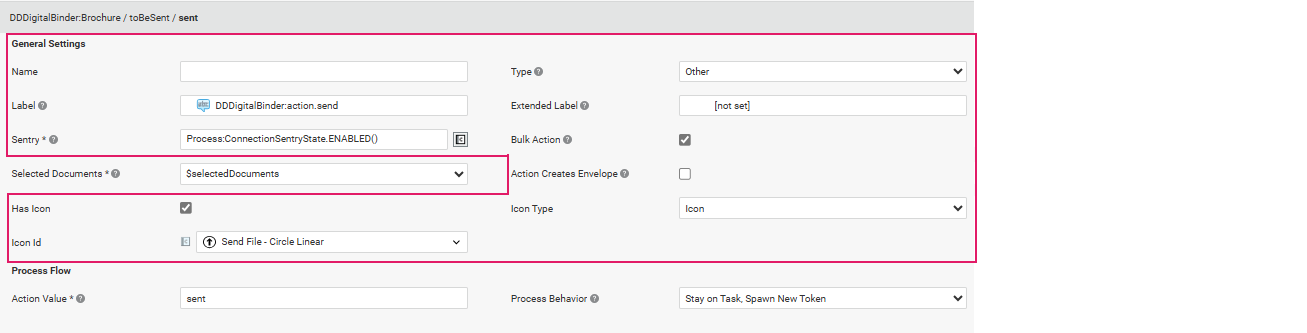
- Bulk Action — If selected, FNZ Studio Runtime users can select multiple Documents and apply this Action to all of them at once. For Process Actions, the variable selected in the Selected Documents property (see below) contains all the Documents selected for the bulk action. For Script Actions instead, the selected Script is executed only once and can access the Documents selected for the bulk action using the implicit variable
$documents. - Has Icon — Select this checkbox to specify an icon to identify this Action. The icon is displayed next to the action value for easier visual identification.
- Icon Type — Select theIcon option to choose from the set of default icons provided by the Platform, or select the Resource option to indicate a Resource Business Object.
- Icon ID/Resource — Depending on the choice performed above, select the desired Icon ID or Resource Business Object.
General Settings (Specific to Process Actions):
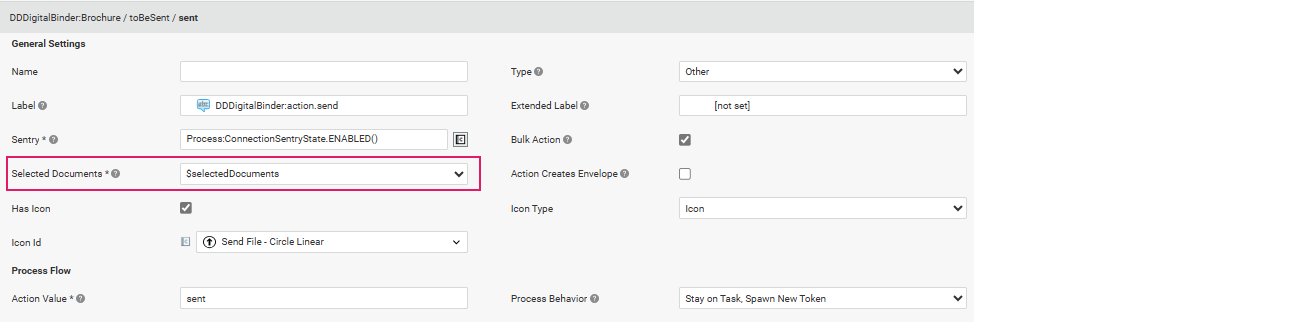
- Selected Document(s) — Select the variable to be automatically populated at runtime with the Document (or Documents in case of Bulk Actions) selected by the user. The type of the variable must be the same as the type selected in the Document Parent Data Class setting in the Documents tab (see section) or a type that inherits from it. If the Bulk Action property is selected, the variable must be an Indexed Collection.
Process Flow (for Process Actions):

- Action Value — String that is stored in the Process
$actionvalue when the Custom Action is triggered - Process Behavior — Allows Specifying the Process behavior when the action is executed:
- Move Current User Token — The user leaves App Task and follows the created Action
- Stay on Task, Spawn New Token — The user stays on the App Task and a separate token is created to follow the created Action (the Action can be assigned to other users).
- Open in new tab (available if you selected Stay on Task, Spawn New Token above): Select this checkbox if you want the new App Task token to open in a separate tab, while keeping the current token opened in the current tab.
Script (for Script Actions):

- Script Function — Script Function that defines the logic to be executed when the Action is triggered by the user. If the Script Function returns a String or Label reference, such value is used to indicate the outcome of the Action to the user instead of the value defined in the Outcome Label field.
- Pending Label — Label Business Object containing the message to be shown when the Action is triggered in FNZ Studio Runtime and while the Script Function is being executed.
- Outcome Label — Label Business Object containing the message to be shown upon execution of the Script Function. However, If the Script Function field returns a String or Label reference, such value is used to indicate the outcome of the Action to the user instead of the value here defined
Note that you can change the order of the Actions defined for each Stage by dragging them vertically. This sorting defines the order in which they are shown in the Workspace for each Document. In particular, the first Action is consider "primary" (marked with a specific icon and shown in the UI. If the first Action is hidden by a Sentry, the second Action is considered primary (and so on).
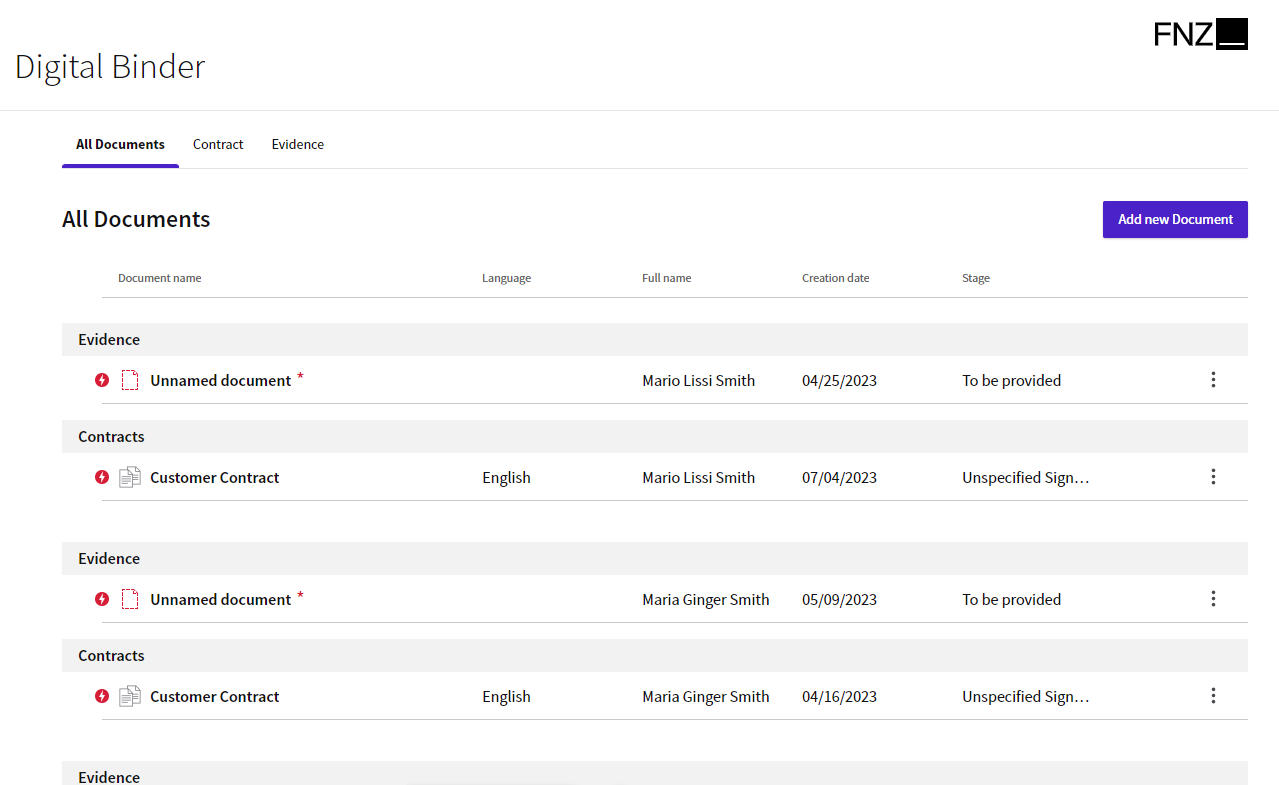
Content Area: Documents
Feature Overview A Document represents a collection of files and its metadata. For example, a document could be a contract with multiple files (pages), or a passport with two files (a scan of the front and a scan of the back). In Digital Binder, the list of records are Documents that may contain zero or many files.
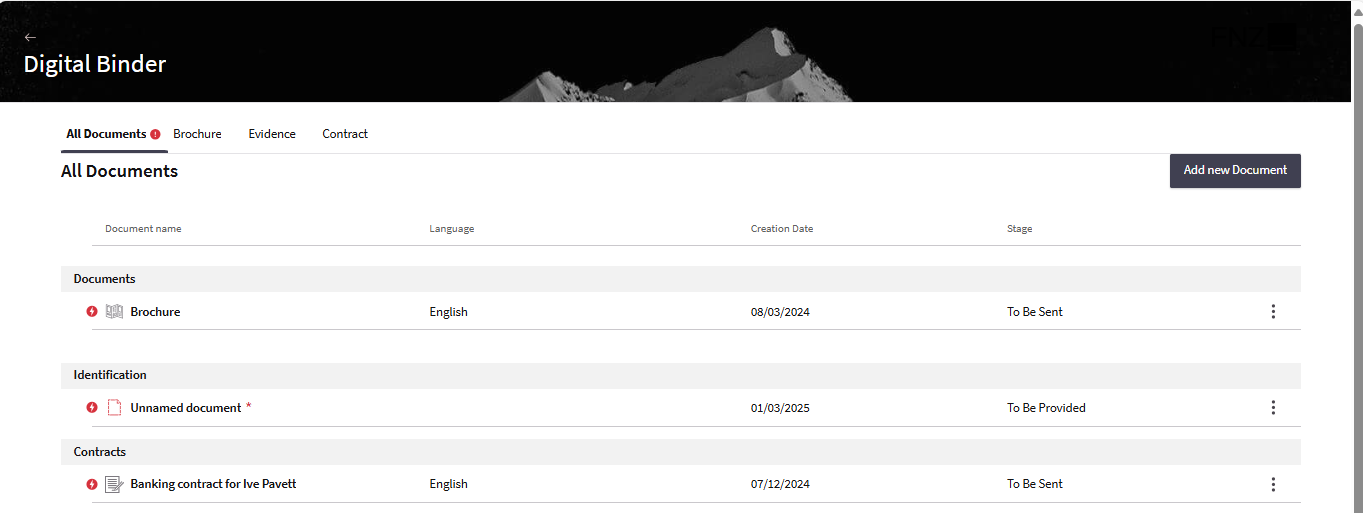
By default, all documents are displayed on the same page in the UI (All Documents View). This is the standard landing page.
If you have set Document Categories, documents can also be displayed in Categories View.
Configuration Overview
From a configuration point of view, Documents are Data Class Controls or Collection Controls (Data Logic BO) whose type is a Data Class associated with a Document Behavior, and which inherits from a Document Parent Data Class.
Following is an overview of the basic steps to configure a Document:
- Data Class Inheritance: If you want to support various types of documents (e.g., Contracts, Evidences, Brochures) aka Document Categories, you need to create a parent Data Class (e.g., Document) from which child Data Classes (e.g., Contract) inherit some of their properties. See Data Class Inheritance.
- Data Class configuration: You need to configure Data Classes representing Documents, e.g. the Contract Data Class, with the following items:
- At least one property of type
Blob:FileorIndexed Blob:File, which represents the actual file. See Data Class Configuration: File Uploader. - Other properties other than
Blob:Filerepresent metadata (issue date, issue authority and so on). See Data Class Configuration: Metadata. - A Document Behavior. Any property not tied to a Data Class Document Behavior is ignored at runtime. See Data Class Configuration: Document Behavior.
- At least one property of type
- Data Logic configuration: You need to configure a Data Logic Business Object that contains an instance of the document Parent Data Class, as well as instances of its child Data Classes (Data Class Controls). Optionally, it can contain one or more Collection Controls, which allow adding documents. See Data Logic Configuration.
- Digital Binder App Task Editor configuration: In the Documents tab of the Digital Binder App Task Editor, you need to add a reference to the items configured above (see App Task Editor: Referencing Documents):
- Data Logic BO
- Document Parent Data Class (if any), i.e. the Data Class that all types of Documents (Contracts, Brochures and so on have in common).
Each of these steps is illustrated in details in the sections below.
Data Class Inheritance

If you want to support various types of documents (e.g., Contracts, Evidences, Brochures) aka Document Categories, you need to create a parent Data Class (e.g., Document) from which child Data Classes (e.g., Contract) inherit some of their properties
For example, the Document parent Data Class may contain properties Stage, Language and Name Info. Contract, Evidence and Brochure child Data Classes may inherit these properties from it.
Data Class Configuration: File Uploader
File uploading capabilities in Digital Binder are provided by the File UploaderControl (see File Uploader).
File Uploading consists of two steps:
- Blob Storage configuration. This step is usually performed by your system administrator
- Data Class configuration. Your Data Class must contain at least one property of type
Blob:FileorIndexed Blob:File.
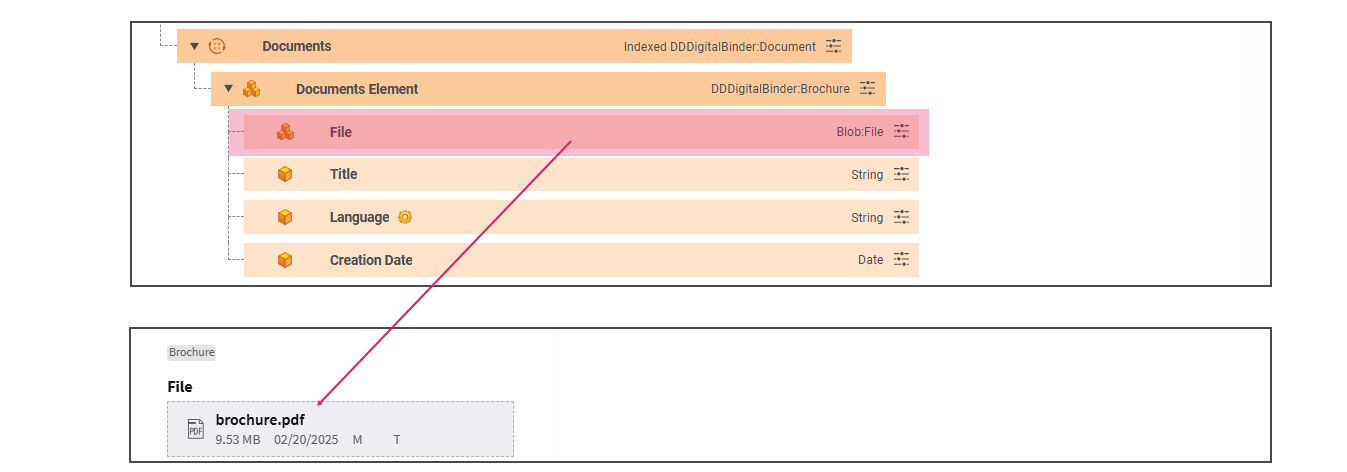
Important Note: As happens in Data Gathering ABC / App Task, the files contained in documents are Blob:File properties saved in the Platform Blob Storage. Therefore, all files to be managed by the Digital Binder App Task must be stored in that location. This is always automatically taken care of for files uploaded from App Task UIs (Data Gathering, Digital Binder), but must be ensured by the developer for other files (e.g., PDF files generated using PDF generation capabilities, such as PDF Output).
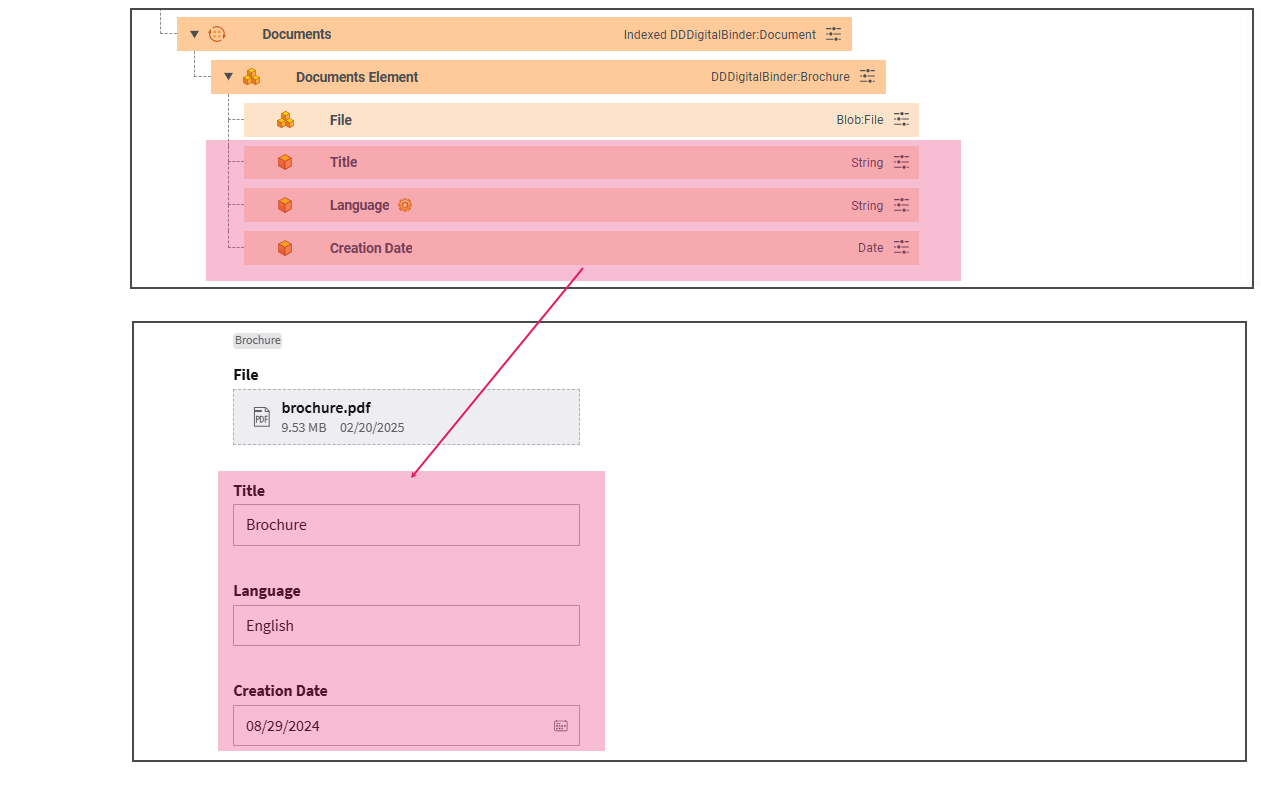
Data Class Configuration: Metadata
With Digital Binder, it is possible to preview a document while viewing and editing its metadata. Metadata can be collected per document.
Properties of the Data Class other than Blob:File represent metadata (issue date, issue authority and so on).
Data Class Configuration: Document Behavior
As mentioned above, the configured Data Classes must be associated with a Document Behavior (from the Data Class Behaviors tab). Any property not tied to a Data Class Document Behavior is ignored at runtime.
The Document Behavior provides the document table feature, for both All Documents and Categories view. The columns of the table are automatically created and set based on the configuration defined in the Document Behavior. Not every document in a table will have the same columns, a table with multiple documents will show the joint list of column values. This means that some documents may not have values for every column.
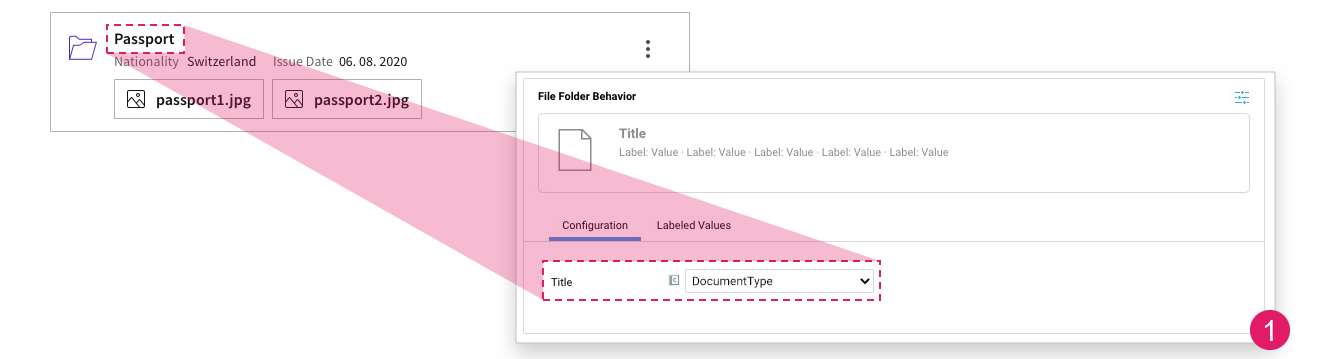
- To configure a Document Behavior, go to the Behaviors tab of your Data Class and drag a Document Component to the edit area.
- Set Title (Configuration tab). This represents the title displayed on top of the card to indicate the document folder (e.g., Passport). It can either be chosen from the String properties of the Data Class, or defined using a Script.
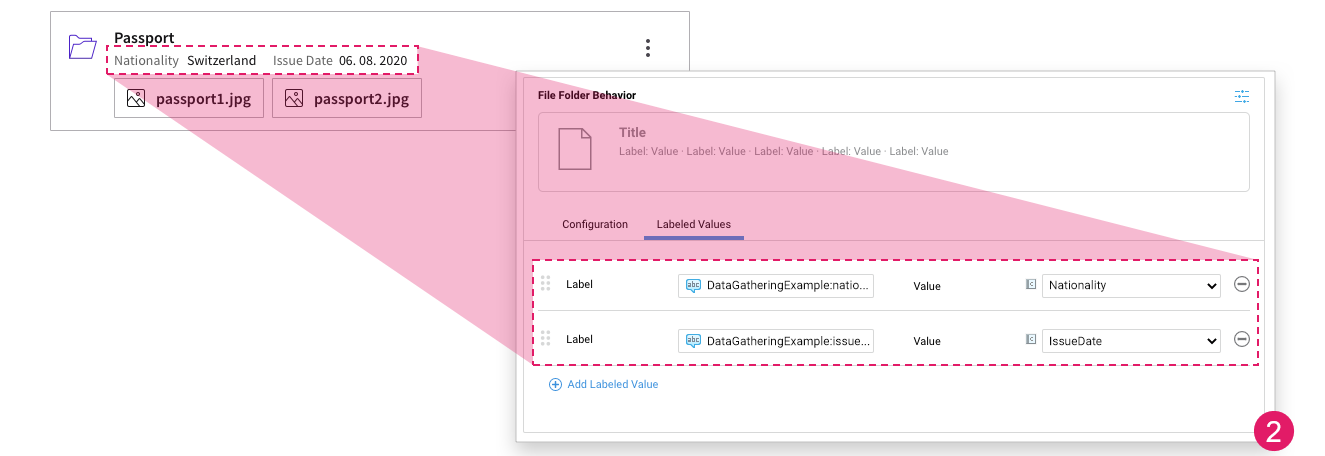
- Set Label - Value properties ( Labeled Values tab). This represents additional contextual information displayed in the auto-generated UI as key-value pairs (e.g., Issue Date - [Issue date of the uploaded document]) Each Label is a Label Business Object representing the name of the field, and each Value is the value written next to the label. The value can either be a property of the Data Class or can be built using a Script. Note: Since Documents with different Document Behaviors can have different Labeled Values, the table displays one column for each unique Label Id found in all Labeled Values of all Document Behaviors used by Documents in the table.
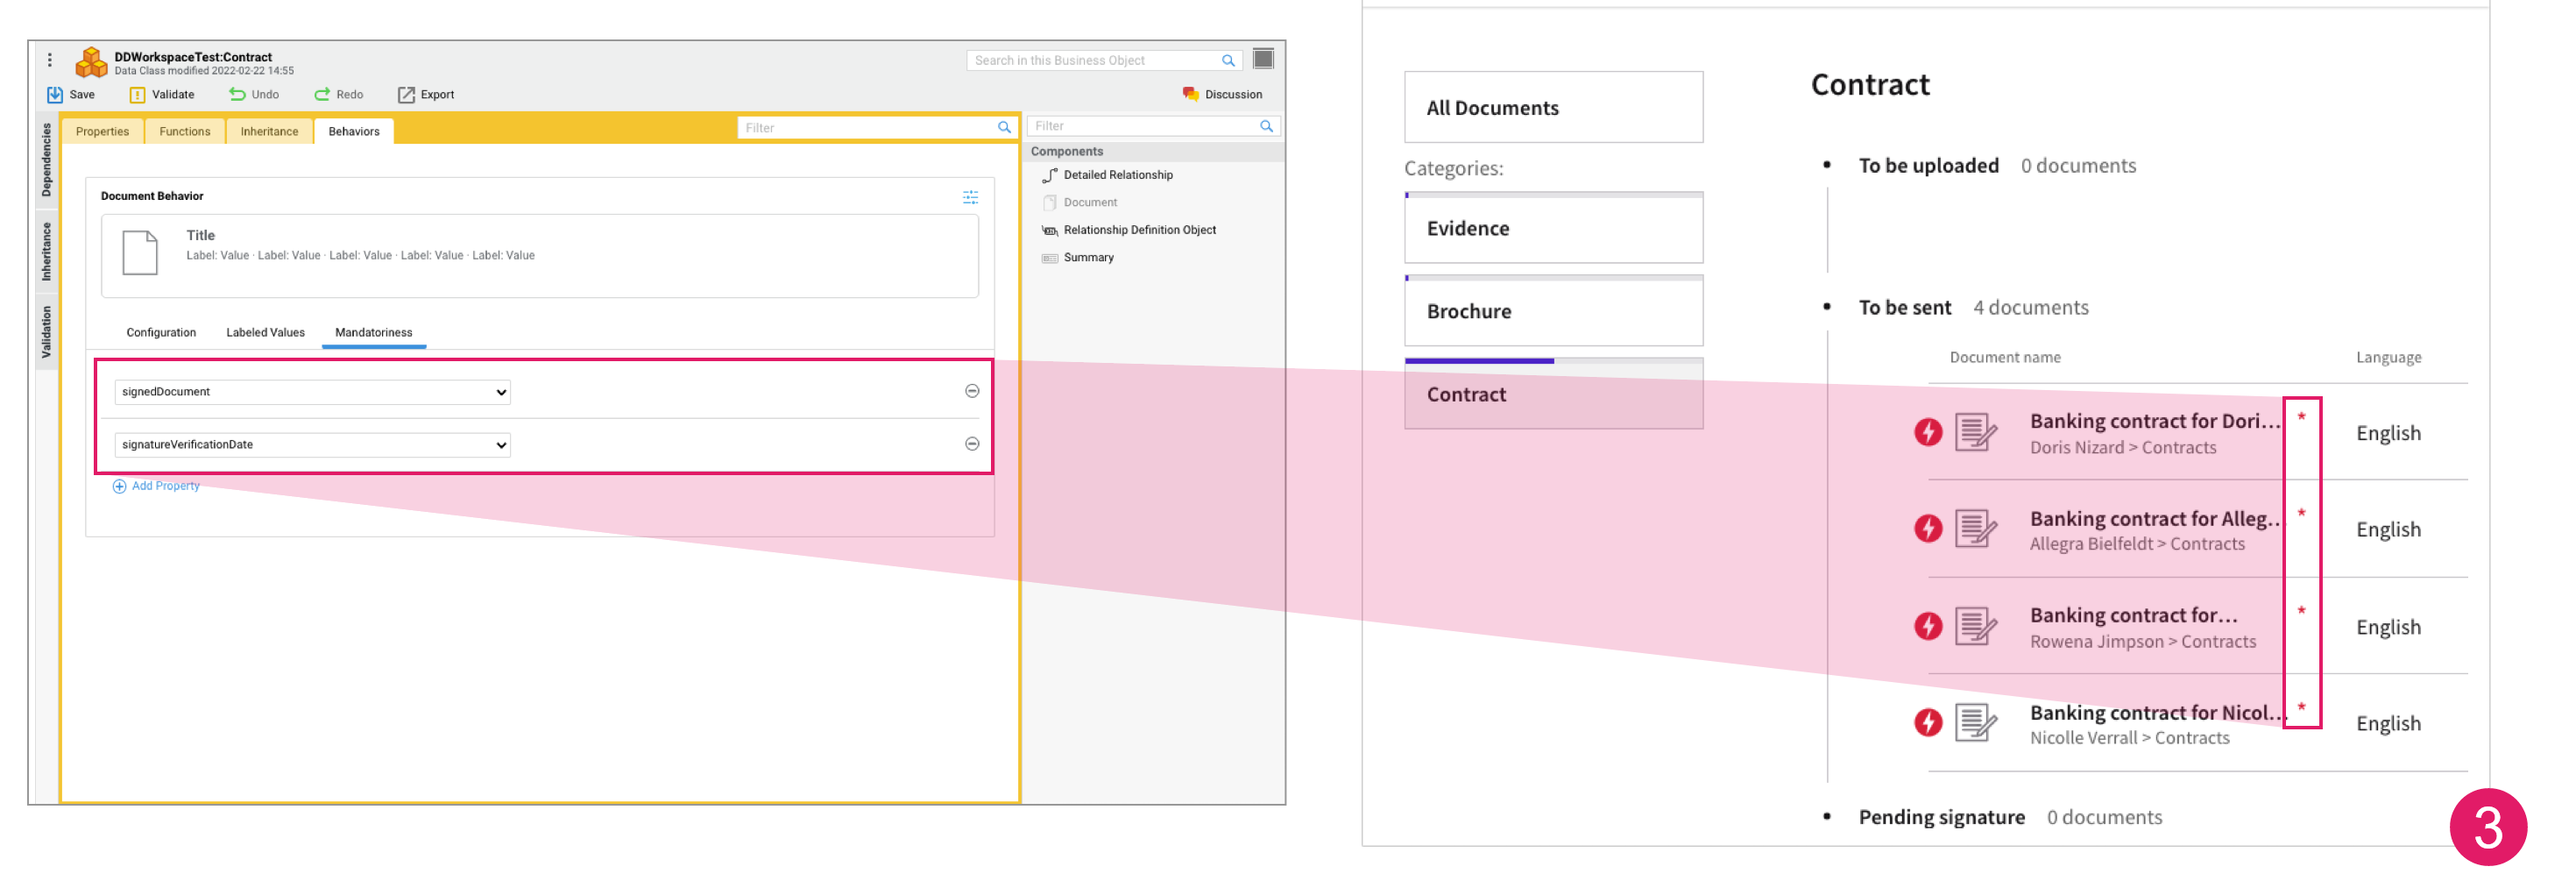
- In the Mandatoriness tab, use the Add Property selector to set mandatory properties (language, title, and so on). If set, the whole document appears as mandatory (marked by an asterisk) in the Digital Binder table. This is only a visual indicator, since violations are driven solely by Data Rules. In fact, if any of the properties selected in the Document Behavior (Data Class) is made mandatory by a Mandatory Fields Data Rule (Data Logic), the Document is marked as mandatory by an error violation icon. See full information in Information Framework.
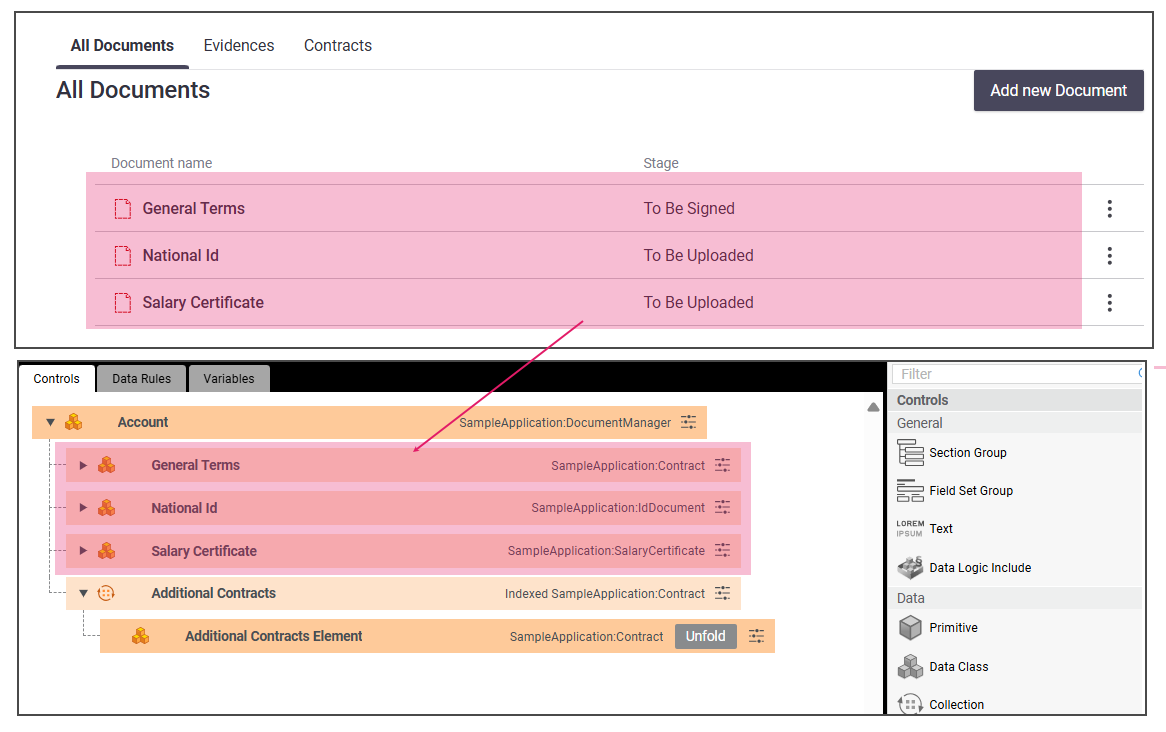
Data Logic Configuration
You need to configure a Data Logic Business Object that should contain:
- The Data Class Controls representing an instance of the Parent Data Class, as well as instances of child Data Classes (in the image below, the Contract, IdDocument and Salary Certificate Data Classes inheriting from the Document Data Class).
- (Optionally) One ore more Collection Controls if you want to allow adding documents to a collection (in the image below, the Additional Contracts Collection).
All child Data Classes must, therefore:
- Inherit from a Parent Data Class
- Be associated with a Document Behavior, Moreover, for Collection Controls, the Document Category selected in the Document Behavior must be supported by the Digital Binder App Task (Document Categories tab). See the Document Categories section for more details.
Data Logic configurations that do not meet these requirements are ignored by Digital Binder (unlike in the Data Gathering App Task). The same Data Logic Business Object used to configure the Data Gathering ABC / App Task and Business Data Comparison ABC / Data Review App Task can, therefore, be used in the Digital Binder App Task. Such Data Logic will filter out all irrelevant Controls.
Note: Documents should be stored in dedicated properties nested in the Data Model. For example, the passport of each Client should be stored in a binding similar to
$client.passport, instead of having one single collection containing all Documents handled by the Process. The recommended approach provides more fine-grained configuration capabilities (for example when defining Data Rules to be applied to each Document to determine its mandatoriness). However, the approach based on a single Collection containing all Documents is also supported.
App Task Editor: Referencing Documents
The Data Class and Data Logic Business Object configured above must be referenced in the Documents tab of the Digital Binder App Task.

| Property | Description |
|---|---|
| Document Parent Data Class field | Select the Data Class (e.g., Document) from which all the Data Classes representing various types of Documents (e.g., Contracts, Brochures, Evidences) inherit. In case all Documents have the same Data Class type, you can select that Data Class. The Documents whose type does not inherit from the selected Data Class are ignored. If the Data Classes representing Documents do not have a common parent Data Class, it is possible to keep the default selection Any. |
| Data Logic field | Select the Data Logic Business Object that you have configured. This BO to defines the set of Documents to be managed. The necessary assignments are to be set in the Variable Assignments tab. |
Content Structure: Document Categories
Documents can be organized in Categories to support the user in handling large amounts of Documents. Categories are sets of Documents processed following the same steps. Such steps are referred to as Stages (see Main Concepts and Terminology). Examples of Document Categories may be Evidences (documents that are received and need to be uploaded), Contracts (documents that need to be signed and returned) or Brochures (documents that are just sent to the user).
Note that Document Categories are optional, and the Digital Binder App Task can also be used when no Document Category is defined.
Document Categories have two main impacts:
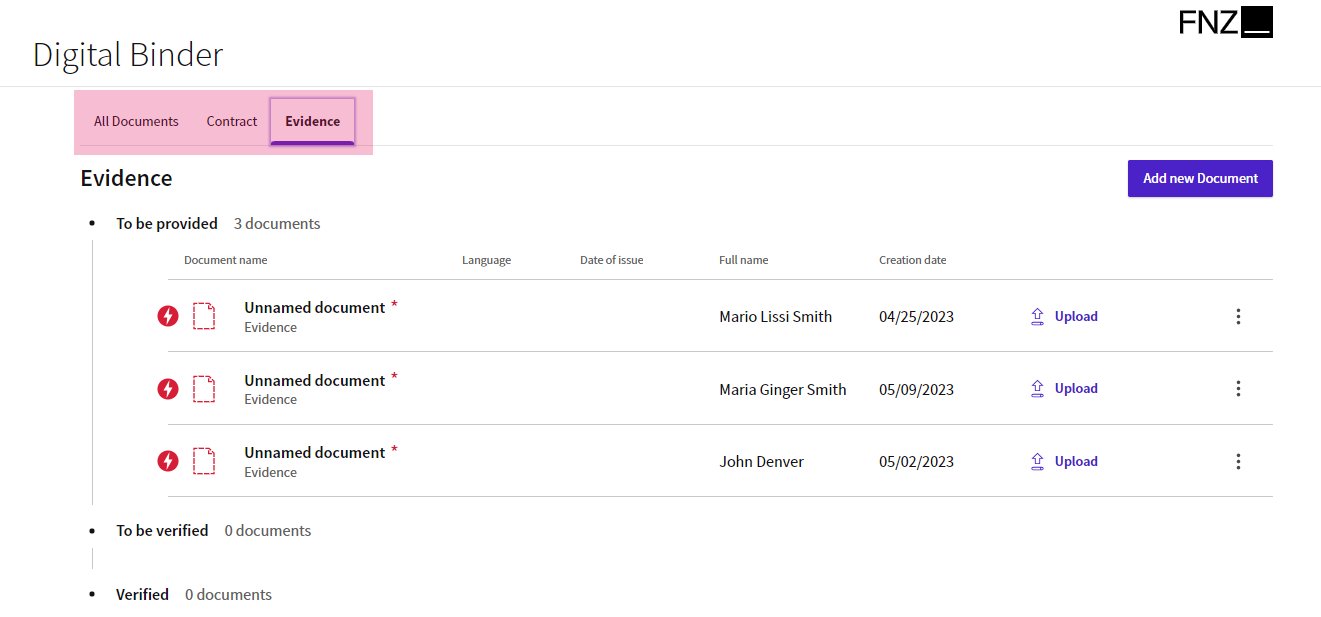
- Enabling a Categories View in the UI (as an alternative to the default All Documents View). This view provides a filtered view of documents based on each document category defined by the developer (Brochures, Documents, Evidences and so on). The Categories View may display a progress meter to provide an approximation of the work that remains to be done per category, which corresponds to the number of documents that are not in their final stage.
- Configuring Document-Level Actions. These Actions are available in the UI for each applicable Document, e.g., Documents currently located in a given Stage (based on the Stage Id property selected in the Document Behavior) will have Actions defined specifically for that Stage. See Document-Level Actions.
Configuration Overview
Document Categories are configured mainly through the Document Category Business Object. Following is an overview of the configuration process. The sections below describe each step in details.
- Create Document Categories (Document Category Business Object) and Stages. See Document Categories and Stages (Document Category BO).
- Assign Document Categories to Documents. See Assigning Document Categories to Documents: Document Behavior.
- Reference Document Categories in the Digital Binder App Task Editor. See App Task Editor: Categorizing Documents.
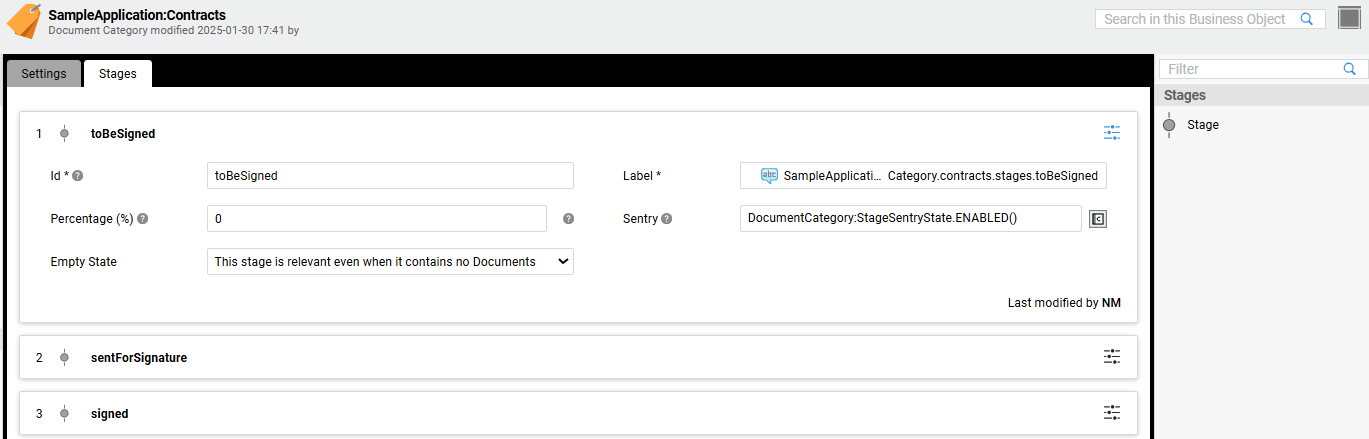
Document Categories and Stages (Document Category BO)
Categories and Stages can be defined and configured using the Document Category Business Object. 
Configuration consists of two basic steps (details are illustrated in the table below)
- Create a Document Category by dragging the Document Category Business Objects from the BO list (Solution Design module) to the edit area.
- (Optional) Define and configure one or more Stages in the by dragging them from the right-hand side library in the Stages tab. Note that Stages can be dragged vertically and sorted. This sorting determines the order in which Stages are shown in in FNZ Studio Runtime.
| Tab | Setting | Description |
|---|---|---|
| Settings | Category Name | Label Business Object to be used as the Document Category name in FNZ Studio Runtime (e.g., Contracts, Evidences, Brochures). |
| Settings | Icon Type | Select an Icon or Resource to illustrate the Document Category in in FNZ Studio Runtime (either the Icon Id or Resource Id selector is available depending on your choice). |
| Stages | Id | Stage Id, which must unique in the Document Category (e.g., toBesigned. Uppercase and/or lowercase Latin letters (A to Z), digits (0 to 9) and underscore are allowed. The id cannot start with a digit. |
| Stages | Label | Label Business Object representing the Stage name in FNZ Studio Runtime (e.g., "To Be Signed", "Sent for Signature"). |
| Stages | Percentage (%) | (optional) Specify the progress ratio of the Document when in the current Stage (e.g., Stage "to be sent" represents the 10% of a contract workflow completion). The first Stage (e.g., "to be sent") should be 0 and the final Stage (e.g., "signed") should be 100. Percentages must either increase or remain the same from top to bottom of the Stage list. If a Percentage different from 0 is defined for one of the Stages in the Document Category, then Percentages for each Stage must be specified. |
| Stages | Sentry | (optional) Define the conditions that determine the availability of the Stage for runtime users. Use the Functions available in the DocumentCategory:StageSentryState Data Class to return one of the possible states (enabled or hidden), e.g., DocumentCategory:StageSentryState.ENABLED(). The Sentry can be used to show or hide the Stage for certain Users, Groups, or Roles. |
| Stages | Empty State | Select an option between "This Stage is relevant even when it contains no documents" or "This Stage can be de-emphasized or ignored when empty". This selection determines whether an Empty Stage is displayed or not in FNZ Studio Runtime. |
Assigning Document Categories to Documents: Document Behavior
After creating a Document Category, you need to assign it to actual Documents in order to use it. You can do so through some of the properties of the Document Behavior in the Data Class editor (Configuration tab).
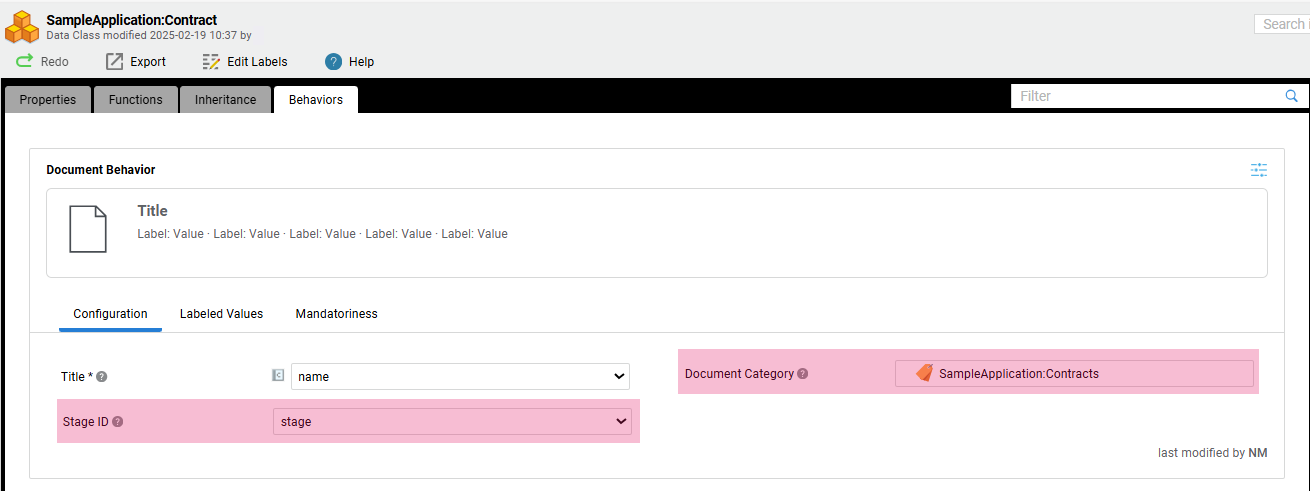
- Document Category — Select the desired Document Category Business Object from the ones you have created (e.g., Evidences, Contracts, Brochures). Note that this is an optional settings, as Document do not need to be assigned to any Category.
- Stage ID — This selector lists all Single Element String properties of the Data Class. Select the property to be used to store the current Stage (we recommend that you use a property called
stagethat you have previously configured in your Data Class). The selected property is excluded from the metadata view of the Document and, therefore, not shown in the Controls tab of the Data Logic editor when unfolding the Data Class Control corresponding to the Document Data Class.
If a 'Document' Data Class has a Document Category set in the Document Behavior, the Script Function
DocumentCategory:GetFromDocumentcan be used to get the Document Category Business Object Reference corresponding to a given Document instance provided as an input of the Script Function. Additionally, if the Document Category has Stages, each Document must be in one of the defined Stages at any time. The current Stage is stored in aStringproperty defined in the 'Document' Data Class. The property must contain the Stage Id (Stages tab in the Document Category editor).
Consider the following information:
- If the Document Category property is set in the Document Behavior and the selected Document Category has Stages, the Stage ID property of the Behavior must also be set. Viceversa, if the Stage ID is set in the Behavior, the Document Category must also be set and it must contain Stages.
- There is no built-in mechanism that sets the content of the property selected for the Stage ID. Instead, the property must be manually set and updated as necessary, depending on the Actions triggered by the user (see Actions).
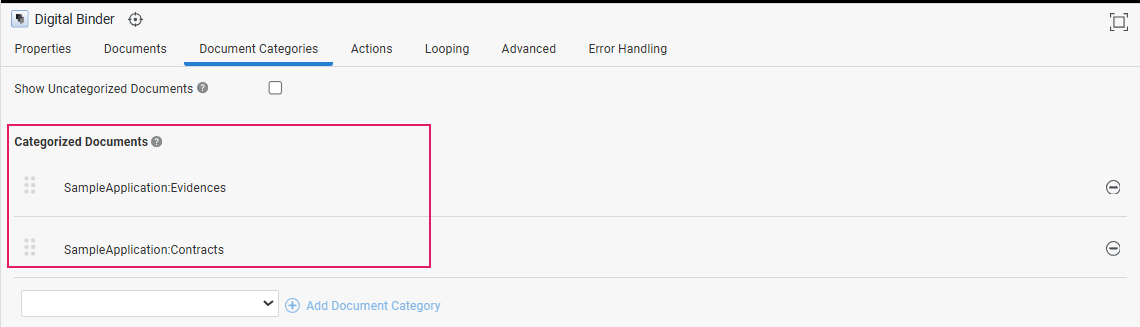
App Task Editor: Categorizing Documents
In the Document Categories tab of the Digital Binder App Task, you can select the Document Categories that must be supported by the App Task. Only Documents assigned to the selected Categories are shown at runtime, while other Documents found in the Data Logic are ignored.
| Property | Description |
|---|---|
| Show Uncategorized Documents checkbox | Select this option if you want Documents with no assigned Category to be supported by the App Task. |
| Categorized Documents section | Select and add the Document Categories to be supported by the App Task. The Document Categories to be added can be chosen among the ones assigned to Documents found in the Data Logic Business Object and selected in the Documents tab of the Digital Binder App Task (see App Task Editor: Referencing Documents). Once added, Document Categories can be sorted by dragging them vertically. This sorting determines the order in which Categories are shown in the UI. |
Information Framework: Validation
Validation Overview
The information framework in App Tasks provides continuous feedback and annotations on the fixes and actions necessary to continue in the data gathering activity.
-
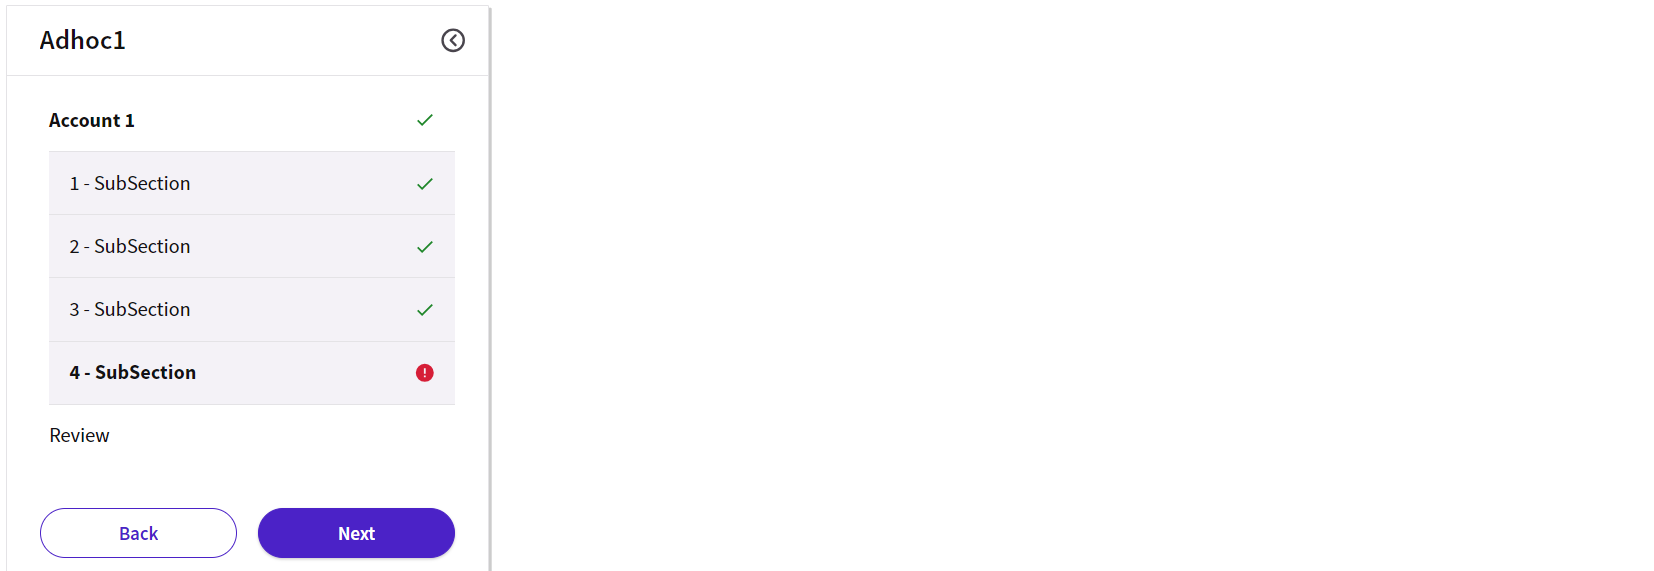
Sidebar (Navigation Validation) (
1): The sidebar (if available) shows the validation status of each step in the navigation (i.e. if the step is complete or incomplete). This way, the user is provided with an overview of missing steps and can take action to complete all his/her tasks. This is configured through Ad-Hoc Sub-Processes and is valid for all App Tasks. -
Content Area (Content Validation) (
2): This area highlights the violation of predefined rules at content level (missing or unexpected data, wrong data format and so on). This way, the user can address and correct any issues and continue with their task. This is configured through the Data Logic BO and the Data Class (Document Behavior).
Navigation Validation (Ad-Hoc Sub-Processes)
Feature Overview The sidebar shows the validation status of each step in the navigation (i.e. if the step is complete or incomplete). When validation is configured, users are provided with an overview of errors and can quickly take action where needed. Valid/invalid Navigation Items are visually indicated by a badge. This is valid for all App Tasks.
Configuration Overview
Navigation validation may be rendered only if your Digital Binder App Task is contained in an Ad-Hoc Sub-Process Component. Configuration is performed in the Ad-Hoc tab of your App Task Process Editor.
Content Validation (Data Logic/Data Class)
Feature and Configuration Overview Content validation in Digital Binder relies on two types of markers:
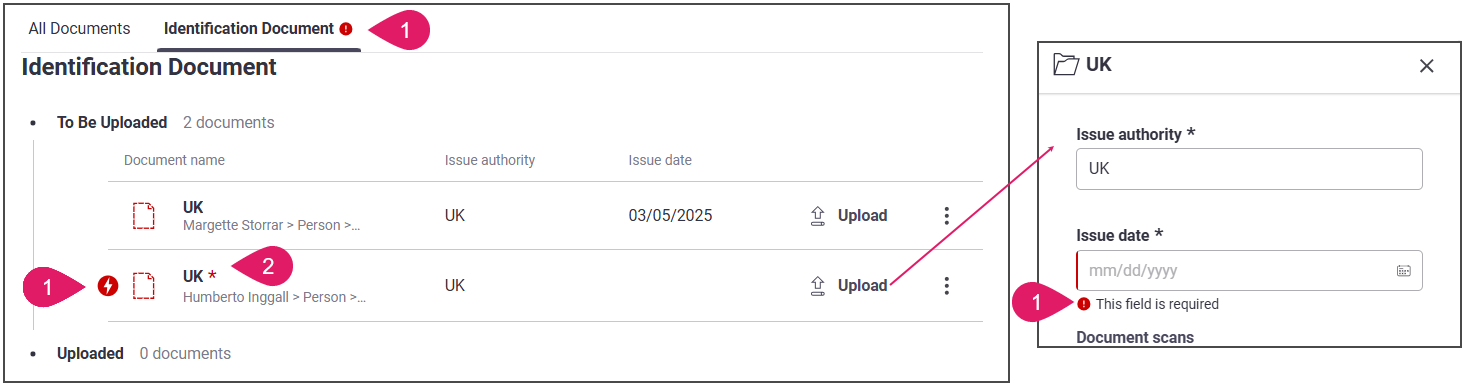
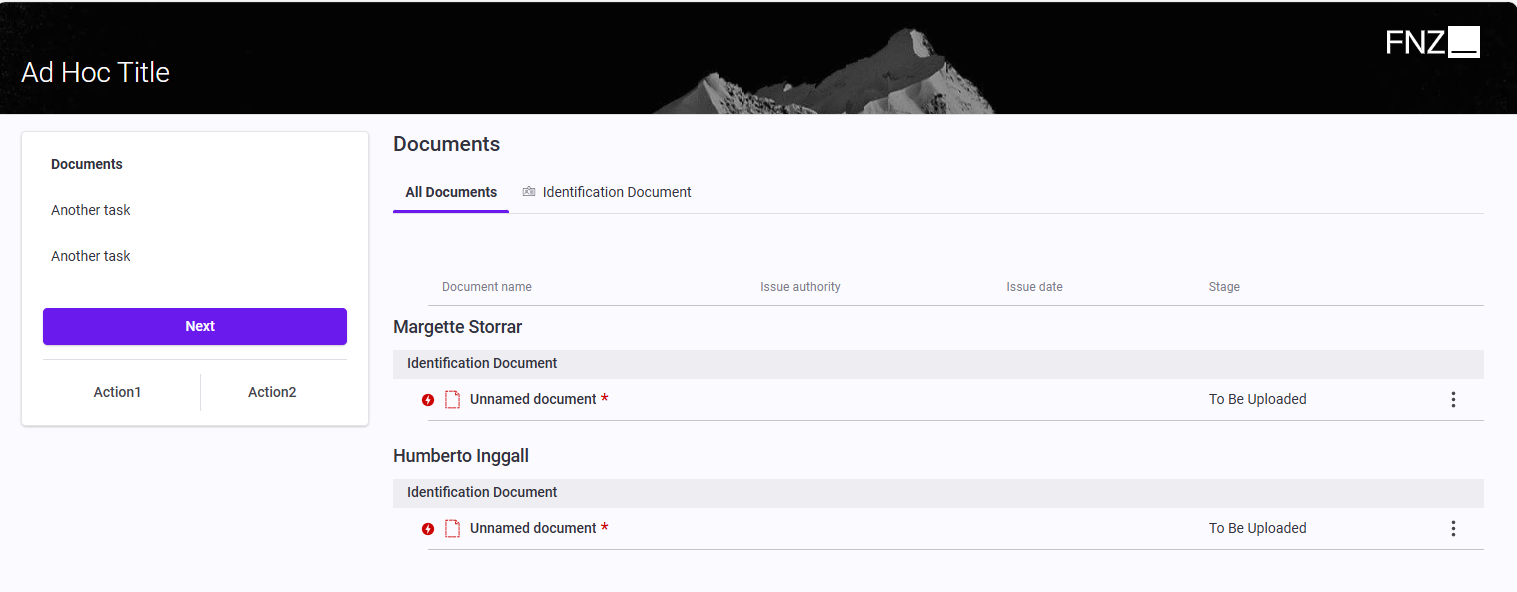
- Violation of predefined rules at content level (missing or unexpected data), marked by a violation icon. Rule violations are configured through Data Rules in the Data Logic Business Object. This kind of violation is highlighted in:
- Tab Bar
- Document table, to the left of the document icon
- Modal window containing document metadata (which is opened when clicking the Upload or View button)
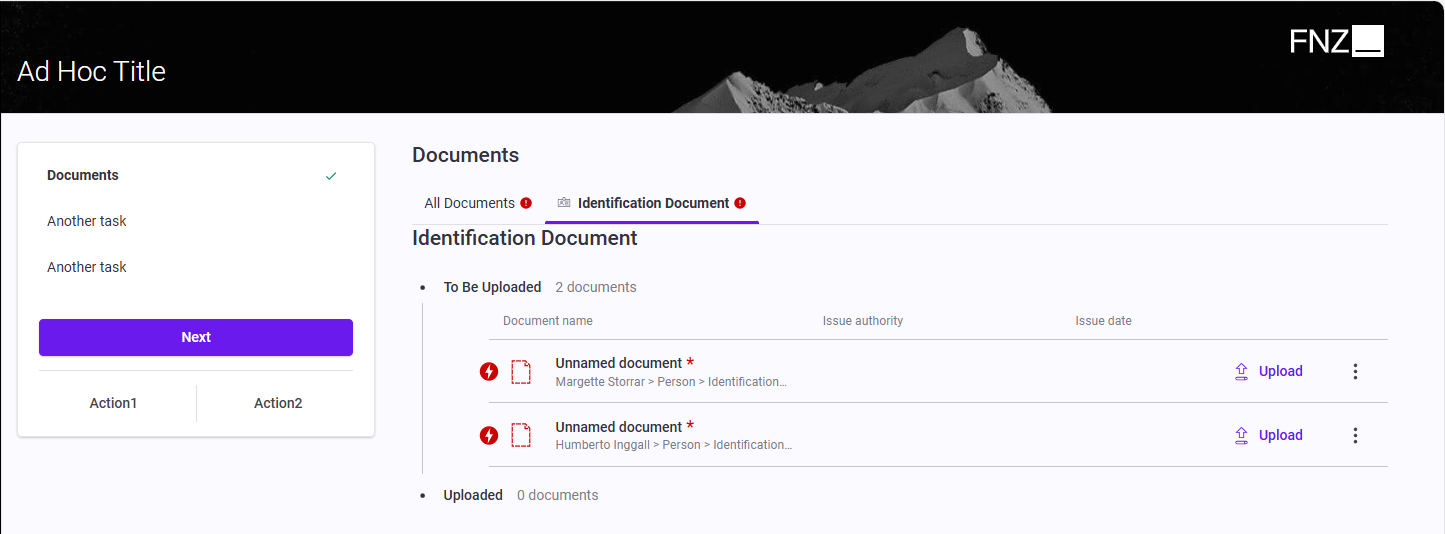
- Indicator that a document is mandatory, marked by a red asterisk. Document mandatoriness is configured through the Document Behavior in the Data Class. This kind of violation is highlighted in:
- Document table, to the right of the document icon.
Rule Violations (Data Logic)
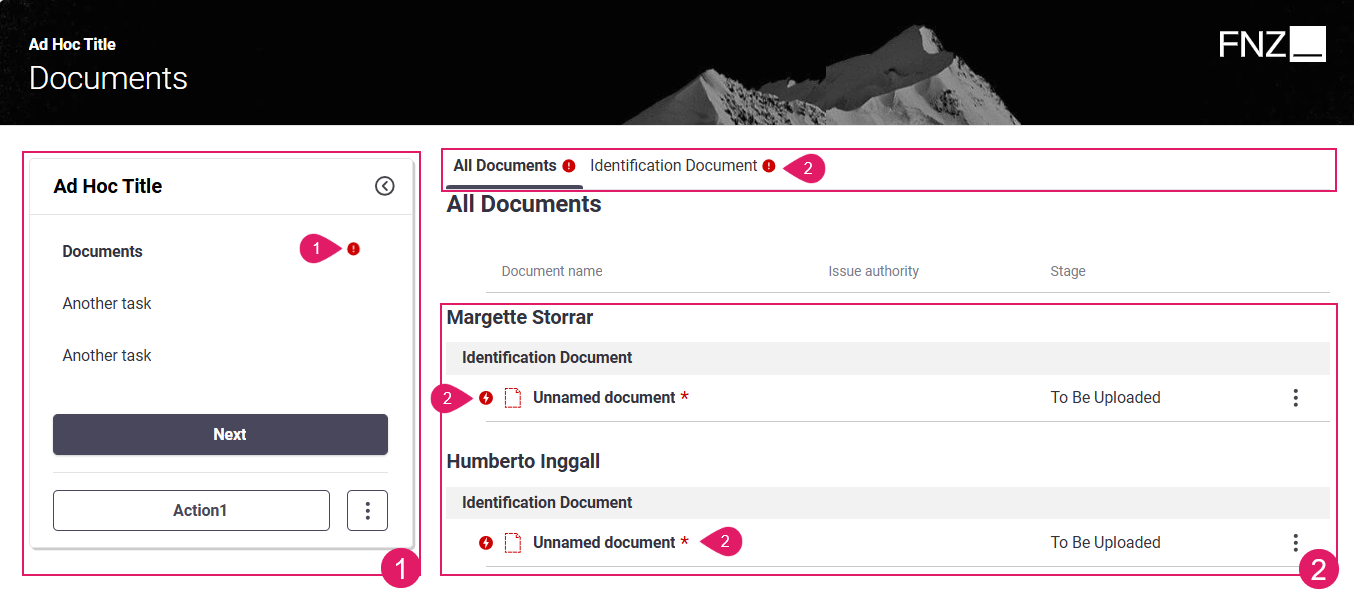
Feature As mentioned above, violations of predefined rules at content level may be shown in the Tab bar, Document table and in the document metadata window.

These content areas may show two types of violations, marked by an icon and a text message (only shown in the document metadata window):
- Blocking issues (errors) — These must be fixed to proceed and end the task. They are marked in red.

- Non-blocking issues (Warnings) — These are suggestions on how to improve the quality of entered data. Fixing them is not required to proceed and end the task, but it is recommended. They are marked in yellow.

Configuration
These violations are configured through Mandatory Fields Data Rules in the Data Logic Business Object (details are illustrated in the table below). In the Digital Binder App Task, a Mandatory Fields Data Rule may be specified:
- For the
Blob:Fileproperty of a Document. In this case, uploading a file for that Document is mandatory. - For other properties (name, authority issue and so on) of the Document. In this case, those properties are considered as mandatory metadata.
| UI element | Description | Configuration |
|---|---|---|
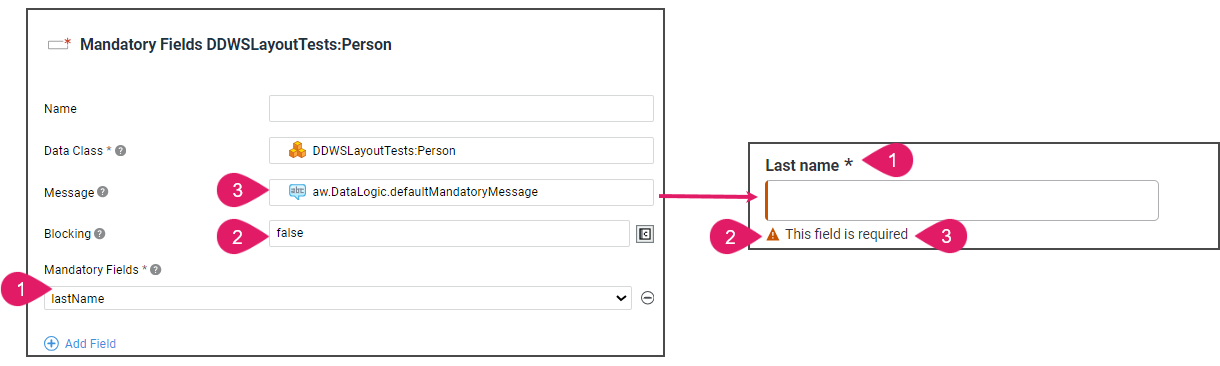
Mandatory field (1) |
Field that is mandatory to be filled (marked with an asterisk). | A Mandatory Fields Data Rule must be added in the Data Logic Editor. Each mandatory item (e.g., Name, Surname...) must be added as a property in the Mandatory Fields section. |
Blocking/ Non-blocking issue (2) |
Type of violation, either error (marked in red) or warning (marked in yellow) | The Blocking property must be set in the corresponding Data Rule in the Data Logic Rule Editor. If Blocking = true, the issue is blocking (error). If Blocking = false, the issue is non-blocking (warning). |
Text message (3) |
Text message specified under the field affected by the issue (e.g., This field is required) | The Message property must be filled in the corresponding Data Rule (e.g., in the String Data Rule for string values) in the Data Logic Editor. |
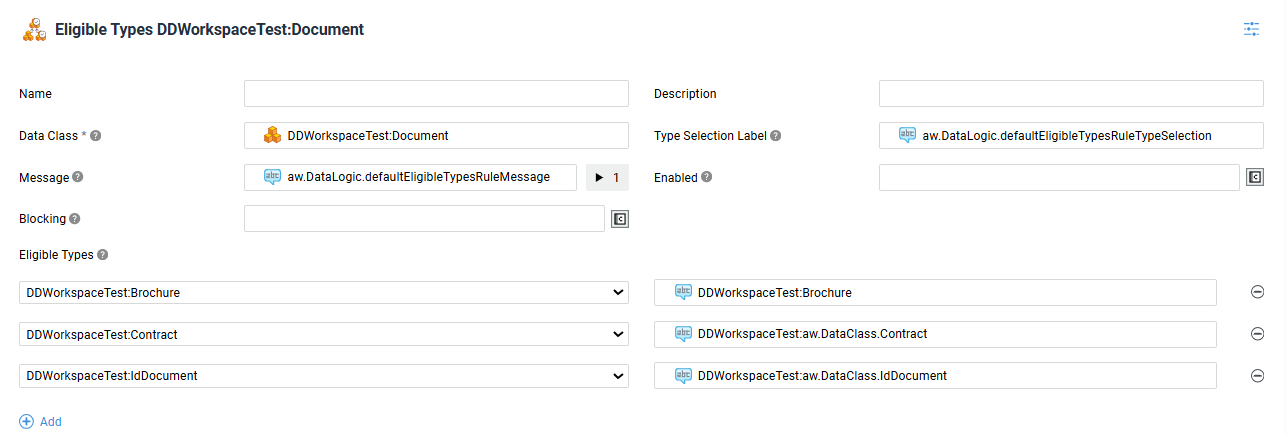
Moreover, you may also apply an Eligible Types Data Rule to a Data Class Collection to limit the end-user option. For example, you may configure a Document field (Parent Data Class) to accept only Contracts, Evidences and Brochures (Child data Classes). The Digital Binder App Task will use this information to allow the user to add only allowed values.
Document Mandatoriness (Data Class)
In addition, the Digital Binder ABC may show a red asterisk for mandatory Documents in the document table (to the right of the document icon).
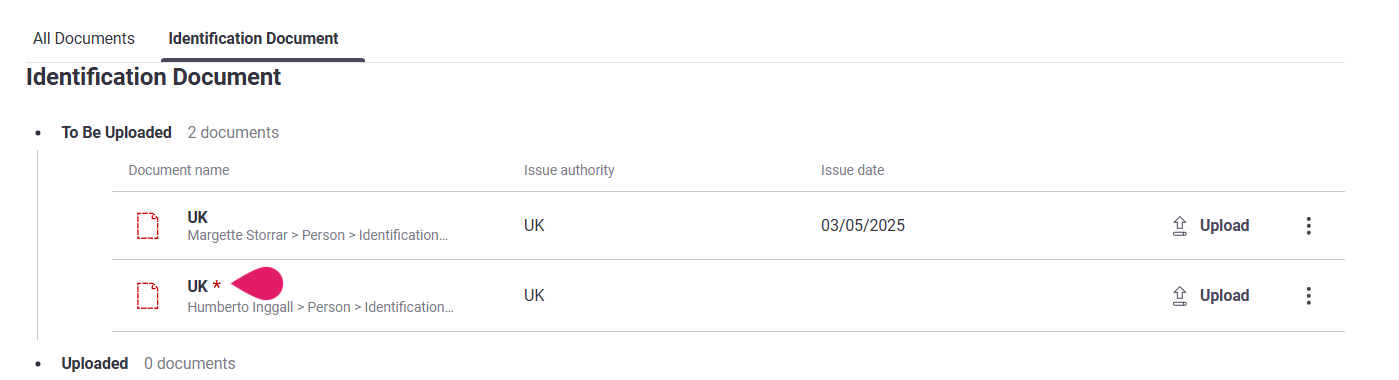
This is only a visual indicator, since violations are driven solely by Data Rules. In fact, if any of the properties selected in the Document Behavior (Data Class) is made mandatory by a Mandatory Fields Data Rule (Data Logic), the Document is marked as mandatory by an error violation icon.
This is configured through the Data Class Document Behavior (Mandatoriness tab).
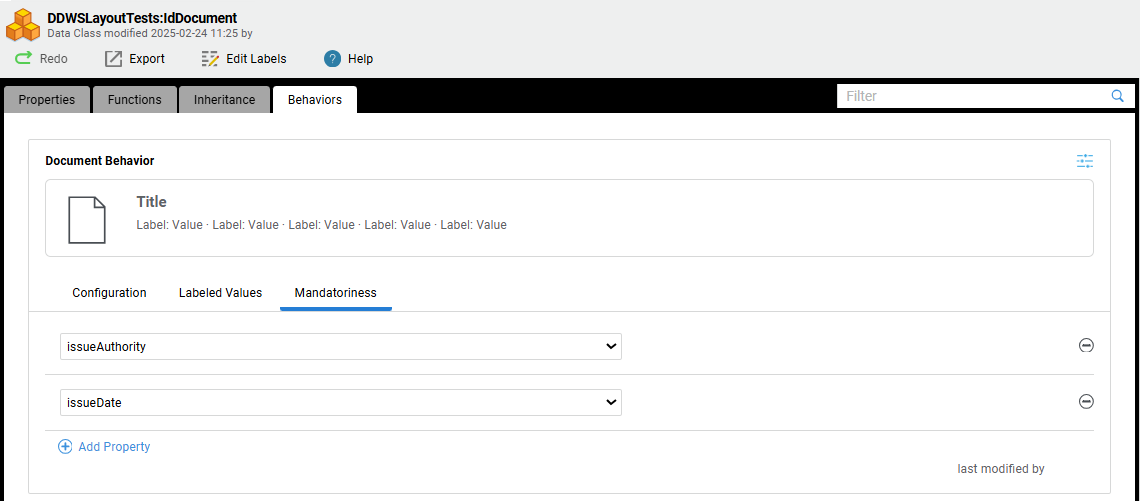
If you set any document property as mandatory (issueAuthority and issueDate in the example above), the whole document appears as mandatory in the Document table.
Note that this is only a visual indicator, since violations are driven solely by Data Rules. In fact, if any of the properties selected in the Document Behavior is made mandatory by a Mandatory Fields Data Rule in the Data Logic, the Document itself is marked as mandatory by an error violation icon.
Review Mode
As mentioned above, validation on Ad-Hoc navigation and on content are separate. However, the Review Mode setting (configured for the Ad-Hoc Sub-Process containing one or more App Tasks) may influence the way both types of validation are displayed in FNZ Studio Runtime. See Review Mode (Ad-Hoc Sub-Process) for full configuration details.
Review ModeOn
Violations are displayed immediately, as soon as the user lands on the page. This is valid both for Ad-Hoc sidebar where validation badges are displayed, as well as for the content area, where violation icons and messages are shown on the page (see Content Validation (Data Logic) for details).
Review Mode Off
Most violations are not displayed when the user lands on the page. This is valid for Ad-Hoc navigation (i.e. no validation badges are displayed), and the content area. An exception to this rule are mandatory violations (marked with an asterisk), which are displayed.
However, when the user tries to leave the page (e.g., clicks on the Next button), a confirmation modal window warns them that there may be issues.
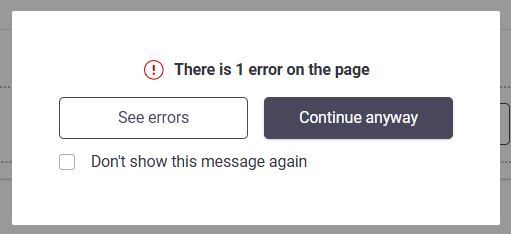
If the user decides to stay on the page, all errors are then shown, both at content level (violation icons and messages) and at navigation level (Ad-Hoc validation badges).
Review Mode Override
Finally, it is possible to override the Review Mode specified at the level of the Ad-Hoc Sub-Process (as described above) for a specific Digital Binder App Task contained inside the Ad-Hoc Sub-Process itself.
This may be useful if a given Digital Binder task needs to have a different review mode with respect to the container Ad-Hoc Sub-Process.
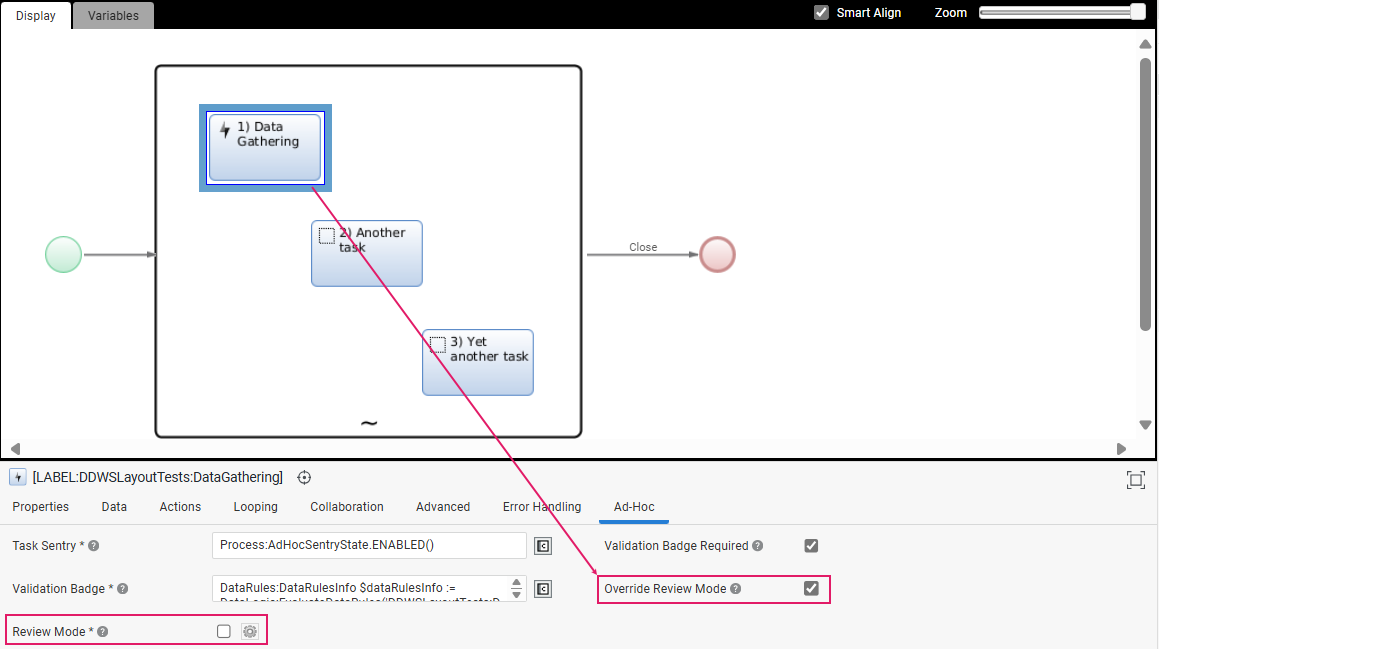
To override the Review Mode for a task, go to its Ad-Hoc tab and:
-
Select the Override Review Modeoption. This will override the review mode option set at the Ad-Hoc Sub-Process level.
-
Select theReview Mode setting in case you want to apply specific Review Mode conditions to this task. Note that this setting is computed only once when the task is initialized.
Developer Toolbar
The Developer Toolbar allows your to access three important developing features:
- The Theme Editor, which allows editing the look-and-feel of FNZ Studio Runtime. See Theming (Theme Editor).

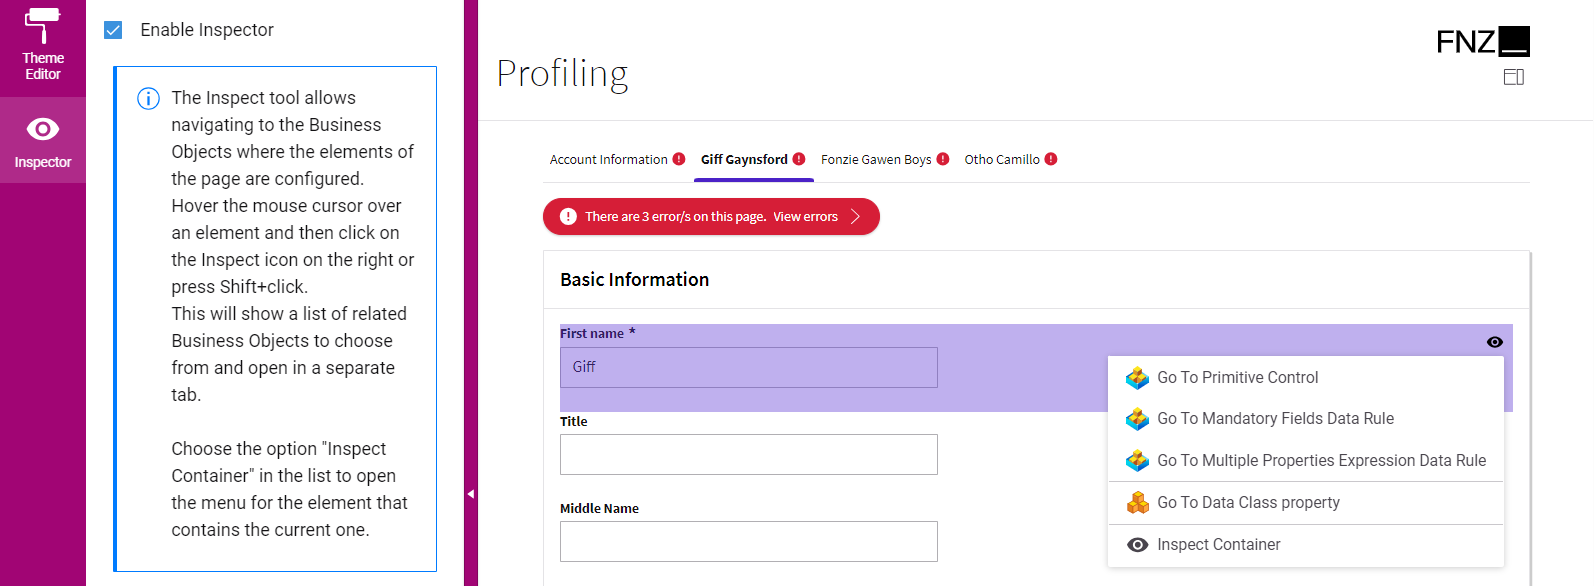
- The Inspector tool, which allows navigating to and editing the Business Objects responsible for the FNZ Studio Runtime page. See Inspector.
- The Integration console, which shows all the integration calls performed by the current Process Instance for easier contextual debugging. The content is a filtered version of the data contained in the Integration Troubleshooting Console available in FNZ Studio (Data & Integration module). See Integration.
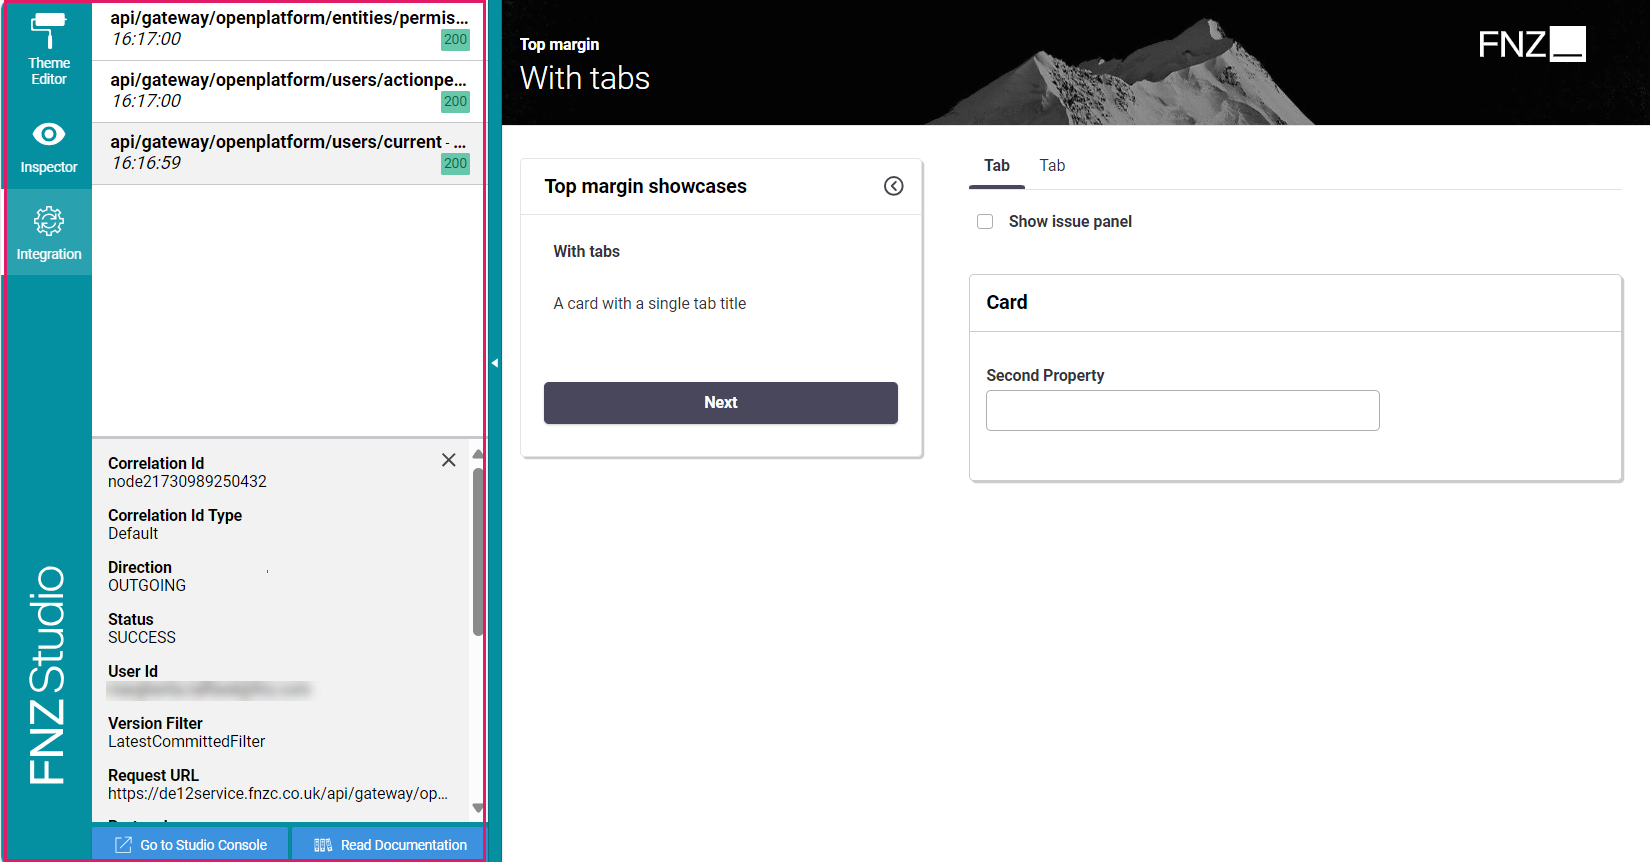
You can open the Developer Toolbar from your ABC page by clicking on the arrow on the left-hand side (this is displayed when hovering over the page left border). Note that you need Studio Permission to access the tool (see Advanced Studio Permissions).
Localization
Language, date and number localization is available for all App Tasks.
As for language, all basic labels used for the Digital Binder App Task (e.g., calendar months) are included in the following Platform Packages:
AppTask(common to all App Tasks)DigitalBinderResources
You can edit the displayed text and add translations through the Overriding Translations approach (recommended - ).
As for dates and numbers, App Tasks define their localization according to a Locale configured at FNZ Studio Composition level.
Accessibility
FNZ Studio's Application Business Components (ABCs) have been designed with special attention to accessibility criteria and follow the latest Web Content Accessibility Guidelines (WCAG). All App Tasks have been designed following WCAG 2.1 Success Criteria.
Further Resources
- App Tasks: Common Configuration contains configuration details common to all App Tasks.
- Data Logic Business Object
- Data Class Business Object