Business Data Comparison ABC / Data Review App Task
Introduction
An Application Business Component (ABCs) is a pre-fabricated software product that serve as a Solution building blocks. It solves recurring business problems out-of-the-box, can be used for a wide range of business scenarios thanks to powerful configurations, and comes with continuous evolution that is taken care of by FNZ Studio.
Business Data Comparison provides overviews of changes between a current state of a data structure and previous versions in time. The component provides a clear overviews of data changes and allows handovers among multiple collaborators working on a business process.
Following this Data-Driven approach, the Business Data Comparison Application Business Component (ABC) v4 and higher comes with the Data Review App Task.
Data review is a very common activity in collaboration contexts. Risk and compliance officers are often required to review data gathered from prospects to ensure it meets regulatory or compliance standards. In case of erroneous or missing information, the gathered data must be sent back to the front office for editing.
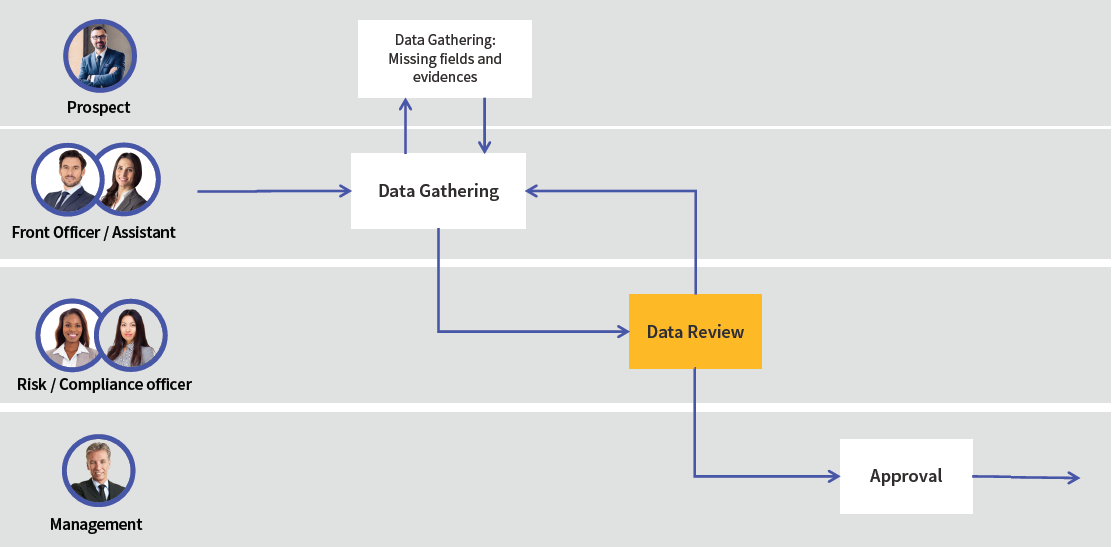
In the framework of this collaborative approach, the Data Review App Task complements the Data Gathering ABC / App Task and provides the necessary tools for effective and thorough business data review.
Installation and Upgrade
Ingredients and Installation Steps
The Business Data Comparison consists of the following basic ingredients:
- AppTask Extension (included in FNZ Studio (Core))
- AppTaskAPI Extension (included in FNZ Studio (Core))
- BusinessDataComparison Extension
- DataHistory Extension
- (optional) WorkspaceCollaboration Extension (if using Collaboration: Comments and Review Requests).
Technical Requirements
Make sure you check the following:
- You are on a compatible FNZ Studio Core version. See the Business Data Comparison Product page for compatibility information.
- Your FNZ Studio installation includes all other mandatory extensions (in addition to AppTask and AppTaskAPI) and Packages. See System Upgrade section.
Installation
After checking the technical requirements above, follow these steps:
- Install Data History following the steps described in Data History.
- Upload the above-mentioned Extensions:
- BusinessDataComparison Extension
- AppTask Extension
- AppTaskAPI Extension
- (optional) WorkspaceCollaboration Extension
General Properties
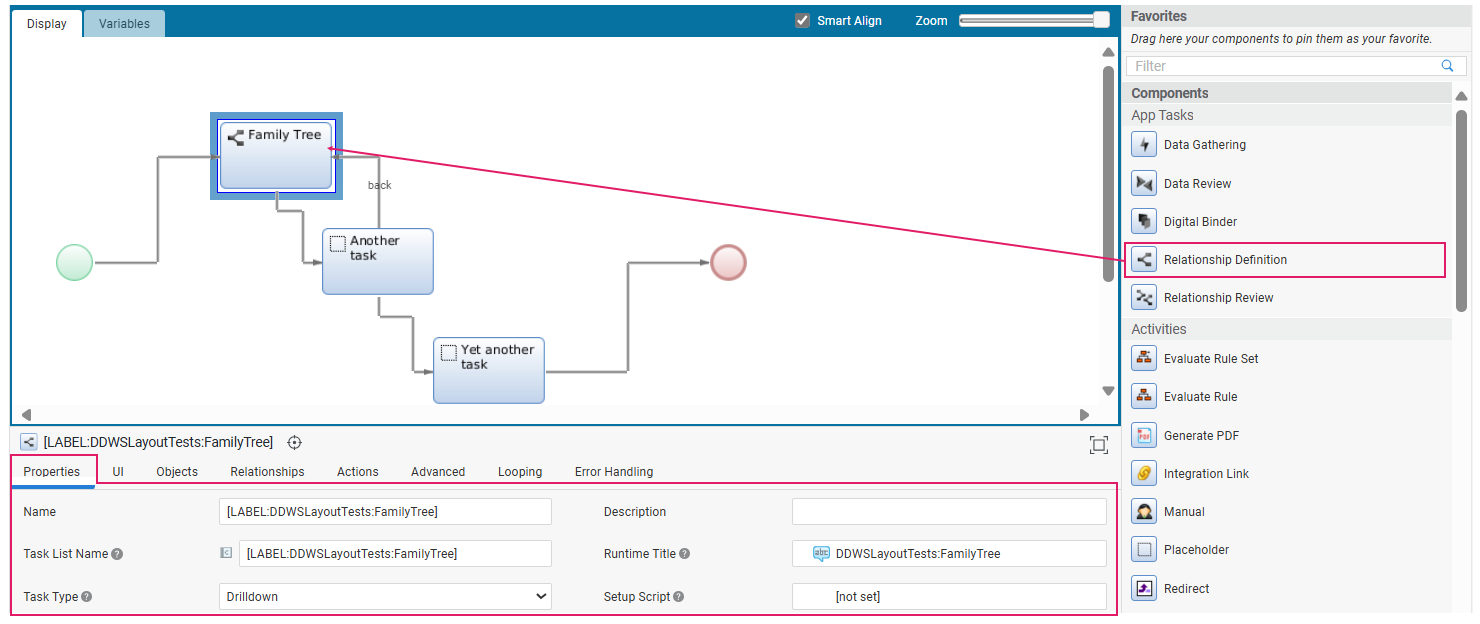
After following the installation steps described above, the Data Review App Task will be available in the Process Editor. You can drag and drop it into the central composition area, as shown in the image below. The Data Review App Task usually complements a Data Gathering App Task.
Process Properties
Most of the general properties of the Data Review App Task (title, type, and so on) can be set in the Process Editor, as illustrated in the table below.
| Property | Description | Configuration |
|---|---|---|
| App Task Title (Process Editor) | Name of the Data Review App Task in the Process Editor (Data Review in the image above). | Process Editor Properties tab > Name field. |
| Page Title (UI) | Name of the App Task page in FNZ Studio Runtime | Process Editor Properties tab > Runtime Title field. You need to select a Label Business Object. In case the property is not set, it shows 'FNZ'. This property is mandatory for App Tasks included in Ad-Hoc Sub-Process, in which case, the page title is displayed at the top of the content area. |
| App Task Title (Task List) | Name of the page on a Task List (backend) Process Editor. | Properties tab > Task List Name field. You can select a Label Business Object or enter a text. Set the name of the page, as it should appear on a Task List (it may contain a Label or not). |
| Type of App Task | Type of navigation pattern to use inside the App Task | Properties tab > Task type dropdown. Select the Task pattern between Sequential (tasks form a linear sequence, where users navigate through each Task step-by-step, and can typically only move forward or backward) and Drill Down (multiple different Sub-Tasks can be opened from one main Task). This influences navigation and Page Structure. See Task Types. |
| App Task initialization | Logic to be executed when initializing the App Task | (optional) Properties tab > Setup Script field. Specify the Script Function Business Object that contains the logic to be executed when initializing the context of the App Task (if any). This can be used, e.g., to set any necessary Process Instance or Token Attribute. The script is executed once for each token when it becomes Active. |
Home Button
The Home button is rendered as the logo on the top-right of the FNZ Studio Runtime page.
The Home button is not configured in the App Task, instead it is managed by the global configuration property nm.window.start. If you do not set this property, the FNZ logo is shown by default.
Feature Overview
Following is an overview of the main Business data Comparison features. The sections below will provide detailed information on each feature and how they are configured.
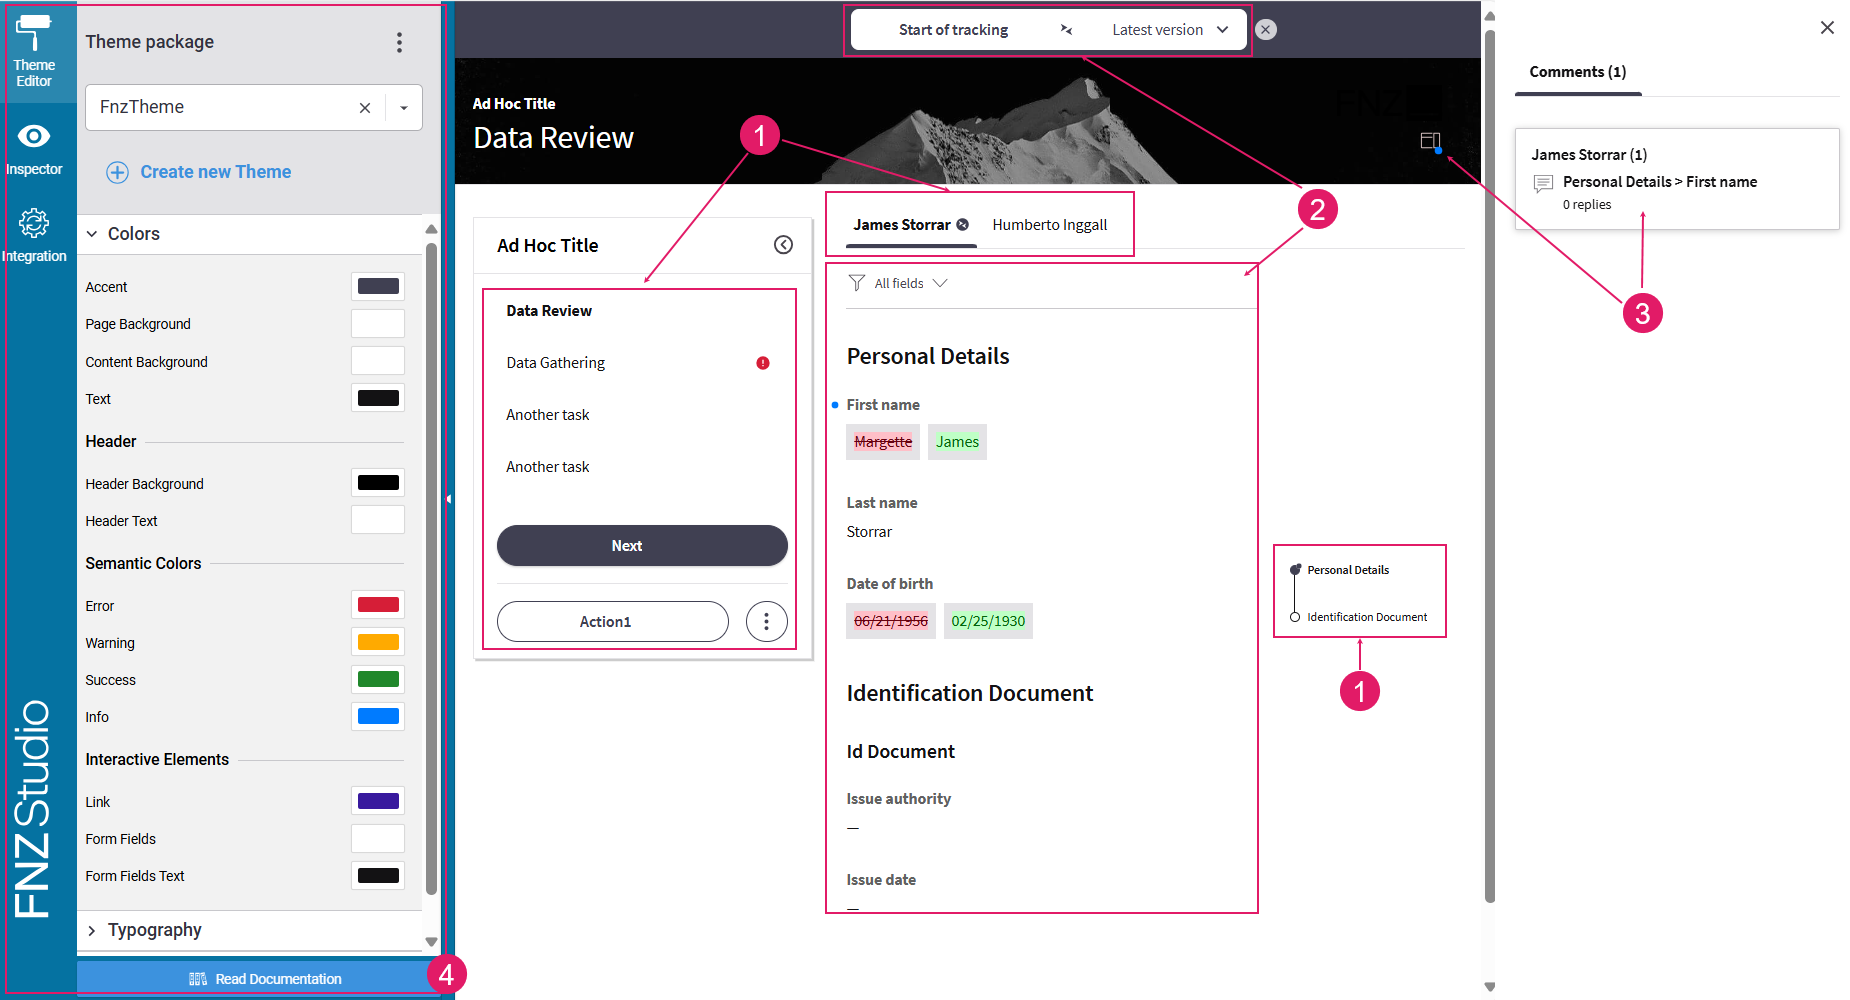
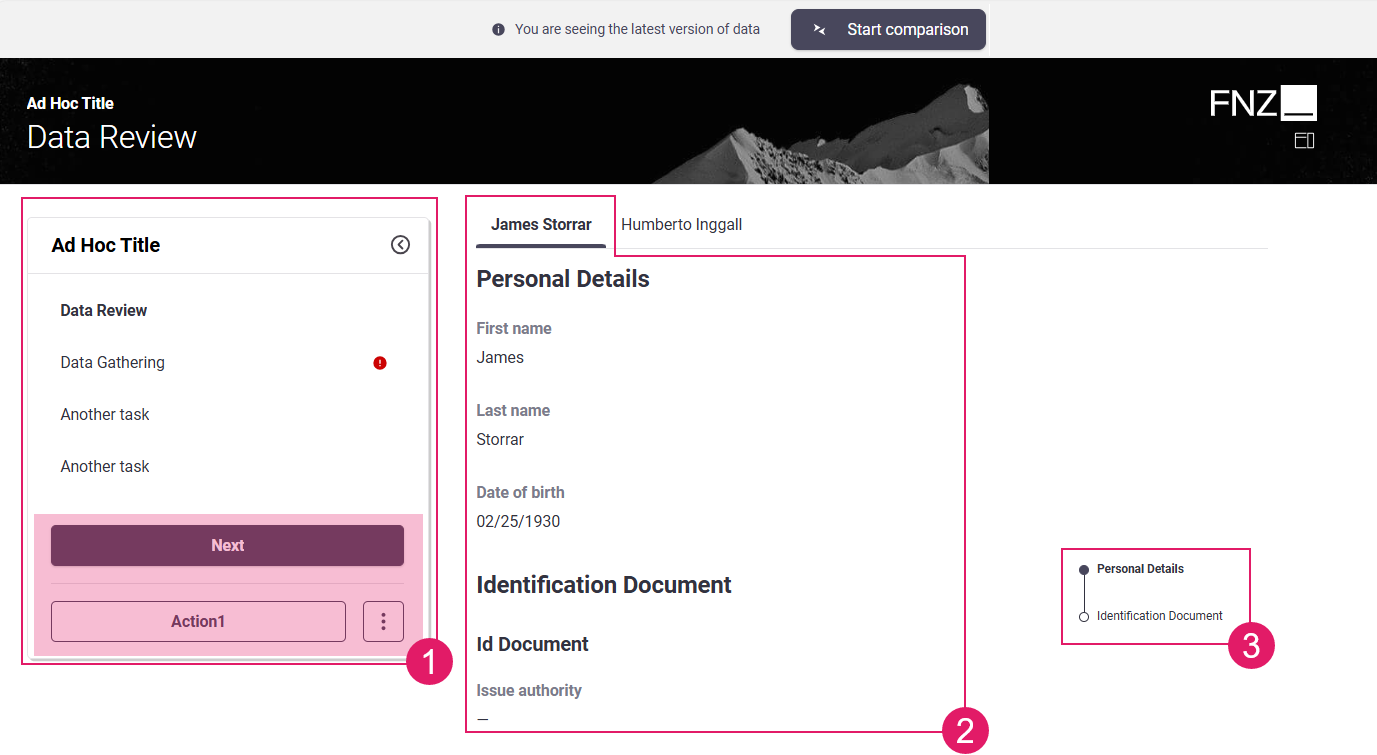
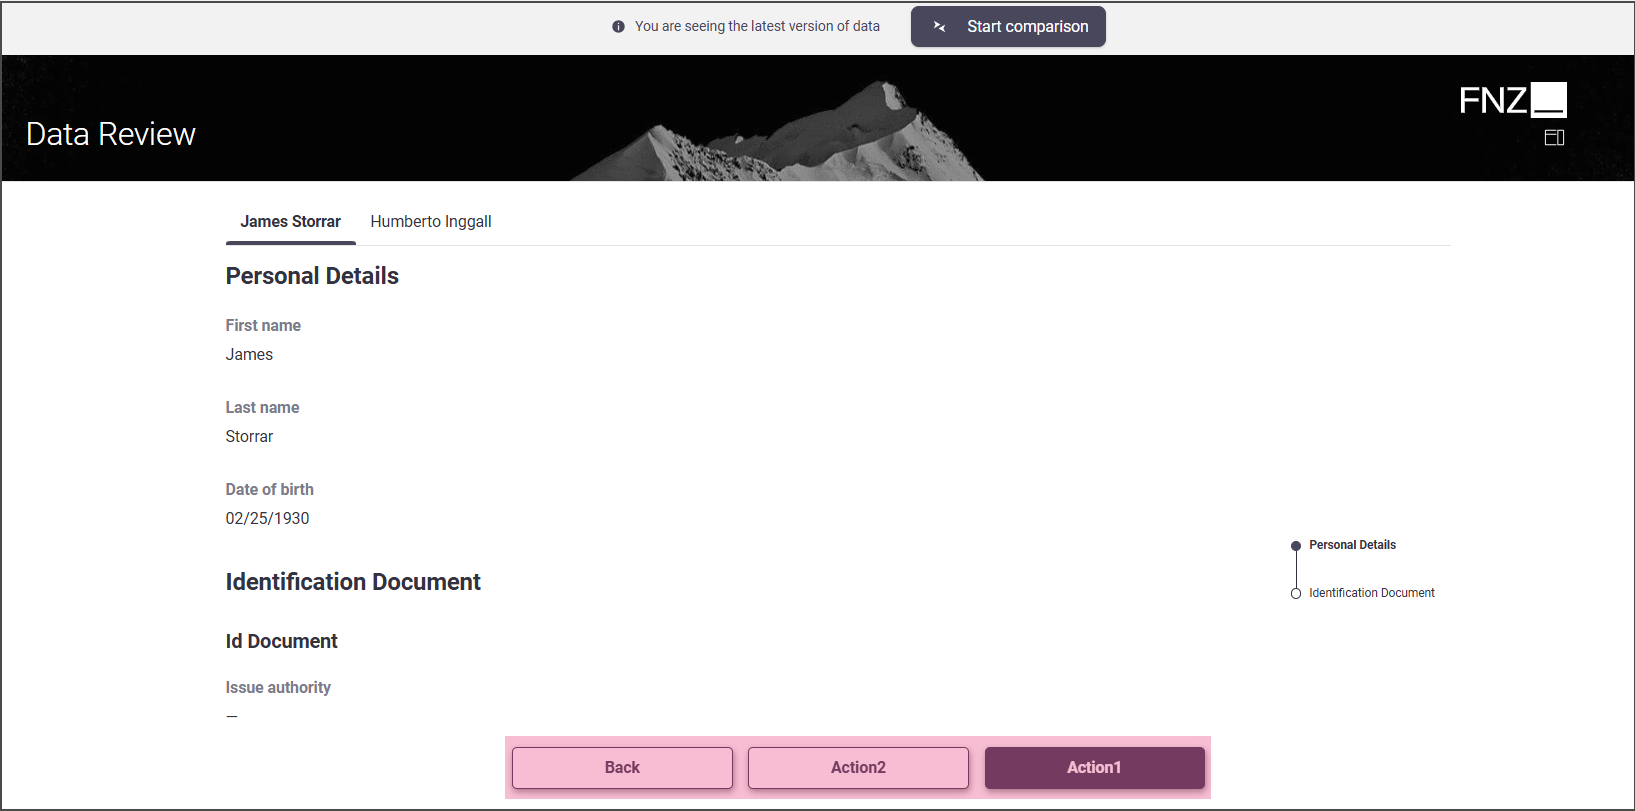
- Navigation and Actions (
1) — A bird-eye overview of the page structure allows you to find fields easily. Moreover, actions allow going back or forward in the process, deleting items or move to a different task, among others. See Navigation and Actions sections. - Data Review (
2) Data review is the core feature of Business Data Comparison. Users may be required to review information proceeding from the Data Gathering ABC to ensure it is correct. In case of erroneous or missing information, data can be sent back for editing. See Data Review section - Collaboration (
3) — Comments and Review Requests provide an easy way for reviewers to cooperate among them and with editors. See the Collaboration: Comments and Review Requests section. - Developer Toolbar (
4) — The Developer Toolbar provides three main tools: the Theme Edito, which allows styling your Solution; the Inspector Tool, used to navigate to the Business Objects where the elements of the current page in FNZ Studio Runtime are configured and fixed any issues; the Integration Console, which shows all the integration calls performed for easier contextual debugging. See the Developer Toolbar section.
Navigation
Feature Overview
A bird-eye overview of the page structure allows you to find fields easily.
Navigation in Business Data Comparison is based on the following elements:
-
Page Structure (Sidebar and Action position): (
1) This determines the way the Business Data Comparison page is organized (whether there is a sidebar or not) and where Actions are positioned on the page itself. Page structure is configured through a combination of the following elements:- Task Type: The Task Types property (Sequential or Drill-Down) set at Process level determines where Actions are positioned on the page.
- Ad-Hoc Sub-Process: If a Data Review App Task is contained in an Ad-Hoc Sub-Process Component, a navigation sidebar may be displayed. With the Sidebar, users are constantly provided with an overview of the steps that are needed to reach the end of the process. They can either follow a predefined path or jump to a specific step directly by clicking on any task.
-
Content Navigation: This determines the way you navigate through page content and is based on two items, both of which are configured through the Data Logic BO. The way the content navigation is rendered is specific to Data Review.
- Tab Bar (
2): It allows users to navigate through different pages (e.g., different customers' pages). - Anchor (
3): It allows users to navigate to a specific section of the current page (e.g., from the Personal Details section to the ID Documents section for a specific customer).
- Tab Bar (
The following sections illustrate configuration details.
Page Structure
Configuration
As mentioned above, the way the data review page is structured and the position of Actions on the page depends on a combination of the following elements:
- Task Type: Sequential or Drill-Down . This property is set in the Data Review Process Properties.
- Ad-Hoc Sub-Process: The Data Review App Task (plus the linked Data Gathering App Tasks and other Process Components, if any) may be contained in an Ad-Hoc Sub-Process. In this case, each Process Component included in the Ad-Hoc Sub-Process may be rendered as an item in a navigation sidebar. See Ad-Hoc Sub-Process.
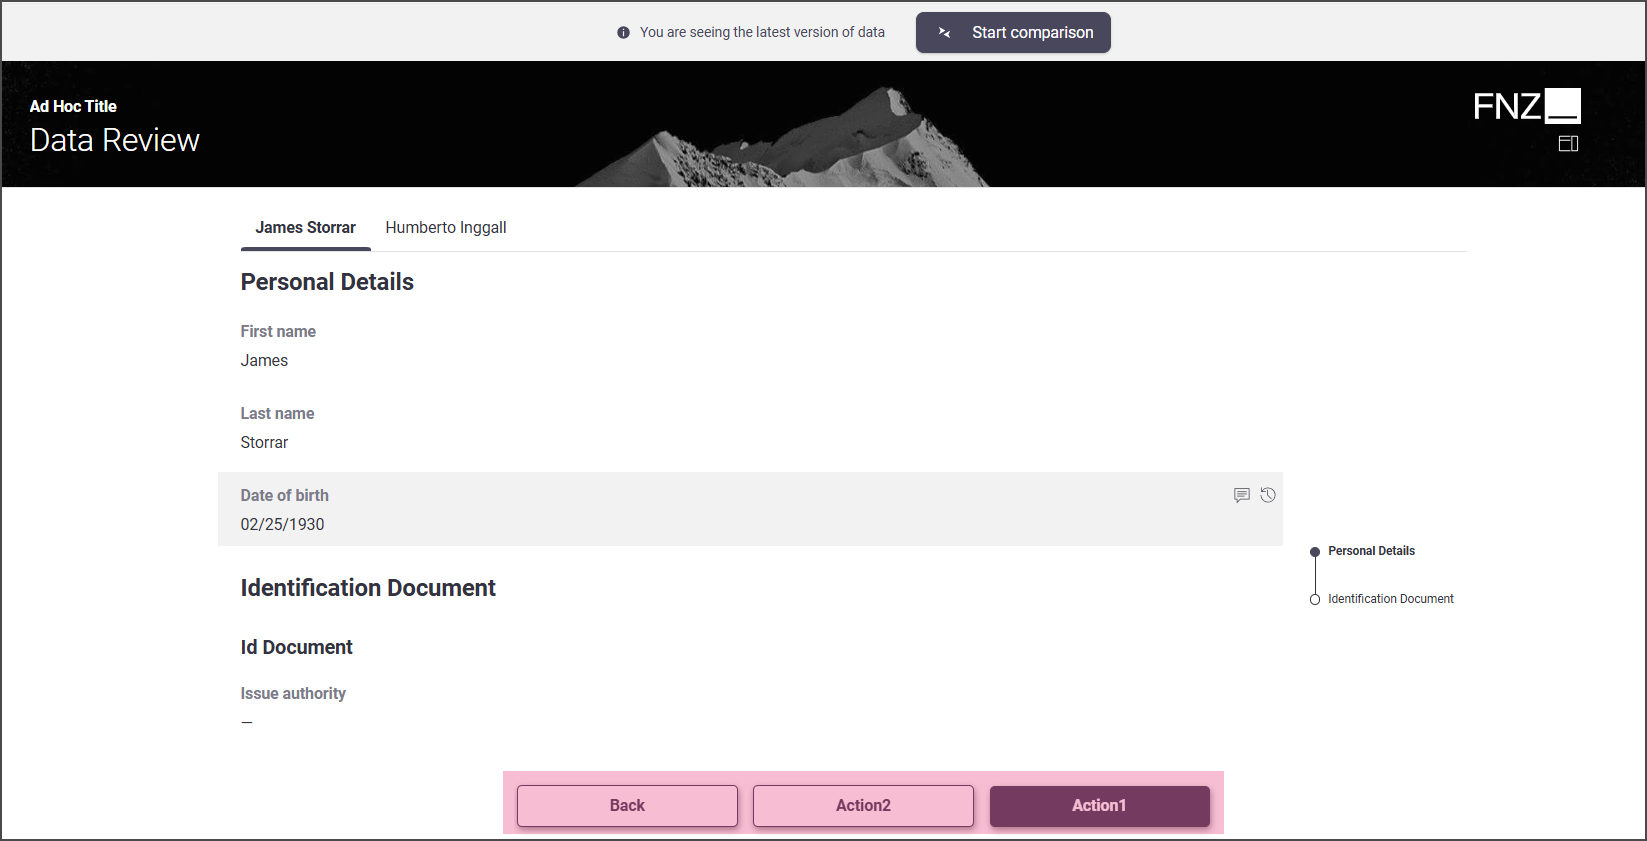
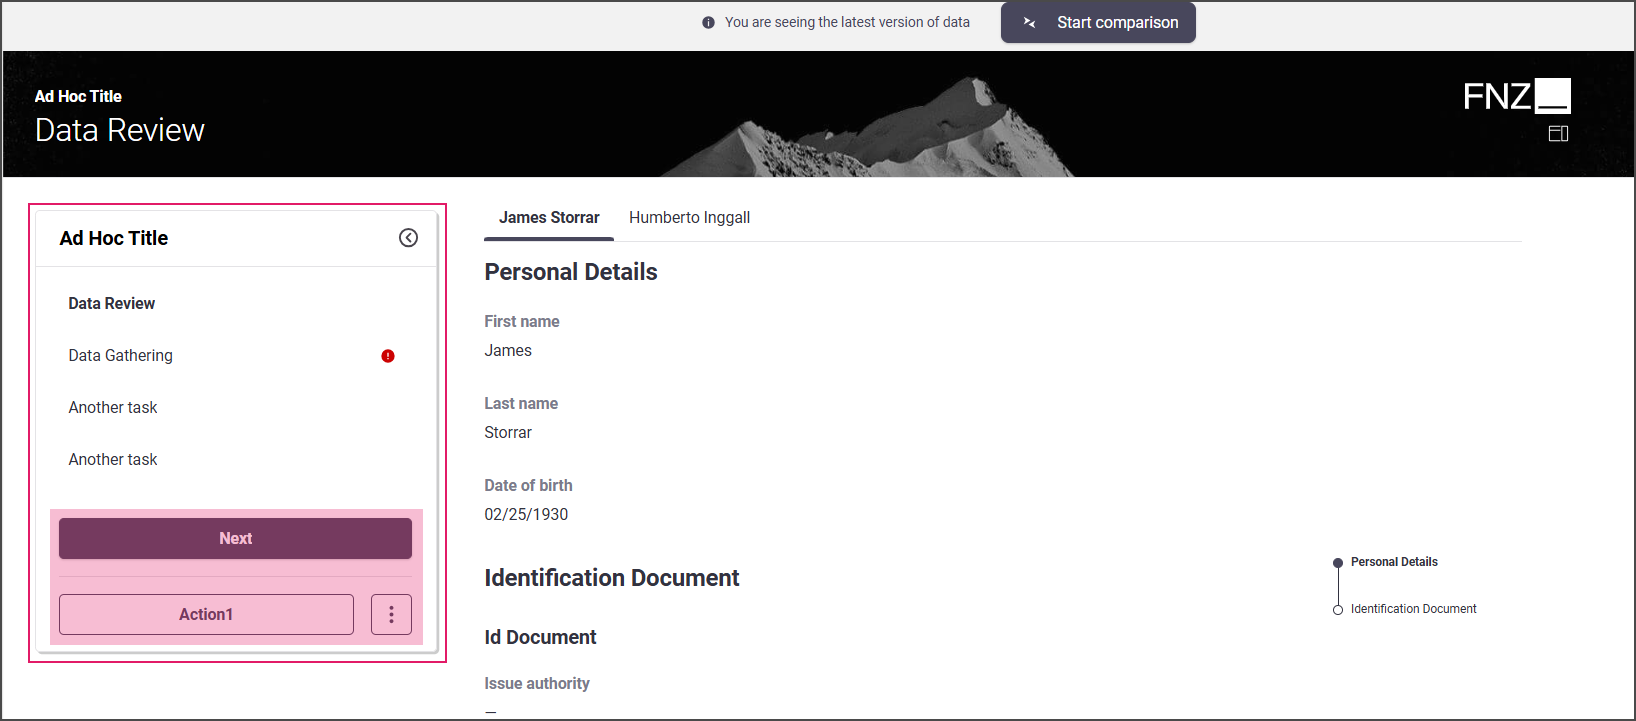
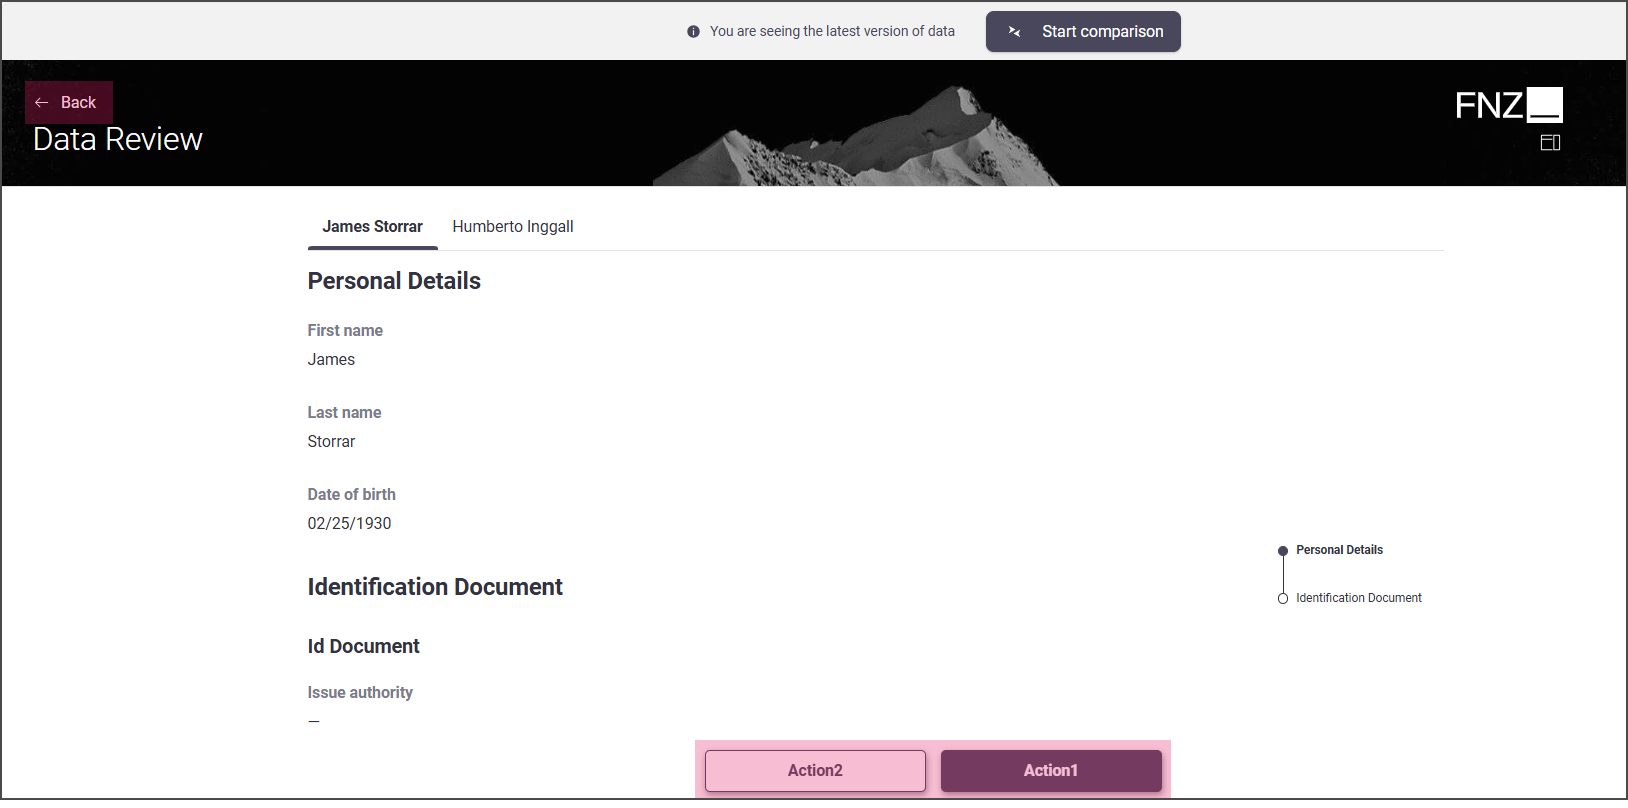
There are four types of page structure depending on each configuration type, as illustrated in the images below:
Mode 1: No sidebar is shown; all Actions are displayed at the bottom center of the page.
- Task Type: Drill Down
- Data Review App Task inside an Ad-Hoc Sub-Process
Mode 2: Sidebar is shown; all Actions are displayed in the sidebar.
- Task Type: Sequential
- Data Review App Task inside an Ad-Hoc Sub-Process
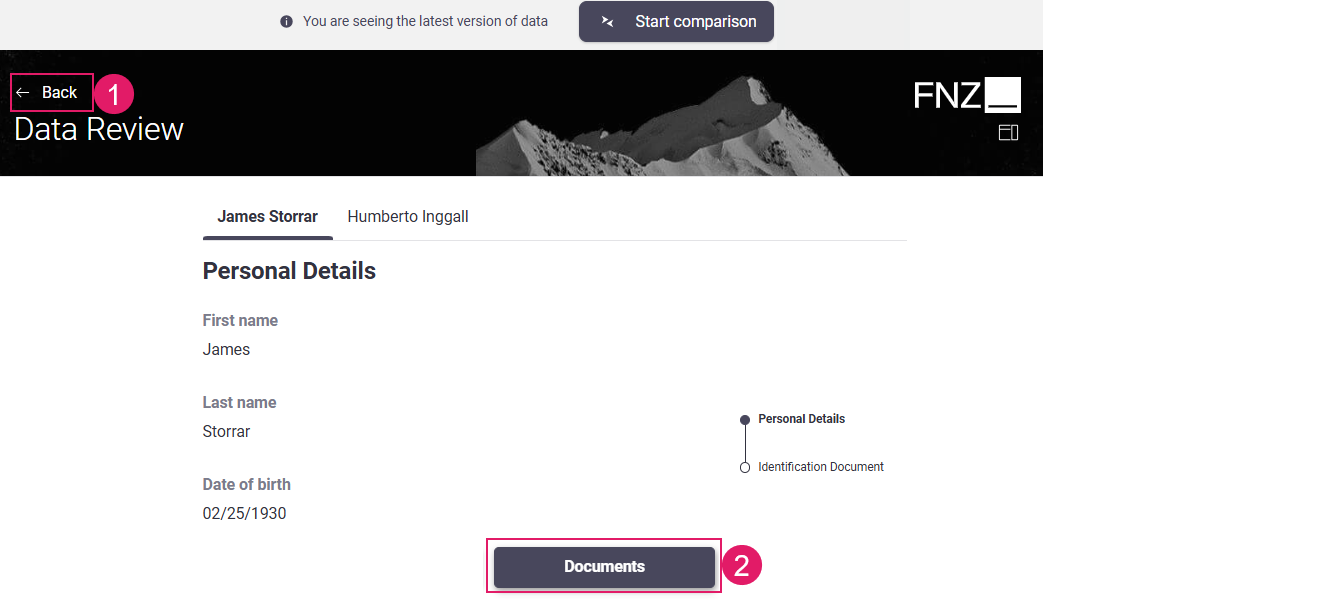
Mode 3: No sidebar is shown;Back Action is displayed at the top left of the page, Custom Actions are displayed at the bottom center of the page.
- Task Type: Drill Down
- Data Review App Task outside an Ad-Hoc Sub-Process
Mode 4: No sidebar is shown; all Actions are displayed at the bottom center of the page.
- Task Type: Sequential
- Data Review App Task outside an Ad-Hoc Sub-Process
Content Navigation
Configuration
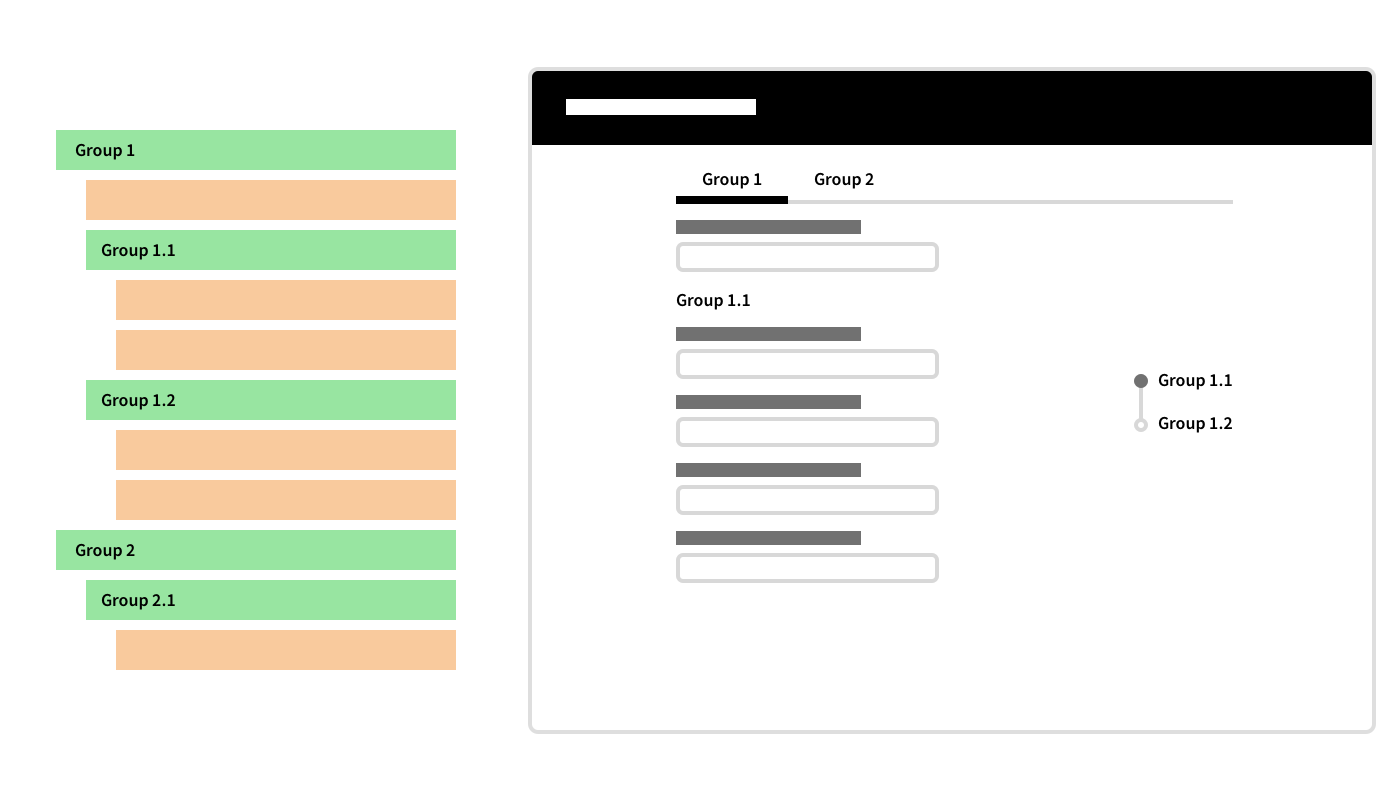
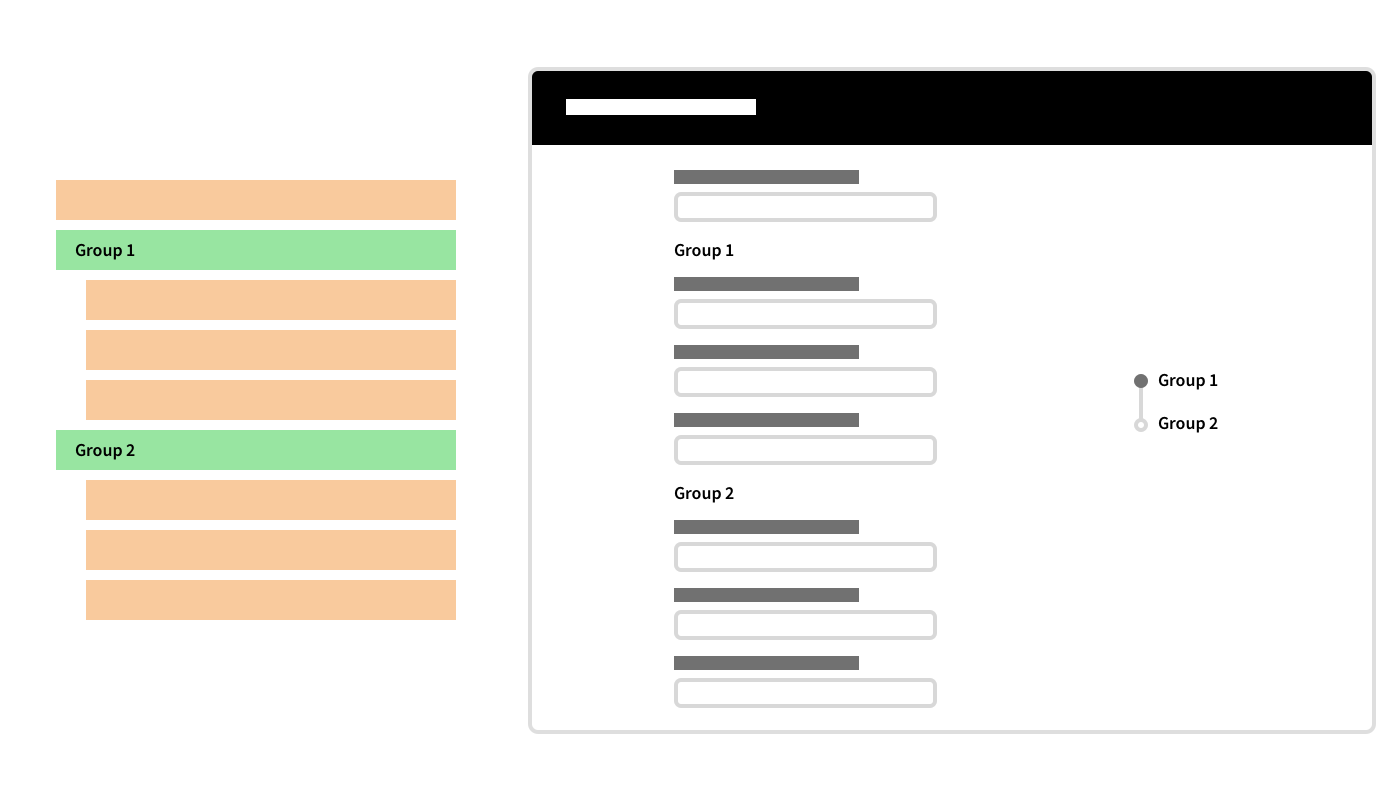
The Tab Bar allows navigating through different pages (e.g., customer pages), while Anchor Navigation allows landing on a specific section of the current page (e.g., from the Personal Details section to the ID Documents section for a specific customer). Both the Tab Bar and Anchor are configured through Section Group Controls in the Data Logic Editor (see Data Logic Section Group / Field Set Group). Three different navigation modes are supported, based on the level of Section Group nesting (as illustrated in the images below). Note that Section Group Controls also determine how data is grouped on a page (see Content Structure section in Data Gathering).
Mode 1:
- Section Group Controls: not nested

Mode 2:
- Section Group Controls: nested
Mode 3:
- Section Group Controls: nested; Structure starts with a Data Class Control
Actions
Feature Overview
App Task Actions allow developers to define all aspects of an Action in the Process editor directly. This allows reusing the same Data Logic in different situations, and with different actions. Moreover, only the Process Business Object is altered when actions need to be added, removed, or updated.
Data Review App Task Actions may be of two types (configuration details are illustrated in the table below):
Configuration
Data Review Actions are configured in the Actions tab of the Data Review Process Editor.
| UI element | Description | Configuration |
|---|---|---|
Back Action (1) |
Back button. Depending on the type of type of App Task, it may be visible at the at the top left or at the bottom center of the page. | This is a predefined, static Action, which allows ensuring a consistent developer experience across different solutions. It is configured in the Actions tab > Global Actions > Back option. See Predefined Actions (Back). |
Custom Action (2) |
Any kind of Action applied to the Process (e.g., Go to documents, Ask for help) | This Action is entirely defined by the developer. It is configured in the Actions tab > Global Actions > Custom Actions option. Two types of Custom Actions are available: Process (impacting the Process flow by moving the token) and Script Actions (reload/update actions with no impact on the Process flow). See Custom Actions. |
Data Review
Data change tracking is the main activity performed by the Business Data Comparison Application Business Component.
Data Review Feature Overview
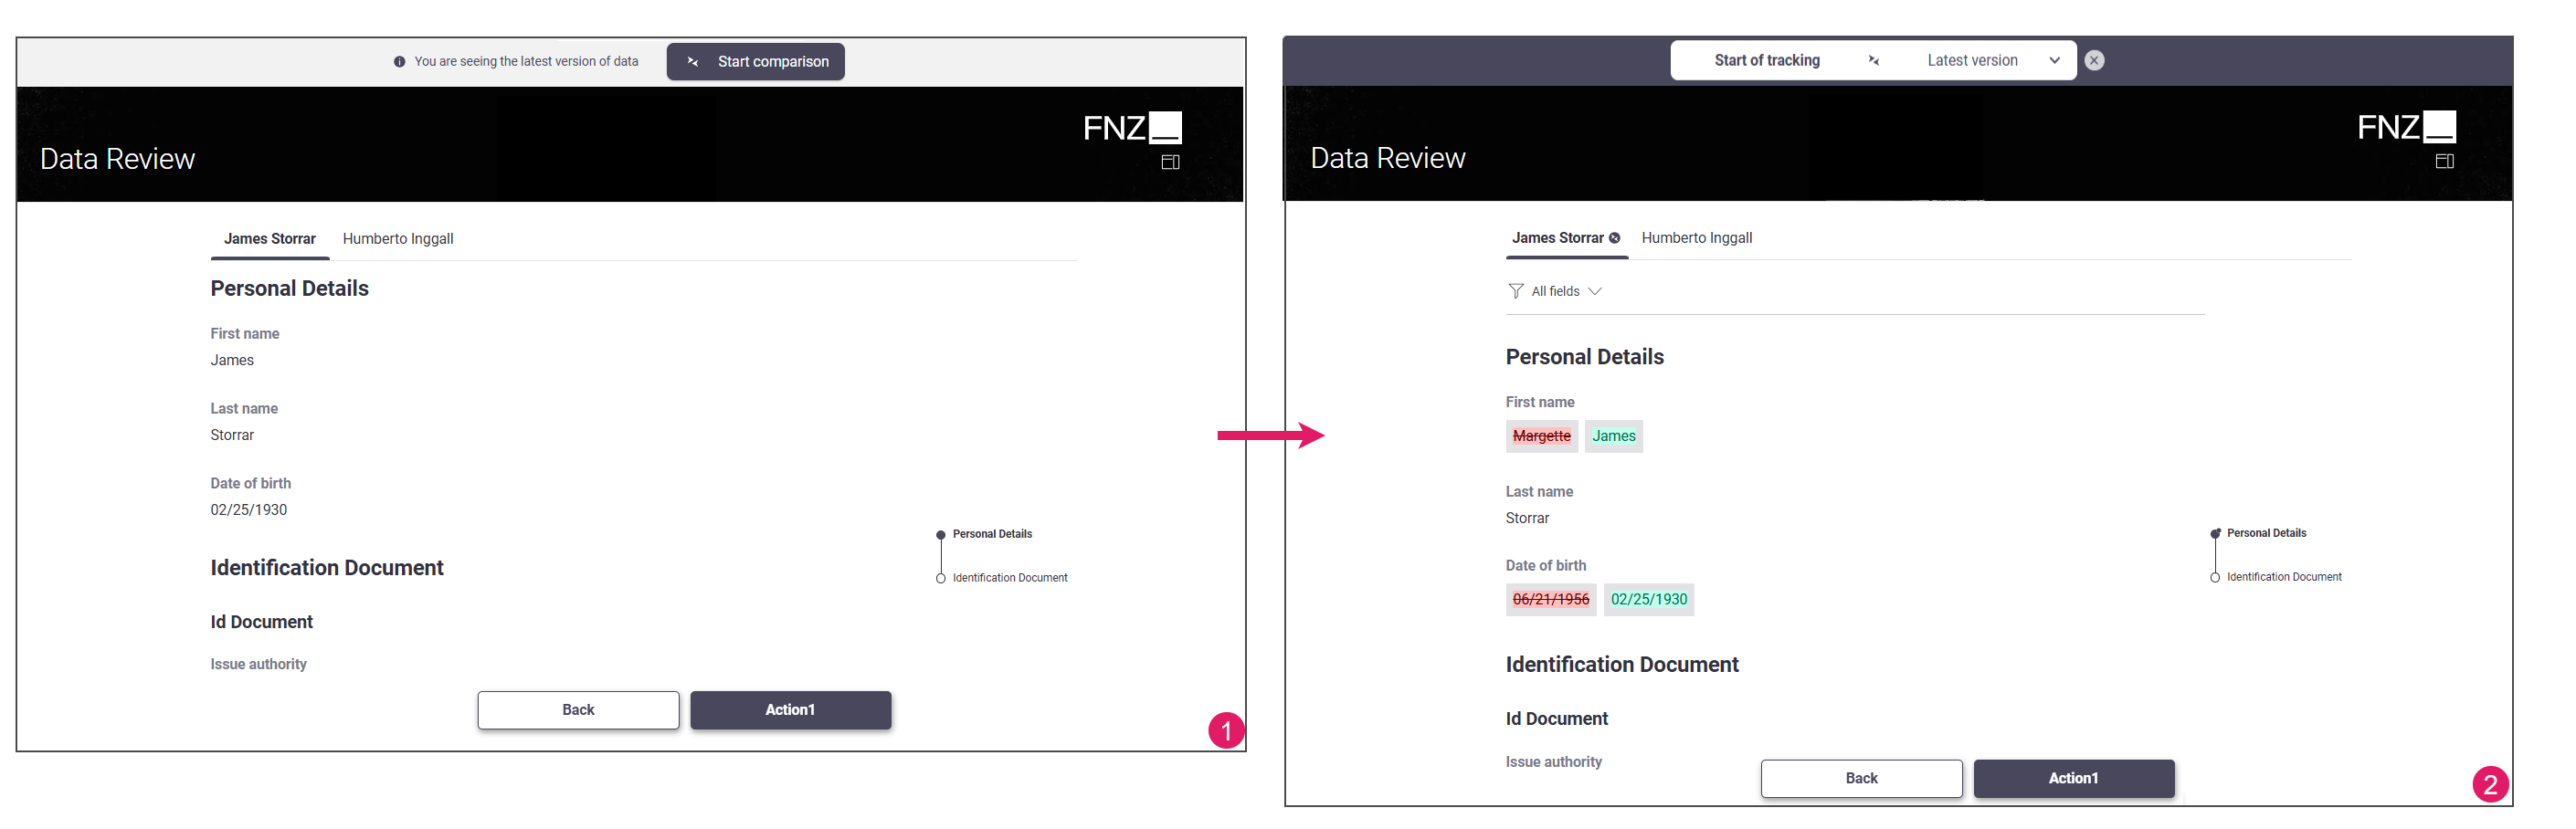
Business Data Comparison data can be shown in two modes:
- Current — (
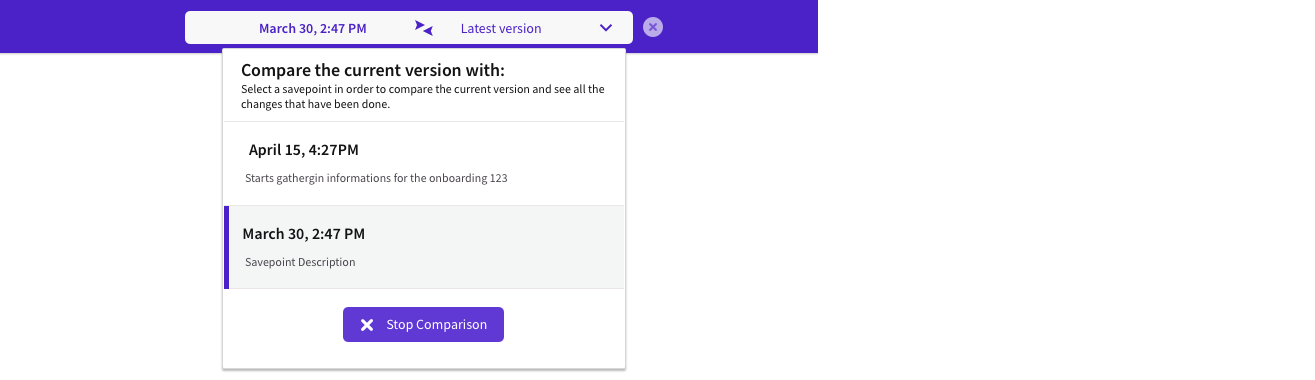
1) Shows the current status of data, with no comparisons. - Comparison — (
2) Compares data between its current status and another point in time, called Savepoint. To start data comparison at runtime, click on the Start Comparison button at the top of you page. A popup allows selecting which set of data (corresponding to a specific Savepoint) you want to compare with your current data.
The following sections describe the main filters and views available for Business Data Comparison.
Change Types
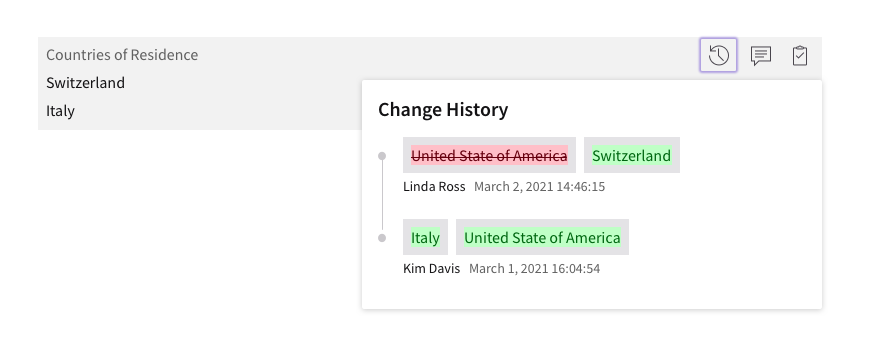
Changes are identified as Added, Removed, or Updated. Each status has a semantic visual notation.
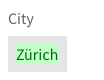
- Added Data: When a data property is added, the value is shown in green.
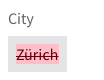
- Removed Data: When a data property is removed, the value is shown in red strikethrough.
- Updated Sections: When a data property or its subset is updated, it gets marked by the 'Has Changes' icon.

Filtering by Change
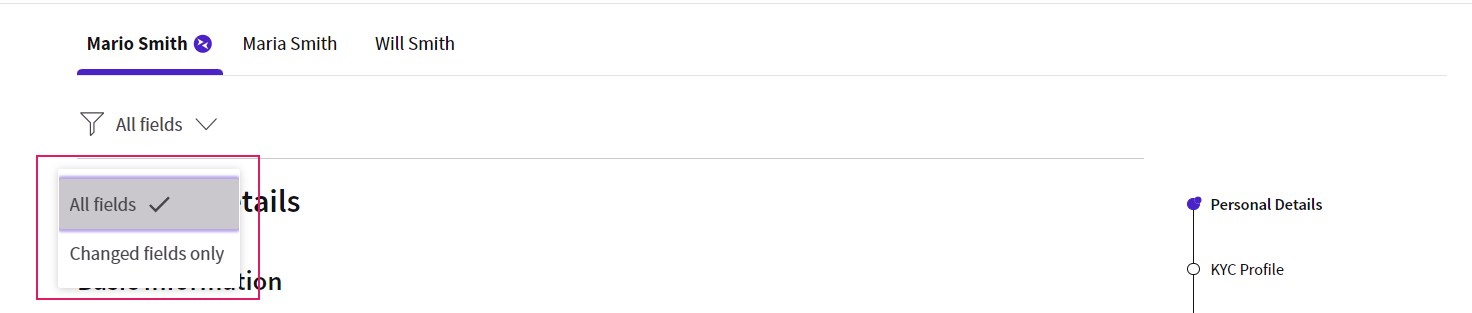
The Changed fields only option (at the top of the page) filters the entire data set (including nested sections) to display only changed data.
Filtering by Savepoint
As mentioned above, Savepoints are the records of changes in time. You can filter by savepoints to see the changes occurred in data between the selected point in time and the present.
If Savepoint names are configured accordingly, you can look for the changes performed by a specific role, the user involved in the business process or other combinations. By default, all Savepoints are available for filtering and sorted by time.
Viewing Change History
The Clock icon (displayed upon hovering on a field) triggers the History popup. The History popup contains the editor's information, and the date and time of change in a timeline. The latest change is highlighted and is always at the top of the timeline
Note that, if you filter by Savepoint (see above), the history display is also filtered. In order to view all changes from the very beginning of data change tracking, please select the very first Savepoint from the dedicated dropdown.
Data Review Configuration
The diagram below explains how data change overview is constructed. Based on a series of configuration steps performed at design time and actual data objects managed in the context of a Process at runtime, the change overview is autogenerated on the fly.
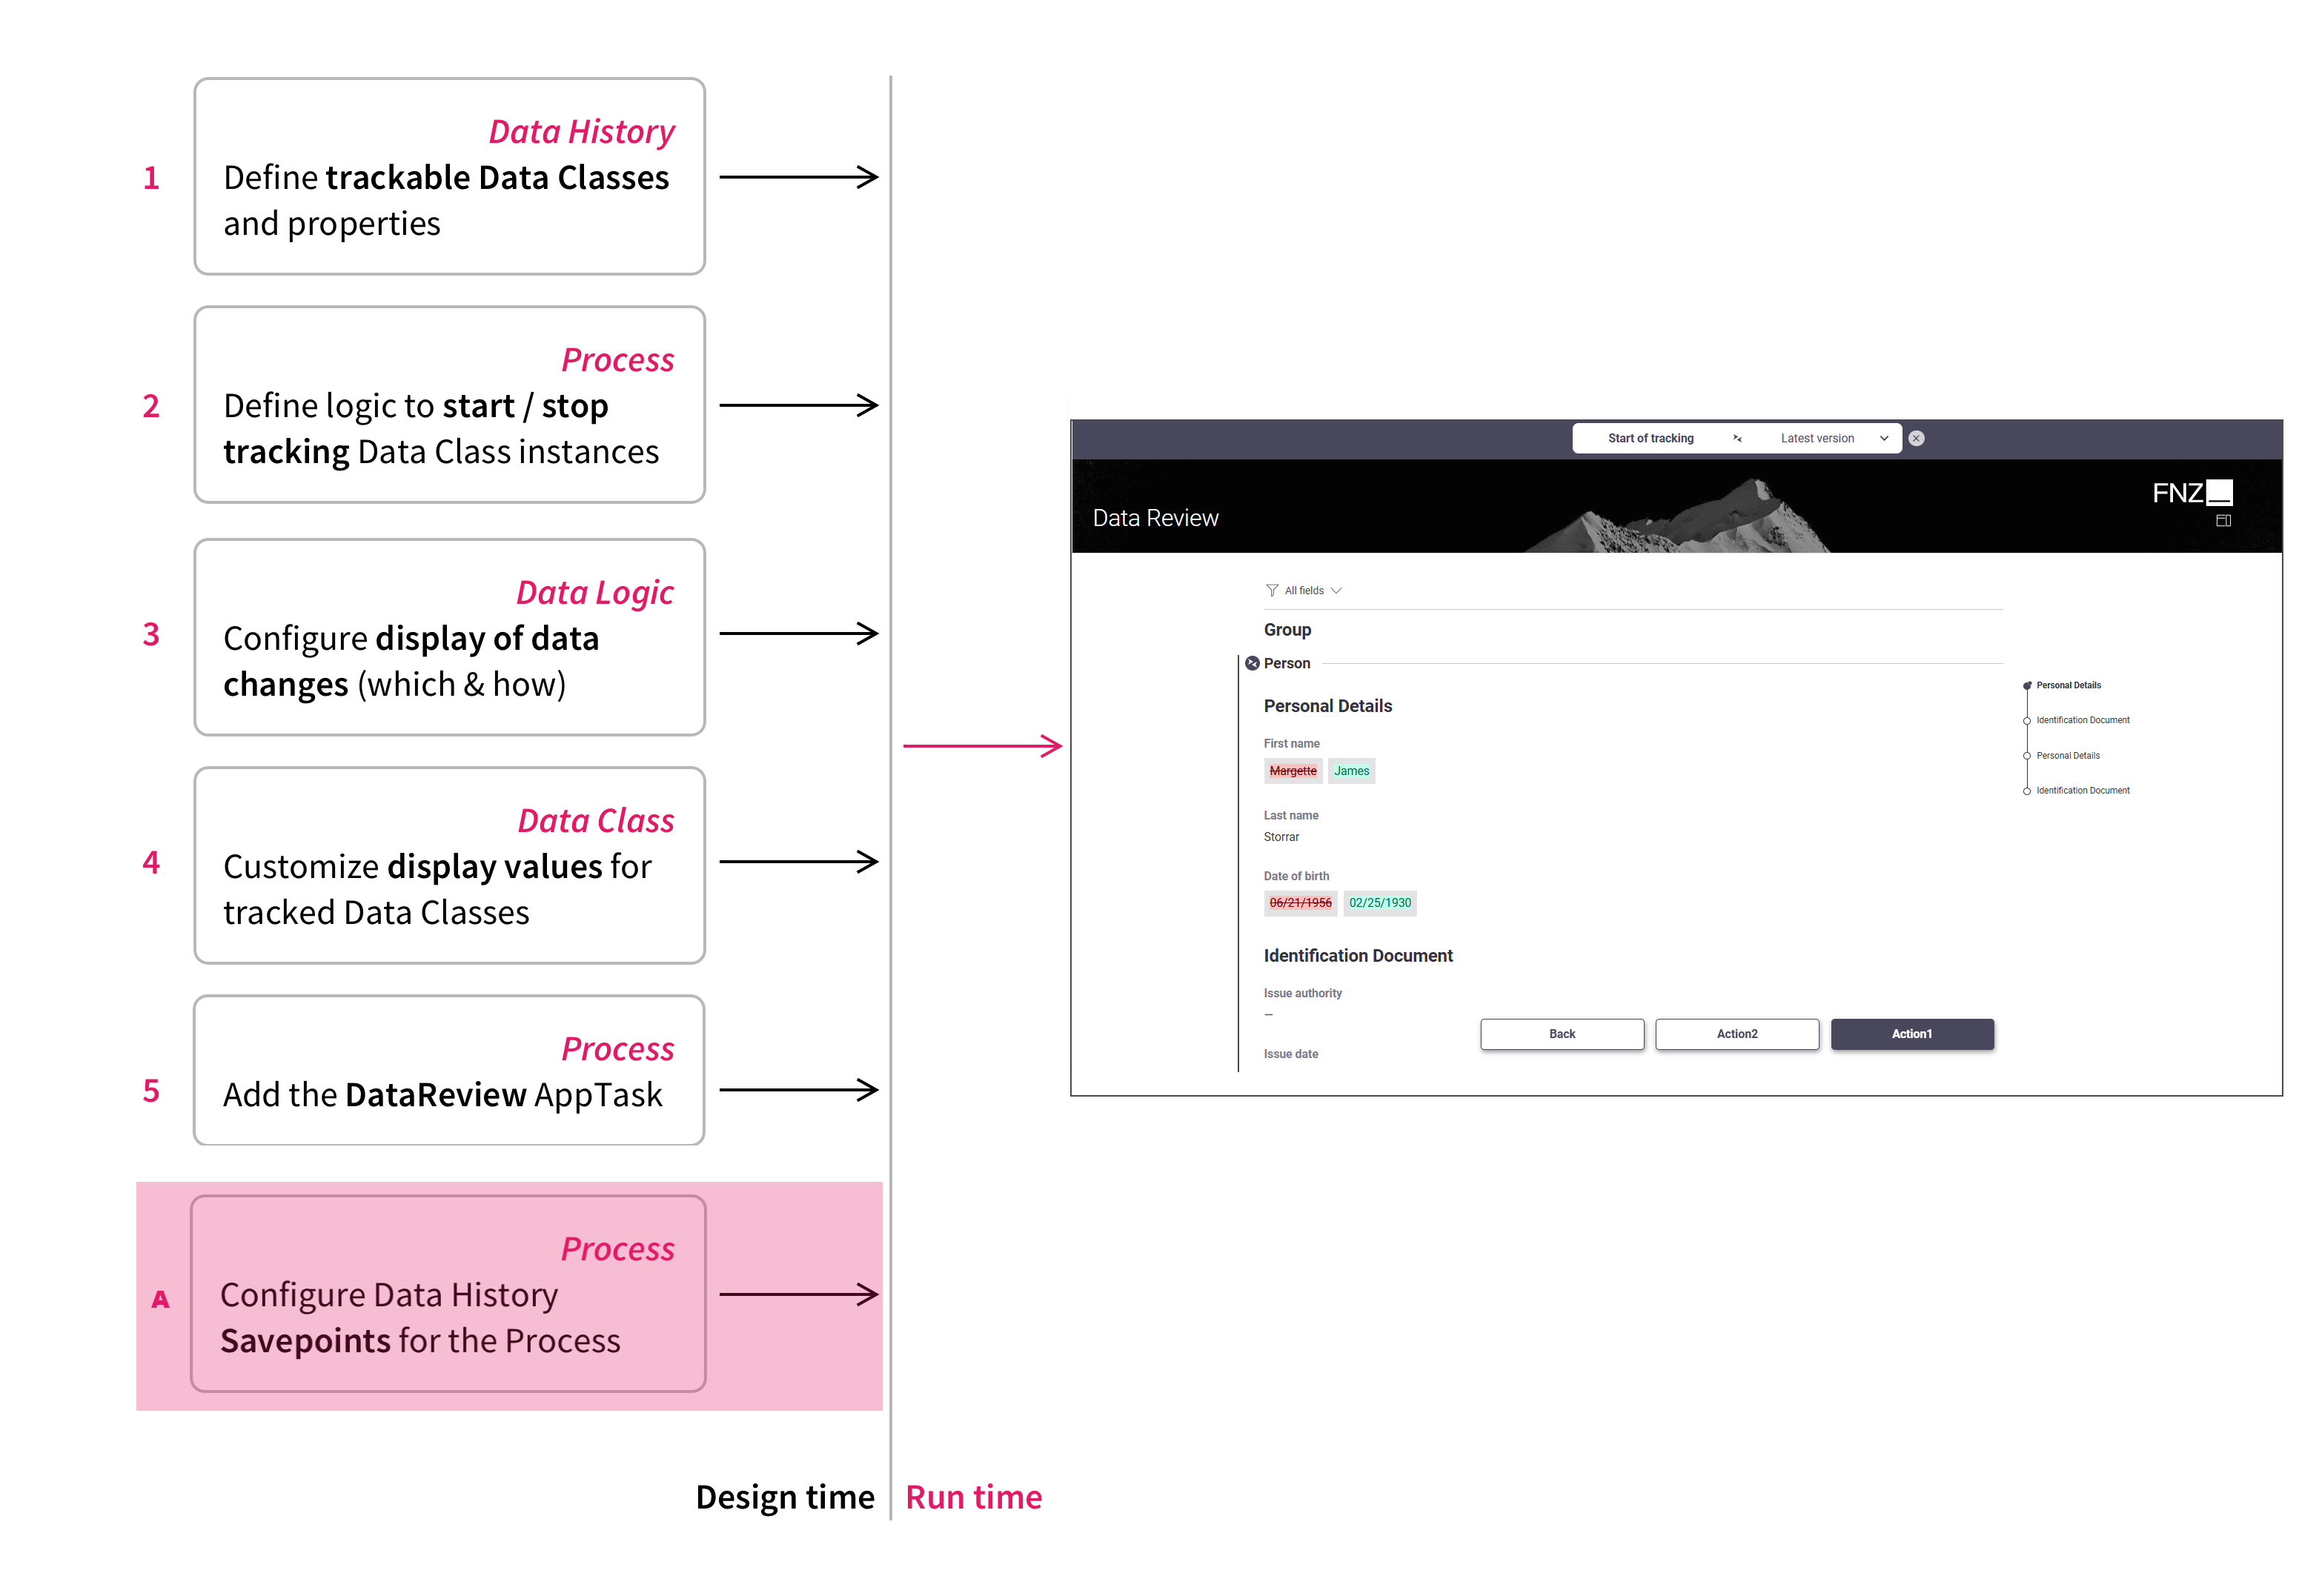
Following is an overview of the configuration steps to be performed at design time (each step is illustrated in detail in a dedicated section below):
- Configure Data History: Change Tracking —
(1)Define which Data Classes, Data Class properties and Collections should be tracked for changes by the Data History. - Configure Data History: Change Tracking Start and Stop—
(2)At the relevant points in the Process, implement the logic to start and stop Data History tracking. - Configure Data Logic Business Object (Data Tab)—
(3)Define the data and changes to be shown and their order by creating a Data Logic Business Object with all the required configurations and add it to the Data Review App Task. - Configure Data Class for display values —
(4)Implement functiongetDataHistoryDisplayValueon each Data Class whose display value needs to be customized. - Configure Data Review App Task (Data Tab) —
(5)At the relevant points in the Process, wherever you need to show data change overviews in a Solution, add the Data Review App Task and configure it. - Configure Filtering by Savepoints — (
A) (Optional, required if you use the Filtering by Savepoint Functionality) At the relevant points in the Process, add Data History Savepoints and configure their names.
Data History: Change Tracking
The first step is to configure Data History for change tracking.
Data History is responsible for tracking and retrieving changes performed by users on Data Class instances and collections in the context of and for the duration of a Process Instance. The Data History feature in FNZ Studio Composition (Data& Integration module) provides support to configure the data properties to be tracked in a visual manner, as well as a series of functions to manage the tracking and querying of information.
![]()
Data History: Change Tracking Start and Stop
The second step is to configure specific Data History Script Functions to start and stop change tracking.
Data History comes with predefined functions to start and stop the tracking of changes, respectively:
DataHistoryStartTrackingDataHistoryStopTracking
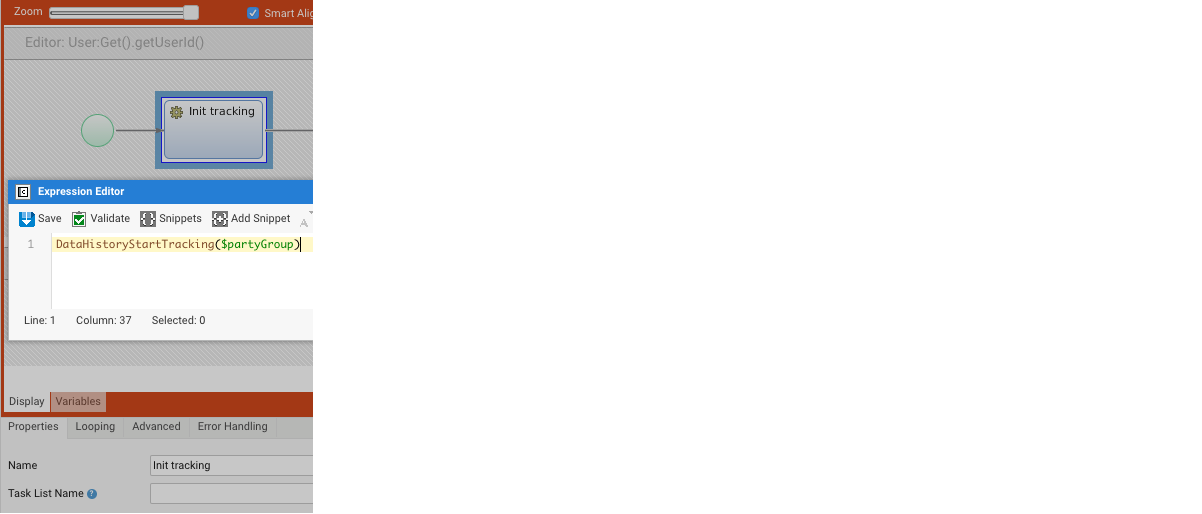
As part of business analysis activities, you need to identify the points in the Process where the Data History start and stop functions need to be invoked for a correct tracking and display of data change information.
Configuring Data Display for Complex Data Classes
For each Data Class tracked by the Data History, the display value is the output of the predefined getDataHistoryDisplayValue function. For complex Data Classes in particular, it is recommended that the Data Class provides an alternative implementation for the getDataHistoryDisplayValue function in order to define a user-friendly representation for the old display values of Data Class instances and collections. Otherwise, the display uses a default String representation (serialization).

An example for a Party Data Class:
Function getDataHistoryDisplayValue() : String Begin
If EMPTY($this.firstName) and EMPTY($this.lastName) and EMPTY($this.dateOfBirth) Then
Return 'Party';
End
Return $this.firstName & ' - ' & $this.lastName & ' (' & SHORT($this.dateOfBirth) & ')';
End
Data Logic Business Object (Data Tab)
The third step is to configure the Data Logic Business Object which governs automatic UI generation.
As for all App Tasks, most of the UI is generated starting from the Data Logic Business Object according to mapping strategies specific to your business requirements. Data Logic configuration for the Data Review App Task is the same as for the Data Gathering App Task.
See Data Gathering documentation for details.
If you are using both the Data Gathering and Data Review App Tasks, we recommend that you configure one Data Logic Business Object an select it in the Process Editor (see Data Review App Task section below) for both App Tasks.
textDiff for Comparing Long Texts
Users can compare changes within text-heavy content such as paragraphs, as in the text below.

A specific setting of the Data Logic allows you to enable the textDiff representation for a specific field. Use a Data Logic Single Property Expression Rule and enable the Allow Multiline option for that field.
Data Class
Implement function getDataHistoryDisplayValue on each Data Class whose display value needs to be customized.
Data Review App Task (Data Tab)
The fourth step is to configure the Data Review App Task.
While general App Task properties are configured in the Properties tab (see General Properties), data-related properties are configured in the Data tab.
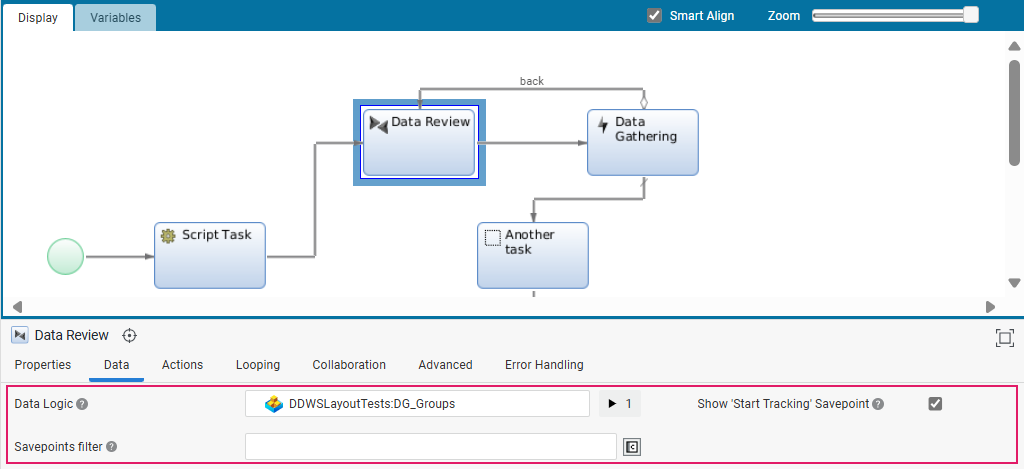
| Property | Description |
|---|---|
| Data Logic | Select the Data Logic Business Object governing the autogenerated UI (see Data Logic Business Object (Data Tab). |
| Show Start Tracking Savepoint | Select this checkbox if the Start Tracking savepoint should be visible and, therefore, selectable (see Data History: Change Tracking Start and Stop). |
| Savepoint Filter | Configure a Script Function to filter the list of all the available Savepoints to be shown in the data comparison. The Script Function should return an indexed list of Strings with the Savepoint IDs. |
Filtering by Savepoints
This last configuration step is optional and is required only if using the Filtering by Savepoint functionality.
Savepoints support use cases where it is necessary to retrieve only a subset of the changes performed on Data Class instances or collections. Consider, for example, a Process with multiple back and forth handovers between collaborators and, thus, multiple rounds of changes over the same data entities. In this case, users need to review only the changes performed since the last time they have returned the process and hide those changes that they have already reviewed in a previous session.
Consider a Process that tracks an account owner and has Savepoints defined where the Process is handed over to another collaborator. The Savepoints are configured to show:
- the stage in the Process, such as "Review1".
- the action performed, such as "Submit", "Return" or "Reject".
- the name of the user who has just performed the action.
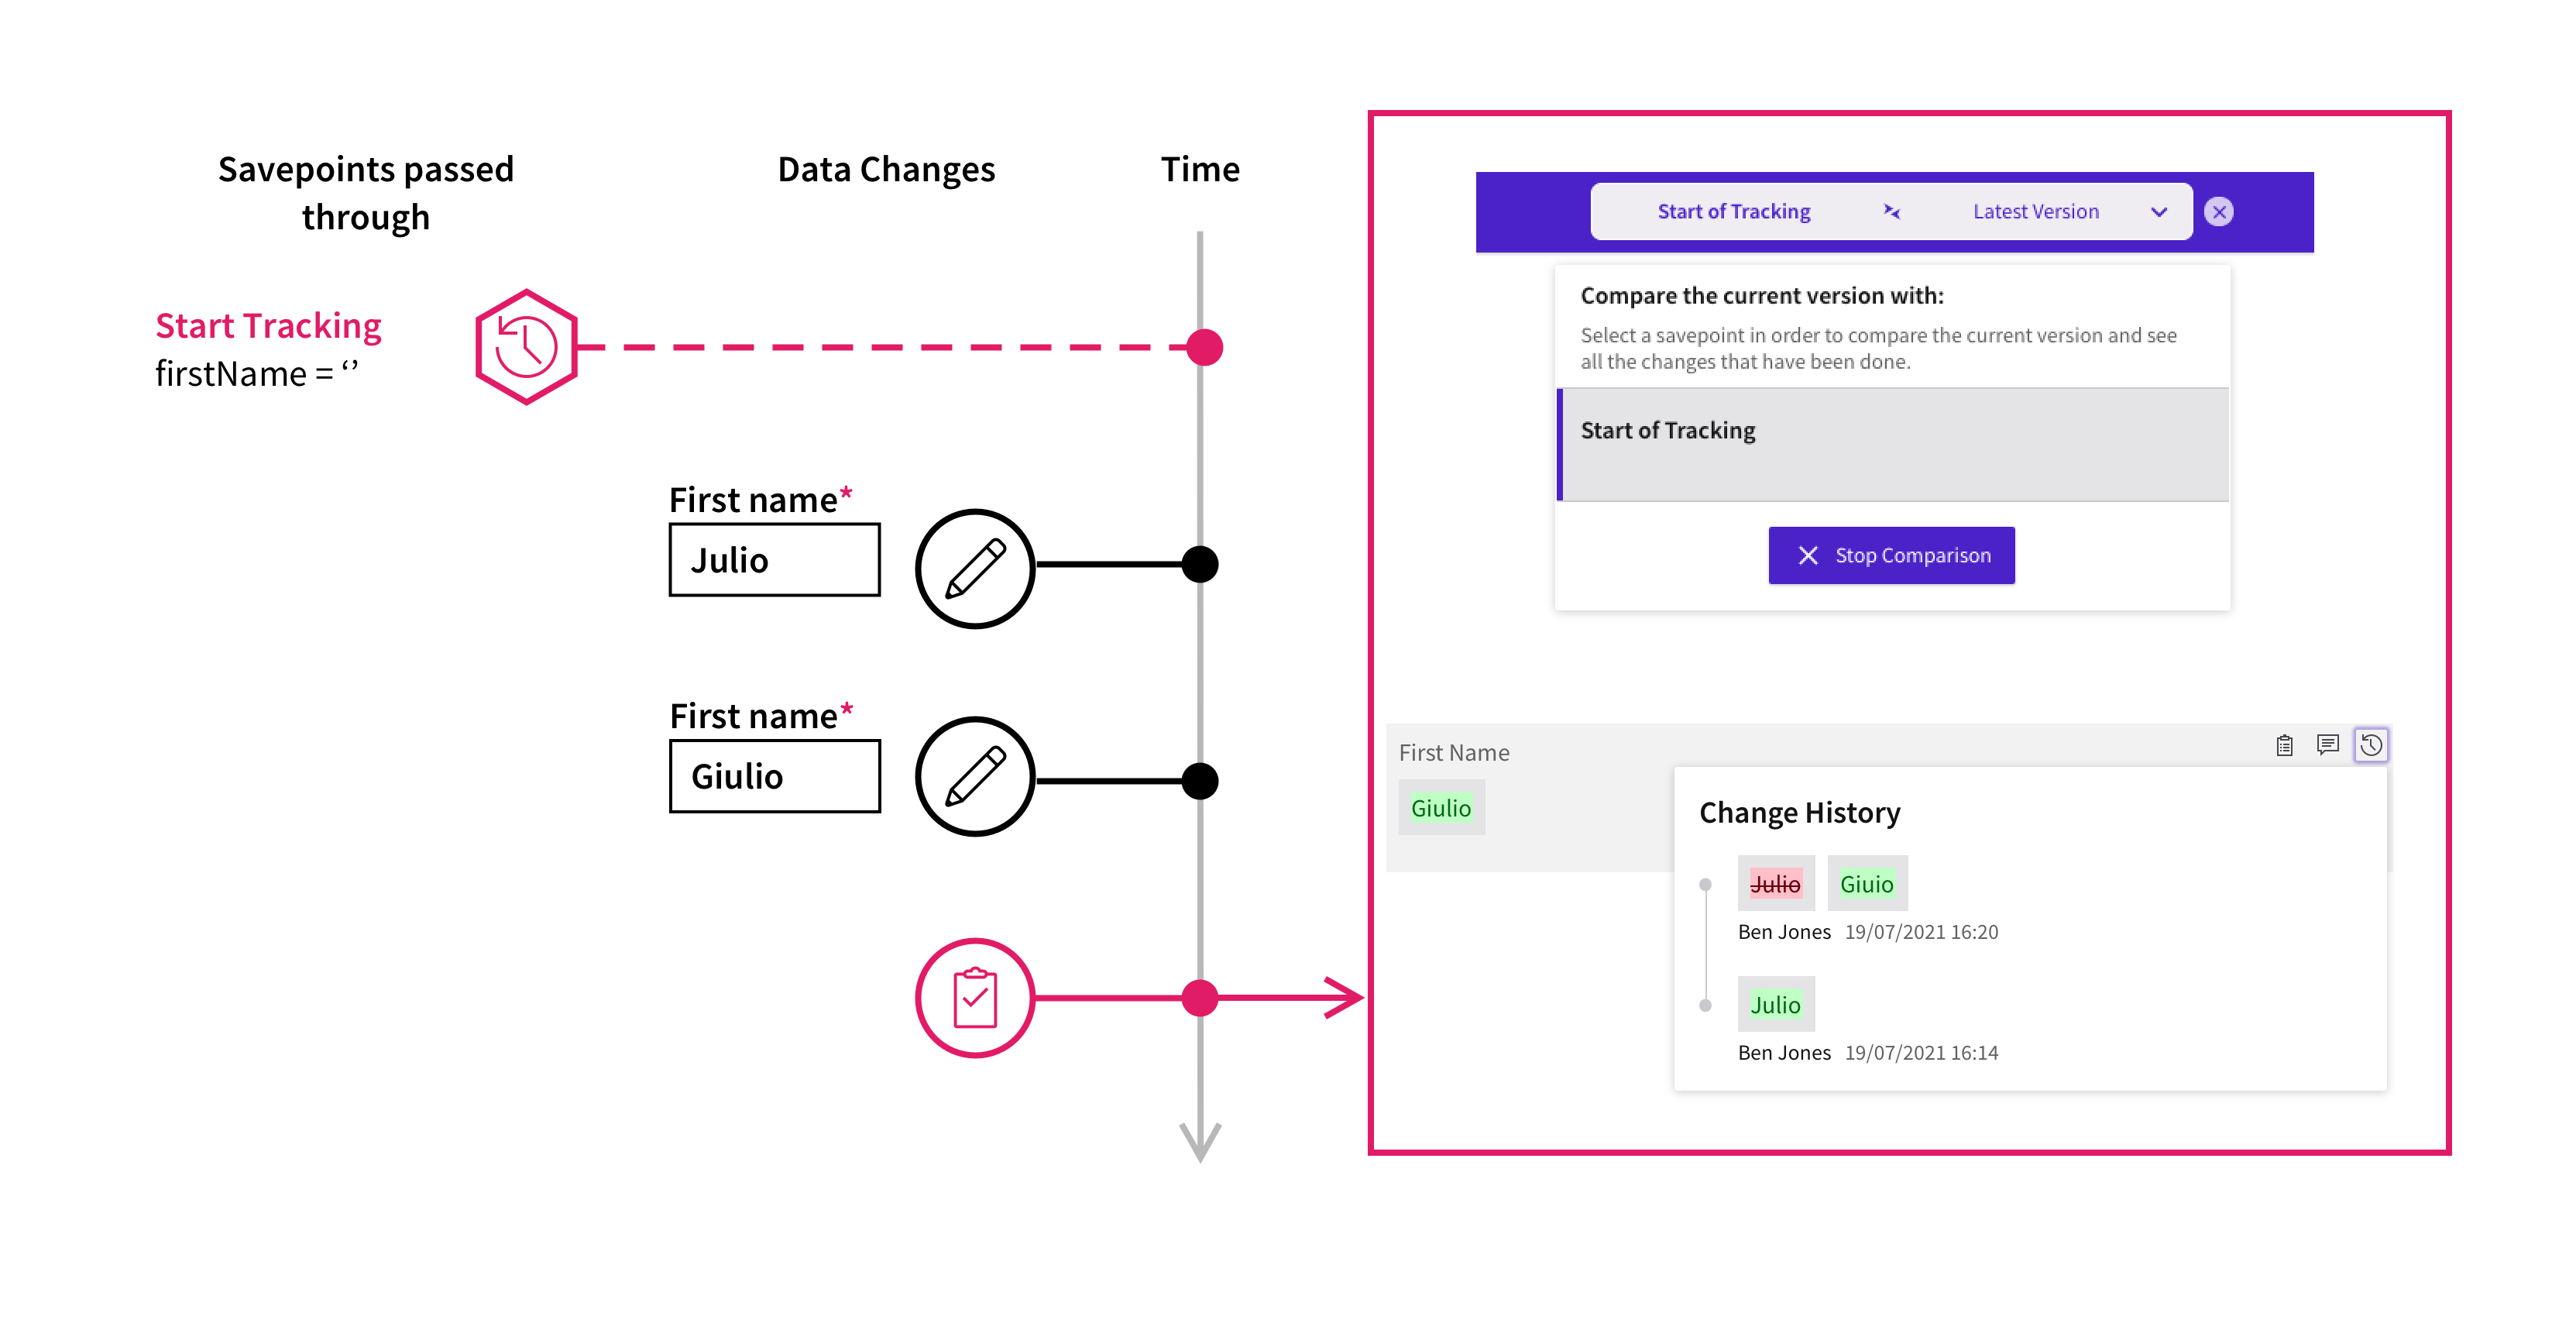
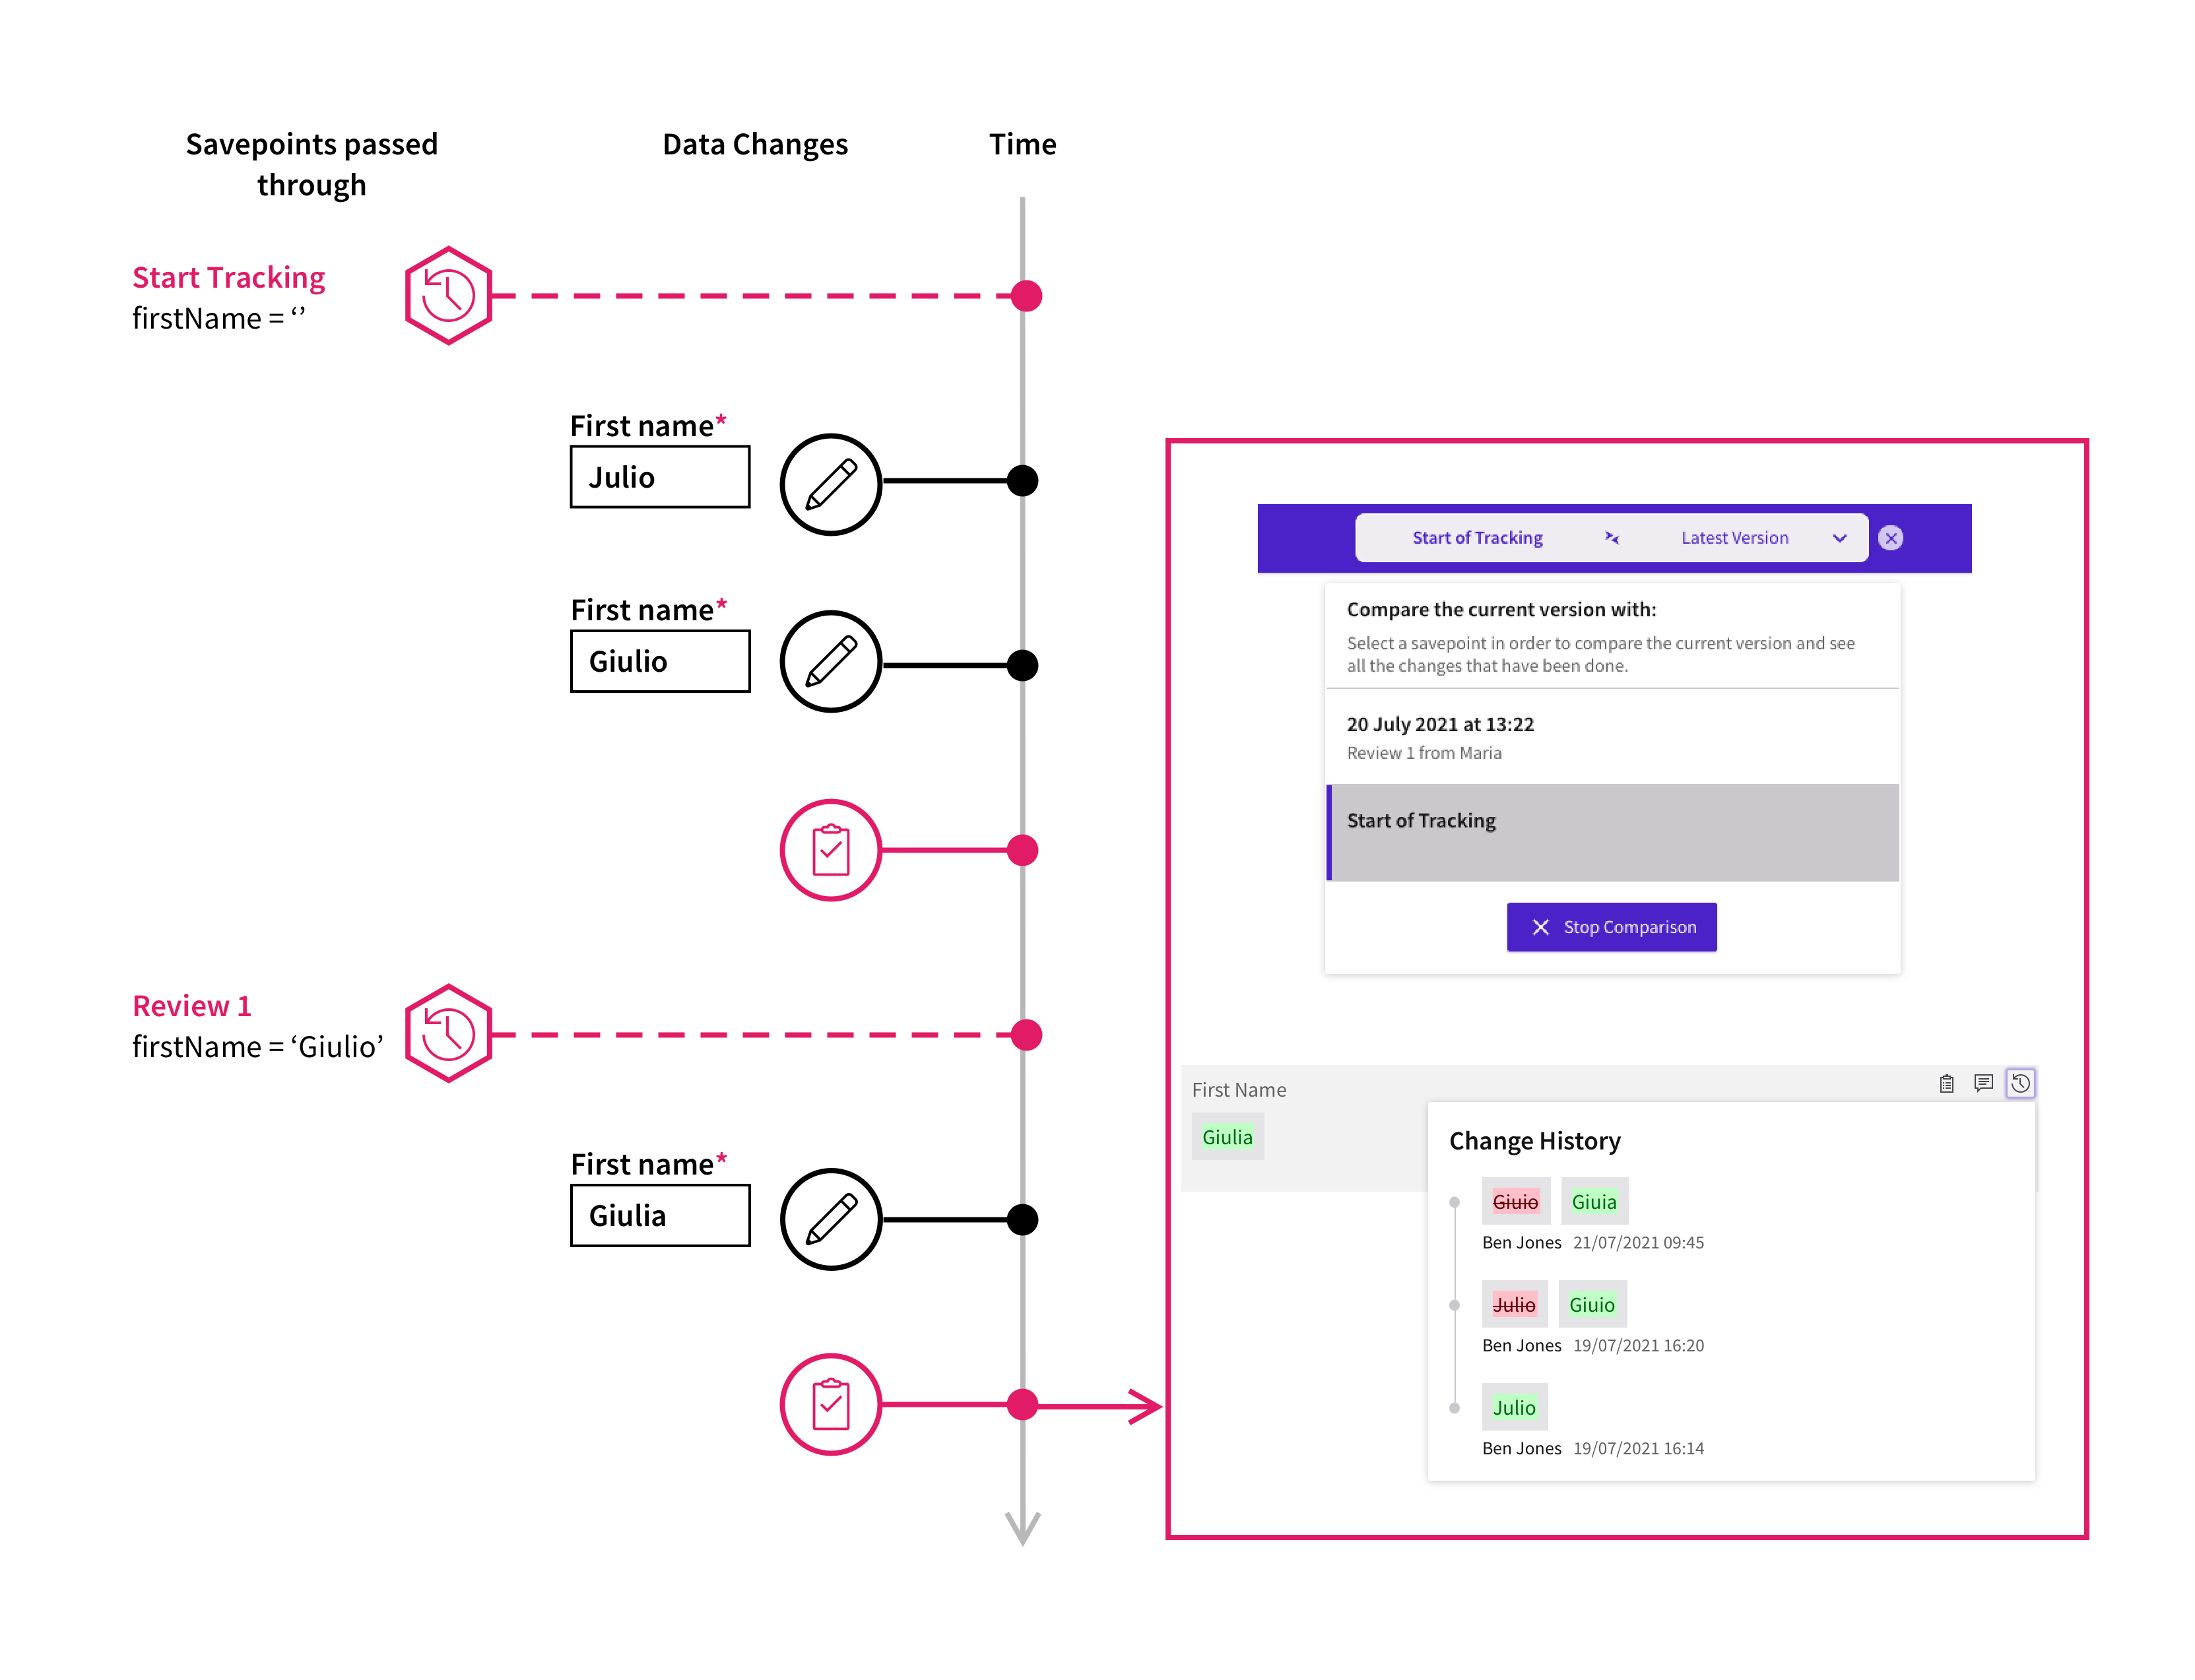
If the Savepoint is set to Start Tracking, the user interface shows that the name has evolved from "Julio" to "Giulio" and then "Giulia". The full history of changes is also displayed in the popup.
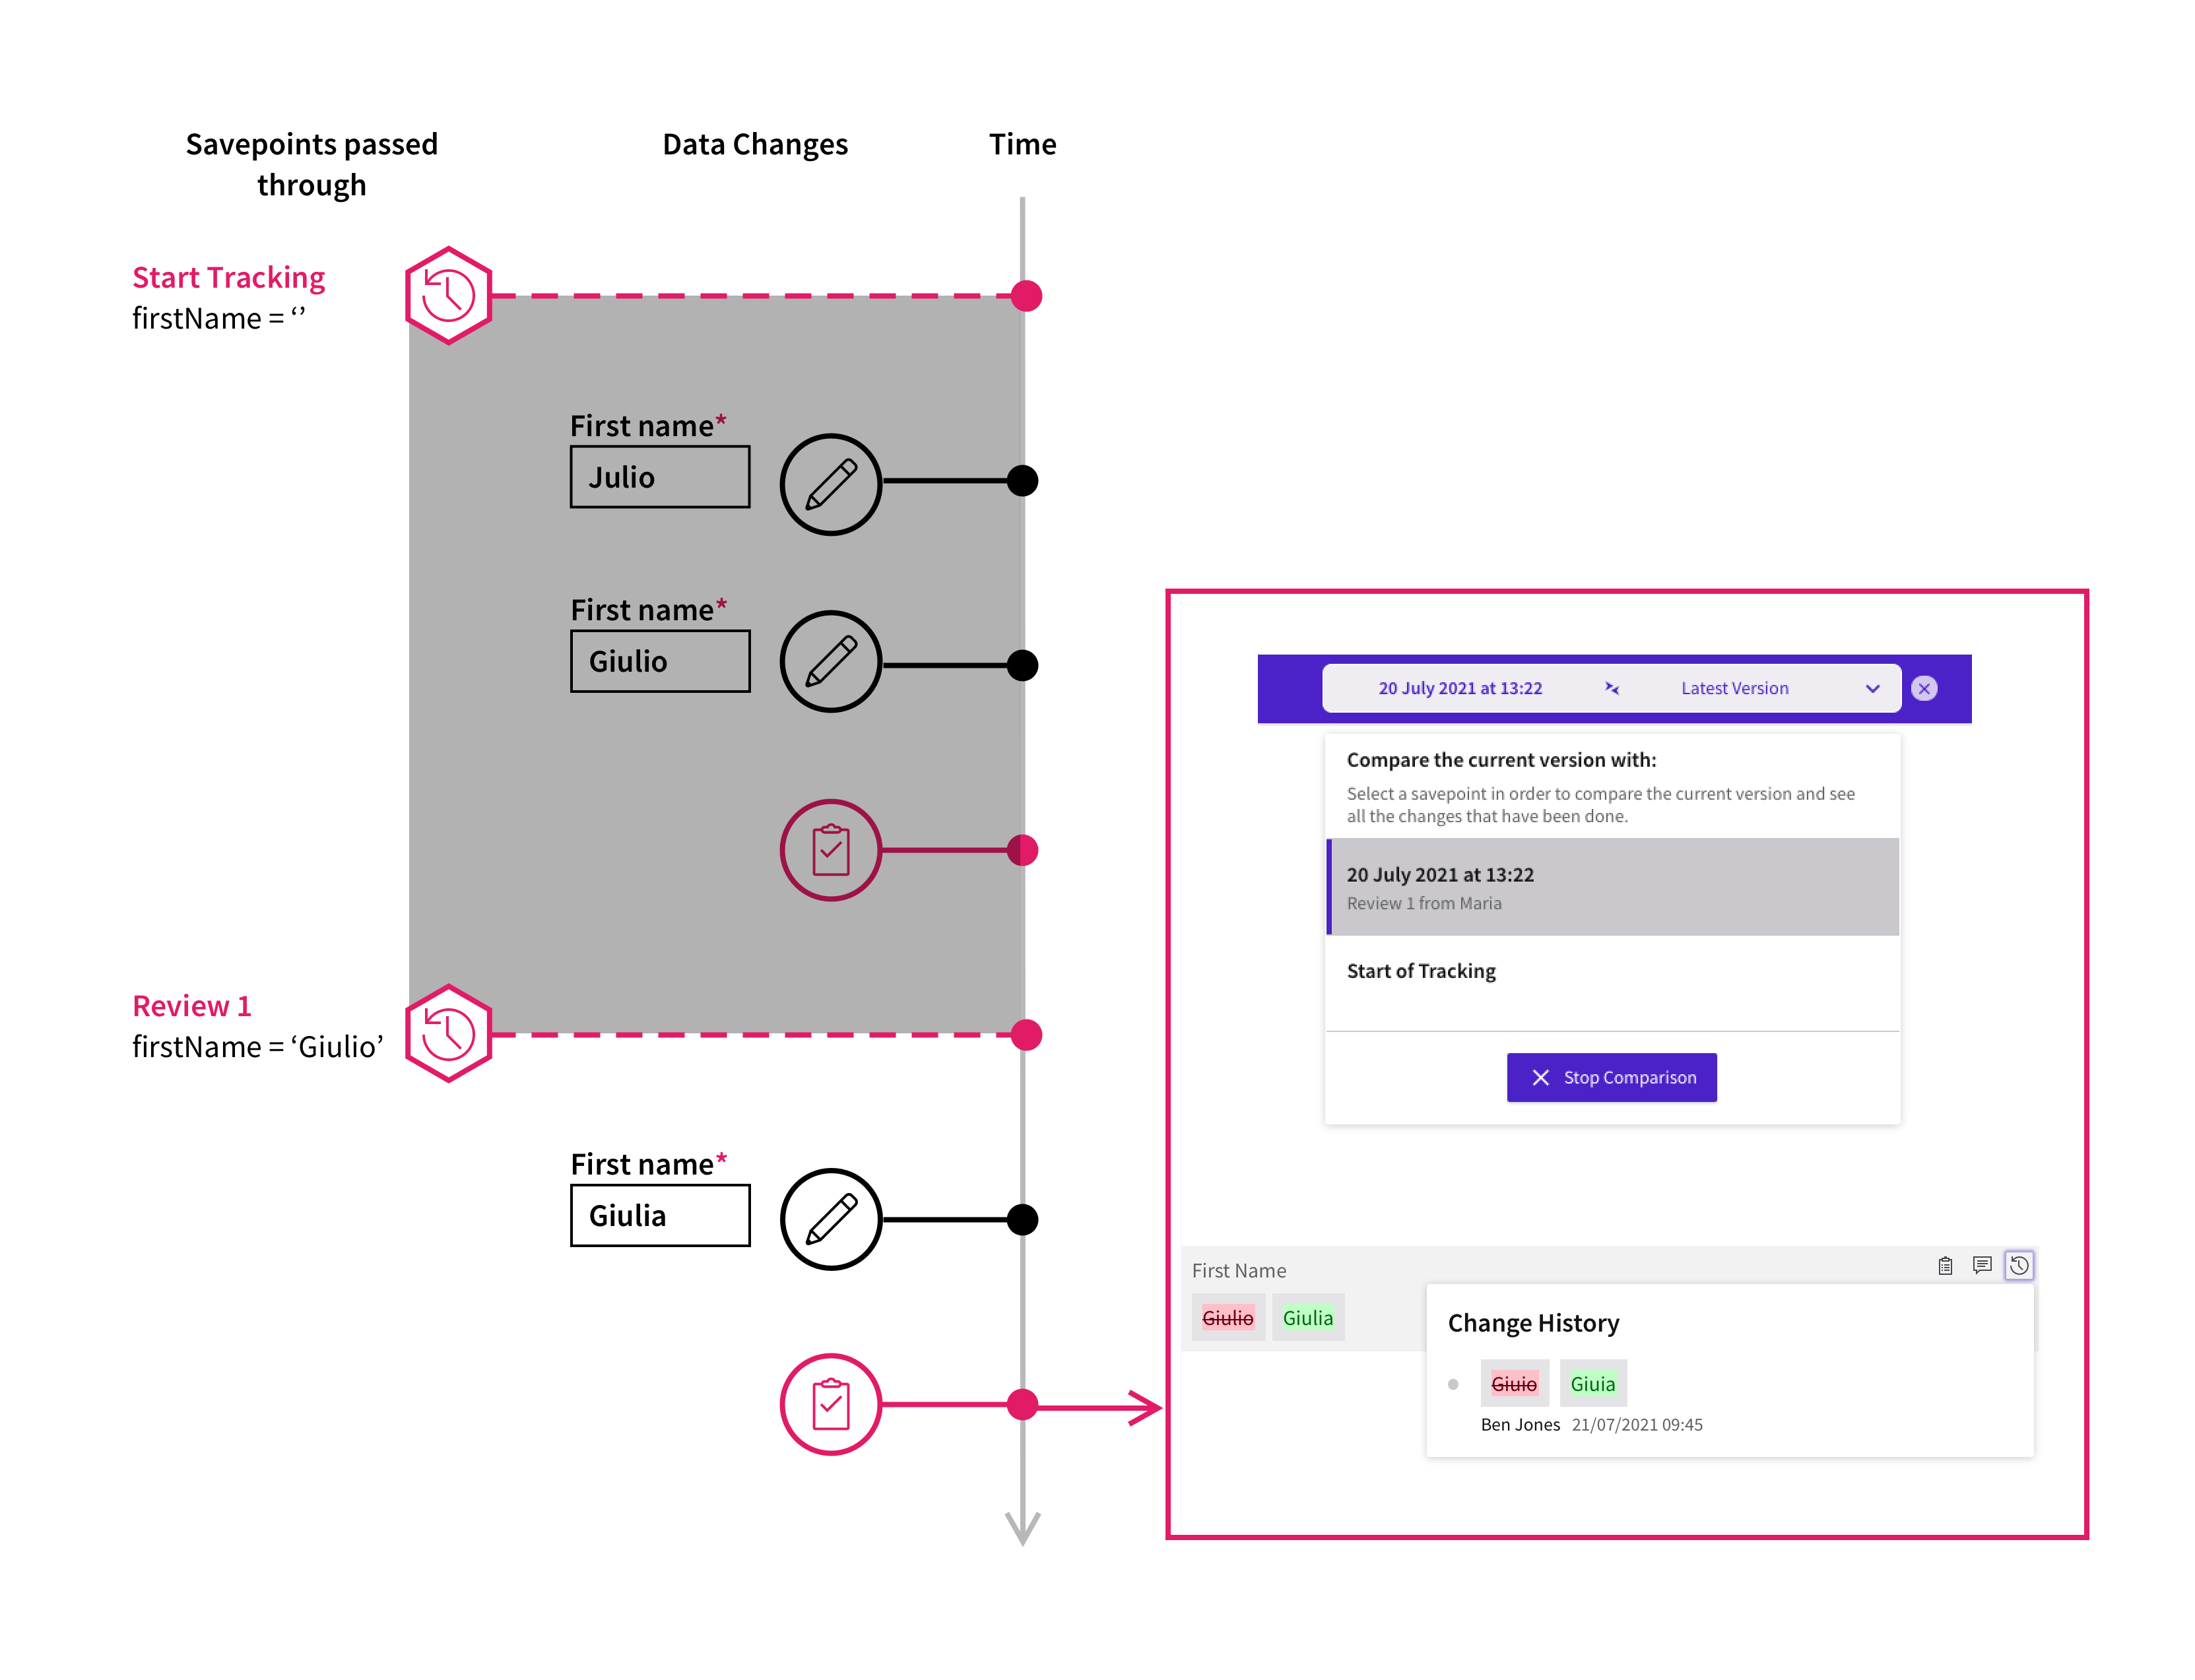
However, if the Savepoint is set to the stage right after "Review 1" action, then the user interface shows that the name has gone through a change from "Giulio" to "Giulia". The history of changes between the two savepoints is also displayed in the popup.
Business Data Comparison Savepoints are based on Data History Savepoints.
To add and configure a Savepoint:
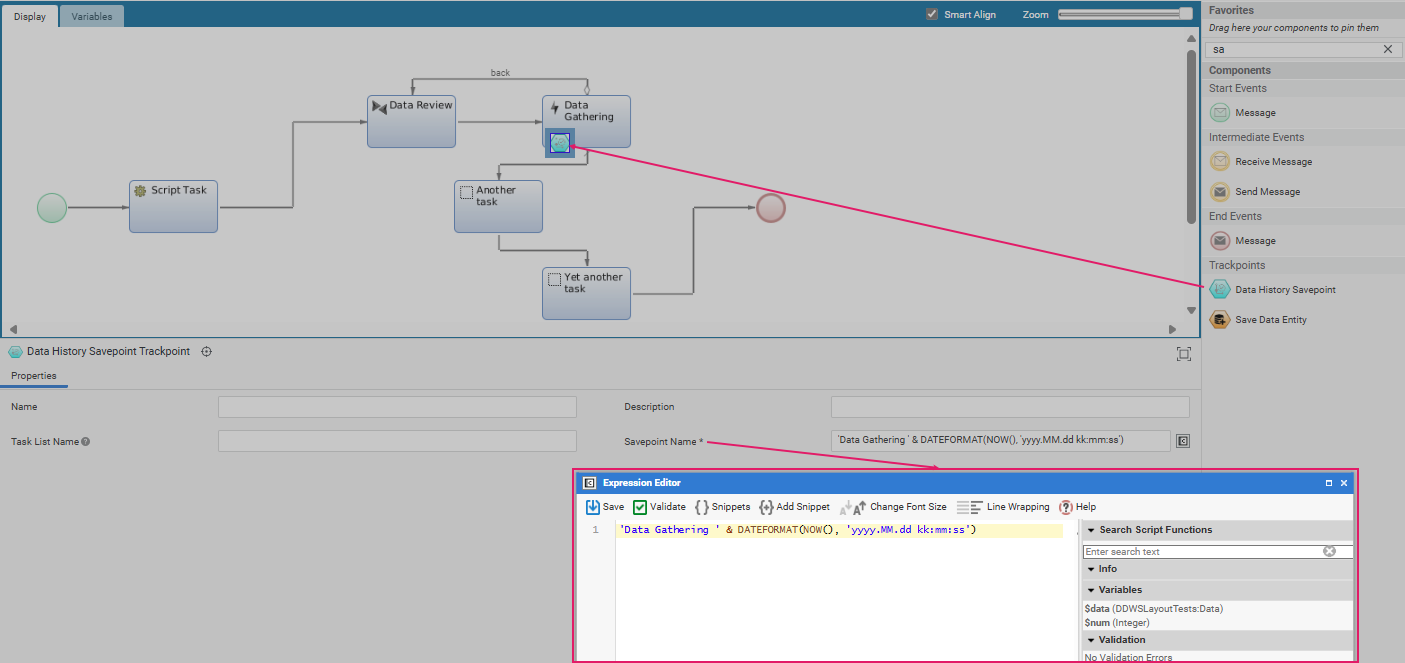
- Add a Data History Savepoints to your Process from the Components Library.
- Click on the Savepoint Component to open its Properties panel.
- In the Savepoint Name field, click on the C icon to open the Expression Editor. Consider that the name of each Data History Savepoint can be configured according to the business requirements of the Solution in such a way that users understand their meaning.
Collaboration: Comments and Review Requests
Business Data Comparison allows reviewers to cooperate among them and with editors by highlighting data which needs to be fixed and checked, thus improving efficiency. Collaboration features in Business Data Comparison include:
- Comments
- Review Requests
Common Configuration
On the configuration side, Comments and Review Requests are based on the Discussion List Screen Component enabled by the WorkspaceCollaboration Extension.
In the Business Data Comparison, Comments and Review Requests are saved in the Discussion Context using the following keys:
DDWS_PROCESS_INSTANCE_ID: The ID of the Process Instance in which the Business Data Comparison is included.Business Data Comparison=processInstanceId#dataEntityPointerId: ThedataEntityPointerIdis a unique identifier of a certain piece of data. For example, assume that a comment is left on the propertyfirstNameof a Data Entity of type Person, withdataEntityId=123456. ThedataEntityPointerIdwould then be123456:firstName.- Any other key defined in the Data Review App Task Process property Additional Discussion Keys (see below).
Example:
DDWS_PROCESS_INSTANCE_ID=1561723587795, Business Data Comparison=1561723587795#1561723587801:name
With the above-mentioned keys, you can retrieve and use Discussion Lists used in the Business Data Comparison scope even outside the component. We recommend that you do not change Review Requests and Discussions Contexts outside the Business Data Comparison and Data Gathering. Every change to discussion contexts performed in Studio (Including the Interactive Script Editor (ISE)) will affect the discussions on FNZ Studio Runtime leading to unpredictable behavior.
For more information about Discussion Contexts, see the WorkspaceCollaboration Extension article.
Review Requests and Value Store Splitting
If Solution developers want to use the Value Store Splitting feature, the Indexed DataReview:ReviewRequest must be set as a standalone variable in the highest scope (e.g. a variable created in the main Process, not in any other Root object).
This variable must be assigned to any Sub-Process containing a Data Gathering/Data Review AppTask and used as value in the Data Review App Task Process property Review Request (see the App Task Process configuration section above).
Data Clean-Up and Data Auditing
Any clean-up activity performed right before the end of a Process should include the physical deletion of Discussions belonging to the Process about to end. Solution developers can delete all the messages containing a Discussion Context by using the following script:
DiscussionMessageFilter $filter := DiscussionMessageFilter.contextFilter('DDWS_PROCESS_INSTANCE_ID', 'n11626030858929');
DeleteDiscussionMessages($filter);
In the Data-Driven model (Data Gathering and Business Data Comparison), no message gets physically deleted, instead it gets marked as removed so as not to be shown in the UI.
For auditing reasons, Solution developers might want to collect all the Discussions started in a Process by setting includeRemoved to true like, as in the following example:
Boolean $includeRemoved := true;
Indexed Discussion $discussionsByFilter := LoadDiscussions($filter, $howManyDiscussions, $includeRemoved);
To determine whether a message was deleted or not solution developers can rely on the getRemovalTimestamp() method:
$discussionsByFilter[1].getPost().getRemovalTimestamp();
//
$discussionsByFilter[1].getReplies()[1].getRemovalTimestamp();
Note: When the whole Discussion is deleted, only the main post is marked as removed, while replies are not.
Comments
Feature Overview
Comments help the collaboration among team members working on the Data Review page.
By clicking on the Comment icon next to a data field, a user can enter a comment for other team members. By default, comments are visible to internal users. However, by selecting the Visible by Client checkbox, the reviewer can make the comment visible to external users. Consider that the following messages in the discussion will inherit this visibility setting.
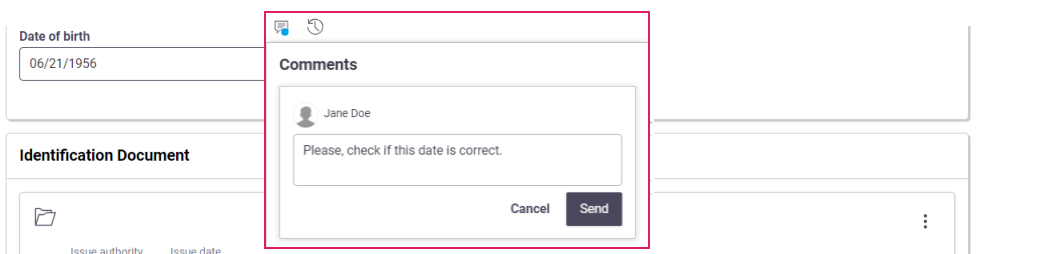
The relevant field is now marked by a blue dot. The same blue dot is also displayed at the top-right of the page. By clicking on it, the Comments sidebar is opened, and the list of open comments with relevant details is shown. Note that comments are grouped in cards by 'user' (user who entered comment) ans keyboard navigation is supported.
Another user can click on each of these comments to be redirected to the field where where the comment was generated. He/she can post a reply on the Comment popup.

Configuration
All configurations relative to Comments are performed in the Collaboration tab of your Data Review Process Editor. Note that, as a prerequisite to use Collaboration features, you need to install the WorkspaceCollaboration Extension (see documentation).
| Property | Description |
|---|---|
| Additional Discussion Keys field | You can enter a list of discussion keys. These will be added when creating new Discussions (discussions are containers for the comments on properties/changes). Default value is []. |
| Enable Comments checkbox | If selected, comments are enabled for each field. |
| Enable Comment Access Control checkbox | If selected, internal users can specify if a message in a chat or a discussion is visible to a set of external users defined through a Script Function (see property below). Internal users will be able to specify message visibility in the UI through the Visible by Client checkbox in the Business Data Comparison ABC. The list of internal users must be specified through the nm.usermessaging.internalUserRoles configuration property, where you can set a comma-separated list of Roles (e.g. nm.usermessaging.internalUserRoles = Admin, Reviewer). |
| List of External Users selector | (available if the Enable Comment Access Control checkbox is selected) Select a Script Function that returns the set of external user ids (Indexed String) which are allowed to see visible chat or discussion messages. |
Review Requests
Feature Overview
Review Requests simplify cross-team collaboration between data reviewers (e.g. a Risk Officer) and editors (e.g. a Front Officer) working on the Data Review and Data Gathering pages, respectively.
Review Requests work as follows:
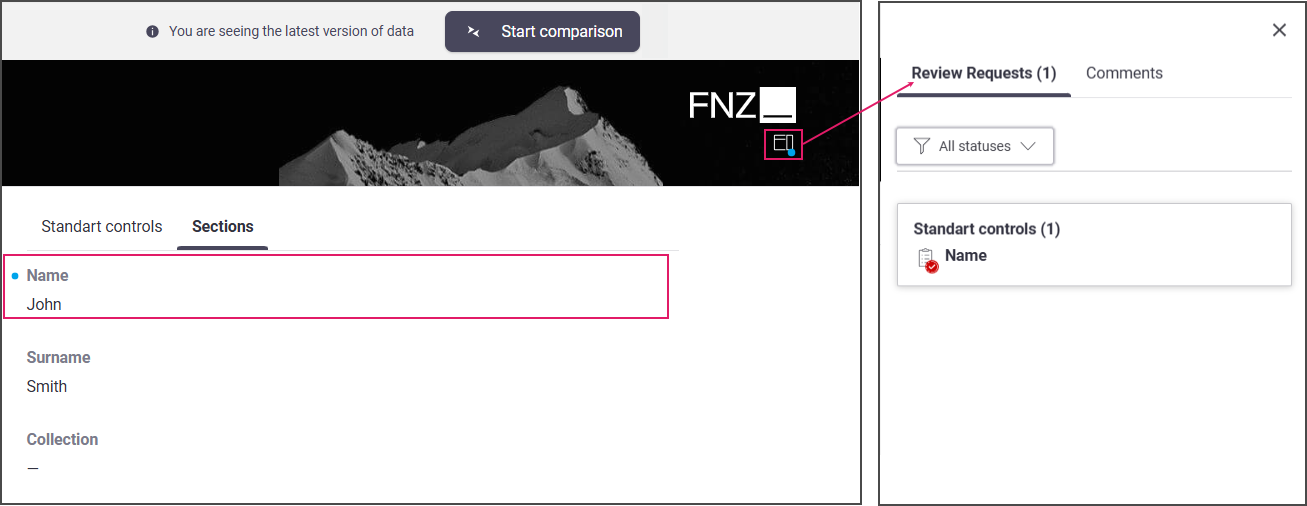
- A reviewer (e.g., Risk Officer) revising customers' data on the Data Review page might find some incorrect information. By clicking on the Review Requests icon next to the affected field, he/she sends a review request to an editor (e.g., Front Officer) working on the Data Gathering page. The relevant fields is now marked by a blue dot.
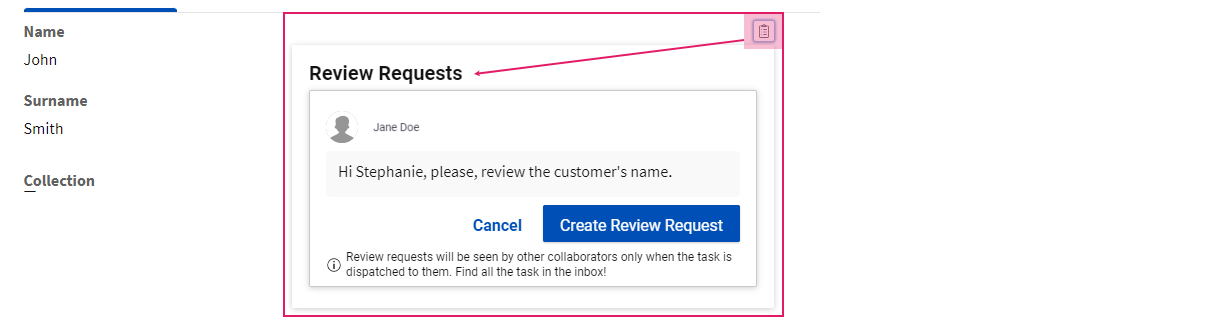
- The same blue dot is also displayed at the top-right of the page. By clicking on it, the Review Requests sidebar is opened, and the list of open requests with relevant details is shown.
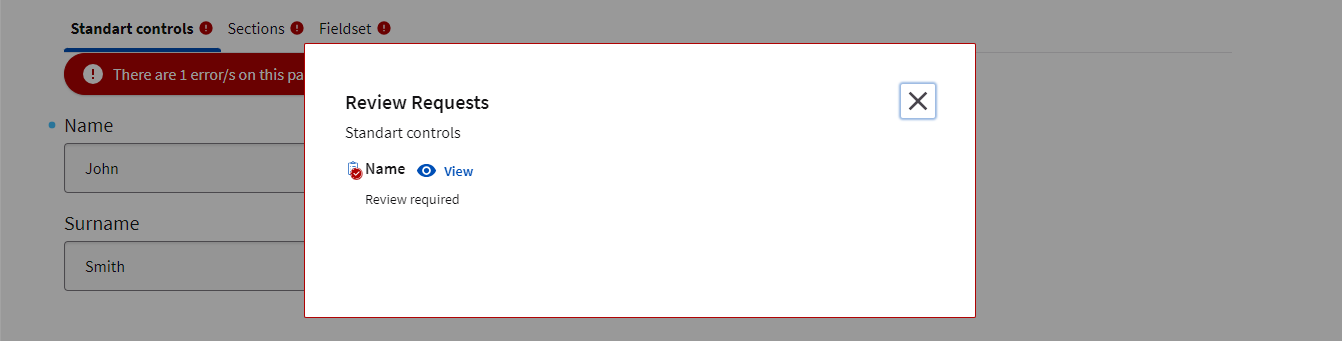
- An editor (e.g. Front Officer) working on the Data Gathering page receives the review request in the form of a blocking issue to be fixed in his/her page.
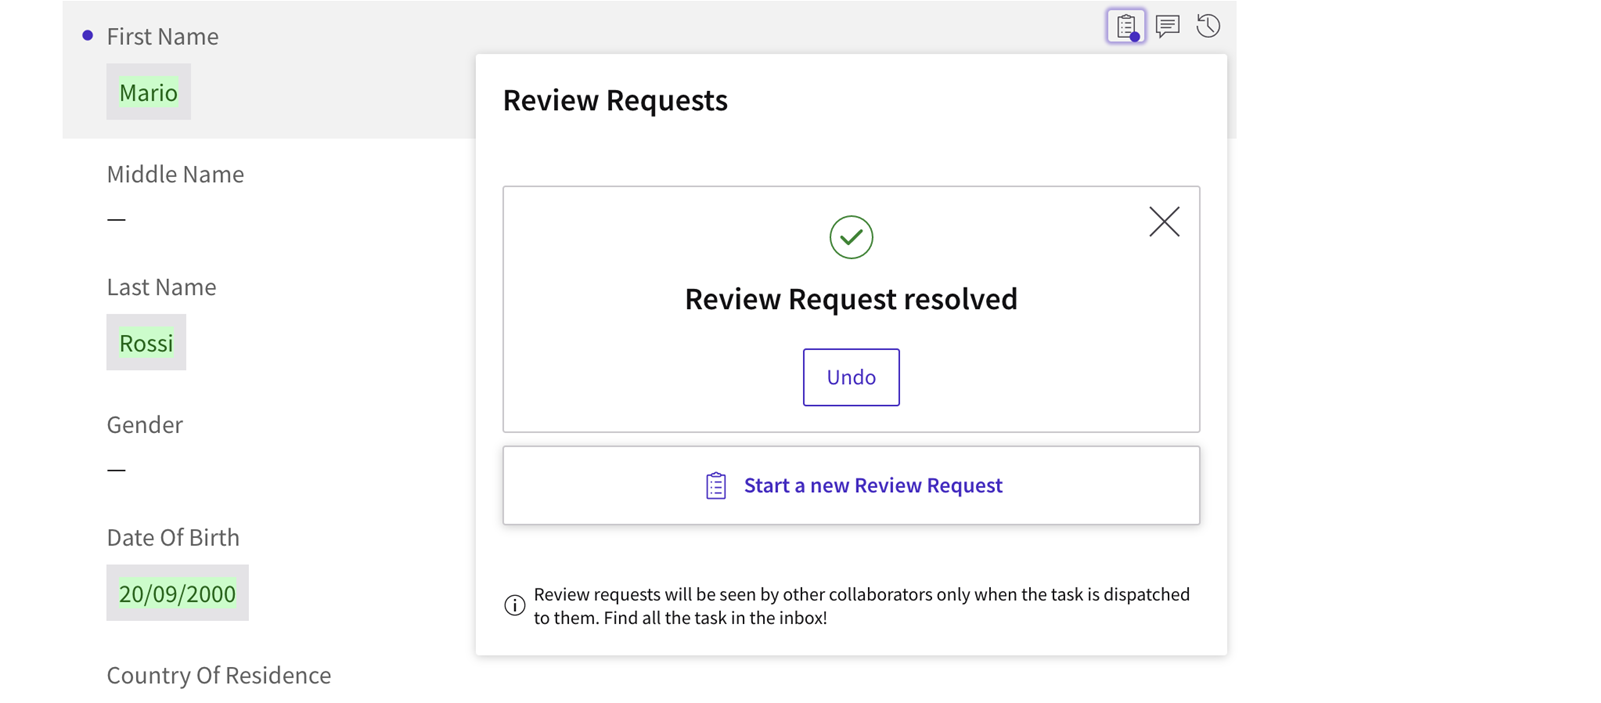
- After fixing the issue/s, the editor can add a comment for the reviewer on the Review Request popup, and then click on the Mark as Resolved button.
- Back to theData Review page, the reviewer can confirm that the issue has been addressed (resolved) or not by clicking on the Resolve button. All Review Requests are set to Done in the sidebar.
Configuration
All configurations relative to Comments are performed in the Collaboration tab of your Data Gathering Process Editor. Note that, as a prerequisite to use Collaboration features, you need to install the WorkspaceCollaboration Extension (see documentation).
| Property | Description |
|---|---|
| Enable Review Requests checkbox | If selected, Review Requests can be entered from the the Data Review App Task. |
| Review Requests field | This property is used to store all review requests. It must point to a variable of type Indexed DataReview:ReviewRequest. |
Developer Toolbar
The Developer Toolbar allows your to access three important developing features:
- The Theme Editor, which allows editing the look-and-feel of FNZ Studio Runtime. See Developer Toolbar.

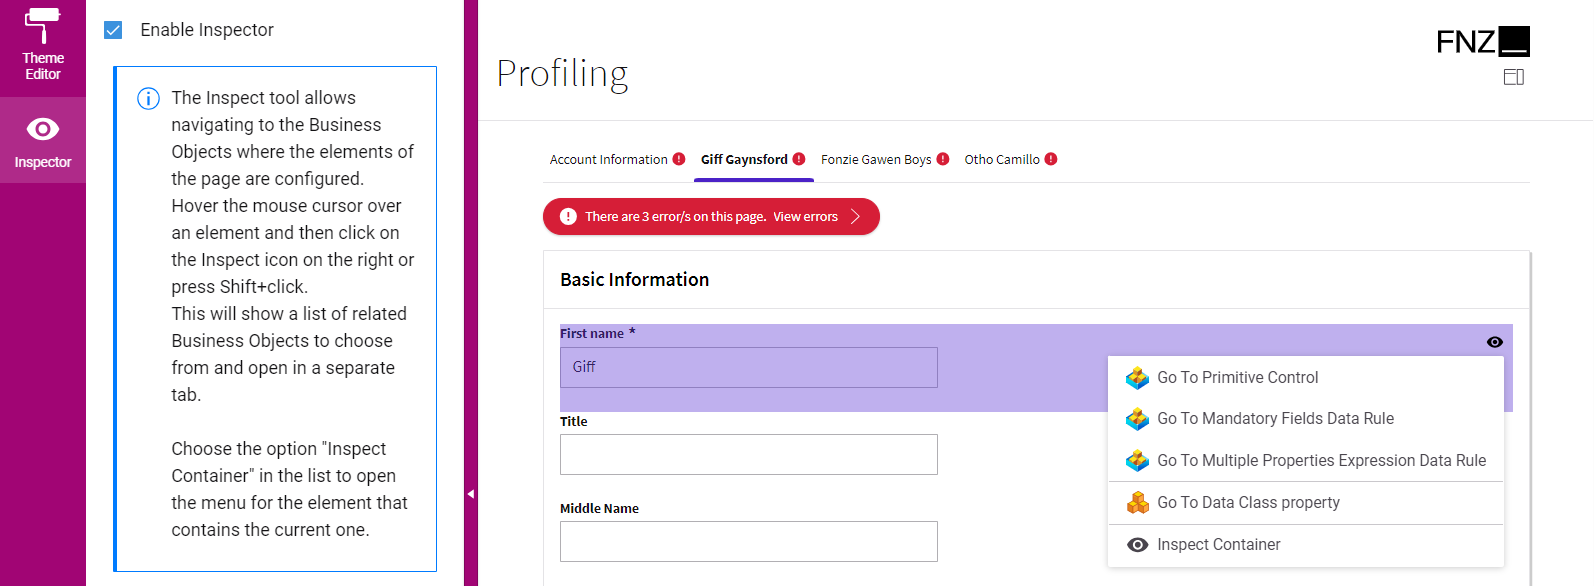
- The Inspector tool, which allows navigating to and editing the Business Objects responsible for the FNZ Studio Runtime page. See Inspector.
- The Integration console, which shows all the integration calls performed by the current Process Instance for easier contextual debugging. The content is a filtered version of the data contained in the Integration Troubleshooting Console available in FNZ Studio (Data & Integration module). See Integration.
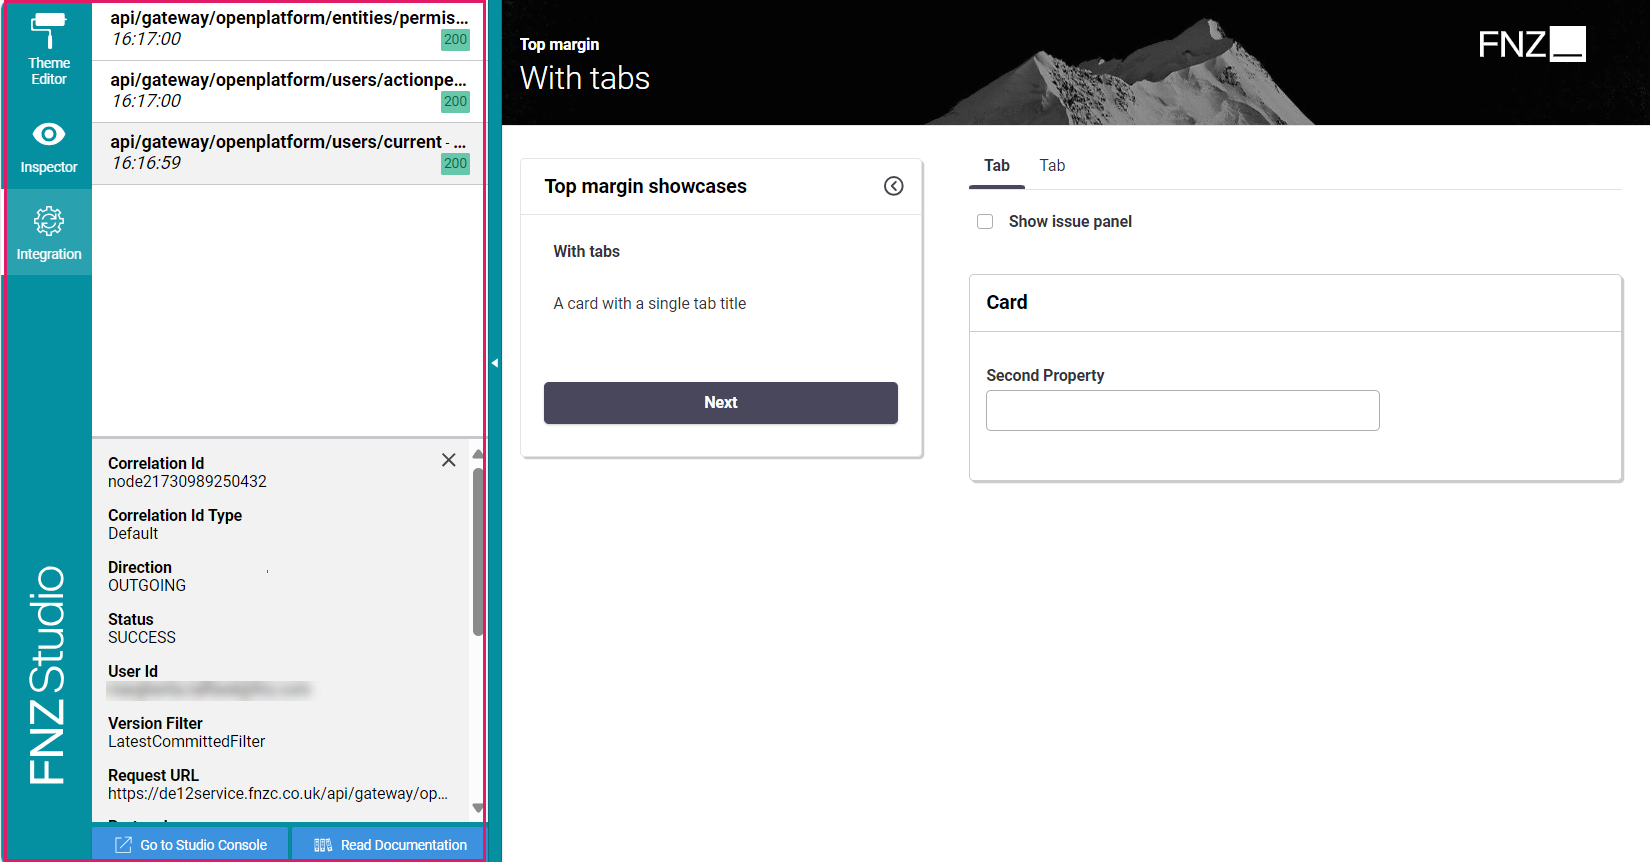
You can open the Developer Toolbar from your ABC page by clicking on the arrow on the left-hand side (this is displayed when hovering over the page left border). Note that you need Advanced Studio Permissions to access the tool.
Localization
Language, date and number localization is available for all App Tasks.
As for language, all basic labels used for the Data Gathering App Tasks (e.g., calendar months) are included in the following Platform Packages:
- AppTask (common to all App Tasks)
- DataGathering You can edit the displayed text and add translations through the Overriding Translations for Labels approach (recommended).
As for dates and numbers, App Tasks define their localization according to a Locale configured at FNZ Studio Composition level.
Accessibility
FNZ Studio's Application Business Components (ABCs) have been designed with special attention to accessibility criteria and follow the latest Web Content Accessibility Guidelines (WCAG). All App Tasks have been designed following WCAG 2.1 Success Criteria.
Data Review Script Function Reference
This section documents the Script Functions provided by the Data Review App Task (not included in the Platform and its mandatory extensions).
DataReview:hasChanges
Returns true if the specified Data Logic contains at least one change since tracking started.
Input Parameters
$dataLogicId(String) The ID of the Data Logic to be used Example:'MyPackage:DataLogic'$variableAssignments(Named Any, Optional) Variable assignments for the Data Logic Business Object. Use the variable defined in$objectVariableto access the current Object from the Objects Collection. In this case, the Variable assignment Collection must be created in the same line as the invocation of this Script Function. Example:{'objVar'=$objectVariable, 'flagVar'=true, 'collection'=$indexedProcessVariable}
Return Value
(Boolean) Returns true if the specified Data Logic contains at least one change since the start tracking.
DataReview:HasChangesAfterSavepoint
Returns true if the specified Data Logic contains at least one change since the specified savepoint.
Input Parameters
$savepointId(String) The Id of the savepoint to be used to search for changes.$dataLogicId(String) The ID of the Data Logic to be used Example:'MyPackage:DataLogic'$variableAssignments(Named Any, Optional) Variable assignments for the Data Logic Business Object. Use the variable defined in$objectVariableto access the current Object from the Objects Collection. In this case, the Variable assignment Collection must be created in the same line as the invocation of this Script Function. Example:{'objVar'=$objectVariable, 'flagVar'=true, 'collection'=$indexedProcessVariable}
Return Value
(Boolean) Returns true if the specified Data Logic contains at least one change since the specified savepoint.
DataReview:getOpenReviewRequests
Returns all the open (pending or done) Review Requests associated to the elements in the Data Logic context.
Input Parameters
$reviewRequests(IndexedDataReview:ReviewRequests) The list of all the Review Requests$dataLogicId(String) The ID of the Data Logic to be used Example:'MyPackage:DataLogic'$variableAssignments(Named Any, Optional) Variable assignments for the Data Logic Business Object. Use the variable defined in$objectVariableto access the current Object from the Objects Collection. In this case, the Variable assignment Collection must be created in the same line as the invocation of this Script Function. Example:{'objVar'=$objectVariable, 'flagVar'=true, 'collection'=$indexedProcessVariable}
Return Value
(Indexed DataReview:ReviewRequests) Returns all the open (pending or done) Review Requests associated to the elements in the Data Logic context.
DataReview:hasOpenReviewRequests
Returns true if there is at least one open (pending or done) Review Request associated with the elements in the Data Logic context.
Input Parameters
$reviewRequests(IndexedDataReview:ReviewRequests) The list of all the Review Requests$dataLogicId(String) The ID of the Data Logic to be used Example:'MyPackage:DataLogic'$variableAssignments(Named Any, Optional) Variable assignments for the Data Logic Business Object. Use the variable defined in$objectVariableto access the current Object from the Objects Collection. In this case, the Variable assignment Collection must be created in the same line as the invocation of this Script Function. Example:{'objVar'=$objectVariable, 'flagVar'=true, 'collection'=$indexedProcessVariable}
Return Value
(Boolean) Returns true if there is at least one open (pending or done) Review Request associated with the elements in the Data Logic context.
DataReview:getUnlinkedReviewRequests
Returns all the Review Requests associated with Data Entities that no longer exist.
Input Parameters
$reviewRequests(IndexedDataReview:ReviewRequests) The list of all the Review Requests
Return Value
(Indexed DataReview:ReviewRequests) Returns all the Review Requests associated with Data Entities that no longer exist.