Ad-Hoc Sub-Process
Introduction to Ad-Hoc Navigation
Process Navigation defines how the user can move among tasks inside a Process. Two different types of Process Navigation are now supported:
- Connection-Based Navigation: The user is focused on a given task and does not have the overview of the other steps.
- Ad-Hoc Navigation: The user is constantly provided with an overview of the steps that are needed to reach the end of the process and can use shortcuts such as Next and Back to follow a predefined path. However, the user can also jump directly to a specific step without following a predefined sequence. Ad-Hoc Navigation is made possible by new Process components called Ad-Hoc Sub-Processes. Compared to the traditional connection-based navigation approach, different Process Tasks are still shown in a sequential UI, but users are allowed to click on any of these tasks at any time.
Support Notes
Consider the following information on this feature:
- It is supported out of the box only by ABCs/App Tasks. This document mainly covers these use cases. It is however possible to implement custom Screens using Ad-Hoc Navigation through provided Script Functions (see Screen Navigation (Script Functions)).
- For its correct functioning, make sure you use them only as illustrated.
Note that:
- It does not support Comment and Review Requests sidebar.
- It does not include the Violation Panel to navigate all the issues inside the page.
Highlights
Ad-Hoc Sub-Processes provide the following advantages:
- Guided & flexible navigation : Navigation is more flexible but the user also feels guided throughout all the various steps.
- Intuitive & easy to use: The navigation sidebar, which is always visible, makes it easy for the user to know where they are.
- Consistency throughout the entire application: The same UI concept is used across all different scenarios.
Ad-Hoc Sub-Process Component
General Properties
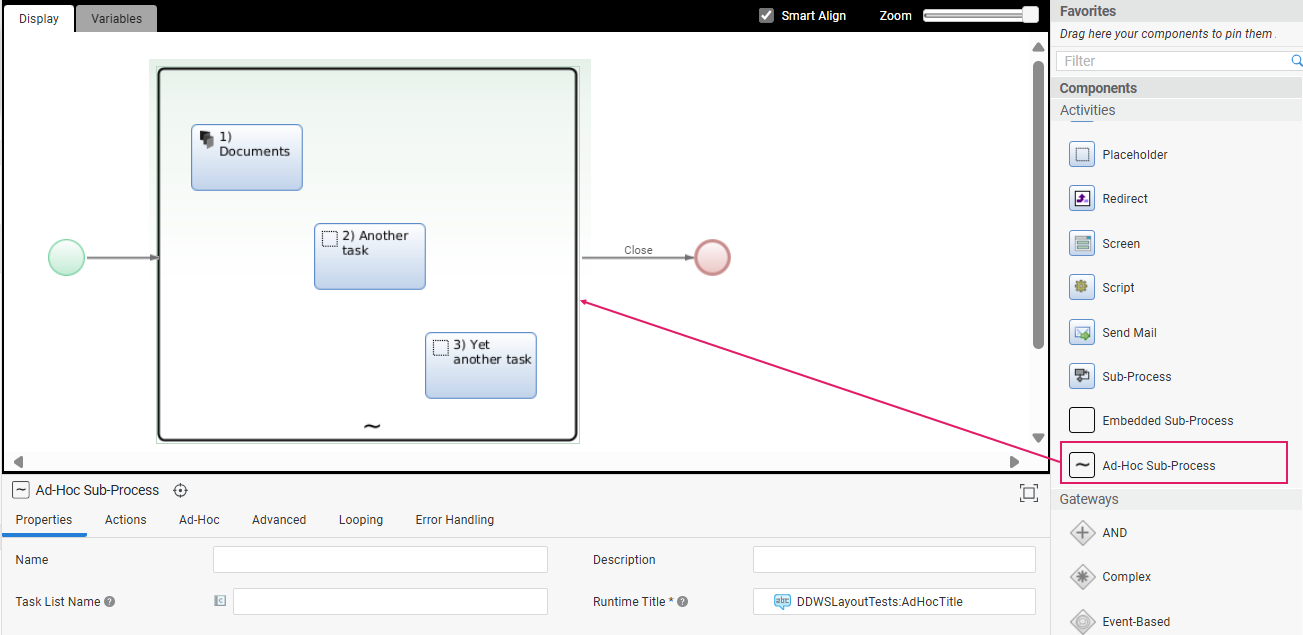
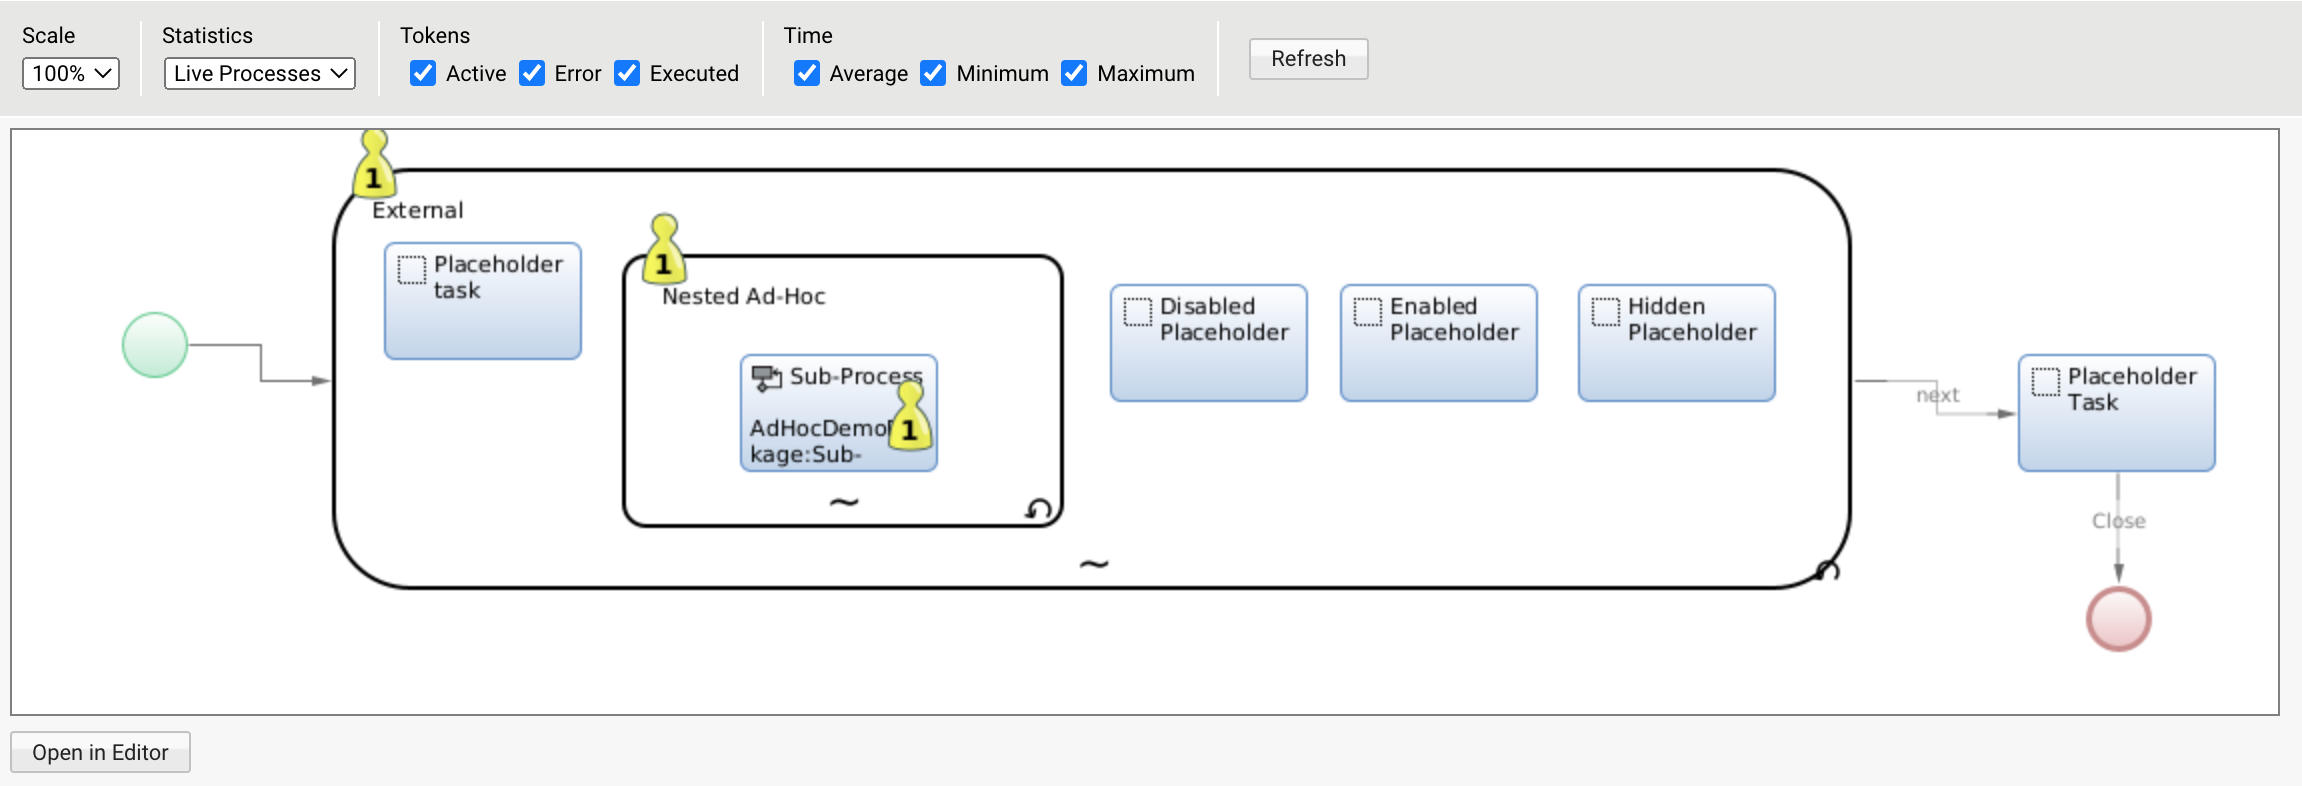
Ad-Hoc Sub-Processes are available as Process Components in the Process Editor. An Ad-Hoc Sub-Process is a container component (graphically similar to an Embedded Sub-Process) which comprises other Process Components. In the Process Editor, Ad-Hoc Sub-Processes are easily identified by the tilde ( ~ ) character and by the lack of Start or End Events, and inner Connections. Ad-Hoc Sub-Processes can be dragged into the Process Editor from the Components library on the right-hand side.
A valid usage of Ad-Hoc Sub-Processes must meet the following constraints:
- Ad-Hoc Sub-Processes can only contain the following Process Components:
- App Tasks
- Screen Tasks
- Sub-Processes
- Placeholder Tasks
- Other Ad-Hoc Sub-Processes (Nested)
- Process Connections are not allowed from and to Process Components contained in an Ad-Hoc Sub-Process. Note that, following this principle, Start and End events cannot be included inside an Ad-Hoc Sub-Process (this is different from Embedded Sub-Processes).
- The Process Components in an Ad-Hoc Sub-Process must be either all included in one Process Phase, or all outside any Process Phases (in other words, they cannot span multiple Phases)
- The Process Components in an Ad-Hoc Sub-Process must be either included in one Swimlane, or all outside any Swimlanes (in other words, they cannot span multiple Swimlanes).
Finally, consider that, based on their position inside a Process, Ad-Hoc Sub-Processes may behave differently in the following situations:
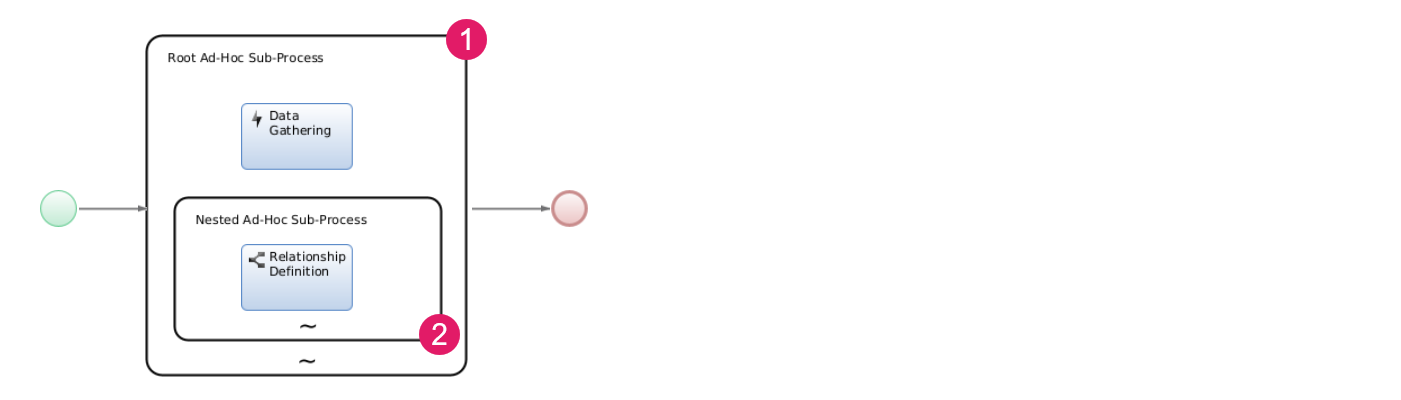
- Root: The Ad-Hoc Sub-Process is not contained inside any other Ad-Hoc Sub-Process (locally to a Process Business Object).
- Nested: The Ad-Hoc Sub-Process is contained inside one or more Ad-Hoc Sub-Processes (locally to a Process Business Object).
Process Properties
Consider the following configuration items in the Ad-Hoc Sub-Process (defined in the Properties
| Property | Tab | Description | Configuration |
|---|---|---|---|
| Component Title (Editor) | Properties | Name of the Ad-Hoc Sub-Process in the Process Editor (1 in figure below).. |
Name field. |
| Runtime Title (UI) | Properties | Title of the Ad-Hoc Sub-Process in FNZ Studio Runtime (2 in figure below). |
Runtime Title field. Must be a Label Business Object. Note that, if the Ad-Hoc Sub-Process contains an App Task, the App Task Runtime Title is mandatory and displayed at the top of the content area. |
| Runtime Subtitle (UI) | Ad-Hoc | Subtitle of the Ad-Hoc Sub-Process in FNZ Studio Runtime to provide further information. It is displayed above the title (3 in figure below). |
Subtitle field. Must be a Label Business Object. |
| Page Title (Task List) | Properties | Name of the page as it should appear on a Task List (backend) | Task List Name field. Can be either a Label Business Object or text. |
| Unique ID | Properties | Unique ID used when evaluating the Process:GetAdHocNavigationStructure Script Function so that the Ad-Hoc navigation structure can be better interpreted. | Unique Identifier field. Applies to Phases, Root and nested Ad-Hoc Sub-Processes, as well as their contained components. |
Ad-Hoc Sub-Process (Editor)
Ad-Hoc Sub-Process (Runtime)
Navigation
As mentioned above, Ad-Hoc Sub-Processes provide the main component to achieve Ad-Hoc Navigation, without the need to map out all possible connections among tasks. When used in Ad-Hoc Sub-Processes, different Process Tasks are still shown in a sequential UI, but users are allowed to move on any of these tasks at any time by moving the token to the desired task directly.
Although App Tasks provide a way to achieve fully flexible navigation in the context of a single process task, if such App Tasks are placed in the context of a sequential process structure, there are still constraints that prevent flexible navigation across different App Tasks.
Ad-Hoc Sub-Processes address these use cases, allowing the user to execute tasks in any order, even several times, or potentially skip them.
Types of Navigation
The type of navigation generated by Ad-Hoc Sub-Processes depends on where the token is located on the Process Component included in an Ad-Hoc Sub-Process. The following rules are applied when the Process is run:
- If the token is on an App Task, FNZ Studio Runtime automatically generates a navigation sidebar showing the available tasks where the user can freely navigate. The Process Components that are included in the Ad-Hoc Sub-Process are rendered as items in the navigation sidebar (see section Navigation in App Tasks for details).
- If the token is on a Screen, the navigation sidebar is not generated automatically. However, Ad-Hoc navigation can be implemented in a custom way using Screen Components and Ad-Hoc Navigation Script Functions (see Navigation Structure for details).
- If the token is on a Placeholder, the Process preview is rendered, and navigation is available through the buttons displayed above the Process preview itself. Placeholders are useful to prototype and test Ad-Hoc Sub-Processes. However, some navigation options, such as Custom Actions, are not available in this mode.
- If the token is on a Sub-Process, the inner token is inspected to determine which of the use cases above applies.
Note that tokens that are injected (e.g., through the StartSubProcess Script Function) in a Process containing Ad-Hoc Sub-Processes are ignored by navigation and, therefore, no item is rendered in the Navigation Sidebar.
Navigation Sidebar
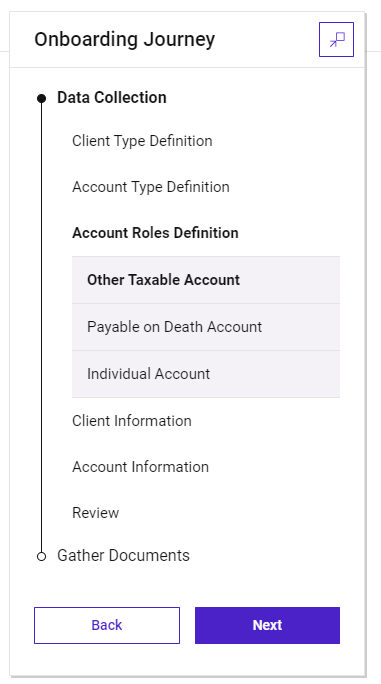
The navigation sidebar showing all the available tasks is generated automatically in the case of App Tasks. In this case, it is always visible and makes it easy for users to know where they are at any time. Following is a representation of the Ad-Hoc Navigation concept, represented by the navigation sidebar:
The main concepts used in navigation are:
- Phases : Explicit partition in the Process workflow, such as Profiling, Account Structure, Documents, and so on. See Phases.
- Navigation Items: These represent tasks (e.g., data collection), and sub-tasks (i.e. activities of the same type, e.g., collecting data for individual accounts).
- Pre-defined Actions: Auto-generated Nex/Back buttons that allow navigating among steps of the same Phase.See Auto-generated Back / Next Buttons.
- Global and Custom Actions: Buttons that allow navigating among different Phases.These may include global Back/Next buttons or other actions configured by the developer. See Custom Actions
Navigation in App Tasks
As mentioned in the section above, if the token is on an App Task, FNZ Studio Runtime automatically generates a navigation sidebar showing the available tasks where the user can freely navigate. The Process Components that are included in the Ad-Hoc Sub-Process are rendered as items in the navigation sidebar (called Navigation Items).
Setting Up Process Tokens
The process engine creates a token on the outermost (Root) Ad-Hoc Sub-Process Component, and adds another token on the (nested) Ad-Hoc Sub-Process Component only if this is the "current" Process. The items contained in the Root Ad-Hoc Sub-Process are always shown in the navigation, while the items contained in the nested Ad-Hoc Sub-Process are only shown when the token is set there.
Setting Up Task Types
Besides the global navigation pattern (structured or Ad-Hoc), it is possible to define the type of navigation to use at App Task level, through the Task Type property (Sequential Process Step or Drilldown) in the Process Editor.
For full information, see the Task Types section in App Tasks: Common Configuration , as well as each separate App Task document for details.
1. In a Sequential Process Step task, the user generally follows the main navigation path,
2. In a Drilldown task, the user usually abandons the main navigation path.
Let's analyze how this works in connection-based and ad-hoc navigation modes.
In connection-based navigation:
- Sequential Process Step: Tasks form a linear sequence, where users navigate through each Task step-by-step, and can typically only move forward or backward.
- Drilldown: Multiple Sub-Tasks can be opened from one main Task.
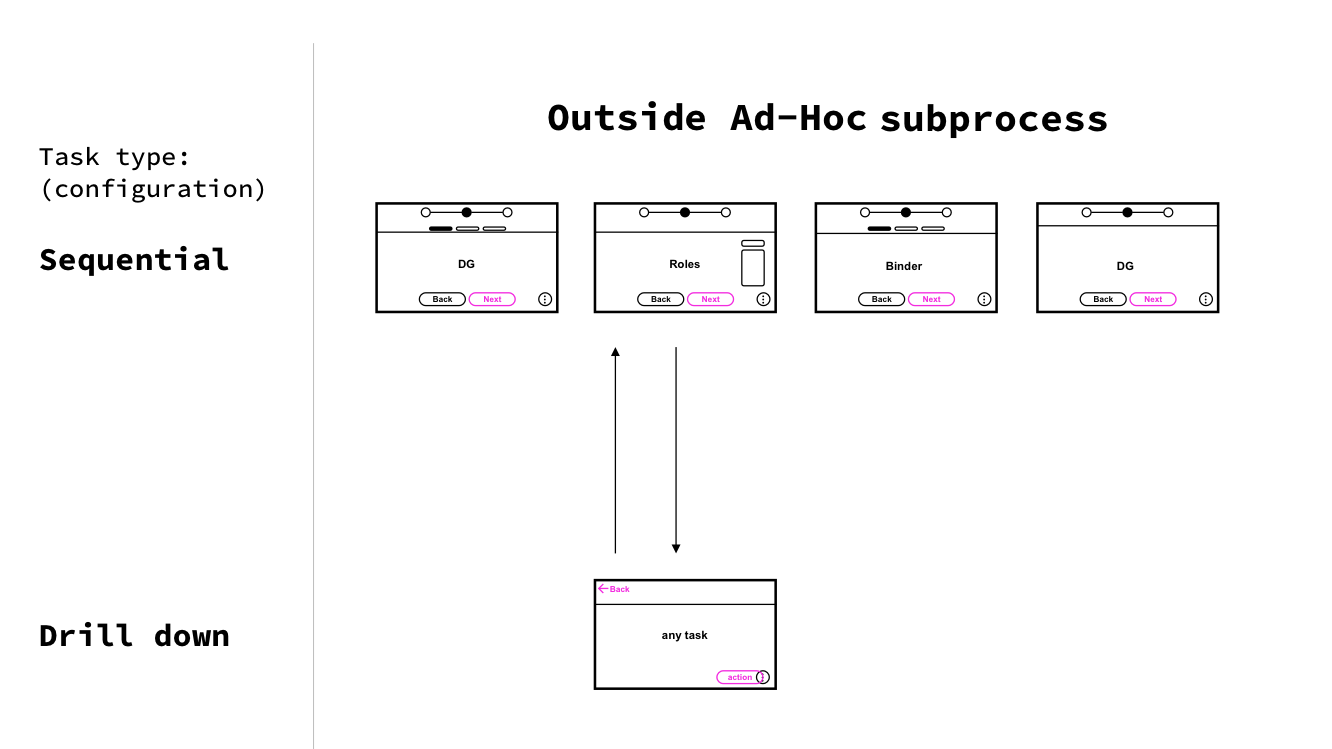
In Ad-Hoc Navigation (when an App Task is inside an Ad-Hoc Sub-Process):
- Sequential Process Step: The user is able to move among phases and steps. Set the Task Typesetting to Sequential Process Step for the navigation sidebar to be displayed.
- Drilldown: Shows a confirmation screen, therefore navigation only allows going back or proceeding without jumping to other steps in the process.

Navigation Example
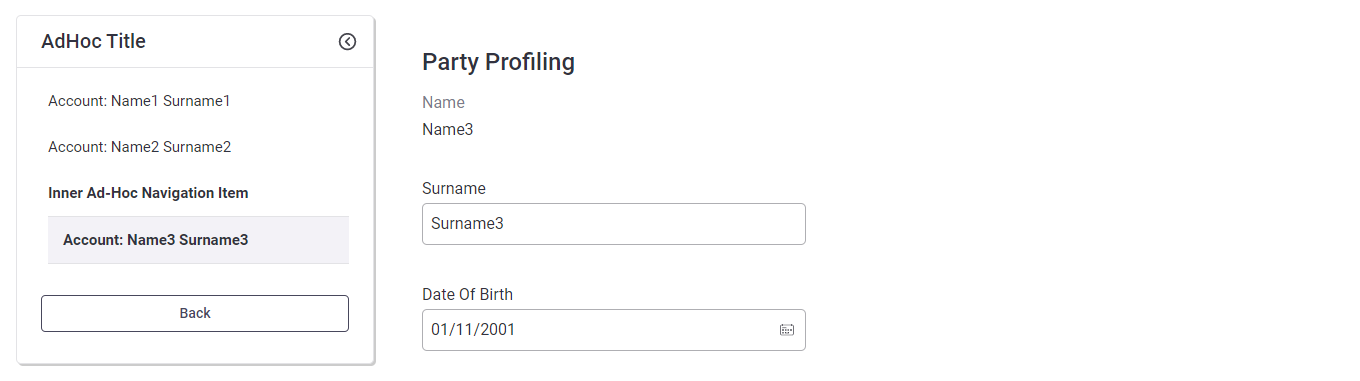
- Consider the following Process:
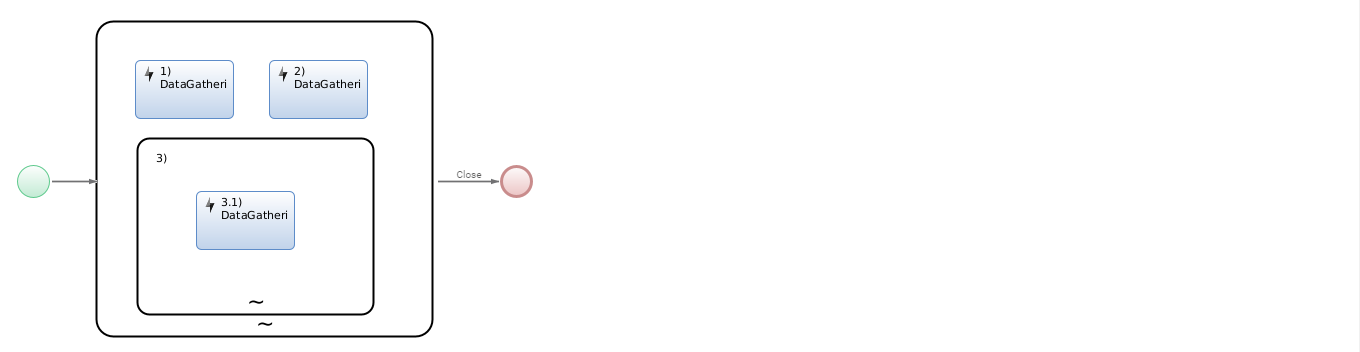
- When the token is on 1)DataGathering, navigation will look as follows (note that the nested Sub-Process is not expanded):
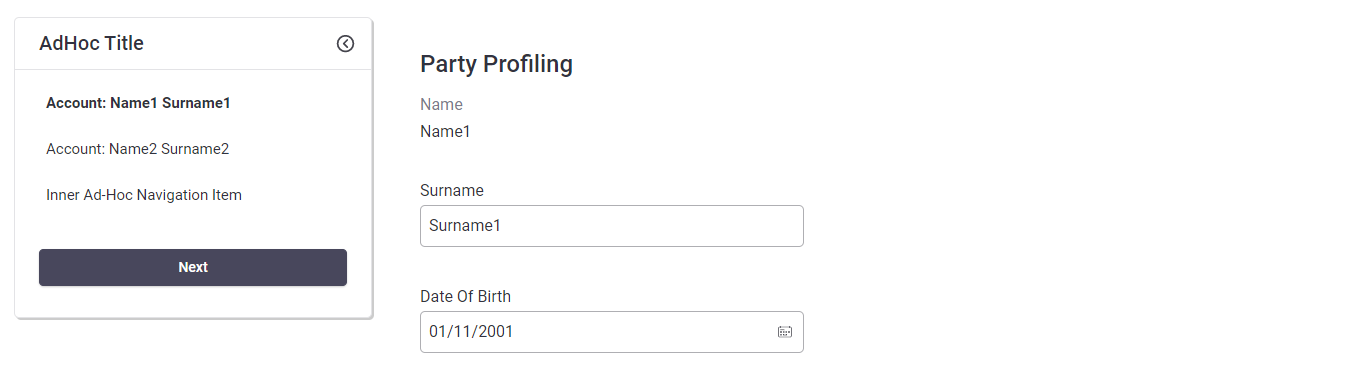
- When the third navigation item (Inner Ad-Hoc Navigation Item) is expanded, the token moves on to 3.1)DataGathering:
Task Order
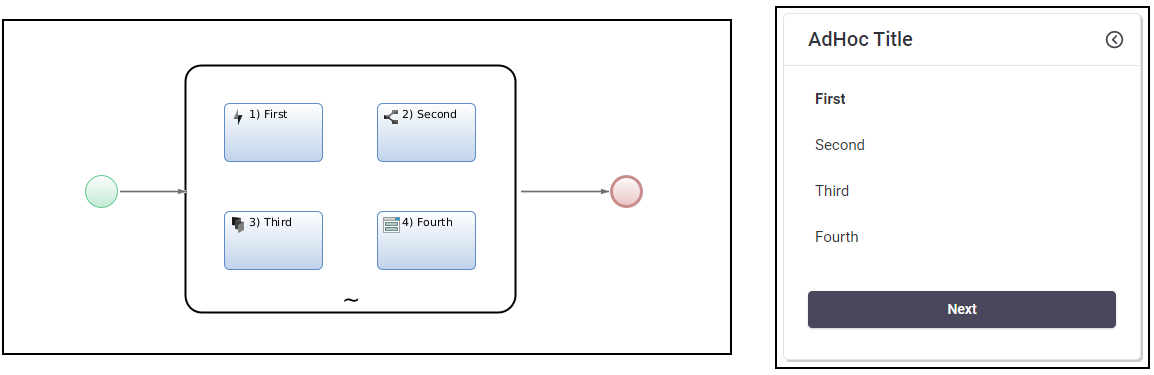
Process Components contained in an Ad-Hoc Sub-Process do not require a specific execution order at runtime: the user can execute them in any sequence. However, the way in which tasks are rendered in the navigation structure is used to generate the navigation sidebar.
Tasks within an Ad-Hoc Sub-Process are ordered from top to bottom and from left to right. Process Components included in Ad-Hoc Sub-Processes also display a number (1,2,3..) indicating their order of appearance in navigation. In case of multiple nesting, numbers are hierarchical (1.1.1, 1.1.2...).
When the Process token reaches an Ad-Hoc Sub-Process (unless there is a specific setting on the connection), it is set to the first task according to the ordering rules explained above. Then, the user is allowed to freely move the token on the other available elements in the same Ad-Hoc Sub-Process (if nested) or in the current Root Ad-Hoc Sub-Process.
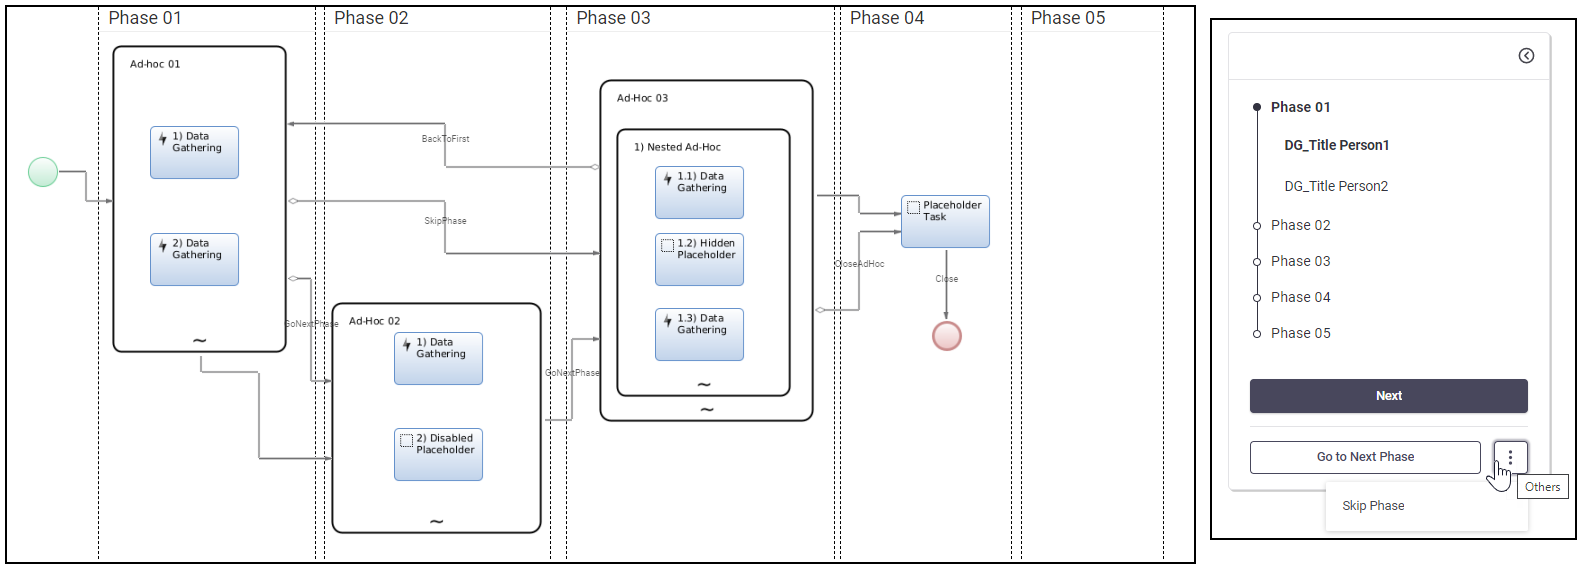
Phases
When Ad-Hoc Sub-Processes are included in Process Phases, the auto-generated navigation shows the list of Phases where the Root Ad-Hoc Sub-Process is contained. Phases are available in the Components library in the Process Editor.
Phase names shown in the navigation sidebar are not clickable (they are not Navigation Items), and the content of each Phase gets expanded when the token reaches the contained Ad-Hoc Sub-Process. A Phase name is determined by the Task List Name property of the Phase component (Properties tab).
Looping
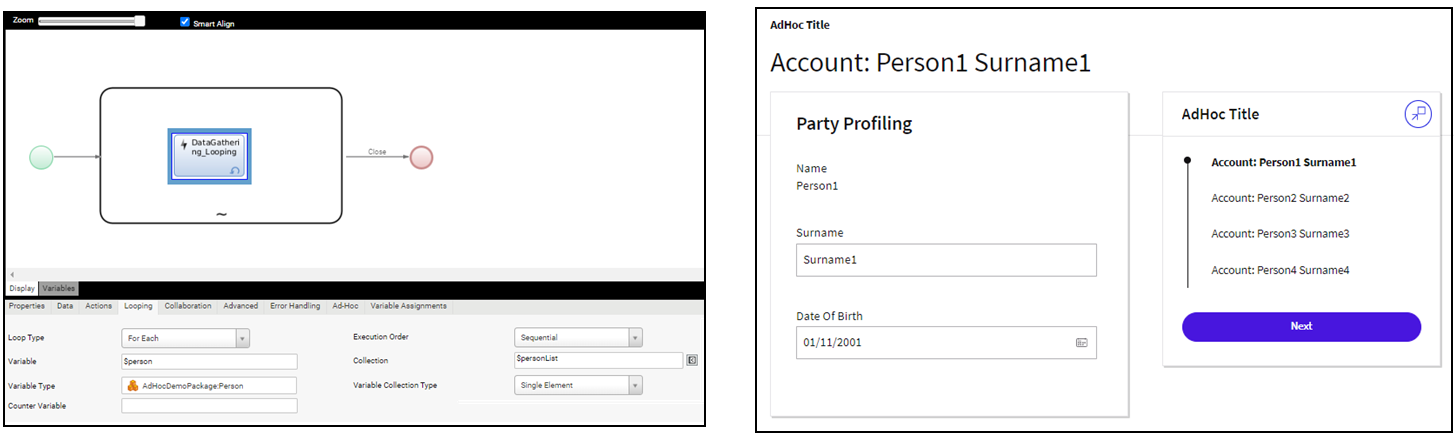
Looping configurations are useful when the same task is applied to multiple different objects (e.g., multiple accounts). The number of such tasks may not be known prior to process execution since it depends on the specific instance of the data model. An example of such use case is the gathering of information on multiple Accounts or Parties.
The Looping functionality allows for an entry in the navigation Sidebar to be shown for each item in a collection at runtime. When the user clicks on that entry, the collection item is assigned to the task. The Looping functionality is configured in the Looping tab, available for any task included inside an Ad-Hoc Sub-Process.
The Looping tab provides the properties to define the list of items to be shown in the navigation sidebar:
- Loop Type: Defines the type of loop used to iterate items. If the property is set to None, the task has no looping.
Note: A collection subject to a For Each looping must not be defined in line, but it must be available as a process variable. Using an in-line Collection of Primitive Types prevents navigation from working correctly since the collection would be re-instantiated each time.
- For tasks inside Ad-Hoc Sub-Processes, only For Each loops are allowed.
- Execution order : Defines the type of loop execution.
- For tasks inside Ad-Hoc Sub-Processes, only a Sequential execution order is allowed.
- Variable: Name of the iteration variable.
- Collection: Collection variable used to contain all the elements of the iteration (can be either a Named or Indexed collection).
- Variable Type: Type of iteration variable (Data Class or Primitive Type).
- Variable Collection Type: Collection type of the iteration variable (Single, Indexed, Named).
- Counter Variable (optional): Variable which is incremented with each iteration, e.g., you have a collection of 100 entries and you jump by 10 at each iteration, the counter variable is 10.
Navigation Structure
Container Sentries
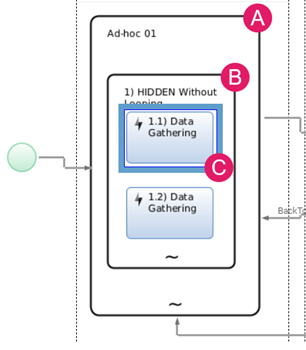
For Ad-Hoc Sub-Processes, the Container Sentry field (defined in the Ad-Hoc Sub-Process Ad-Hoc tab) allows you to specify whether the visibility of the navigation menu entry corresponding to the Ad-Hoc Sub-Process itself is the same as its children (default value), or if such entry should always be hidden. This setting may be useful to hide an intermediate navigation element while keeping its children visible.
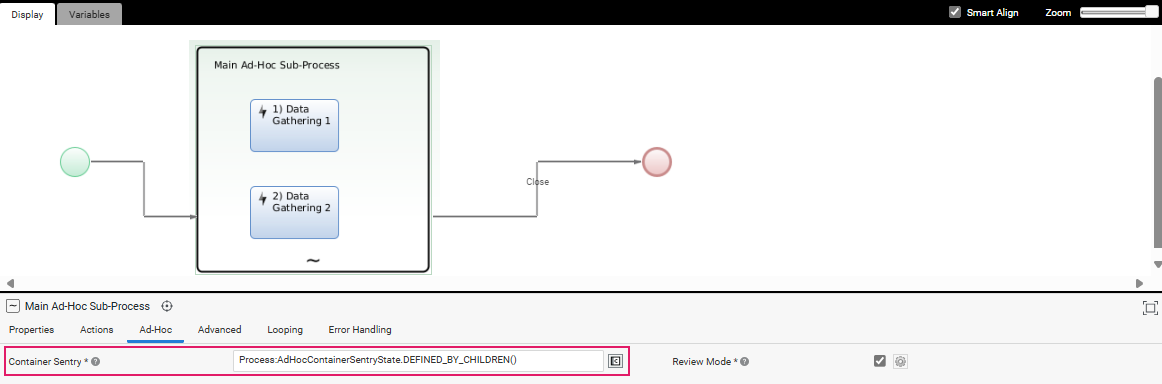
Following are possible values for the sentry property:
Process:AdHocContainerSentryState:DEFINED_BY_CHILDREN: (default value) The visibility of the Navigation Item linked to the Ad-Hoc Sub-Process is determined by the setting defined for its children (according to the logic described in the Task Sentry Hierarchy section below). The image below represents an example of such setting, where only navigation items related to the active task are displayed.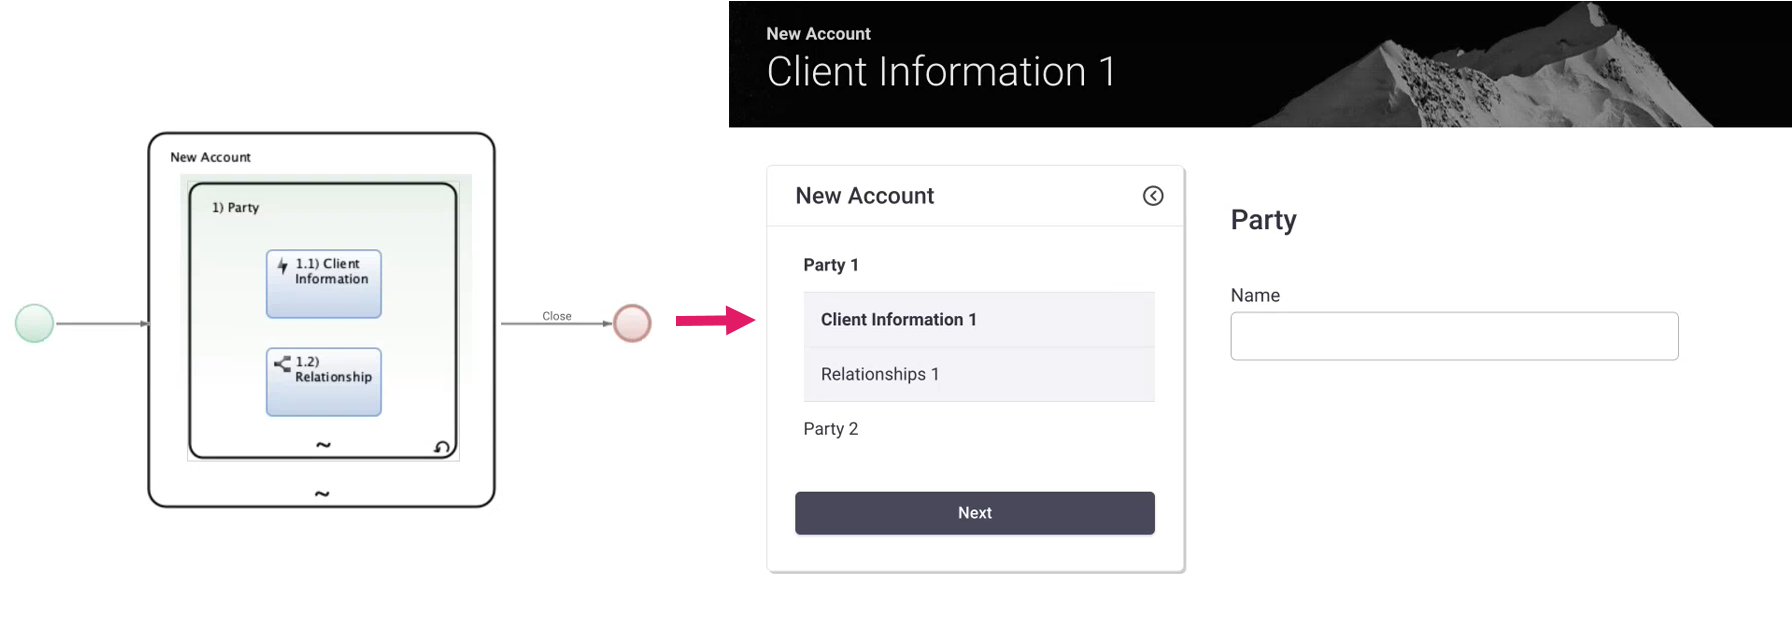
Process:AdHocContainerSentryState:HIDDEN_KEEP_CHILDREN: The Navigation Item linked to the Ad-Hoc Sub-Process is always hidden while keeping the setting defined for its children. The image below represents an example of such setting, where all the navigation items related to all contained tasks are displayed.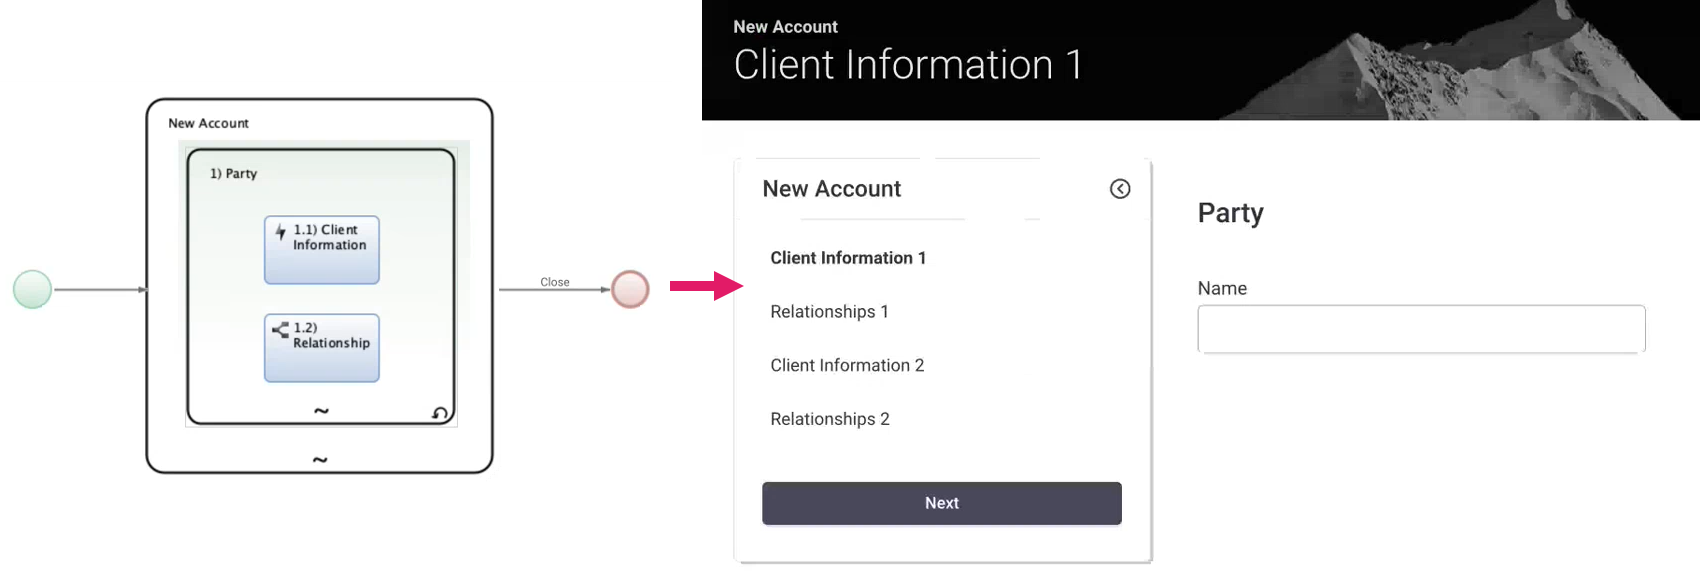
Note: Container Sentries are also applied when an Ad-Hoc Sub-Process is nested through a Sub-Process task (e.g., if the Process Business Object referred to by the Sub-Process task contains an Ad-Hoc Sub-Process).
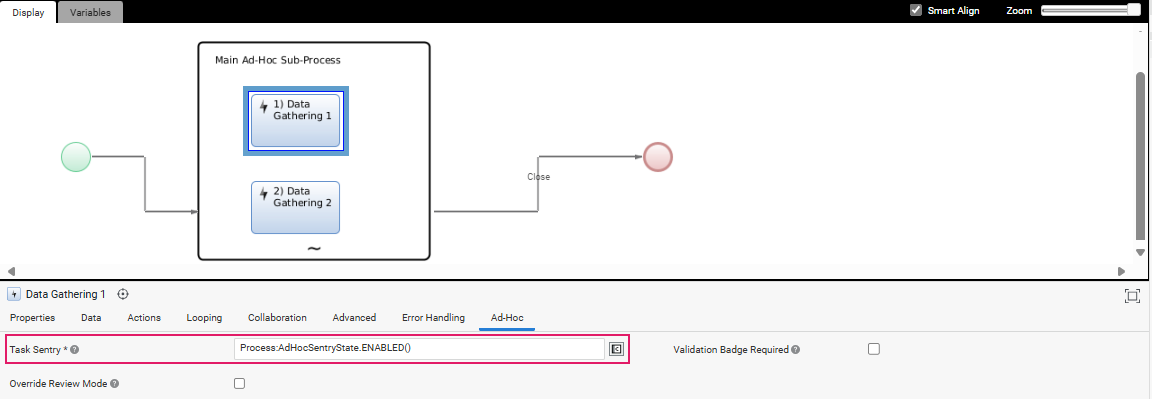
Task Sentries
The Process Components (e.g., Data Gathering App Task) included in an Ad-Hoc Sub-Process can be enabled, disabled or hidden, and their status is reflected in navigation. This allows implementing navigation structures where some elements are shown or hidden based on Solution-specific logic. The status of a navigation item is defined through Sentries.
Sentries are defined is defined in the Task Sentry field (Ad-Hoc tab) available for Process Components included in an Ad-Hoc Sub-Process (e.g., a Data Gathering App Task), with the exception of Nested Ad-Hoc Sub-Processes (see section below).
Note: For this configuration to work, you must declare a dependency on the Process Platform Package.
Following are possible values for the sentry property:
Process:AdHocSentryState:ENABLED(): The Navigation Item linked to the current task is enabled.Process:AdHocSentryState:DISABLED(): The Navigation Item inked to the current task is disabled.Process:AdHocSentryState:HIDDEN(): The Navigation Item inked to the current task is not shown (hidden).
The Sentry property allows Appway Scripts, therefore the developer can change the sentry based on Solution logic.
Task Sentry Hierarchy
The sentry status of the Navigation Item representing the Ad-Hoc Sub-Process (Container) is derived by the Sentries defined on the components contained in it (Tasks), according to the following logic:
-
If at least one child contained in the Ad-Hoc Sub-Process is Enabled, the Navigation Item for that Ad-Hoc Sub-Process is Enabled,
-
ELSE (all children are not enabled), if at least one child Sentry evaluation results in an Error, the Navigation Item shows an Error and behaves as Disabled,
-
ELSE (all children are not enabled, with no errors), if at least one child is Disabled, the Navigation Item for that Ad-Hoc Sub-Process is Disabled,
-
ELSE (all children are hidden), the navigation item for that Ad-Hoc Sub-Process is Hidden
Note: Since Sentries can be dynamic and calculated via scripts, there is also the use case of a failure in the Sentry evaluation.
Sentry Example
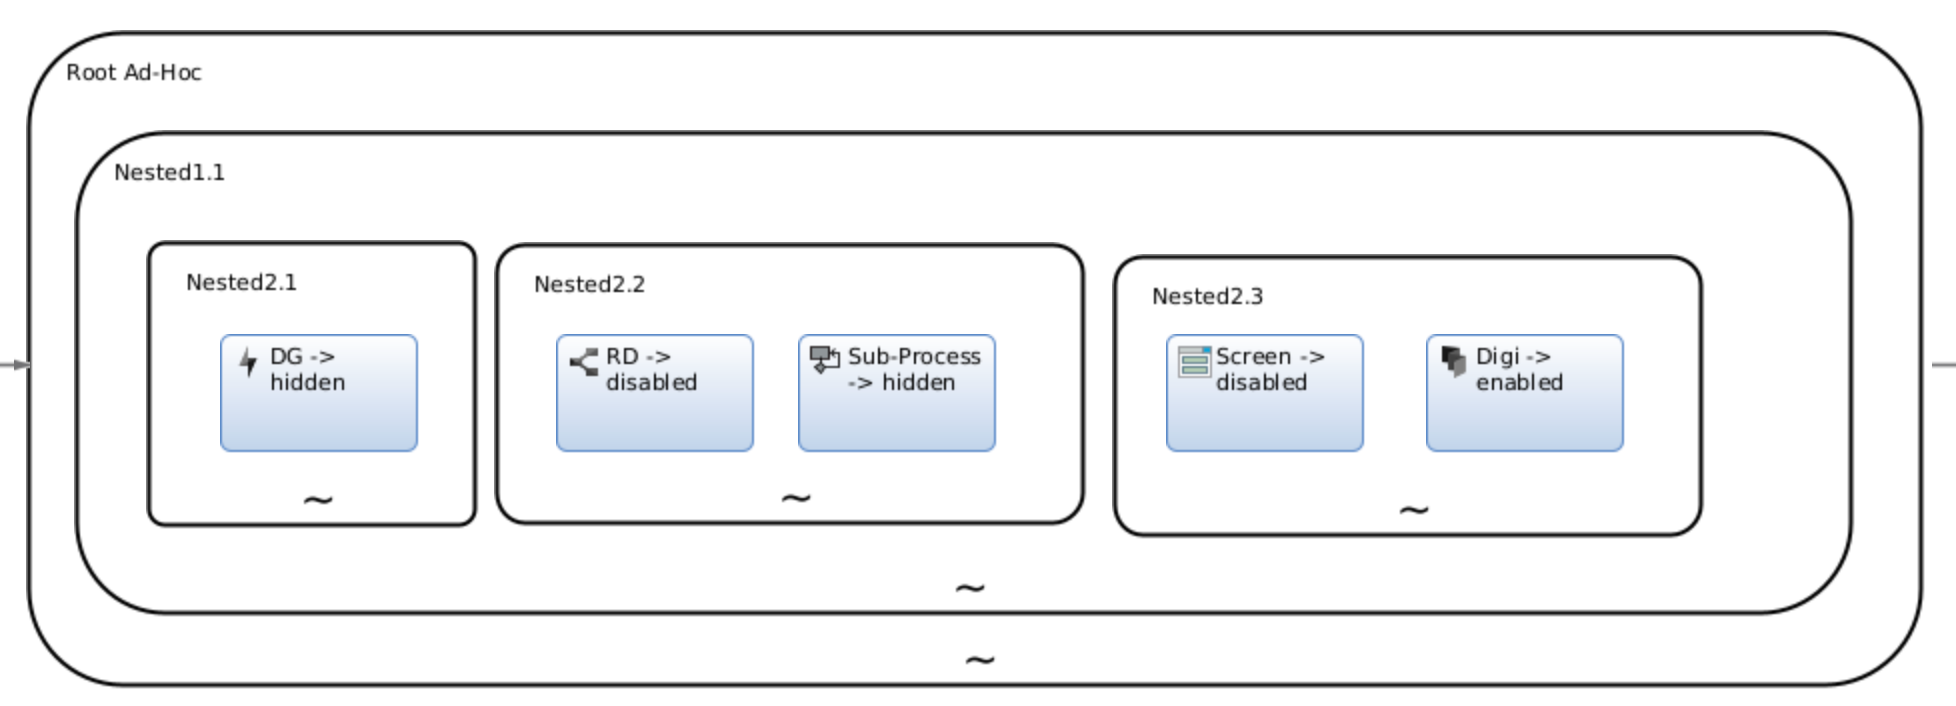 Assuming the token is on the element called Digi, and that the Container Sentries properties of Ad-Hoc Sub-Process are set to the default value
 DEFINED_BY_CHILDREN, this example will create the following navigation:
- Root Ad-Hoc
- Nested1.1
- Nested2.2 [DISABLED]
- Nested2.3
- Screen [DISABLED]
- Digi [current task]
- Nested1.1
Validation
Validation Badges
The Ad-Hoc Navigation sidebar may show the validation status of each step in the navigation (Navigation Item) for an App Task or Sub-Process contained in an Ad-Hoc Sub-Process. When validation is configured, users are provided with an overview of errors and can quickly take action where needed.
Valid / Invalid Navigation Items are visually indicated by a badge. If a Validation Badge is configured on a Navigation Item, a red or green badge may be shown based on the configuration set by the developer (e.g., a green badge indicates there are no blocking issues, a red badge indicates there is at least one blocking issue).
Validation Badges are defined through two properties set in the Ad-Hoc tab of each App Task (e.g., Data Gathering) contained in an Ad-Hoc Sub-Process:
- Validation Badge Required checkbox: Select this checkbox if you want validation badges to be shown.
- Validation Badge field: Enter the expression defining the condition governing the validation badge for the current item, namely:
Process:AdHocValidationBadgeState.OK()(default value): The Navigation Item state is valid.Process:AdHocValidationBadgeState.NOT_OK(): The Navigation Item state is not valid.Process:AdHocValidationBadgeState.NO_BADGE(): The validation badge is hidden
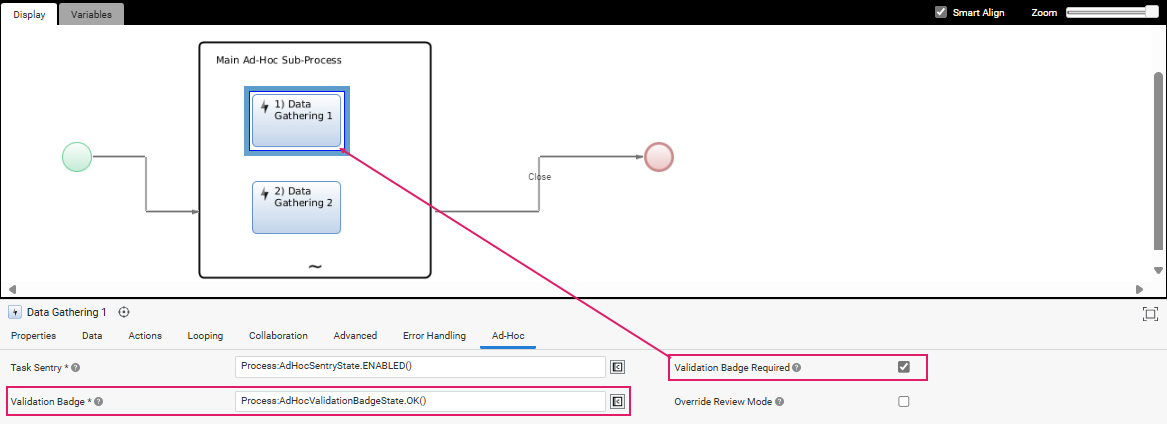
Note: The Validation Badge Required and Validation Badge properties are not available in Review App Tasks (Data Review and Relationship Review).
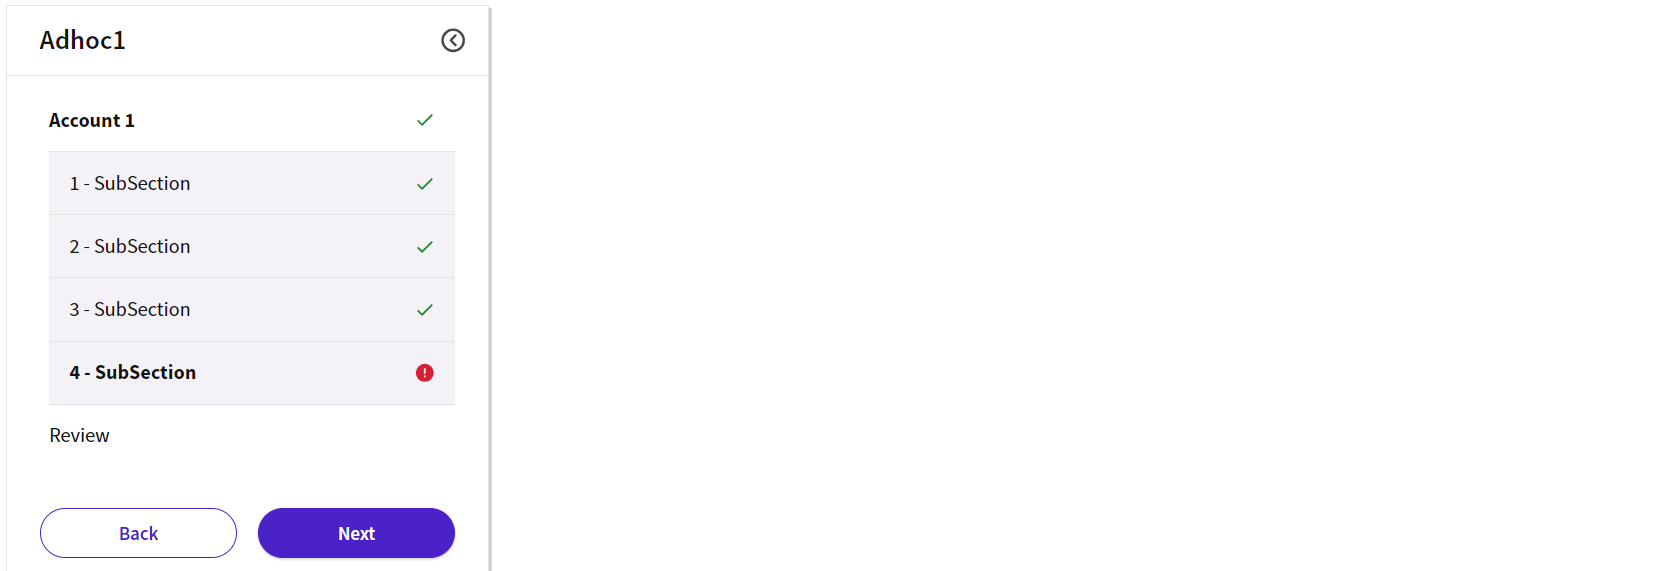
A Validation Badge may be shown on the Navigation Item corresponding to a "container" step, which is calculated based on the configuration applied to the contained steps, according to the logic described below. Note that container/ contained steps may be represented by Root/ Nested Ad-Hoc Sub-Processes, or Ad-Hoc Sub-Processes/ App Tasks, respectively.
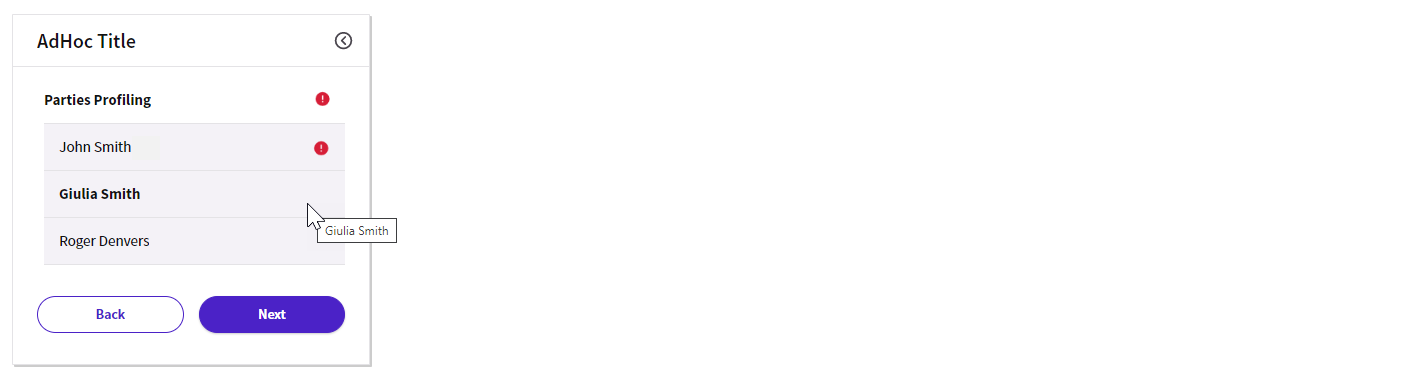
Consider S = container of a number of (visited or unvisited) steps that are ENABLED (according to their Sentry property) and have the Validation Badge Required property checked (Parties Profiling in the images below);
- If at least one step in container S has property Validation Badge set to
Process:AdHocValidationBadgeState.NOT_OK(), then a red badge (invalid status) is shown on container S. - Else, if all steps in container S have property Validation Badge set to
Process:AdHocValidationBadgeState.NO_BADGE(), then no badge is shown on container S. - Else, if all steps in container S have property Validation Badge set to
Process:AdHocValidationBadgeState.OK(), then a green badge (valid status) is shown on container S. - Else, no badge is shown on container S.
In this first example, the user has completed step John Smith and has just clicked on step Giulia Smith. Since step John Smith has a NOT_OK validation badge, the container step Parties Profiling shows a red badge.
In this second example, the last step Review Profiling is a review task, therefore we assume that it has the Validation Badge Required property unchecked. Since all the other steps, John Smith and Giulia Smith, have been visited and have an OK validation badge, the container step Parties Profiling shows a green badge.

Review Mode
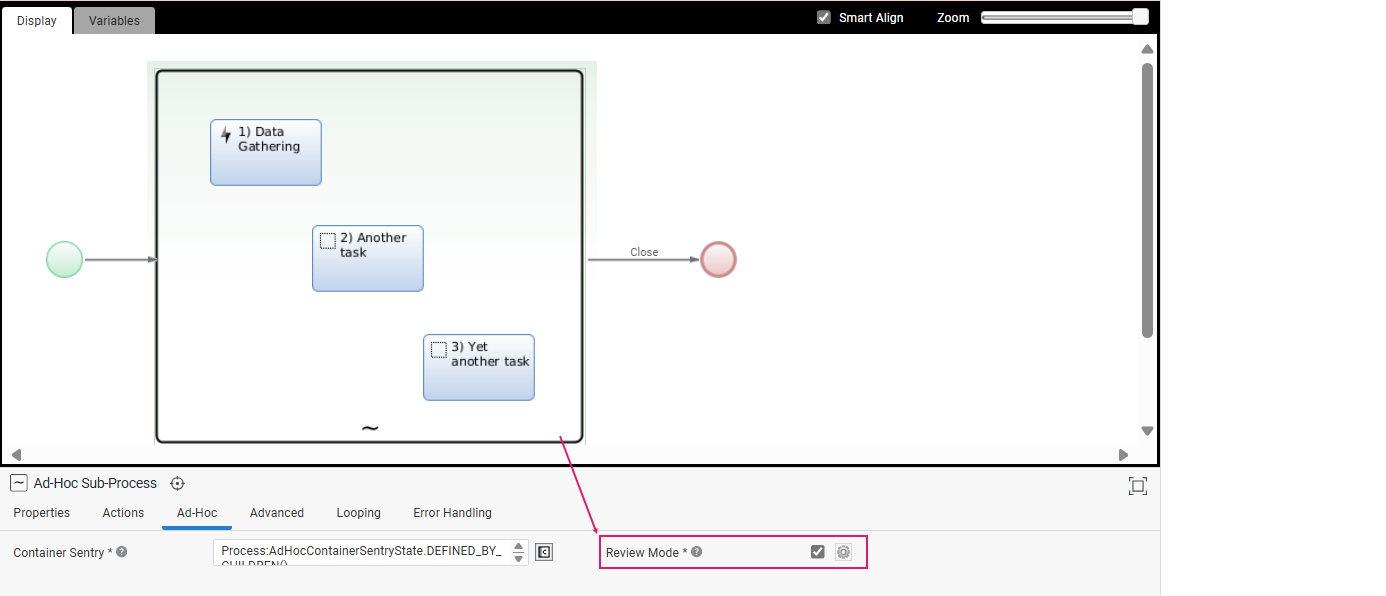
The Review Mode setting can be configured at the Ad-Hoc Sub-Process level (Ad-Hoc tab) and allows specifying whether the Ad-Hoc Sub-Process content is to be reviewed by a given user at runtime (e.g., a page containing client data to be reviewed by a compliance officer). Note that this setting is computed only once when the root Ad-Hoc Sub-Process is initialized and it applies to all Sub-Tasks at all levels.
This setting influences the way validation messages and statuses are displayed in FNZ Studio Runtime for App Tasks contained in an Ad-Hoc Sub-Process.
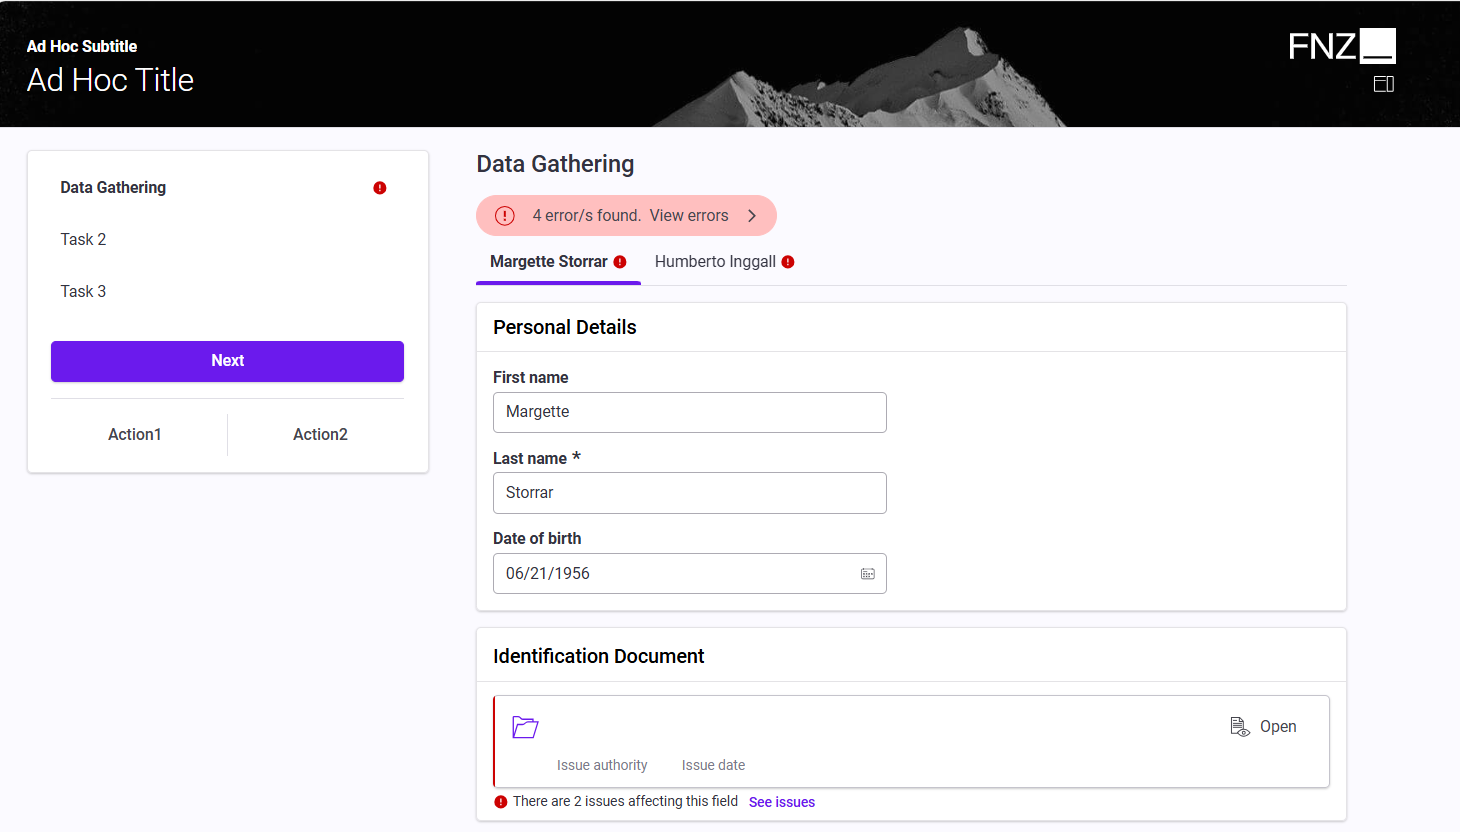
Review Mode On
Violations are displayed immediately, as soon as the user lands on the page. This is valid both for Ad-Hoc sidebar where validation badges are displayed, as well as for the content area, where violation icons and messages are shown on the page and in the Issue Panel (see Content Validation (Data Logic) for details).
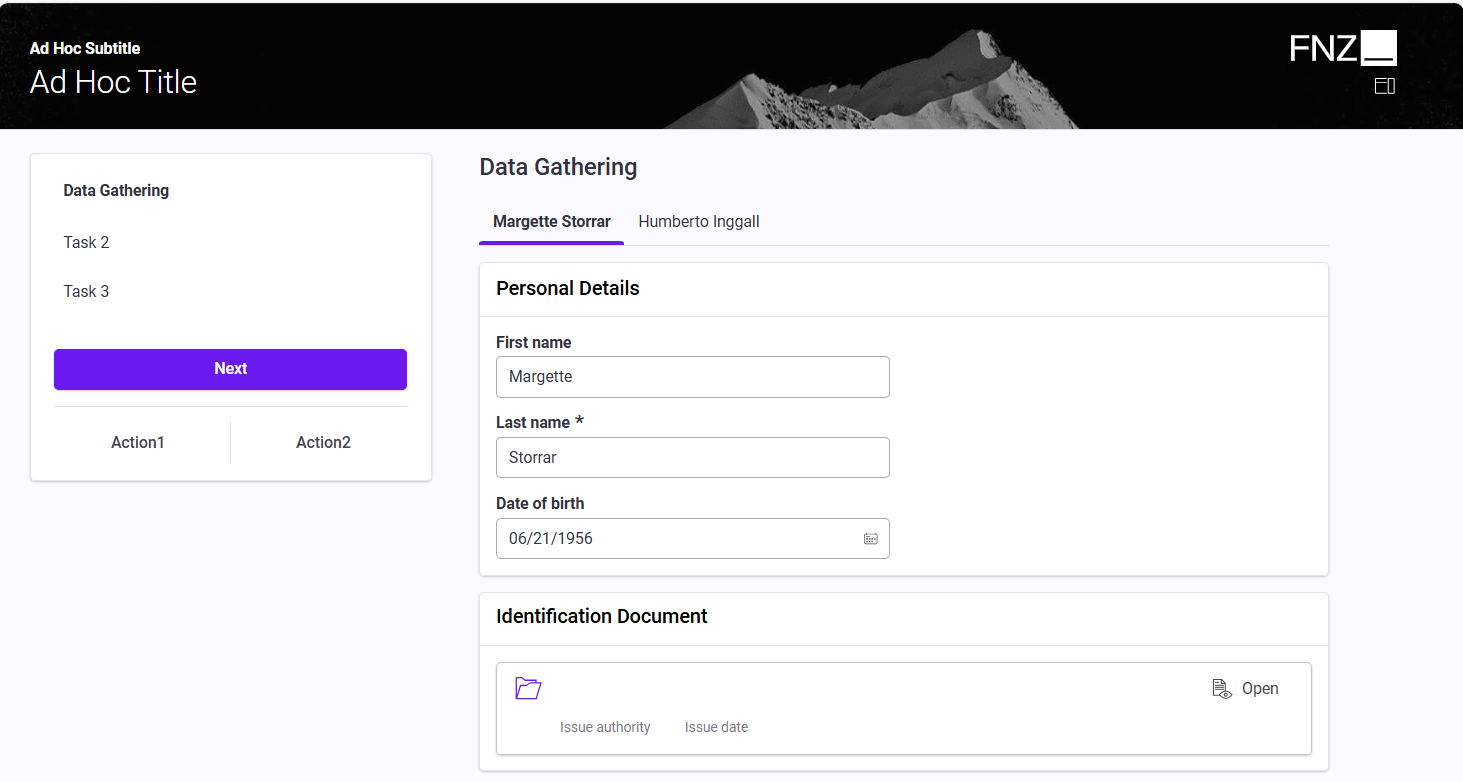
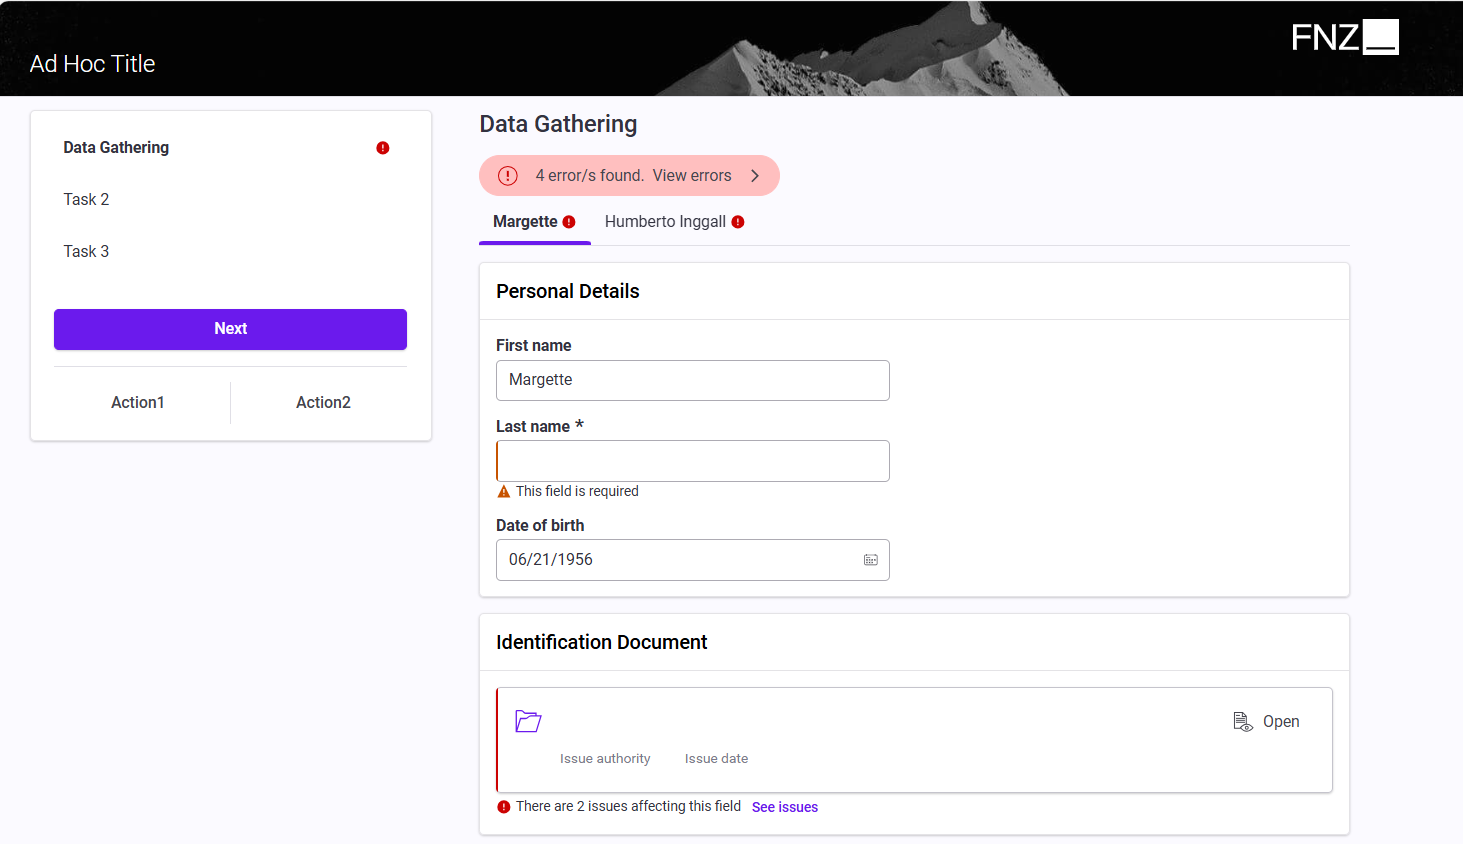
Review Mode Off
Note that, with a disabled Review Mode, each App Task behaves in a slightly different way. Check each separate document (Data Gathering ABC / App Task; Digital Binder ABC / App Task; Relationship Definition ABC / App Task for full details (the figures below are based on Data Gathering)
Most violations are not displayed when the user lands on the page.
However, if the user tries to leave the page, a Confirmation Modal window is displayed warning the user about any errors on the page. If the user decides to stay on the page, all errors are shown.
Review Mode Override
It is possible to override the Review Mode specified at the level of the Ad-Hoc Sub-Process (as described above) for each specific task contained inside the Ad-Hoc Sub-Process itself (e.g., for the Data Gathering App Task in the image below).
This may be useful if a given task needs to have a different review mode with respect to the container Ad-Hoc Sub-Process, for example the Ad-Hoc Sub-Process is not in Review Mode as a whole, but the specific task should be.
This applies to Data Gathering, Digital Binder and Relationship Definition App Tasks, plus Sub-Process tasks, in which case the selected Review Mode applies to all the App Tasks contained inside it at any level.
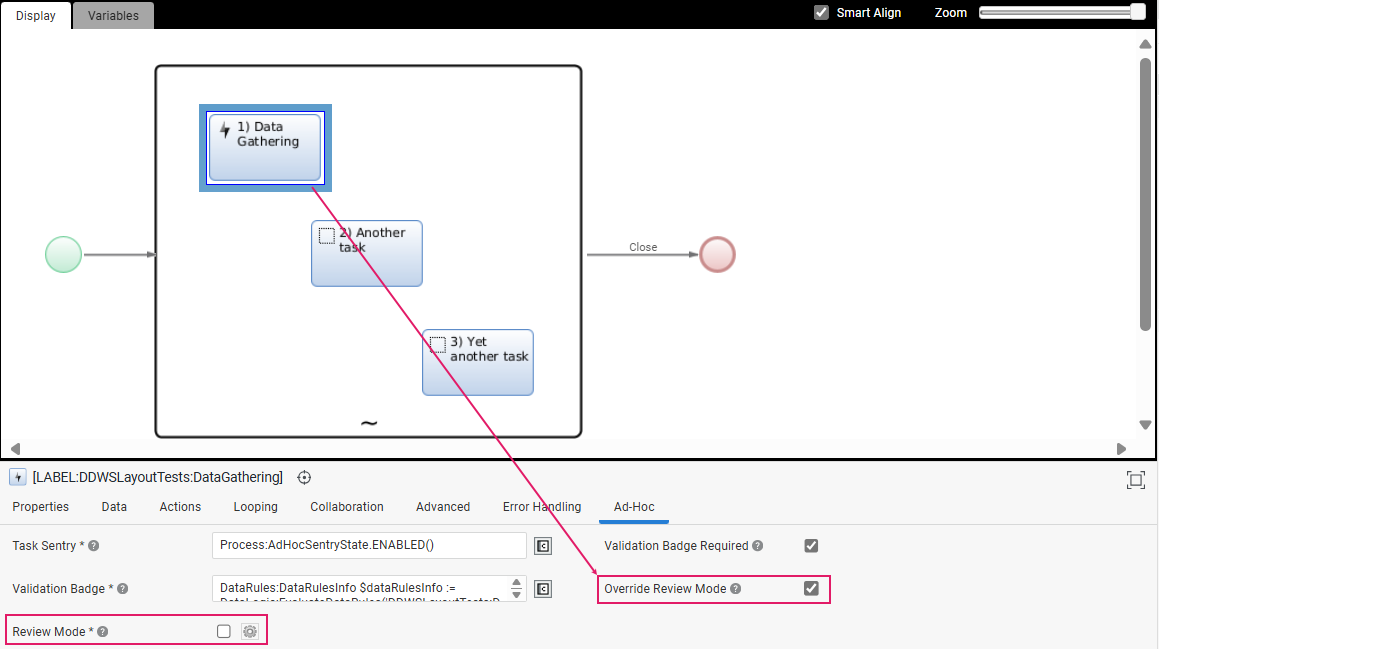
To override the Review Mode for a task, go to its Ad-Hoc tab (e.g., Data Gathering Ad-Hoc tab in the image above) and:
-
Select the Override Review Modeoption. This will override the review mode option set at the Ad-Hoc Sub-Process level.
-
Select theReview Mode setting in case you want to apply specific Review Mode conditions to this task. Note that this setting is computed only once when the task is initialized.
Check each separate App Task document (Data Gathering ABC / App Task; Digital Binder ABC / App Task; Relationship Definition ABC / App Task.
Actions
An Ad-Hoc Sub-Process allows defining actions that can be executed to move across connections starting from the Ad-Hoc Sub-Process itself. These actions are represented in the Navigation Sidebar as buttons.
There are three types of Actions available for Ad-Hoc Sub-Processes:
-
Auto-generated Back / Next Buttons: They are generated automatically, and allow navigating from/to a step within a Phase.
-
Global Back / Next Buttons: They are configured by the developer, and allow navigating from/to a different Phase (out of an Ad-Hoc Sub-Process).
-
Custom Actions: They are configured by the developer to perform any other custom action.
Action Order
Note that Actions are ordered following the hierarchy of components in the Process from the higher to the lower level. As in the example below, if a Root Ad-Hoc Sub-Process defining action A contains a nested Ad-Hoc Sub-Process defining action B which, in turn, contains a Data Gathering App Task defining action C, then the order of Actions is A, B, C.
Auto-generated Back / Next Buttons
The Ad-Hoc Sub-Process navigation sidebar provides auto-generated buttons to move across tasks in their sequential order (from/to steps within a Phase).
In the image below, the auto-generated Back and Next buttons allow navigating from Task 1 to Task 2 and viceversa.
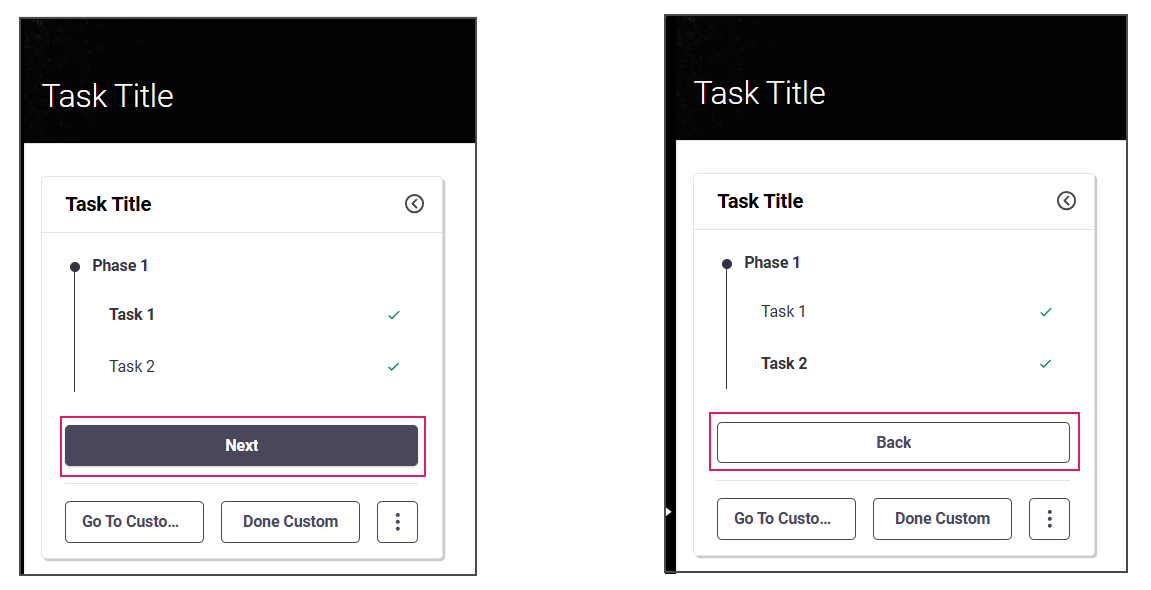
Specifically, when the token is on a task, the following buttons are automatically generated:
- Back: Moves the token to the immediately previous task in the navigation (Label is
Process:aw.AdHocSubProcess.Back) - Next: Moves the token to the immediately following task in the navigation (Label is
Process:aw.AdHocSubProcess.Next)
No configuration is necessary in the Process Editor. However, you must declare a dependency on the Process Platform Package.
Consider that the behavior of Back and Next buttons may be influenced by other configurations, namely, looping, nesting and sentries:
- In a Process Component with Looping configurations, the Back and Next buttons move backwards or forwards in the iteration.
- In a Process Component included in a nested Ad-Hoc Sub-Process, the Back and Next buttons behave according to the order of navigation items in the navigation sidebar (e.g., by clicking Next on the last Process Component in a nested Ad-Hoc Sub-Process, you move to the next Process Component in the container Ad-Hoc Sub-Process).
- If the previous / following task is disabled or the sentry evaluation returns an error, the Back or Next button is disabled.
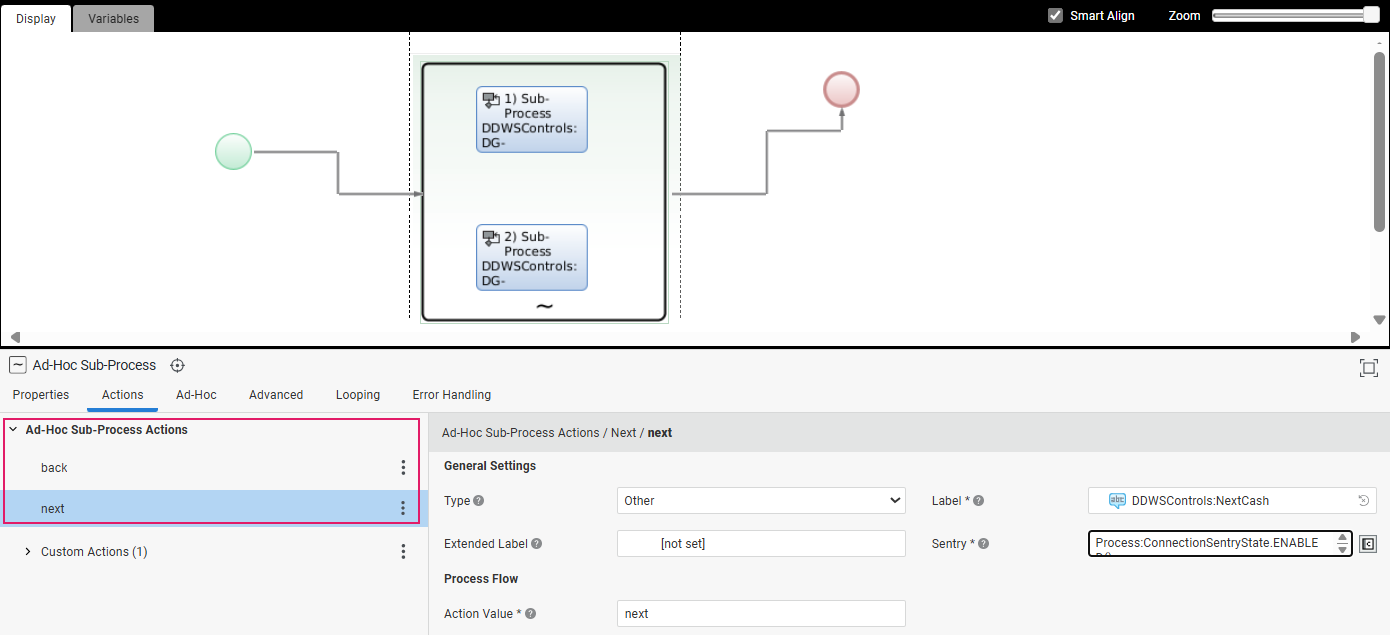
Global Back / Next Buttons
In some situations, the developer may want to define Back and Next buttons to navigate outside the Ad-Hoc Sub-Process (from/to different Phases). This is the case when there is no previous / subsequent task within a Phase, and the user may want to follow a process connection going out of the Ad-Hoc Sub-Process.
Global Back and Next Actions can only be defined for Root Ad-Hoc Sub-Processes when on the first Navigation Item (where the auto-generated Back button is hidden) or on the last Navigation Item (where the auto-generated Next button is hidden).
In the image below, the configured Back to Funds button allows navigating from Task 1 to a previous task outside the Ad-Hoc Sub-Process (Funds). On the other hand, the configured Next to Cash button allow navigating from Task 2 to a subsequent task outside the Ad-Hoc Sub-Process (Cash).
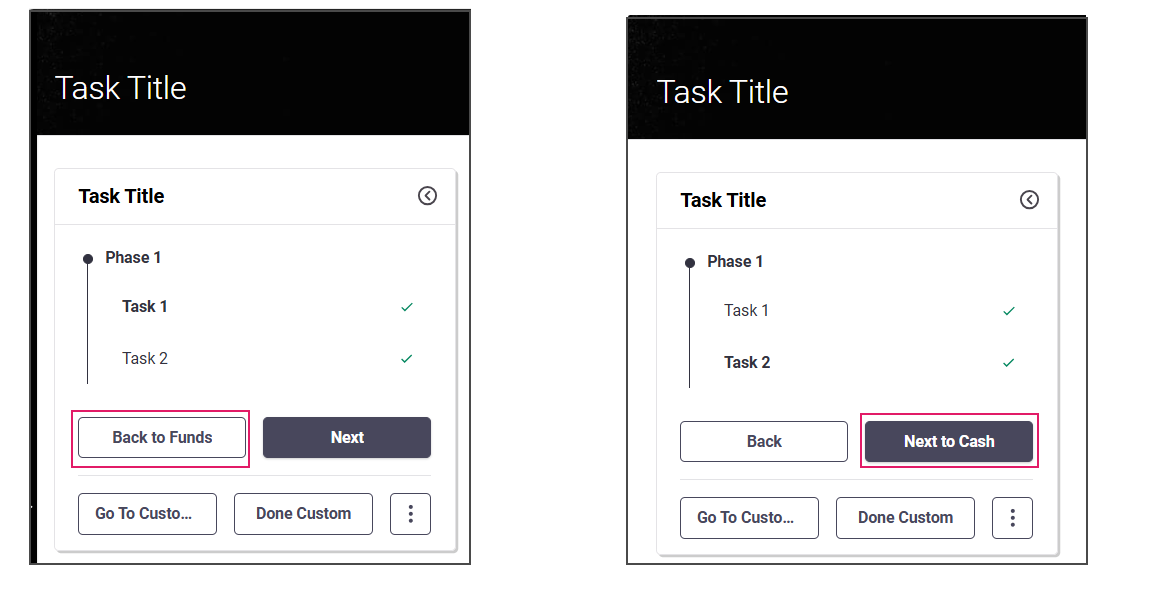
Global Actions are configured in the Actions tab of the Ad-Hoc Sub-Process Editor. The default names of these actions are Back and Next but these values can be configured in the Actions Editor.
 .
.
The configuration of these buttons is similar to Custom Actions. The following properties are available:
General Settings:
- Type : Actions can be of three types (see details below):
- Submit for actions that submit the current form, i.e. they trigger a Process step that cannot be undone.
- Destructive for actions that have destructive effects, such as deleting an object from a collection.
- Other for all other actions.
- Label: Button text (Label Business Object). The default Labels are
Process:aw.AdHocSubProcess.GlobalBack(Back) andProcess:aw.AdHocSubProcess.GlobalNext(Next). - Extended Label: Button tooltip (if any).
- Confirmation Mode — (for Actions of Type Submit or Destructive) Note that this setting is currently available only in back-end configuration and will be supported front-end in the next releases.
- Proceed but allow cancelling: The Action is executed immediately, but the user can cancel execution if needed (default setting for Actions created in FNZ Studio 2025.2 and lower).
- Confirm before proceeding: The user is asked to click a confirmation button before the Action is executed (default setting for Actions created in FNZ Studio 2025.3 and higher). In this case, two additional fields are available:
- Yes Button Label: Label Business Object containing the text to be shown on the button to confirm Action execution.
- No Button Label: Label Business Object containing the text to be shown on the button to cancel Action execution.
- Sentry: Script determining whether the button is currently shown as enabled, disabled, or hidden altogether. The default value is
Process:ConnectionSentryState.HIDDEN(). - Confirmation Label: The message to be shown when confirming a Submit or Destructive Action.
Process Flow:
- Action Value: String that is stored in the Process
$actionvalue when the action is triggered. The default values are back and next, respectively.
Custom Actions
The developer can create further Custom Actions to perform any other tasks (e.g., Go to Documents).
These are displayed below Pre-defined and Global Actions in the Navigation Sidebar, and can be as many as required (further actions can be displayed when opening the three-dot menu)
Custom Actions can be defined on various sources:
- On the Root Ad-Hoc Sub-Process
- On the Nested Ad-Hoc Sub-Process where the token is currently set
- On the Process Component where the token is currently set
In the image below, the custom buttons Go to Customer and Documents allow navigating to the desired tasks.
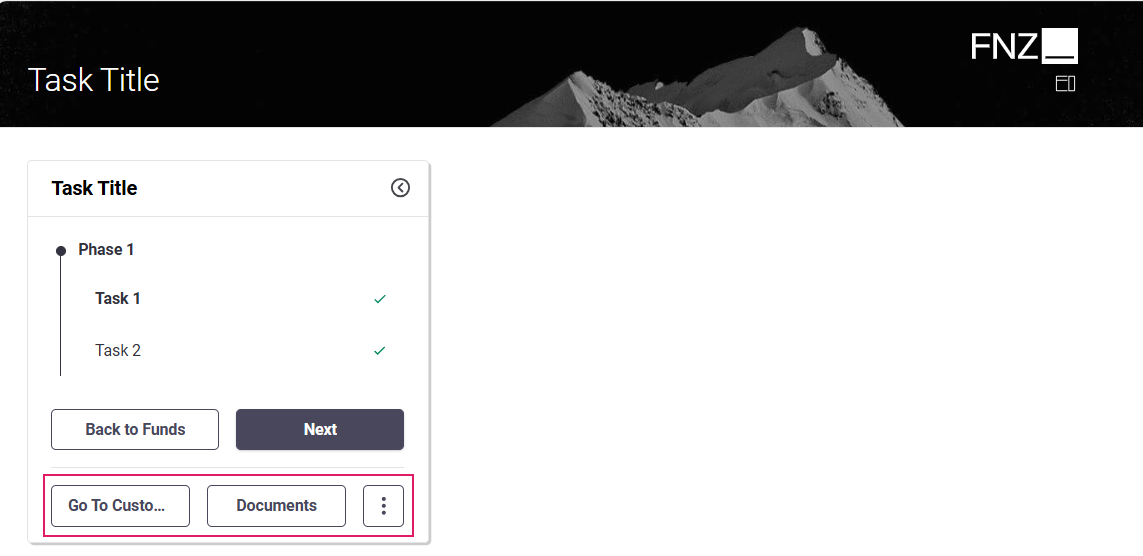
Custom Actions are configured in the Actions tab of the Ad-Hoc Sub-Process Editor. The configuration of Custom Actions is the same as App Task (Process) Custom Actions

Ad-Hoc Custom Actions are Process Action, i.e., they have an impact on the Process flow, either by ending the Ad-Hoc Sub-Process and moving further in the Process, or by creating a new activity.
When you click on the three-dot menu next to the Custom Actions header (left tab), a dropdown list is displayed where you can chose the type of Custom Action you want to add. Moreover, you can copy-paste and delete actions:
- The Copy All Actions option (three-dot menu next to the Custom Actions header) allows copying all available Custom Actions.
- The Copy Action option (three-dot menu next to each Action) allows copying a specific Custom Action. The Paste Before and Paste After options allow pasting the copied Action.
- The Delete Action option (three-dot menu next to each Action) allows deleting a specific Custom Action.
General Settings
- Name — Define a name for the current Action to make it easier to identify it during configuration.
- Type — Custom Actions can have three types (see details below):
- Submit for actions that submit the current form, i.e. they trigger a Process step that cannot be undone.
- Destructive for actions that have destructive effects, such as deleting an object from a collection.
- Other for all other actions.
- Label — Button text (Label Business Object)
- Extended Label — Button tooltip (if any)
- Confirmation Label — The message to be shown when confirming a Submit or Destructive Action.
- Confirmation Mode — (for Actions of Type Submit or Destructive):
- Proceed but allow cancelling: The Action is executed immediately, but the user can cancel execution if needed (default setting for Actions created in FNZ Studio 2025.2 and lower).
- Confirm before proceeding: The user is asked to click a confirmation button before the Action is executed (default setting for Actions created in FNZ Studio 2025.3 and higher). In this case, two additional fields are available:
- Yes Button Label: Label Business Object containing the text to be shown on the button to confirm Action execution.
- No Button Label: Label Business Object containing the text to be shown on the button to cancel Action execution.
- Sentry — A script determining whether the button is currently shown as enabled, disabled, or hidden altogether. The Sentry script must return one value among the following:
Process:ConnectionSentryState.ENABLED()Process:ConnectionSentryState.DISABLED()Process:ConnectionSentryState.HIDDEN()
- Has Icon — Select this checkbox to specify an icon to identify this Action. The icon is displayed next to the action value for easier visual identification.
- Icon Type — Select theIcon option to choose from the set of default icons provided by the Platform, or select the Resource option to indicate a Resource Business Object.
- Icon ID/Resource — Depending on the choice performed above, select the desired Icon ID or Resource Business Object.
Process Flow
- Action Value — String that is stored in the Process
$actionvalue when the Custom Action is triggered. You can configure it as desired. - Process Behavior — Allows Specifying the Process behavior when the action is executed:
- Move Current User Token — The user leaves the Ad-Hoc Sub-Process and follows the created Action
- Stay on Task, Spawn New Token — The user stays on the Ad-Hoc Sub-Process and a separate token is created to follow the Action (the Action can be assigned to other users).
- Open in new tab (available if you selected Stay on Task, Spawn New Token above): Select this checkbox if you want the new token to open in a separate tab, while keeping the current token opened in the current tab.
Token Landing (Ad-Hoc Task Choice)
By default, when the token lands on an Ad-Hoc Sub-Process, it lands on the first enabled Process Component contained in it, according to the ordering logic mentioned above. Note: If there is no enabled component, the Process is suspended and an error is logged.
However, in some situations, you may need to override this logic by choosing a different Process Component where the token should land. See, for example, the two following use cases:
- When there is a sequence of Ad-Hoc Sub-Processes, a global Back action can be used to move back to the previous Ad-Hoc Sub-Process in the sequence. However, the user clicking on Back would expect to land on the last task of the previous Ad-Hoc Sub-Process.
- When it is necessary to perform an action outside the Ad-Hoc Sub-Process and then go back to it, e.g., to reassign a task.
To implement such use cases, all Connections entering an Ad-Hoc Sub-Process provide the additional Ad-Hoc Task Choice setting (Properties tab) to define which task should be reached.
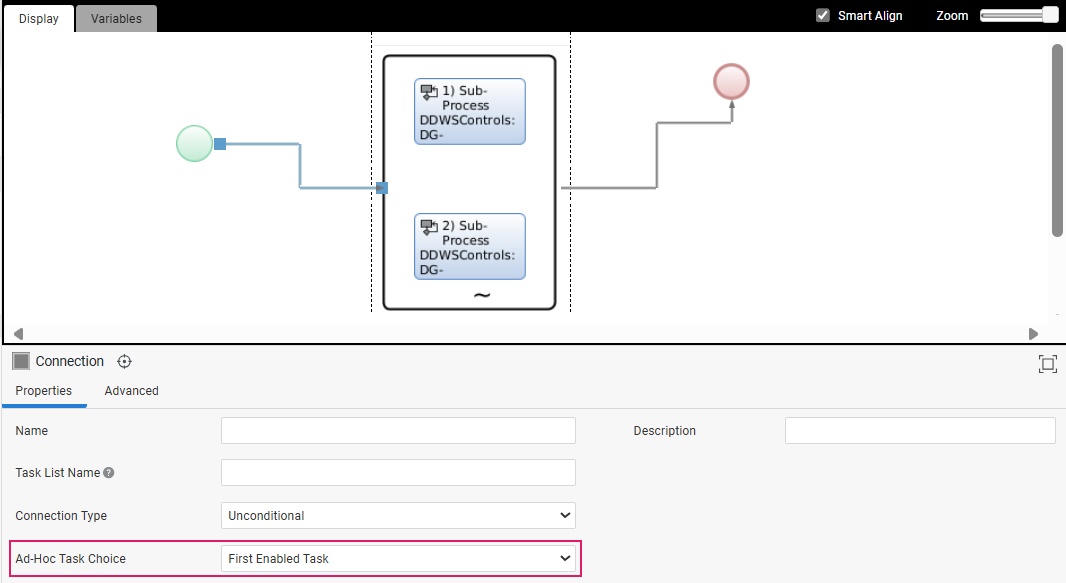
Possible values for this setting are:
- First Enabled Task : (default) The token lands on the first enabled task, according to its Sentry in the Ad-Hoc tab (details).
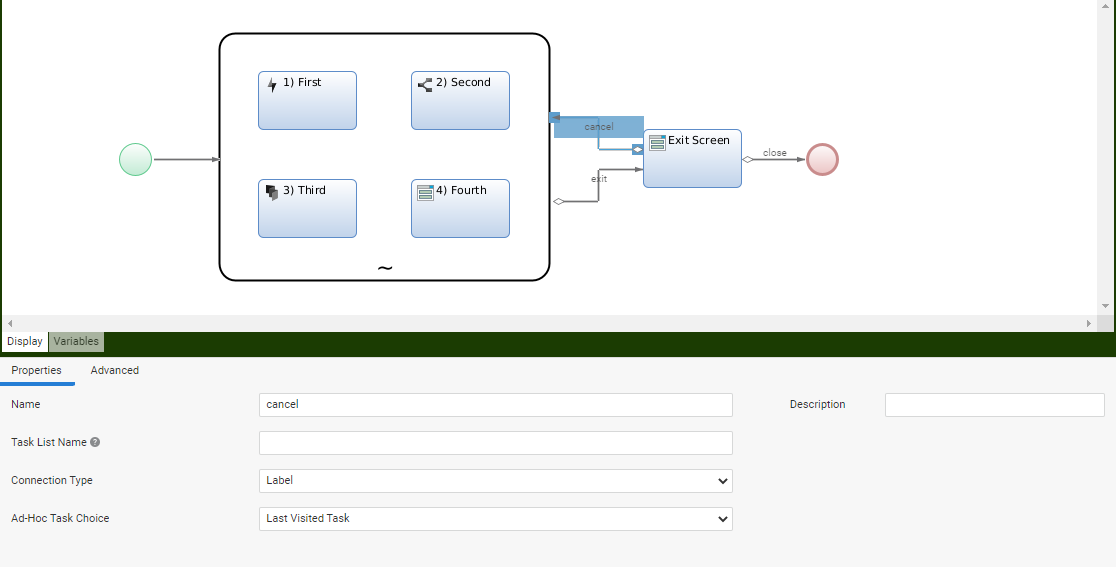
- Last Enabled Task : The token lands on the last enabled task, according to its Sentry in the Ad-Hoc tab (details).
- Last Visited Task : The token lands on the task that was active the last time the token was on the Ad-Hoc Sub-Process. The Last Visited Task information is persisted with each Process Instance, so that it is available also after a restart. The information is kept per Process Instance and per Root Ad-Hoc Sub-Process.
Example In the image below, since the 'cancel' connection returns to the Last Visited Task, if the user was on task Third before exiting the Ad-Hoc Sub-Process, they will return on that task when following the 'cancel' connection.
Screen Navigation (Script Functions)
As mentioned in the introduction, when Ad-Hoc Sub-Processes are used in the context of App Tasks, navigation is generated automatically based on the Process structure. On the other hand, when used in Screens (e.g., when the token inside an Ad-Hoc Sub-Process is on a Screen Task), navigation is not auto-generated but can be custom created using Screen Components and a dedicated set of Script Functions detailed below.
Process:ExecuteAdHocAction
Executes the Ad-Hoc Sub-Process Action with the provided action Id. Allowed actions depend on the task where the current token is placed. Allowed actions are actions defined on an Ad-Hoc Sub-Process containing the current task, and actions that move the token to the next or previous element in the Ad-Hoc Navigation Structure.
Parameters$tokenId (String) WorkflowToken id
$actionId (String) Ad-Hoc Sub-Process Action Id
Return Value Returns Nothing
ExamplesProcess:ExecuteAdHocAction(WORKITEM().getId(), 'PFRPS0VOPmIzMmEzN2Q5YzUxNDI1OTU5NzJkYjVhYTNjNDUxNzBlPC8-PEVMRU0-NTY');
Process:GoToAdHocNavigationItem
Moves the process token to the Ad-Hoc Sub-Process Item with the specified id. The item Id must identify another task, or a task iteration, within the same Ad-Hoc Sub-Process the current task is in.
Parameters$tokenId (String) WorkflowToken id
$itemId (String) Ad-Hoc Sub-Process Navigation Item Id
Return Value Returns Nothing
ExamplesProcess:GoToAdHocNavigationItem(WORKITEM().getId(), �navigationItem999�)
Process:GetAdHocNavigationStructure
Retrieves information about the structure of an Ad-Hoc Sub-Process navigation, given a token id placed on a task contained in an Ad-Hoc Sub-Process.
Note: This function returns the global outer ad-hoc Back action when the token is on the first task of the ad-hoc Sub-Process and the global outer Back action is defined. It returns the global outer ad-hoc Next action when the token is on the last task of the ad-hoc Sub-Process and the global outer Next action is defined. It returns the inner Back and Next actions when the token is on other tasks within the Ad-Hoc Sub-Process.
Parameters$tokenId (String) WorkflowToken id
Return ValueProcess:AdHocNavigationInfo
ExamplesProcess:GetAdHocNavigationStructure(WORKITEM().getId())