Relationship Definition ABC / App Task
Introduction
An Application Business Component (ABCs) is a pre-fabricated software product that serve as a Solution building blocks. It solves recurring business problems out-of-the-box, can be used for a wide range of business scenarios thanks to powerful configurations, and comes with continuous evolution that is taken care of by FNZ Studio.
The Relationship Definition ABC provides support in defining and analyzing business relationships. Its diagram-based approach captures a wide range of business relationships (e.g., the structure of roles associated with a banking relationship or the relationships among different individuals that are part of a household). It can be used to manage relationships with different complexities, from simple private accounts to very elaborated structures associated with multiple trust accounts.
Its functioning is based on a declarative, data-driven approach: the runtime UI is autogenerated according to mapping strategies specific to the Relationship Definition business requirements. Relationship Definition provides two different App Tasks:
- Relationship Definition App Task — Allows creating a structure of Objects and Relationships.
- Relationship Review App Task — Allows viewing the structure in read-only mode, as well as inspecting and exploring data. Changes in Objects and Relationships are not allowed.
Installation and Upgrade
App Task Access
The access to an App Task is managed through Users, Groups and Roles. As with all types of Process, you can define Swimlanes in your App Task, and each Swimlane can be associated with one or multiple Participants. Such Participants are the Users/Groups/Roles defined in FNZ Studio for Access Control.
Anonymous User Access
Anonymous users can access specific features of the Relationship Definition and Relationship Review App Tasks. This is to allow unregistered users to access some specific tasks.
To allow anonymous users, do the following:
- Do not add Swimlanes to your Process
- Enable the
nm.workspace.resource.filetypes.anonymousaccessallowedconfiguration property.
Installation
Ingredients and Installation Steps
Relationship Definition consists of the following basic ingredients, which should be installed in this order:
- AppTask Extension (included in FNZ Studio (Core) installations)
- AppTaskAPI Extension (included in FNZ Studio (Core) installations)
- RelationshipDefinition Extension
Technical Requirements
Make sure you check the following:
- You are on a compatible FNZ Studio Core version. See the Relationship Definition Product page for compatibility information.
- Your FNZ Studio installation includes all other mandatory extensions (in addition to AppTask and AppTaskAPI) and Packages. See System Upgrade section.
Upgrading to Relationship Definition 2025
When upgrading to the latest available Relationship Definition 2025 release (2025.x) from a lower version, you may need to consider the following information:
The following Labels have been added in Relationship Definition to the Platform Package specified in the Label with default English texts. You can add and edit translations for such Labels (in Solution Design> Translations tab):
-
AppTask:ValidationConfirmationModal.MessageSingular -
AppTaskValidationConfirmationModal.MessagePlural -
AppTask:ValidationConfirmationModal.SeeErrors -
AppTask:ValidationConfirmationModal.Continue -
AppTask:ValidationConfirmationModal.Hide
General Properties
After following the installation steps described above, the Relationship Definition App Task and Relationship Review App Task will be available in the Process Editor. You can drag and drop them into the central composition area, as shown in the image below.
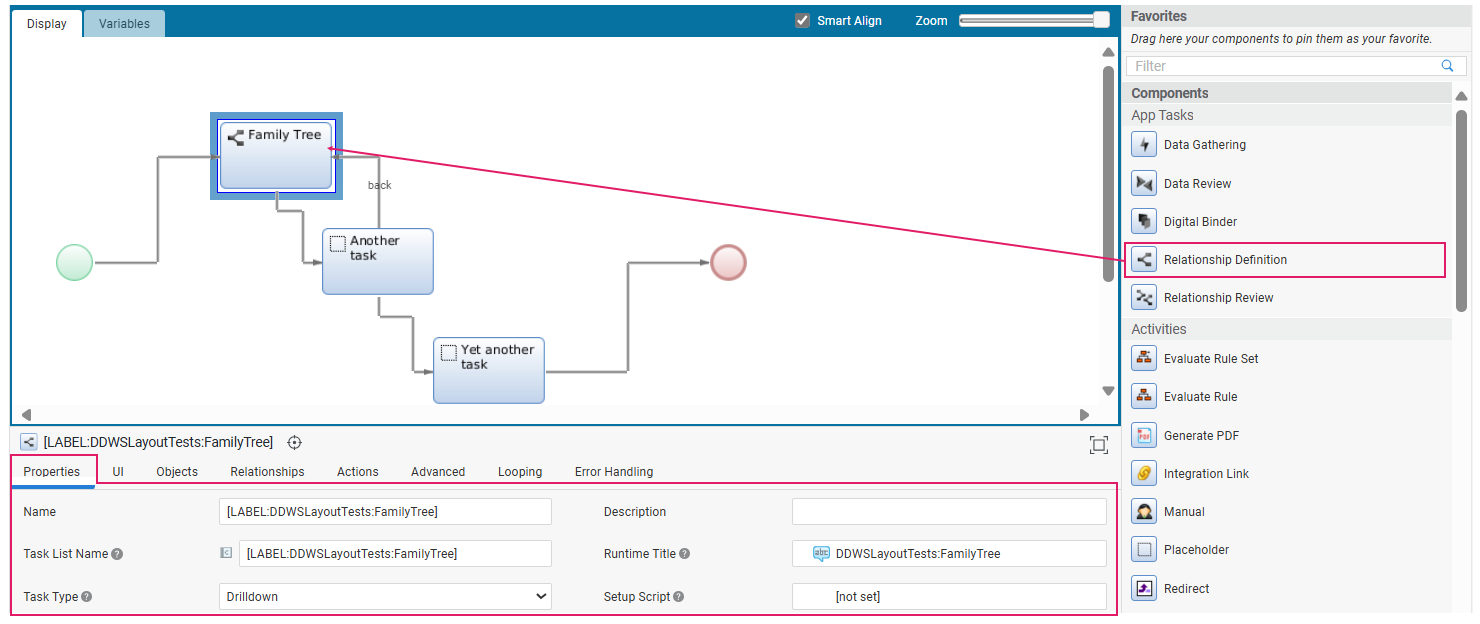 Relationship Definition App Task in the Process Editor
Note that it is possible to copy configurations from/to Relationship Definition and Relationship Review App Tasks to reduce development effort. To do so, right-click on the Relationship Definition or Relationship Review App Task you are configuring in the Process Editor, and select Copy Configurations From. In the pop up, select the App Task from which you want to copy configurations.
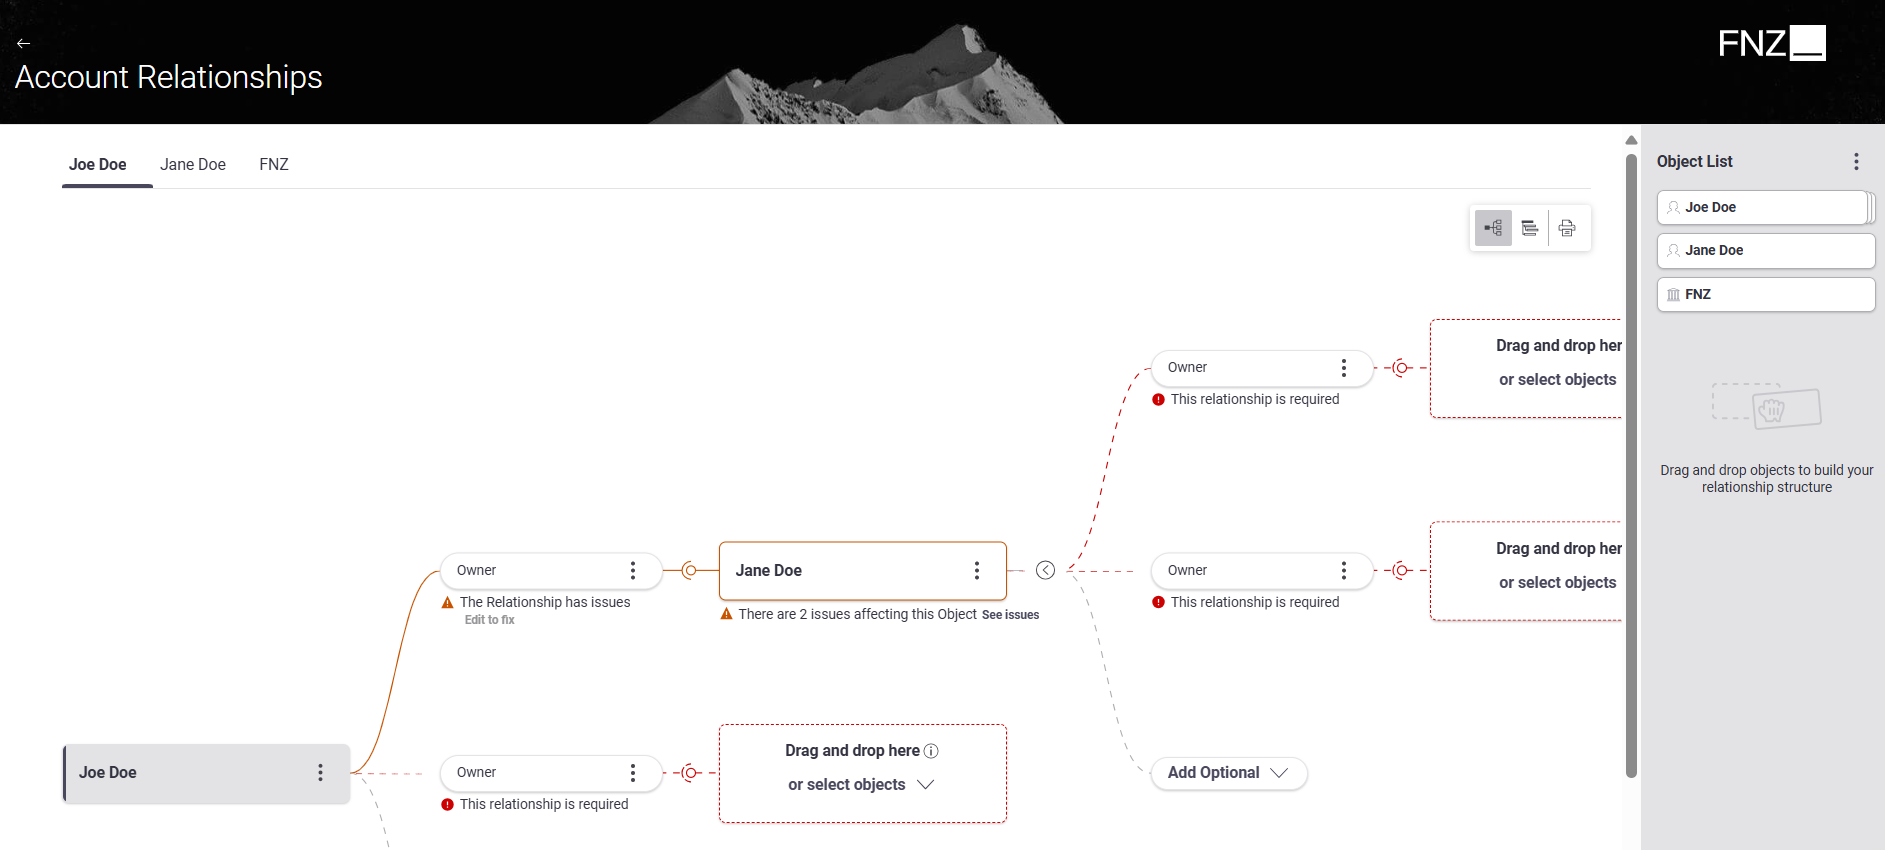 Relationship Definition App Task in FNZ Studio Runtime
Process Properties
Most of the general properties of the App Tasks (title, type, and so on) can be set in the Process Editor, as illustrated in the table below.
| Property | Description | Configuration |
|---|---|---|
| App Task Title (Process Editor) | Name of the App Task in the Process Editor (e.g., Family Tree in the first image above). | Process Editor Properties tab > Name field. |
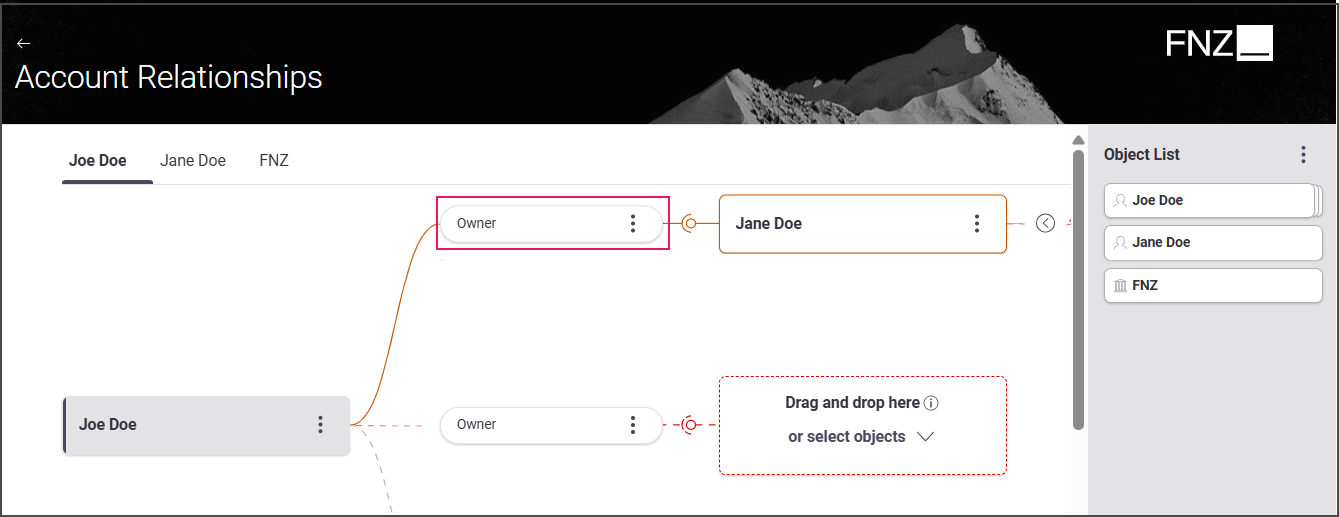
| Page Title (UI) | Name of the App Task in FNZ Studio Runtime, as displayed at the top-left of the page (e.g., Account Relationships in the second image above). | Process Editor Properties tab > Runtime Title field. You need to select a Label Business Object. In case the property is not set, it shows 'FNZ'. This property is mandatory for App Tasks included in Ad-Hoc Sub-Processes, in which case, the page title is displayed at the top of the content area. |
| App Task Title (Task List) | Name of the page on a Task List (backend) Process Editor. | Properties tab > Task List Name field. You can select a Label Business Object or enter a text. Set the name of the page, as it should appear on a Task List (it may contain a Label or not). |
| Type of App Task | Type of navigation pattern to use inside the App Task | Properties tab > Task type dropdown. Select the Task pattern between Sequential (tasks form a linear sequence, where users navigate through each Task step-by-step, and can typically only move forward or backward) and Drill Down (multiple different Sub-Tasks can be opened from one main Task). This influences navigation and page structure. See configuration details. |
| App Task initialization | Logic to be executed when initializing the App Task | (optional) Properties tab > Setup Script field. Specify the Script Function Business Object that contains the logic to be executed when initializing the context of the App Task (if any). This can be used, e.g., to set any necessary Process Instance or Token Attribute. The script is executed once for each token when it becomes Active. |
Home Button
The Home button is rendered as the logo on the top-right of the FNZ Studio Runtime page.
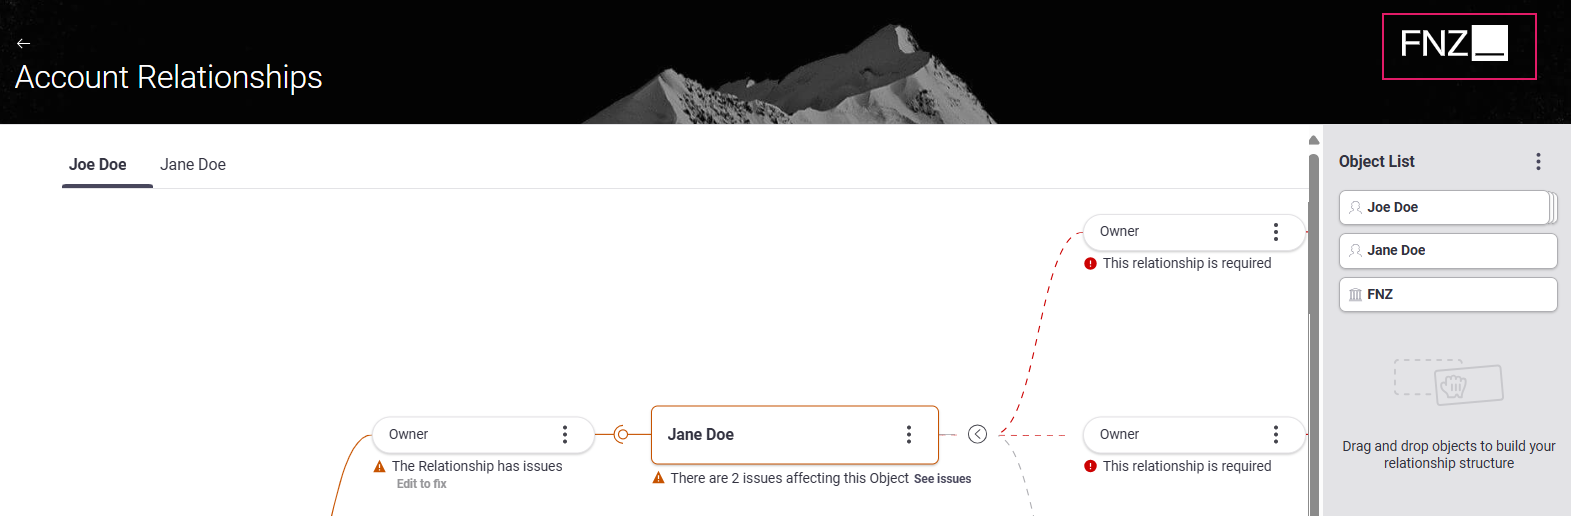
The Home button is not configured in the App Task, instead it is managed by the global configuration property nm.window.start. If you do not set this property, the FNZ logo is shown by default.
Feature Overview
Following is an overview of the main Relationship Definition features. The sections below will provide detailed information on each feature and how they are configured.
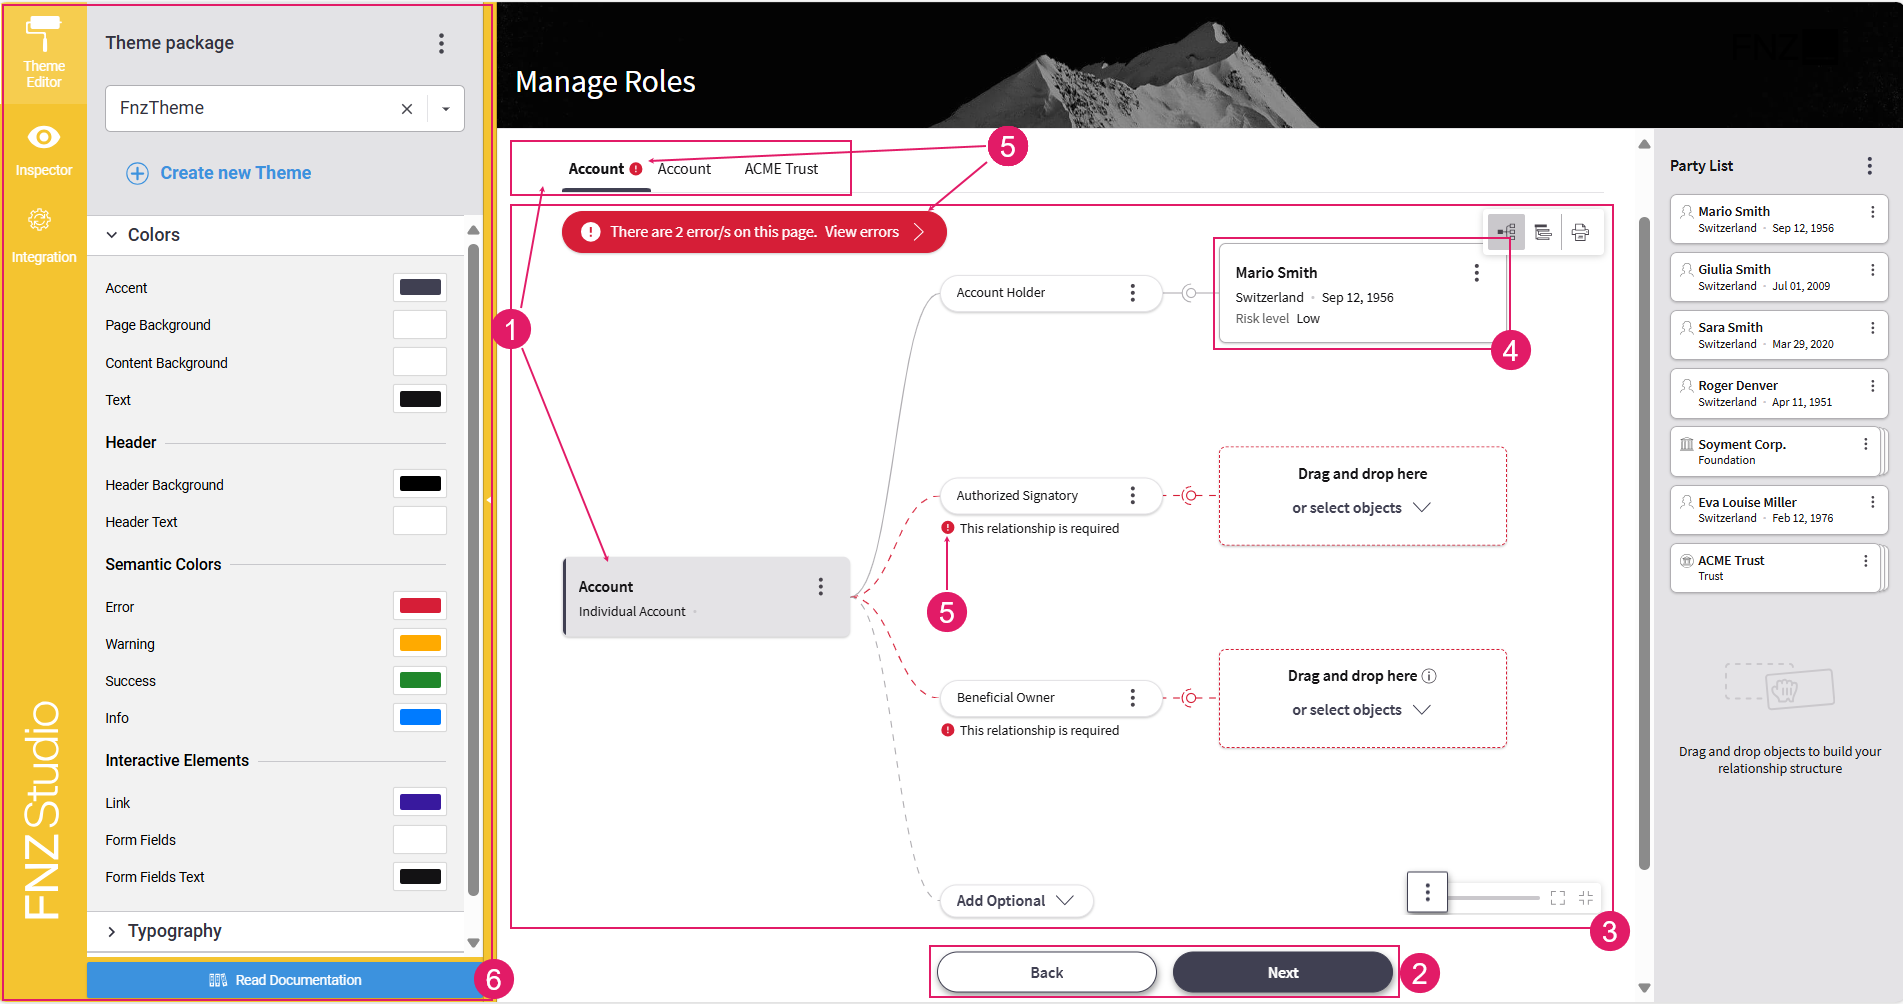
-
Navigation (
1) and Actions (2) — A bird-eye overview of the page structure allows you to find fields easily. Moreover, actions allow going back or forward in the process, deleting items or move to a different task, among others. See Navigation and Actions sections. -
Relationship Tree (
3) — The relationship tree overview allows for a visual and comprehensive outline of defined business relationships to better support decision making and auditability. Relationship Definition adapts to different contexts, from a simple individual account opening with few parties involved to scenarios where multiple accounts need to be defined at the same time and the relationship can reach higher complexity. Its graphic visualization allows zooming in or out on a structure to check relationships, households or parties See Tree Overview section. -
Content Structure (
4) — The structure is pre-defined automatically based on your rules and ready to be populated. Parties can be created with imported banking/registry system data or added manually. Moreover, Object and Relationship content can be configured to show the most relevant information. See the Content Structure section. -
Information framework (validation) (
5) — Continuous feedback and annotations are provided on blocking issues and warnings, as long as suggestions on how to fix them. See the Information Framework section. -
Developer Toolbar (
6) — The Developer Toolbar provides three main tools: the Theme Editor, which allows styling your Solution; the Inspector Tool, used to navigate to the Business Objects where the elements of the current page in FNZ Studio Runtime are configured and fixed any issues; the Integration Console, which shows all the integration calls performed for easier contextual debugging. See the Developer Toolbar section.
Navigation
Content Navigation (Tab Bar)
A bird-eye overview of the page structure allows you to find fields easily. Content navigation in Relationship Definition is based on the Tab Bar, which allows users to navigate through different pages (e.g., customer pages).
 This type of navigation is specific to Relationship Definition and is configured through Root Objects, i.e. each Root Object corresponds to a tab.
Actions
App Task Actions allow developers to define all aspects of an Action in the Process editor directly. This allows reusing the same Data Logic in different situations, and with different actions. Moreover, only the Process Business Object is altered when actions need to be added, removed, or updated.
Global Actions
Feature Overview
Relationship Definition features two types of Global Actions, which are common to all App Tasks:
- Back Action (Predefined)
- Custom Actions
Configuration
| Action | Description | Configuration |
|---|---|---|
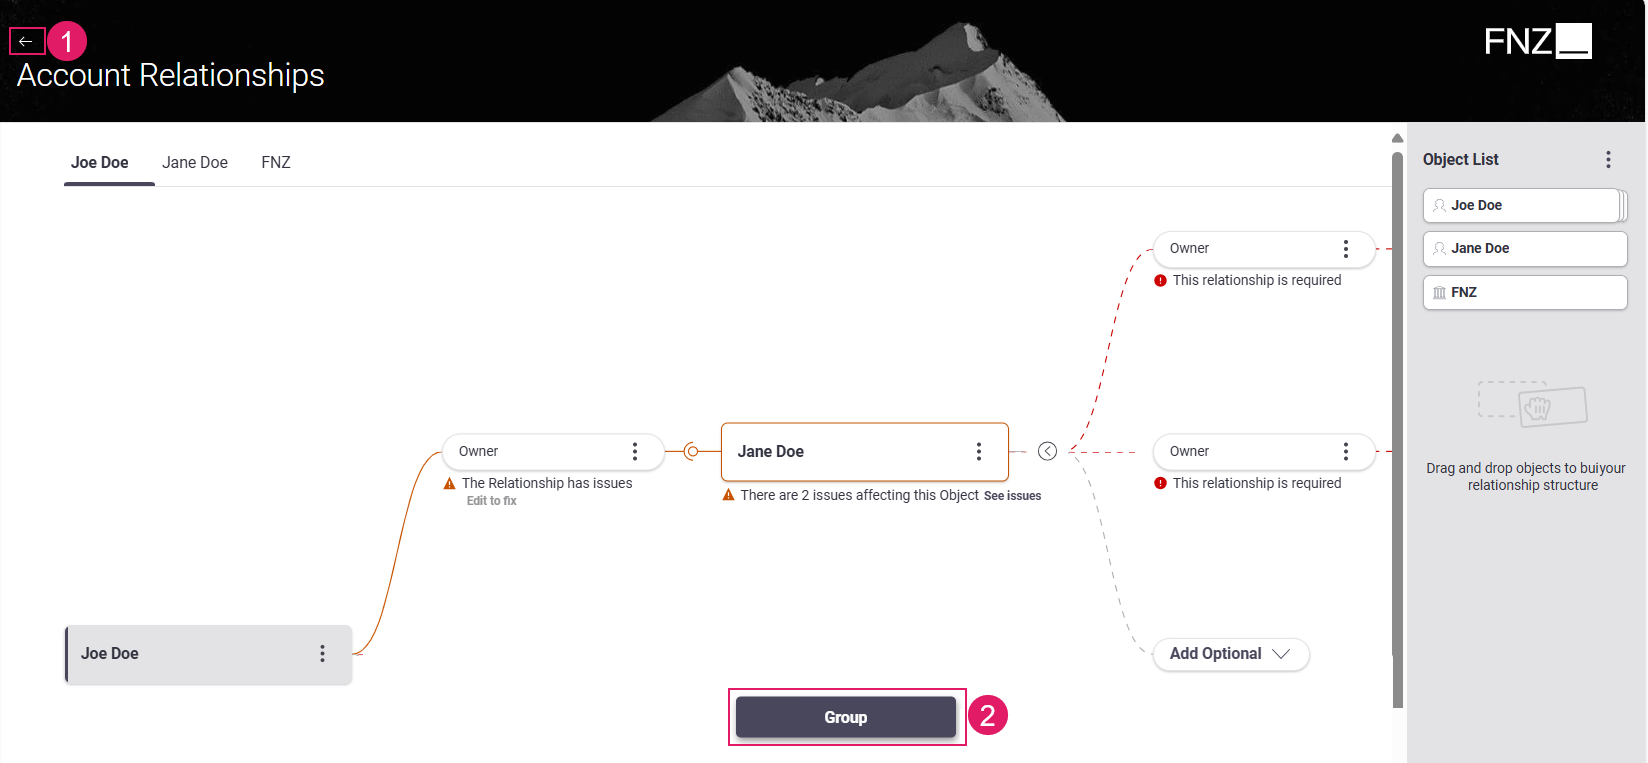
Back Action (1) |
Back button. Depending on the type of type of App Task, it may be visible at the at the top left or at the bottom center of the page. | This is a predefined, static Action, which allows ensuring a consistent developer experience across different solutions. It is configured in the Relationship Definition App Task Editor (Actions tab > Global Actions > Back option). See Predefined Actions (Back). |
Custom Action (2) |
Any kind of Action applied to the Process (e.g., Go to documents, Ask for help) | This Action is entirely defined by the developer. It is configured in the Relationship Definition App Task Editor (Actions tab > Global Actions > Custom Actions option). Two types of Custom Actions are available: Process (impacting the Process flow by moving the token) and Script Actions (reload/update actions with no impact on the Process flow). See Custom Actions. |
Objects Actions
In addition to the Back and Custom Actions available for all App Tasks, the Relationship Definition App Tasks (Relationship Definition and Relationship Review) provide three predefined Actions related to Objects:
- Add Object (available for the Relationship Definition App Task only)
- Go to Object (available for both Relationship Definition and Relationship Review App Tasks)
- Remove Object (available for the Relationship Definition App Task only)
Add Object
Feature Overview
The Add Object Action is triggered when the user selects the option to add a new Object to the Object List. In fact, adding a new Object is not part of the Relationship Definition App Task and must be implemented as a separate process step. This step must take care of adding the selected Object to the Collection set in the Objects field.
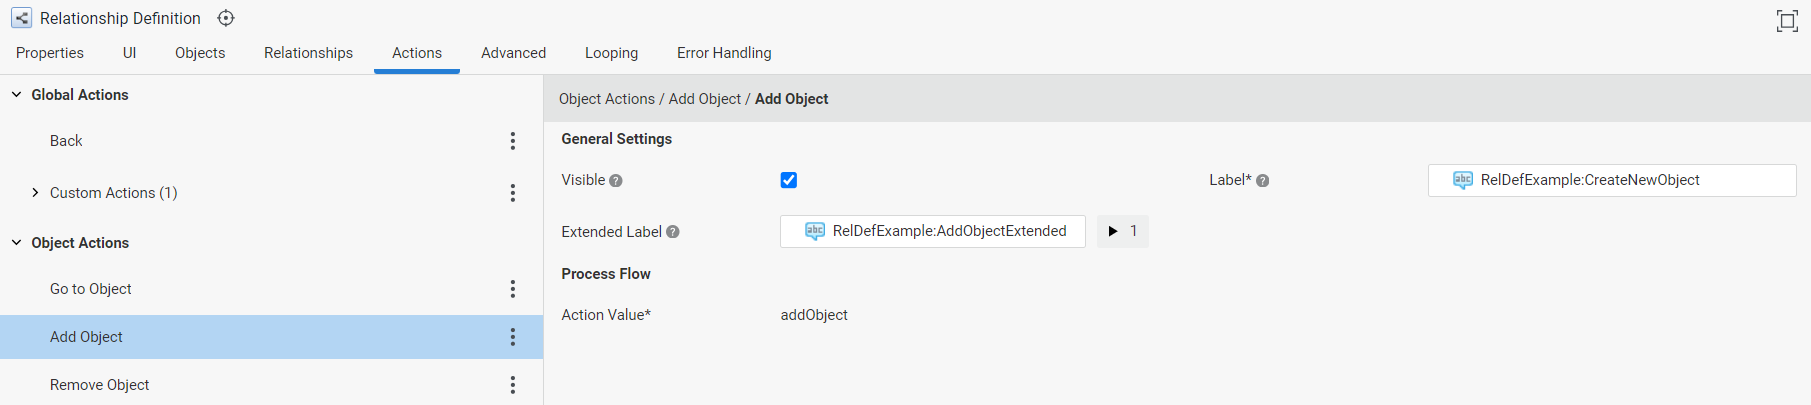
Configuration The Add Object action is configured in the Actions tab of the Relationship Definition App Task Editor and has the following properties: General Settings section:
- Label — The action Label.
- Extended Label — The action tooltip.
- Visible — Determines whether the corresponding action is visible in Studio Runtime. If your Relationship Definition does not need the option to add a new Object, you can deselect this property.
Process Flow section:
- Action Value — Static value set to
addObject. A corresponding connection must be created in the Process.
Go to Object
Feature Overview
The Go to Object Action is triggered when the user selects the option to navigate to a selected Object. In fact, browsing details and editing an Object is not part of the Relationship Definition or Relationship Reviews App Task and must be implemented as a separate Process Task (for example using a Data Gathering App Task).
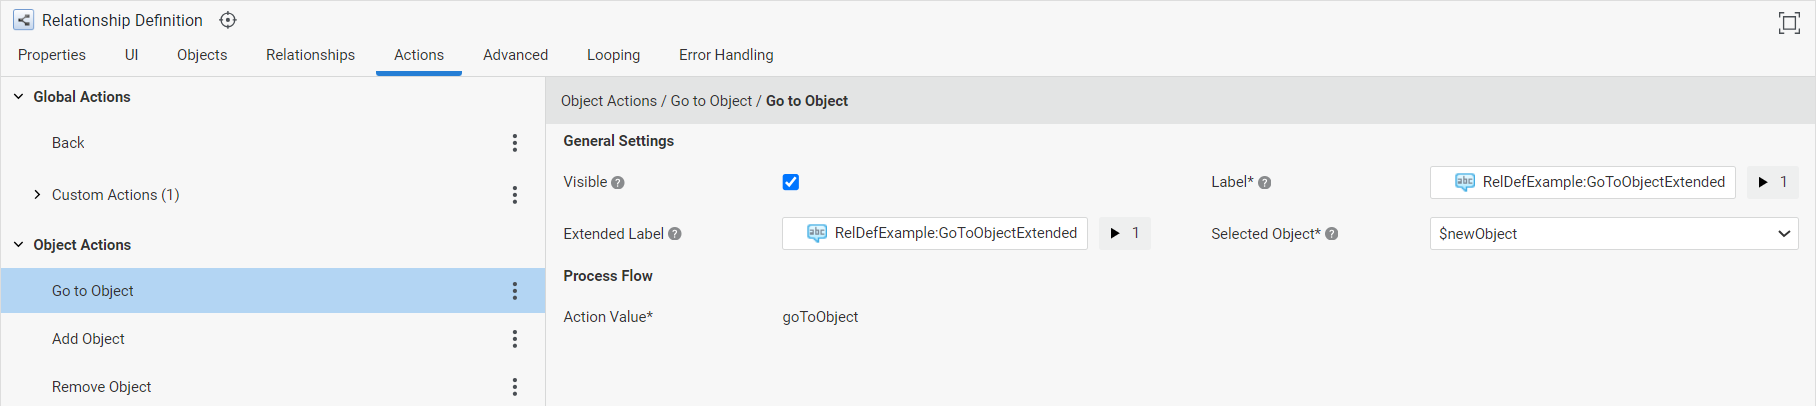
Configuration The Go to Object Action is configured in the Actions tab of the Relationship Definition/Relationship Review App Task Editor and has the following properties:
General Settings section:
- Label — The action Label.
- Extended Label — The action tooltip.
- Visible — Determines whether the corresponding action is visible in Studio Runtime. If your Relationship Definition does not need the option to navigate to an Object, you can deselect this property.
- Selected Object — The Variable to be automatically populated at runtime with the Object selected by the user. The type of the Variable must be the same as the one selected in the Object Type setting in the Objects tab or one that inherits from it.
Process Flow section:
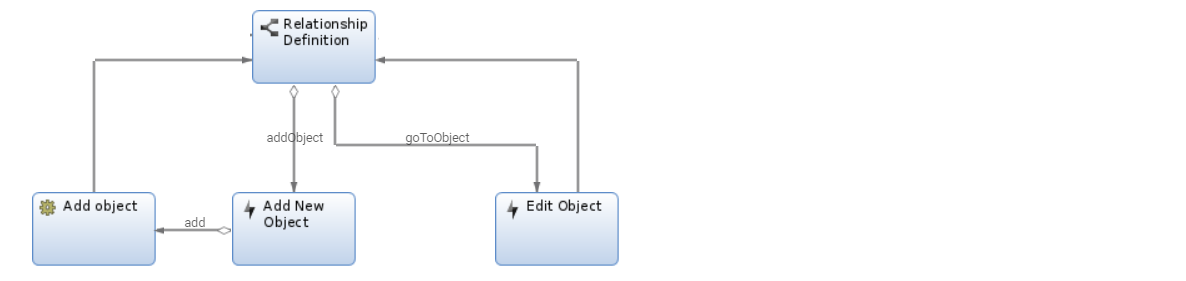
- Action Value — Static value set to 'goToObject'. A corresponding connection must be created in the Process. An example of a possible Process configuration supporting Relationship Definition predefined Actions is illustrated in the image below:
Remove Object
Feature Overview
The Remove Object Action is triggered when the user selects the option to remove an Object from the Object List. It removes the selected Object from the Object collection and, if the Object is also part of the Root Object collection, it also removes it from that collection. The Action is not available for Root Objects which are not part of the Object collection.
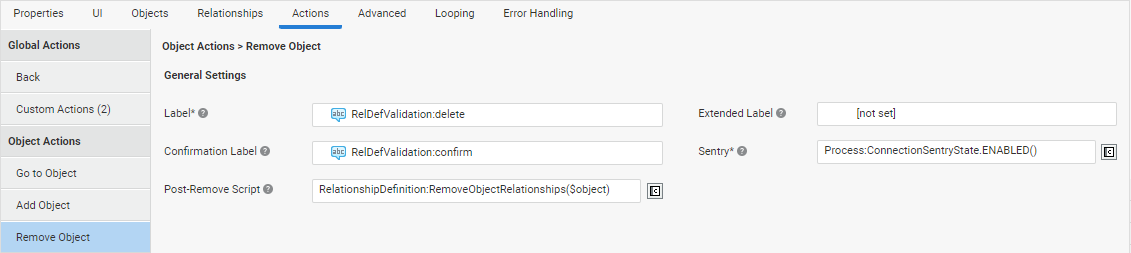
Configuration The Remove Object Action is configured in the Actions tab of the Relationship Definition Process Editor and has the following properties:
- Label — The action Label.
- Extended Label — The action tooltip.
- Confirmation Label — The Label Business Object containing the message to be shown when confirming the action.
- Sentry — The conditions that govern the state of the Action for users in Studio Runtime (enabled, disabled or hidden). Use the functions available in the Data Class
Process:ConnectionSentryStateto return one of the possible states. Use the implicitly defined$objectvariable to access the Object being removed. - Post-Remove Script — The logic to be executed when an Object is removed in Studio Runtime. By default, it invokes the Script Function
RelationshipDefinition:RemoveObjectRelationships, which removes all the Relationships handled in the Relationship Definition App Task that have the provided Object set as source or target. Use the implicitly defined$objectvariable to access the Object being removed.
Tree Overview
Terminology
The Relationship Definition is based on three main concepts:
- Root Objects — Collection of Data Class instances that represent the set of Objects used as "entry points" for navigation in the Relationship structure. These are shown as tabs in FNZ Studio Runtime.
- Relationships — Relationships are represented in the Platform Business Object model as Data Class instances. For example, the fact that the client
Mark Smithis the account holder for the bank accountBA12345678can be represented by an instance of a Data Class calledAccountHolder. - Objects — Objects are the Data Class instances that can be used as sources and targets of Relationships (e.g. Client Data Class instance, Party Data Class instances, and so on). Following the example above, Objects are the Data Class instances representing client
Mark Smithand bank accountBA12345678, respectively.
Tree
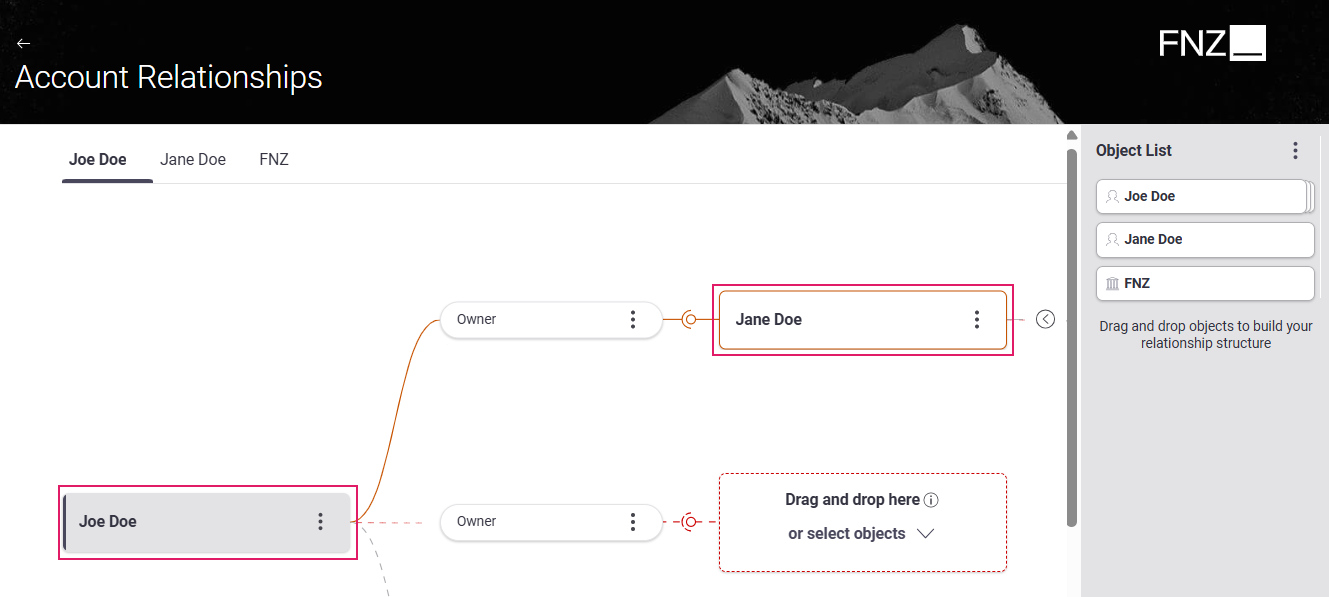
Feature Overview
The Relationship Tree allows for a visual and comprehensive outline of defined business relationships to better support decision making and auditability. Relationship Definition adapts to different contexts, from a simple individual account opening with few parties involved to scenarios where multiple accounts need to be defined at the same time and the relationship can reach higher complexity. Its graphic visualization allows zooming in or out on a structure to check relationships, households or parties
The two available Relationship Definition App Tasks provide different features, illustrated in detail below:
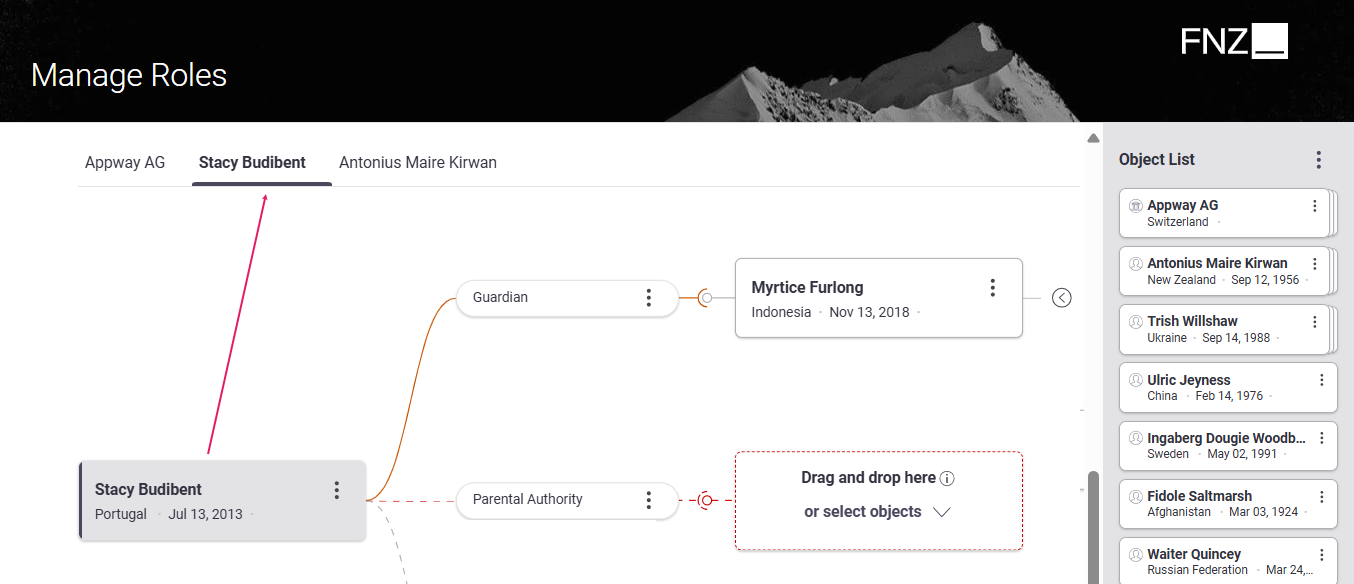
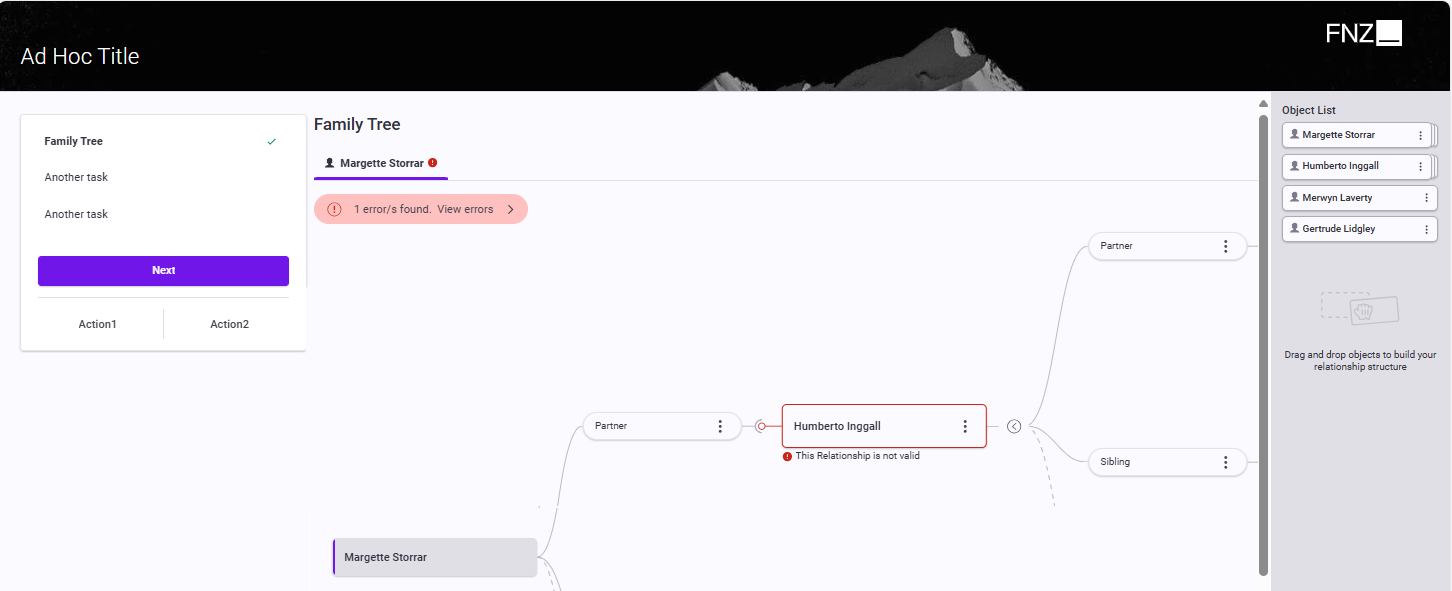
- The Relationship Definition App Task allows creating a structure of Objects and Relationships (Figure 1).
- The Relationship Review App Task allows seeing Relationships in read-only mode for review use cases, therefore no edit operations are available (Figure 2).
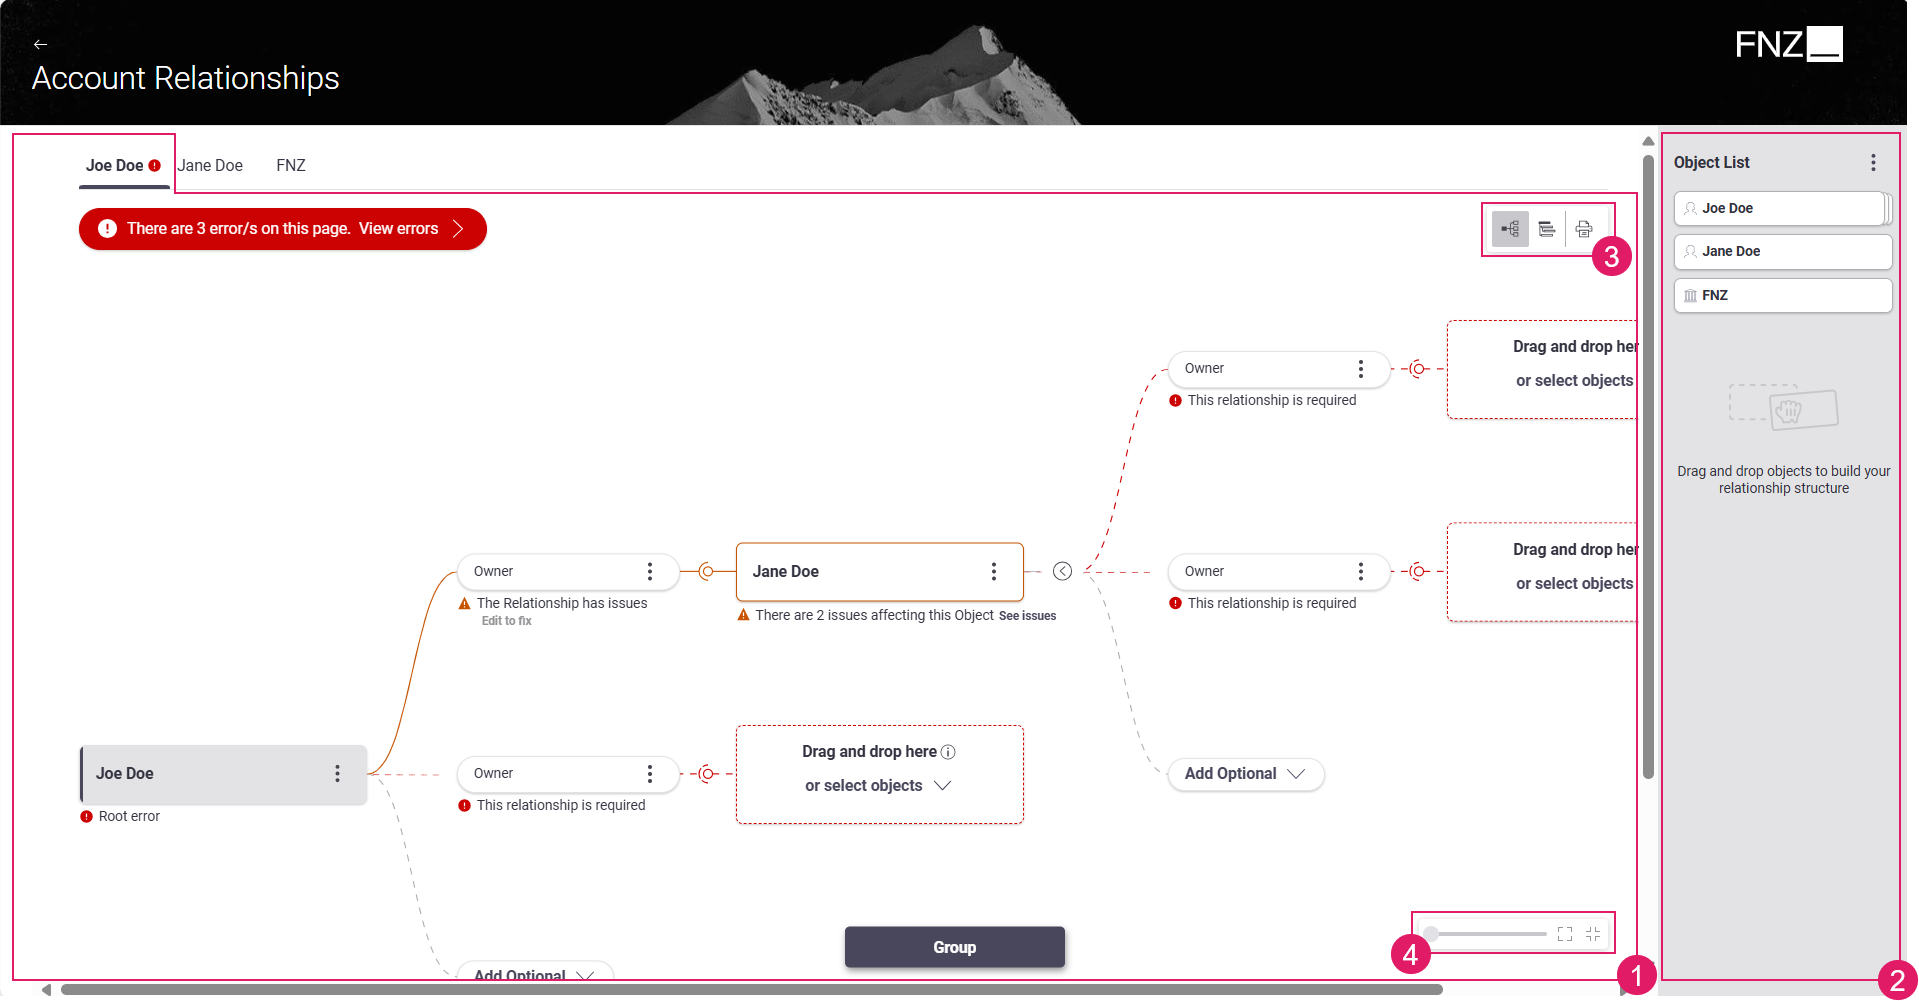 Figure 1: Relationship Definition App Task
- Content Area (Tree) (
1) — Provides a visual and comprehensive outline of defined business relationships to better support decision making and auditability. The user can perform various actions:- At Relationships level: Adding, editing or deleting a Relationship (in the latter case, its content is deleted and a placeholder is displayed).

- At Object level: Opening Object details (the user is redirected to Data Gathering ABC / App Task, or deleting an Object (in the latter case, its content is deleted and a placeholder is displayed).

- At Relationships level: Adding, editing or deleting a Relationship (in the latter case, its content is deleted and a placeholder is displayed).
- Objects List (
2) — Displays all the Objects involved in the business relationship. Objects already involved in relationships can be easily identified, and existing Relationships are automatically added once the Object is associated with the account. It is also possible to:- Search in the Objects List (if there are more than 10 items)
- Add a new or existing item by clicking on the Add button, and selecting Create new [Object] or Add existing [Object], respectively. The latter option triggers the Search functionality (see configuration details).
- View Selector (
3) — Displays the whole Relationship structure as a Tree or as a List
 . Moreover, the Print option
  optimizes the printing of the relationship in List mode.
 - Zoom Bar (
4) — Allows zooming in or out the diagram. It features two additional options:- Fit tree to window
- Reset zoom
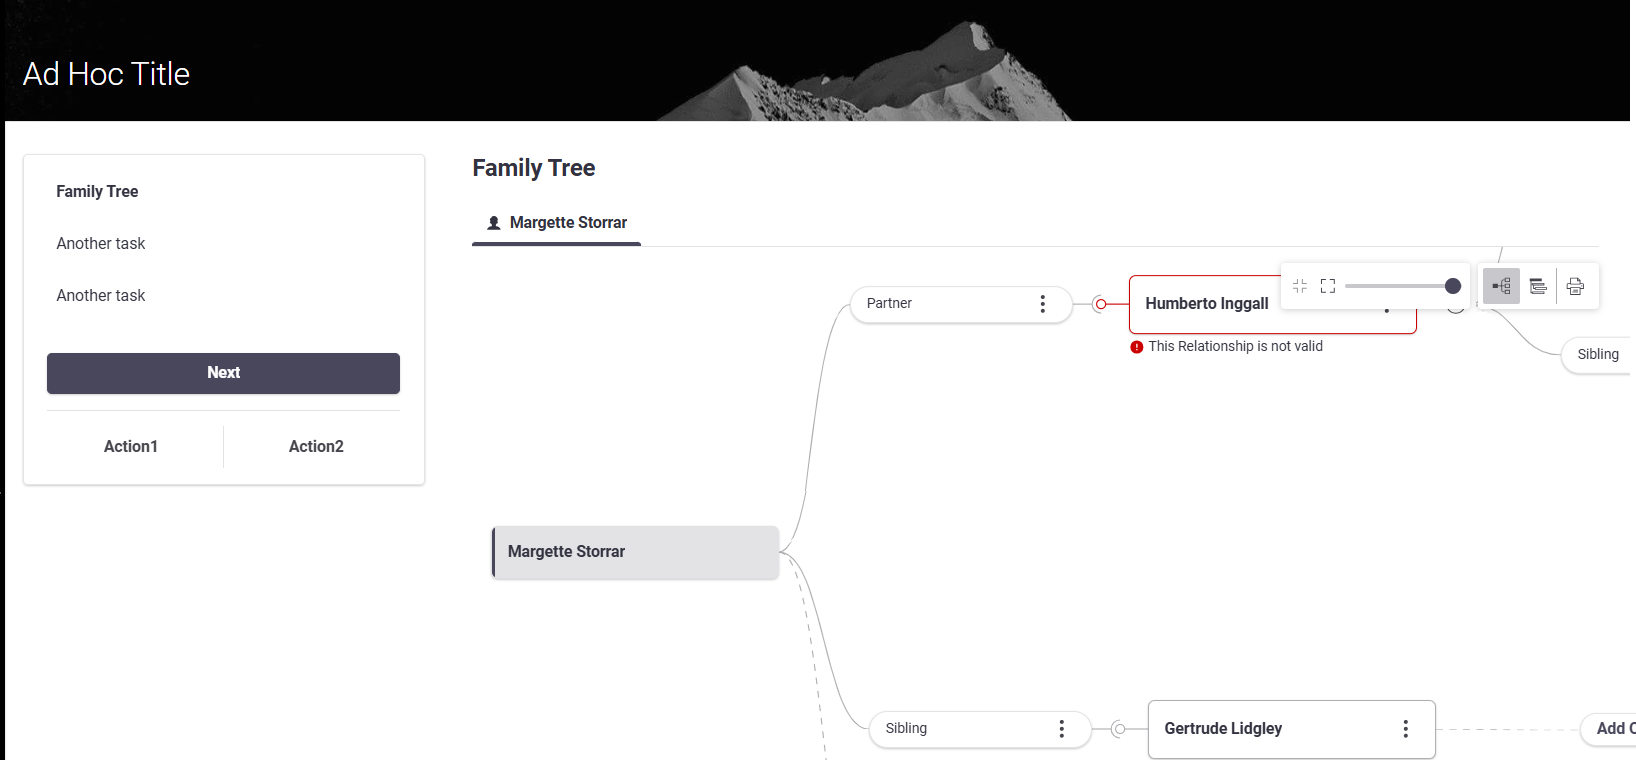
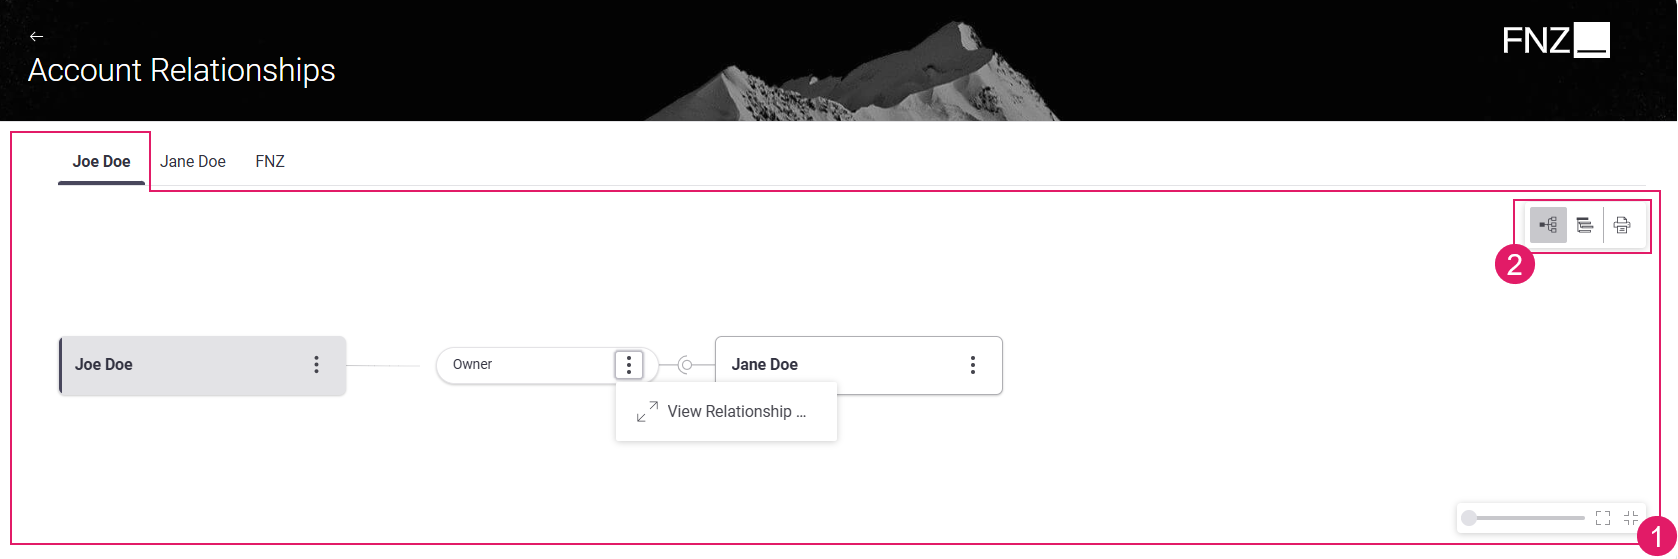 Figure 2: Relationship Review App Task
- Content Area (Tree) (
1) — Provides a visual and comprehensive outline of defined business relationships to better support decision making and auditability. The user can view (read-only mode):- Relationships details
- Object details
- View Selector (
2) — Allows displaying the whole relationship structure as a Tree or as a List . Moreover, the Print option optimizes the printing of the relationship in List View.
Configuration
The diagram overview is based on the configuration of Objects and Relationships. These are explained in detail in the sections below.
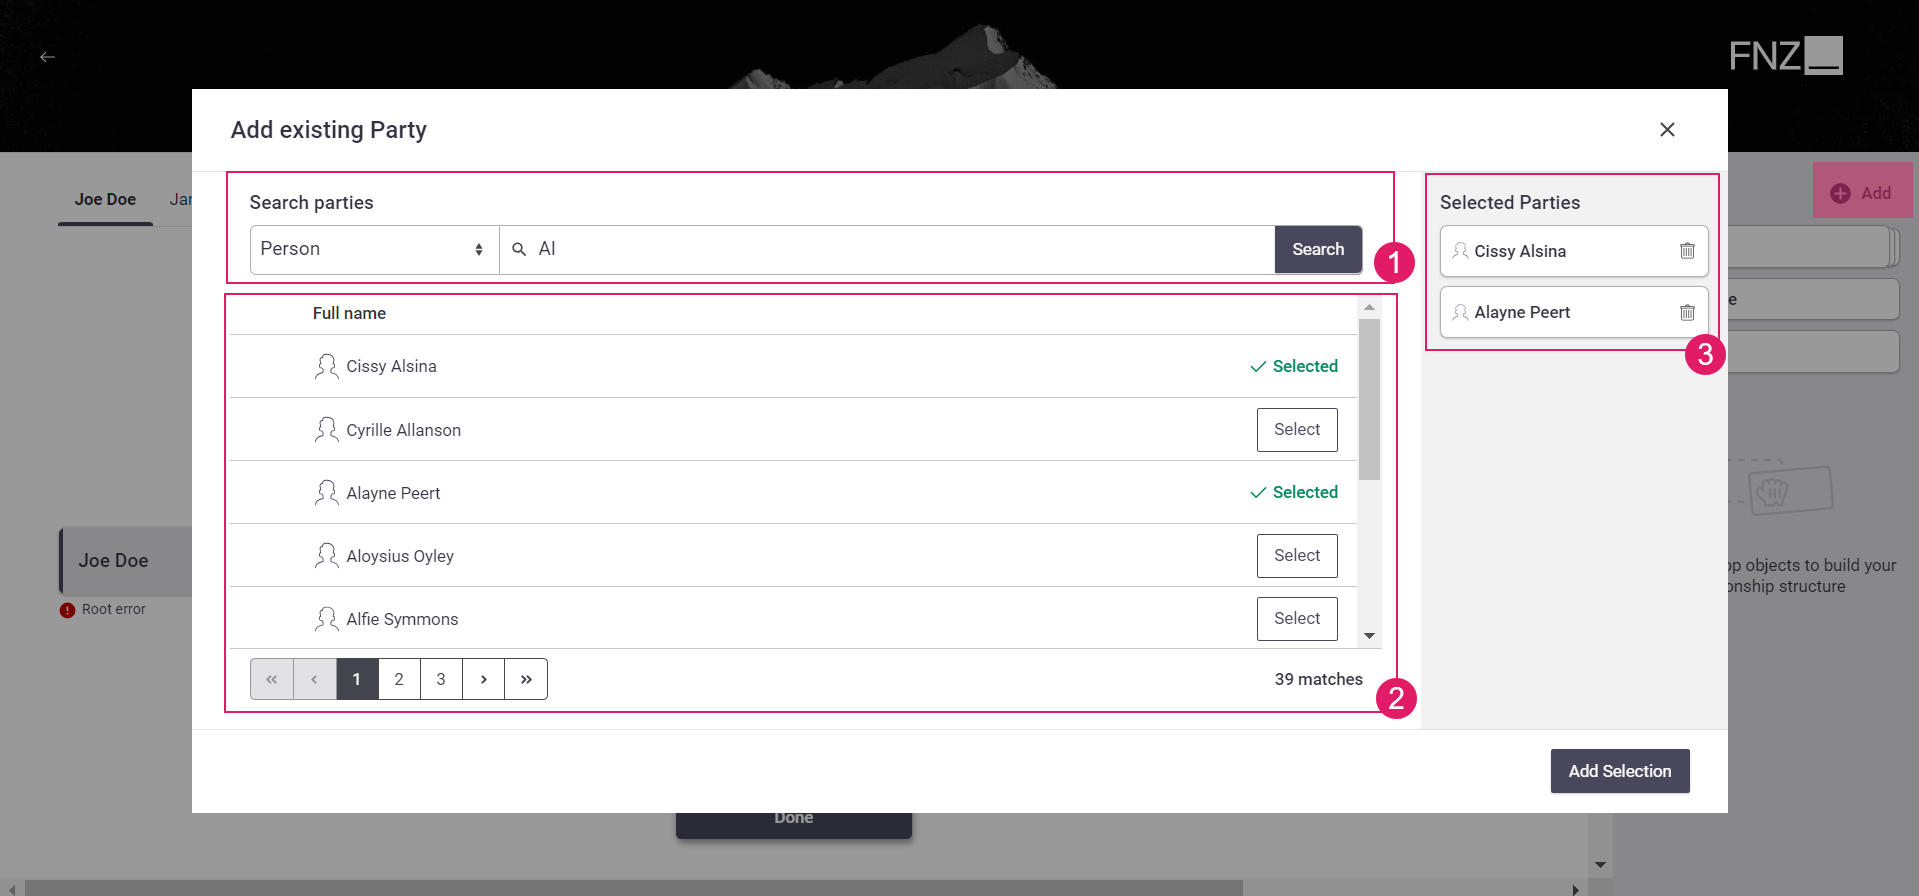
Object Search
Feature Overview
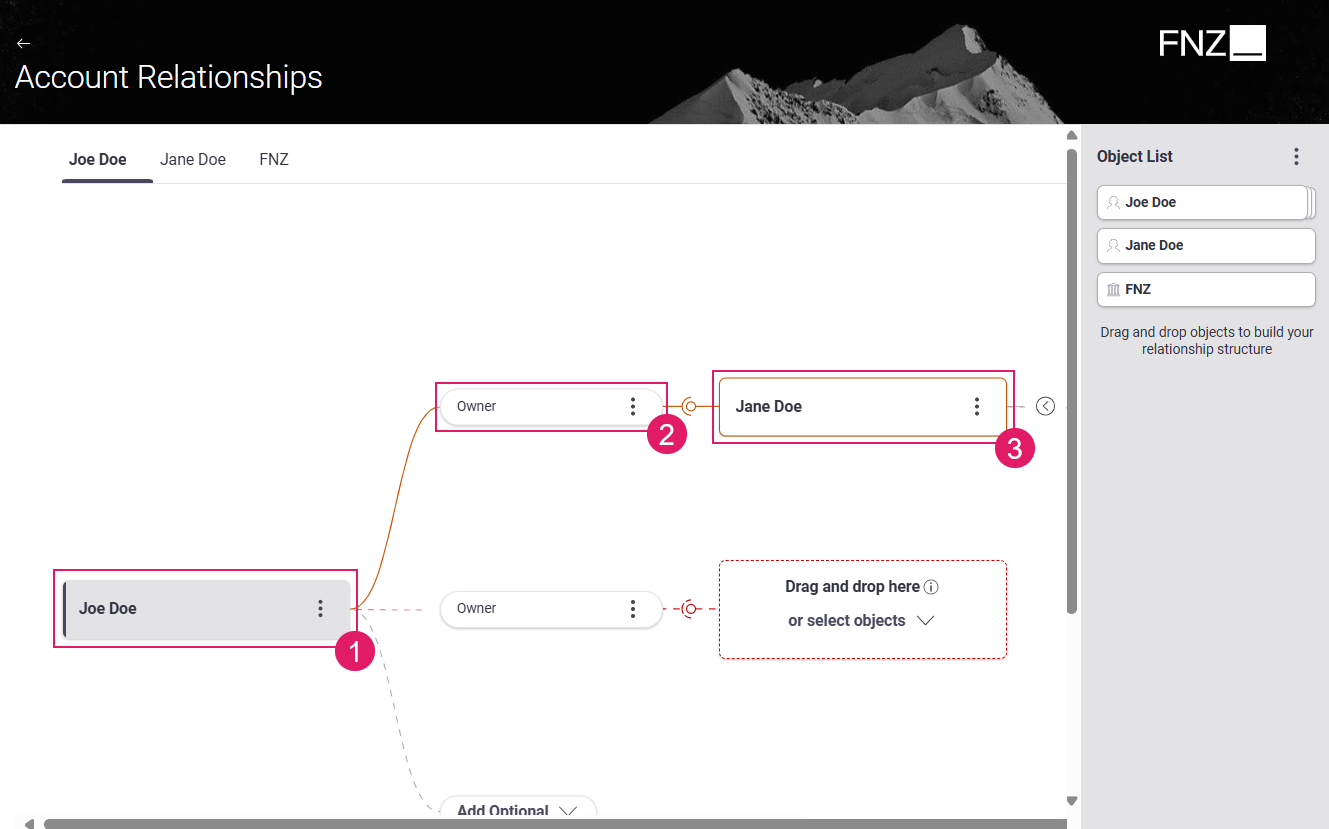
You can search and add elements from an existing Collection (external or not) in the Relationship Definition ABC. The main use case in Relationship Definition is Party Search, however it is possible to search for any Object.
- To search for existing Parties (or other Objects) in a collection, click on the Add existing [Party] button on the main data collection page.
- The Search modal window is opened. Enter the desired text in the search bar (
1) and click the Search button to view results (2). - Click on the [Select] button to actually add the Objects to the collection (they are moved to the Selected [Parties] area (
3)).
Configuration
To set the Search feature in your Relationship Definition:
- Configure a Data Logic Search Data Rule. This governs both Search Criteria and Search Results, as illustrated in details in the table below.
- The configured Data Logic BO must then be referenced in the Objects tab (Objects Data Logic field) of the Process Editor.
- See the following table for further configuration details on each search item (see image above):
| UI element | Use | Configuration |
|---|---|---|
Search Criteria (1) |
Area where you enter search data. You may have a basic search bar (a Type dropdown and a free-text search field) or custom search criteria. | The Search Mode setting in your Search Data Rule determines whether you have basic search or advanced search (configured through further settings). See Search Data Rule configuration details. |
Search Results (2) |
Area where search results are displayed. | The Search Results setting in your Search Data Rule determines how search results are structured (based on a linked Data Logic Business Object). See Search Data Rule configuration details and the note on Search Results* below. |
Selected Objects (3) |
Area displaying the selected objects. | A Relationship Definition Object Behavior associated with your Data Class (e.g., Party) determines the card layout. See configuration details. |
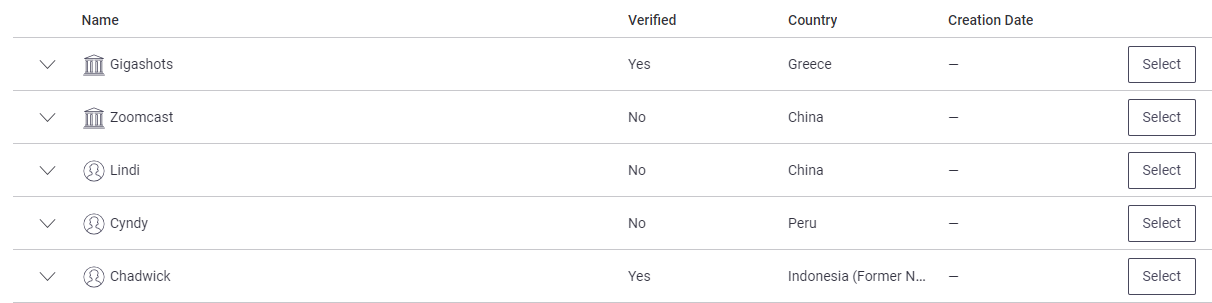
*Note on Search Results: The columns displayed in the Search Results table are computed merging all the Data Logic Controls set in the Data Logic Business Object. The merge logic is based on the Control Label ID, meaning that two Controls with the same Label Id are merged in one column. In the example below, you may have String Controls Company Name and Party Name with matching Label IDs and, thus, they are shown under one Name column. At the same time, you may have String Controls Party Name and Party Middle Name with matching Label IDs, meaning that, even in this case, only one Name column is shown.
Objects
Relationship Definition defines business relationships among roles and individuals, which are represented by Objects.
Objects are Data Class Instances that can be used as sources and targets of Relationships (e.g. Client Data Class instance, Party Data Class instances and so on).
Configuring Objects
Objects are configured in the Objects tab in the Relationship Definition App Task.

See the table below for details:
| Configuration field | Description |
|---|---|
| Object Type field | (optional): Parent Object. Data Class from which all Data Classes representing Objects and Root Objects inherit or the common Data Class (in case all Objects have the same Data Class type). If the Data Classes representing Objects do not have a common parent Data Class, you can keep the default selection Any for the Object Type field. In this case, there is no restriction on the type of the Collections set in the Objects and Root Objects fields. |
| Objects field | (mandatory) Enter a binding pointing to a Collection of Data Class instances. The Collection type must be the same as or inherit from the Data Class selected in the Object Type setting. Moreover, the referenced Data Class must be associated with one of the following Data Class Behaviors specified: Object Information (Relationship Definition Object Behavior) or Summary Mode (Summary Behavior) (used as a fallback in case the Relationship Definition Object is not defined). The information provided in the Behavior is used to display the necessary information when showing Objects in the Relationship Definition UI. Otherwise, these Data Class instances cannot be used as Objects. |
| Root Objects field | (mandatory) Specify the Collection of Data Class instances that represent the set of Objects used as "entry points" for navigation in the Relationship structure (shown as tabs in FNZ Studio Runtime). This setting must contain a binding pointing to a Collection of Data Class instances. The Collection type must be the same as or inherit from the Data Class selected in the Object Type setting. Moreover, the referenced Data Class must be associated with one of the following Data Class Behaviors: Relationship Definition Object or Summary (used as a fallback in case the Relationship Definition Object is not defined). The information provided in the Behavior is used to display the necessary information when showing Objects in the Relationship Definition UI. Otherwise, these Data Class instances cannot be used as Objects. |
| Objects Data Logic field | (optional) Data Logic Business Object that defines Controls and Data Rules related to Objects. This Data Logic is necessary only if the task should support searching for new Objects to be added using the Search Data Rule. In this case, the Data Logic BO must contain a configured Search Data Rule. If no Data Logic is selected, the Search feature is not supported. Moreover, the Data Logic BO should contain a Control corresponding to the Object Collection (which must be assigned to the Data Logic wrapped in its container Data Class). All other Controls and Data Rules are ignored. |
Relationships
The connection between roles and individuals is represented by Relationships.
Relationships are Data Class instances representing connections among Objects.
Configuration Overview
The configuration of Relationships is complex and requires several steps. Following is an overview of the main settings (each of them is explained in details in a separate section):
- Configuring Data Classes — Relationships are represented as Data Class Instances. These Data Classes must be configured following specific requirements.
- Defining Relationships — Set the binding to the Indexed Collection which contains all the Relationship instances managed by the App Task. This is done mainly in Relationship Definition App Task > Relationships tab > Relationships and Relationship Type fields. See details.
- Configuring Relationship metadata — Set the list of Relationship types (Data Classes) that are supported in the task. This is done mainly in Relationship Definition App Task > Relationships tab > Controls field. See details. See details.
- Defining Relationship Sentries — Define Sentries which govern the visibility state of the Relationships for users in FNZ Studio Runtime. This is done mainly in Relationship Definition App Task > Relationships tab > Type Sentry, Instance Sentry fields. See details.
- Defining Relationship Rules (Information framework) — Specify the Rules to be applied to Relationships, which can be of two types:
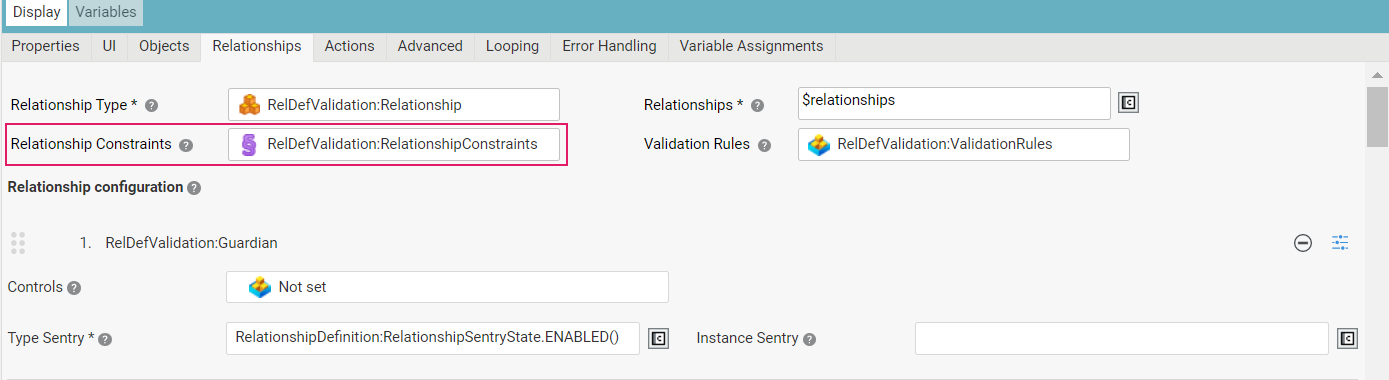
- Enforced Rules. This is done mainly in Relationship Definition App Task > Relationships tab > Relationship Constraints field.
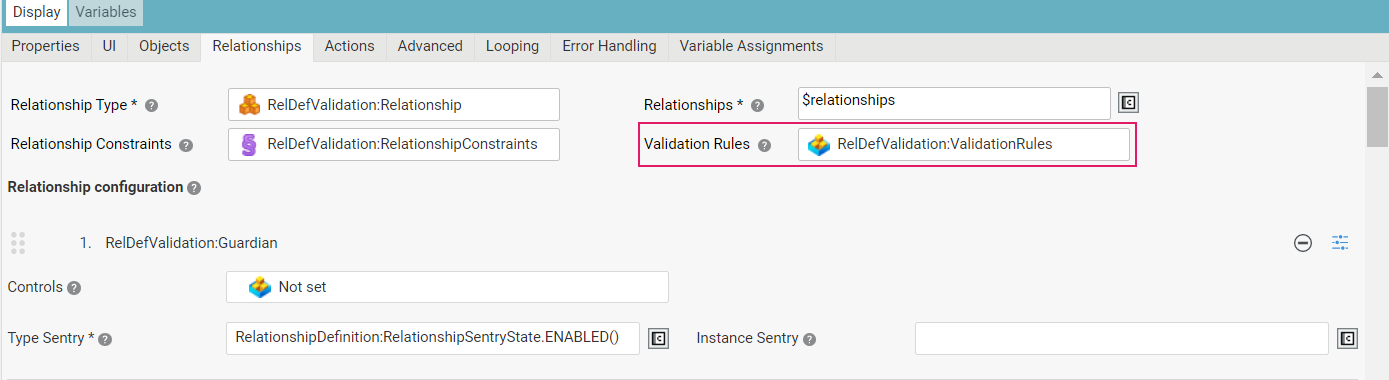
- Validation Rules . This is done mainly in Relationship Definition App Task > Relationships tab > Validation Rules field. See details
Configuring Data Classes
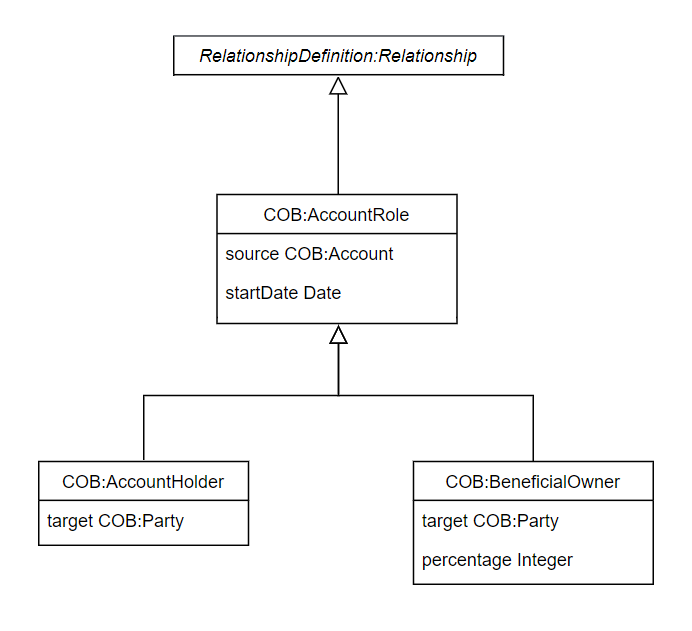
The main purpose of the Relationship Definition App Tasks is defining Relationships among Objects. These Relationships are represented in the Platform Business Object model as Data Class Instances. For example, the fact that the client Mark Smith is the account holder for the bank account BA12345678 can be represented by an instance of a Data Class called AccountHolder.
Data Classes representing Relationships have the following requirements:
- Must have a property called source and a property called target: these point to the Data Class instances representing the Objects that the Relationship connects (for example the Data Class instance representing the client
Mark Smithand the Data Class instance representing the bank accountBA12345678). Use the Script FunctionsRelationshipDefinition:GetSourceandRelationshipDefinition:GetTargetto access the content of the source and target properties. - Must inherit from the Platform built-in Data Class
RelationshipDefinition:Relationship.
It is also possible to define more complex hierarchies among Relationship Data Classes, for example creating "abstract" parent Data Classes with properties or functions that are common to multiple Relationship types. In this case, the "abstract" Data Classes that only act as aggregators of common features but cannot be instantiated do not need to have source and target properties. Consider, for example, the following sample Data Model:
When Relationships are displayed in Studio Runtime, the default Label used for them is the Label Business Object corresponding to the Data Class representing the Relationship. The Business Object Id of this Label is in the format {PackageId}:aw.DataClass.{DataClassId}. For example, for the Data Class Onboarding:AccountHolder, the default Label used by the Relationship Definition App Task is Onboarding:aw.DataClass.AccountHolder. You can use the Edit Labels Editing Label Translations in the Process Editor to create and translate such labels. If necessary, this default can be overridden by defining the Detailed Relationship Behavior on the Data Class representing the Relationship. Consider that defining this Behavior on the Data Class is optional.
Defining Relationships
Relationships are defined in the Relationships tab of the Relationship Definition App Task.

| Configuration field | Description |
|---|---|
| Relationships field | (mandatory) Set the binding to the Indexed Collection which contains all the Relationship instances managed by the App Task. The App Task automatically populates the Collection by adding and removing Relationships when the user adds and removes them in FNZ Studio Runtime. Relationships can also be added to the Collection by adding a Script task before/after the Relationship Definition/Relationship Review App Tasks, if necessary. Notes: All Relationships in the Collection must have the source and target properties set to one of the Objects (or Root Objects) managed by the App Tasks, otherwise they are considered invalid. Additionally, it is not possible to have Relationships whose source and target properties are set to the same Object. Finally, since App Tasks manipulate the Collection and changes need to be persisted at Process level, the Relationship Collection needs to be stored in the Value Store; for example, it can be bound to a Process variable. |
| Relationship Type field | (optional) Pent Relationship Type: this is the Data Class from which all Data Classes representing Relationships inherit or the common Data Class (in case all Relationships have the same Data Class). Only Data Classes which inherit from the built-in Data Class RelationshipDefinition:Relationship (default) can be selected. The Collection type provided in the Relationships setting (above) must be the same as or inherit from the Data Class selected in the Relationship Type setting. |
| Update Function field | (optional) Script Function that defines the logic to be executed (if any) when Relationships are added or removed from the Relationships Collection in FNZ Studio Runtime. In the Variable Assignments for the Script Function (Variable Assignments tab), use the implicitly defined $addedRelationship and $removedRelationship variables to access the Relationship instance that was added/removed. Consider the following: the Update Function must be simple and lightweight: heavy functions could have a highly negative impact on performance. Moreover, Integration Calls (Database queries, Web Services call and so on) should be avoided. In general, we recommend using this setting only when strictly necessary, so as not to affect Solution maintainability. Moreover, the System Health Sensor Relationship Definition Update Function Execution Time checks the average execution time of Update Functions defined in Relationship Definition App Tasks to ensure optimal UX. See full information. |
Configuring Relationship Metadata
The Relationship Configuration section of the Relationships tab allows setting the list of Relationship types (Data Classes) that are supported in the task.
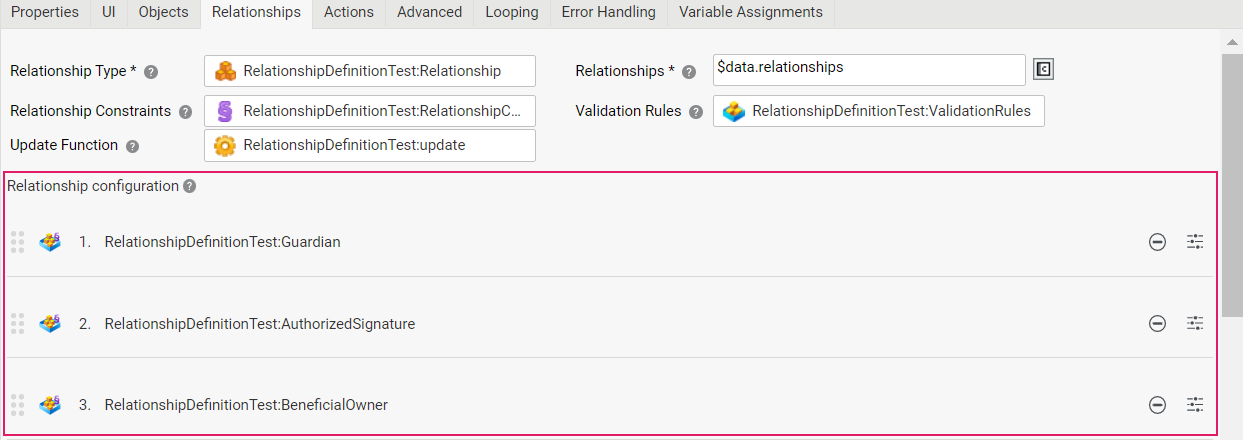
For example, you can specify that Relationships of type AccountHolder and BeneficialOwner are supported, while Relationships of type JointOwner are not. The Data Classes to be supported can be chosen among all Data Classes that inherit from the one selected in the Relationship Type field. In FNZ Studio Runtime, the user will only be able to add Relationships of the selected Data Class types. If the Relationships Collection set in the same tab contains Relationships whose type is not among the configured ones, those Relationships are considered invalid and can only be removed in the UI. You can also reorder Data Classes by dragging and dropping them. This defines the order in which Relationship instances are shown in Studio Runtime for each source Object.
Note that Relationships whose type is a Data Class which inherits from one of the selected types are also not supported and considered invalid.
The table below illustrates the configuration details available in this section:
| Configuration field | Description |
|---|---|
| Controls field | (optional) You can select a Data Logic Business Object for each added Data Class. This is used when editing Relationship metadata information in the dedicated popup in FNZ Studio Runtime. The Data Logic describes all Relationship metadata information to be edited in the popup together with their sorting order, grouping, visibility and so on (see Data Logic Controls documentation). If no Data Logic is set, no metadata editing popup is available at runtime. The Data Logic excludes the source and target properties of the Relationship Data Class by default, since these are not part of the metadata information. Note that only the content of the Controls tab of the Data Logic is used (Data Class, Primitive, Collection of Primitive (with a Catalog Rule), Section Group (without navigation) and Text Controls are supported). All Data Rules defined in this Data Logic are ignored. The Data Rules necessary for Relationship metadata information validation must be specified in the Validation Rules Data Logic (see below). |
| Variable Assignments fields | The Data Logic selected above must have an Assigned Variable whose type is compatible with the Data Class for which it is selected (same Data Class or a parent Data Class). In the Variable Assignments tab, use the implicitly defined $relationship variable which contains the Relationship instance the user selected to populate the Assigned Variable of the Data Logic Business Object. |
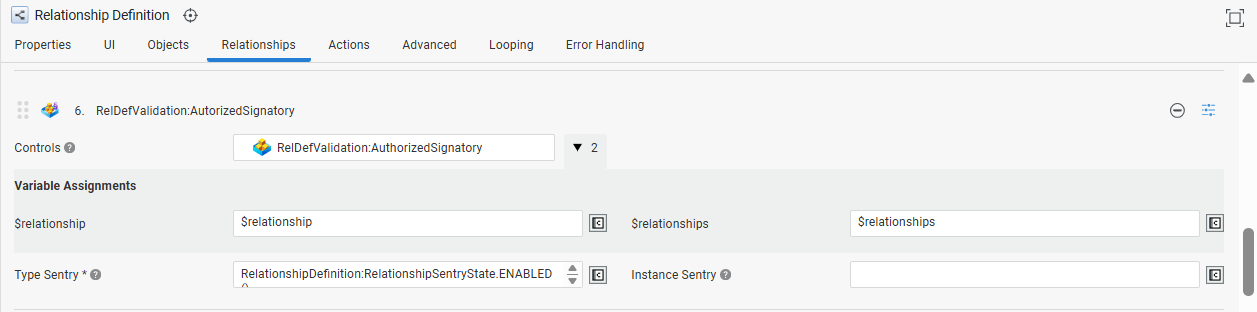
Defining Relationship Sentries
Optionally, for each Data Class it is possible to define two types of Sentries, which govern the state of the Relationships of the selected type for users in FNZ Studio Runtime: Enabled (for the Relationship Definition App Task only), Disabled, Hidden. Use the Functions available in the Data Class RelationshipDefinition:RelationshipSentryState to return one of these states.
Note that, for the Relationship Review App Task, the Enabled sentry is treated as a Disabled sentry and, therefore, has no effect.

| Configuration field | Description |
|---|---|
| Type Sentry | Defines whether Relationships of the given type are visible and can be added, removed or updated (for the Relationship Definition App Task only). The value is applied to all instances of that type, unless overridden by the Instance Sentry (see below). It is also applied to Relationship metadata (if any), unless overridden by the Data Logic selected for the Relationship. This setting is mandatory and initialized to RelationshipDefinition:RelationshipSentryState.ENABLED() for Relationship Definition App Tasks and to RelationshipDefinition:RelationshipSentryState.DISABLED() for Relationship Review App Taskss. If the Type Sentry state is Hidden, all instances are hidden regardless of the Instance Sentry state. Use the implicitly defined $rootObject variable to refer to the current Root Object in Studio Runtime. |
| Instance Sentry | (optional, empty by default) Defines whether specific Relationship instances are visible and can be removed or updated (for the Relationship Definition App Task only). It overrides the Type Sentry for specific instances of that type and it is also applied to Relationship metadata (if any), unless overridden by the Data Logic selected for the Relationship. If empty, the Type Sentry is inherited for all instances; on the other hand, if this sentry returns a value only for some instances, the Type Sentry is inherited for the other instances. Use the implicitly defined $relationship variable to refer to the current instance and the $rootObject variable to refer to the current Root Object in Studio Runtime. |
Following are the possible Enabled/Disabled combinations for the Relationship Definition App Task:
- Type sentry: Enabled; Instance sentry: Enabled Relationships of that type can be added, and the specific instance can be edited and removed
- Type sentry: Enabled; Instance sentry: Disabled Relationships of that type can be added, but the specific instance cannot be edited nor removed
- Type sentry: Disabled; Instance sentry: Enabled Relationships of that type cannot be added, but the specific existing instance can be edited and removed
- Type sentry: Disabled; Instance sentry: Disabled Relationships of that type cannot be added, and the specific existing instance cannot be edited nor removed
Note: We recommend against having different types of visibility for Relationships of the same type with the same source in a given Relationships tab. For example, if three Relationships of a given type exist but the user sees only two of them while knowing that up to three Relationships are allowed, they may assume that one more Relationship can be added.
Defining Relationship Rules
Finally, the Relationship Definition App Task provide configuration features to specify the Rules to be applied to Relationships to ensure that the defined structure is compliant with business regulations. These Rule will prevent violations or, if not possible, highlight them in the UI.
Rules can be of two types:
- Enforced Rules. These rules are enforced by the UI wherever possible, meaning that the user is prevented from performing certain actions (e.g., adding a wrong Relationship). Enforced rules are based on Rule Business Objects and are configured in the Relationship Definition App Task > Relationships tab > Relationship Constraints field.
- Validation Rules. These Rules are validated, that is, they are not enforced, rather, a validation message is reported to the user in case of violation. Validated rules are based on Data Rules (Data Logic Business Object) and are configured in the Relationship Definition / Relationship Review App Task > Relationships tab > Validation Rules field.
Content Structure: Behaviors
When building a solution that uses Data Driven UIs, the User Interface is automatically generated based on:
- The specific App Task used in the Process, such as the Relationship Definition App Task
- The business logic defined in one or more Data Logic Business Objects
- The data model defined through Data Classes
When the Data Logic is translated in a data-driven UI, controls are rendered as form elements by default.
However, you can further structure content based on one ore more display modes, which allow showing relevant information for Objects and/or Relationships. These are configured through Data Class Behaviors (Relationship Definition Object and Detailed Relationship, respectively).
Object Information (Relationship Definition Object Behavior)
Feature Overview
The Relationship Definition provides capabilities to define Relationship Objects. Relationship Definition Object Behavior allows showing the relevant information for each Object in the Relationship Definition App Task.
Configuration
Behaviors are configured at Data Class level. A Behavior defines the way in which a certain Data Class behaves when it is represented in an automatically-generated UI. To configure a Behavior for your Data Class, you first need to got to the Behaviors tab of your Data Class and drag a Relationship Definition Object Component to the edit area. The table below summarizes how to configure each item.
| UI element | Use | Configuration |
|---|---|---|
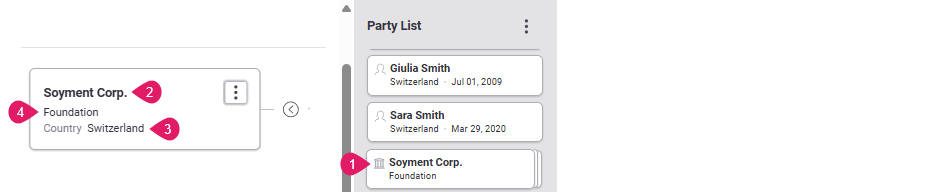
Card icon (1) |
Icon or image representing the content of the card | Icon Type / Icon Id / Resource Id properties (Configuration tab). Icons can be chosen from the set of default icons provided by FNZ Studio or by selecting a Resource Business Object. |
Card title (2) |
Title displayed on top of the card. | Title property (Configuration tab). It can either be chosen from the String properties of the Data Class, or defined using a Script. |
Contextual information (Key-value pairs) (3) |
Additional contextual information displayed in the auto-generated UI as key-value pairs (e.g., Country - [Country code]) | Label - Value properties ( Labeled Values tab). Each Label is a Label Business Object representing the name of the field, and each Value is the value written next to the label. The value can either be a property of the Data Class or can be built using a Script. |
Additional information (unstructured) (4) |
Additional values to be shown in the Auto-generated UI (e.g., street, city) | Unlabeled Value properties (Unlabeled Values tab). Each value can either be a property of the Data Class or can be built using a Script. You can reorder Unlabeled values through drag-and-drop. |
Relationship Details (Detailed Relationship Behavior)
Feature Overview
Relationship Definition provides capabilities to define Relationships between Objects. The Detailed Relationship Behavior allows enhancing the details and information shown next to each Relationship in the Relationship Definition App Task.
Configuration
First of all, consider that the Detailed Relationship Behavior is meant to be applied only to Data Classes that are actual Relationships for the Relationship Definition App Task. This is represented in the data model through the inheritance from the Data Class RelationshipDefinition:Relationship. Therefore, if a Data Class has Detailed Relationship Definition Behavior but is not inheriting from RelationshipDefinition:Relationship, a validation error is shown.
To configure a Behavior for your Data Class, you first need to got to the Behaviors tab of your Data Class and drag a Detailed Relationship Component to the edit area. The table below summarizes how to configure each item.
| UI element | Use | Configuration |
|---|---|---|
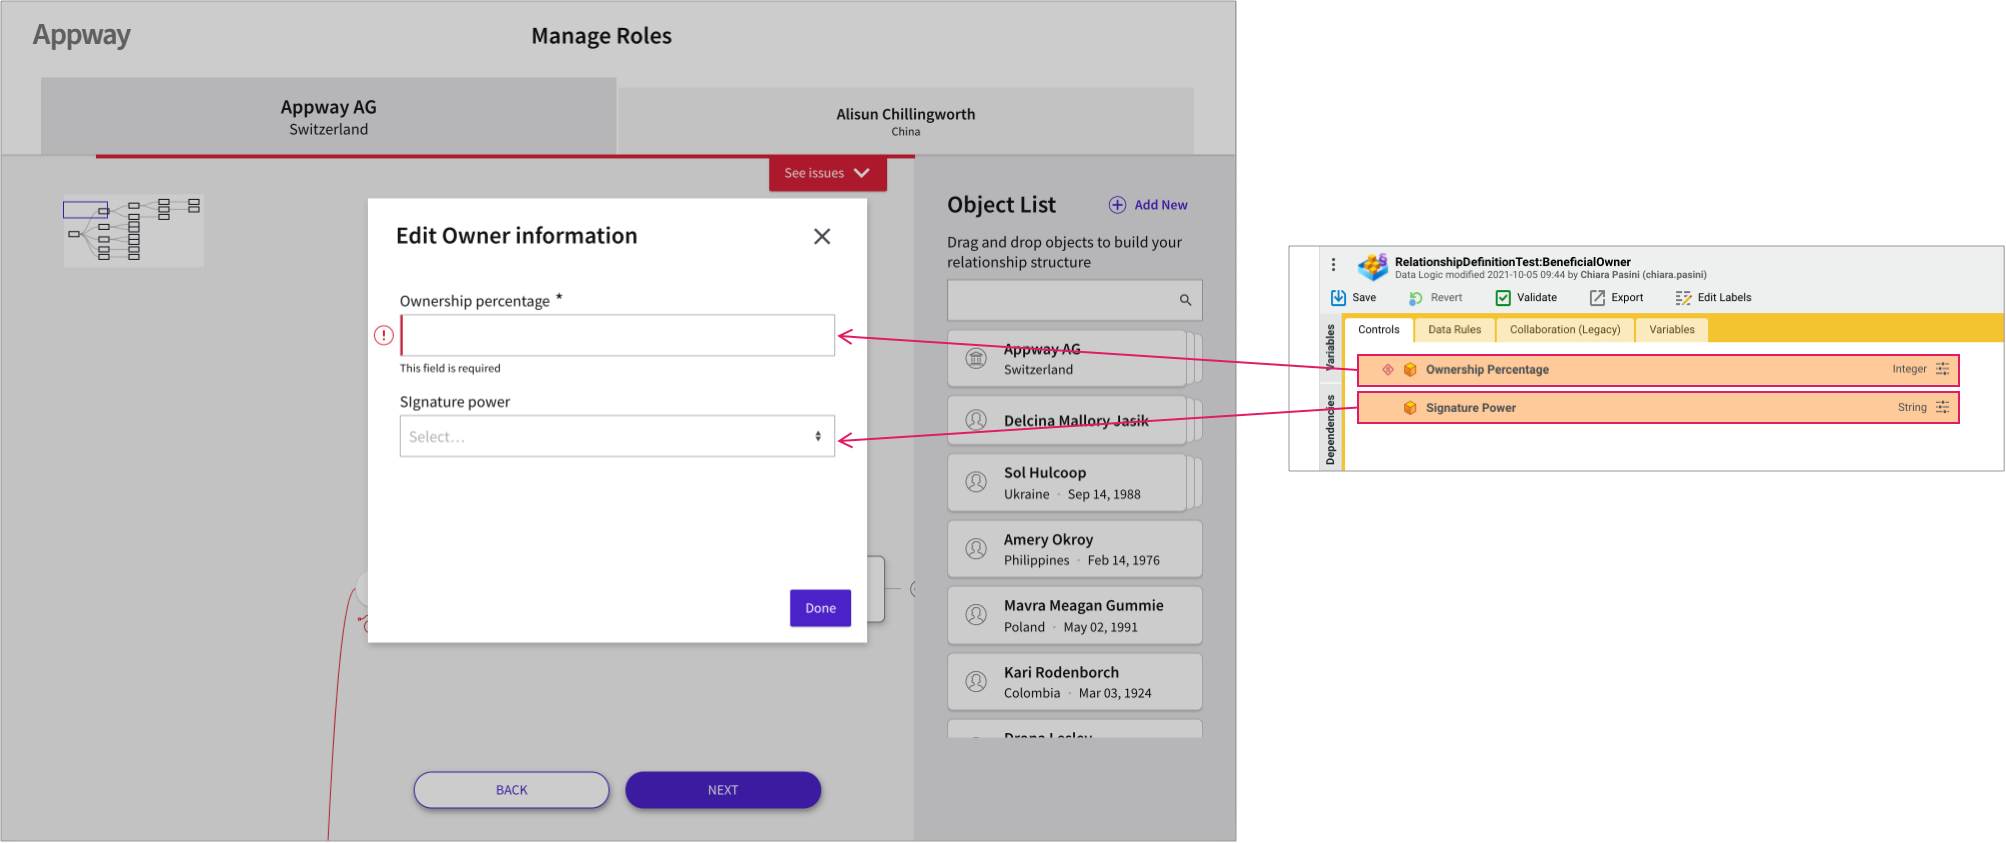
Title (1) |
Title displayed for the Relationship (e.g., Beneficial Owner, Authorized Signatory and so on). | Label property (Configuration tab). It must be a Label Business Object. The Variable Assignments option allows you to define a variable (e.g., ownership percentage). |
Tooltip (2) |
Additional information on the Relationship shown in a tooltip. | Description property (Configuration tab). It must be a Label Business Object.The Variable Assignments option allows you to define a variable (e.g., ownership percentage). |
Information Framework: Validation
Validation Overview
The information framework in Relationship Definition provides continuous feedback and annotations on the fixes and actions necessary to continue in the relationship design activity.
The information framework consists of two different types of validation:
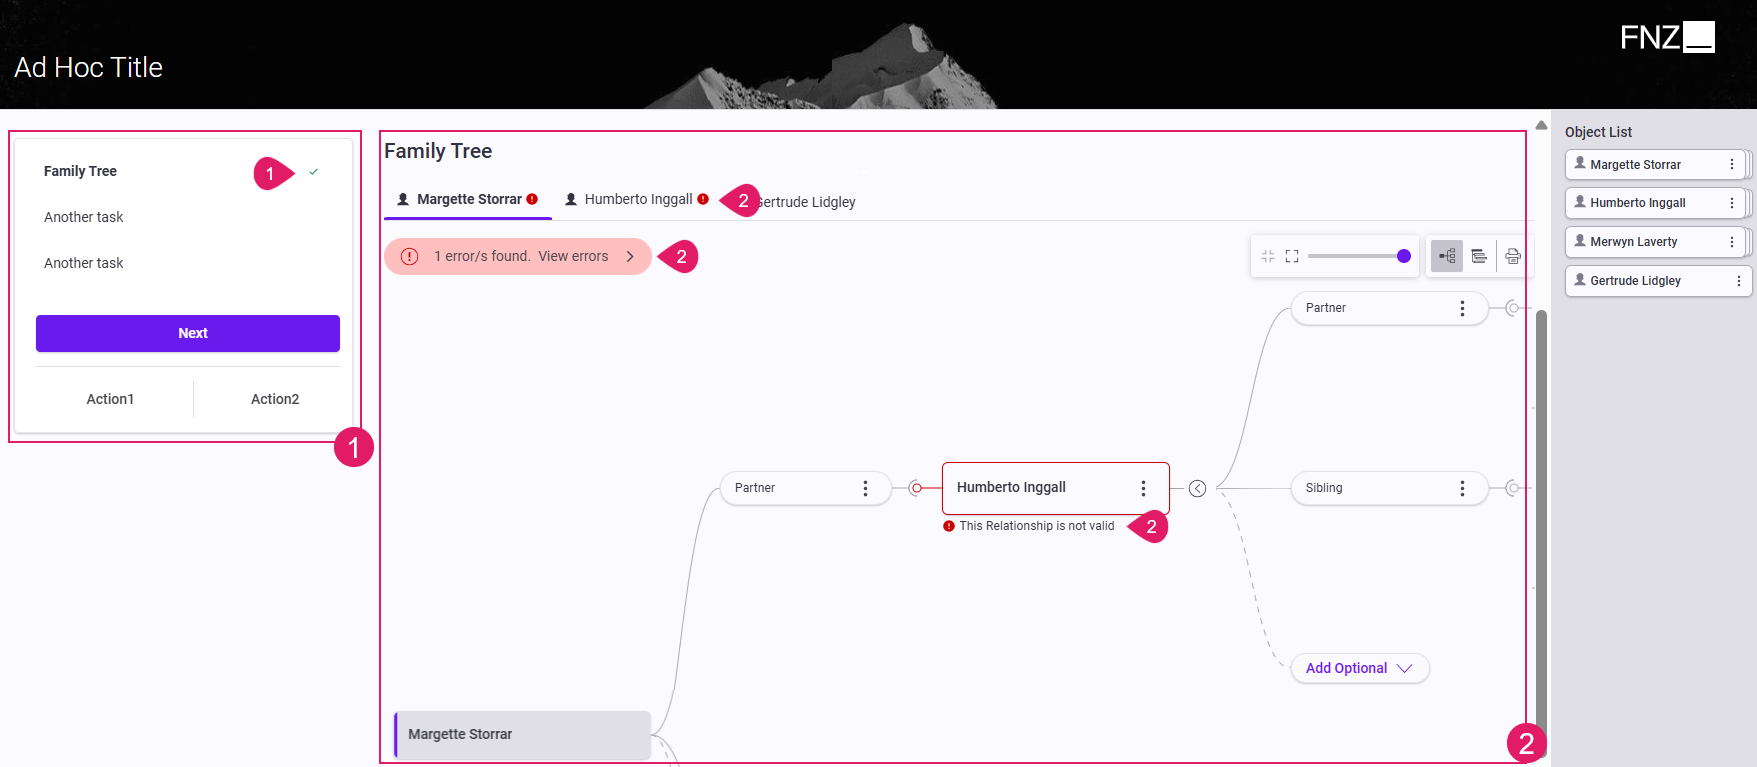
- Sidebar (Ad-Hoc Navigation Validation) (
1): The sidebar shows the validation status of each step in the navigation (i.e. if the step is complete or incomplete). This way, the user is provided with an overview of missing steps and can take action to complete all their tasks. - Content Area (Structure Validation) (
2): The Relationship Definition App Task provide configuration features to specify the Rules to be applied to Relationships.
Navigation Validation (Ad-Hoc Sub-Processes)
Feature Overview
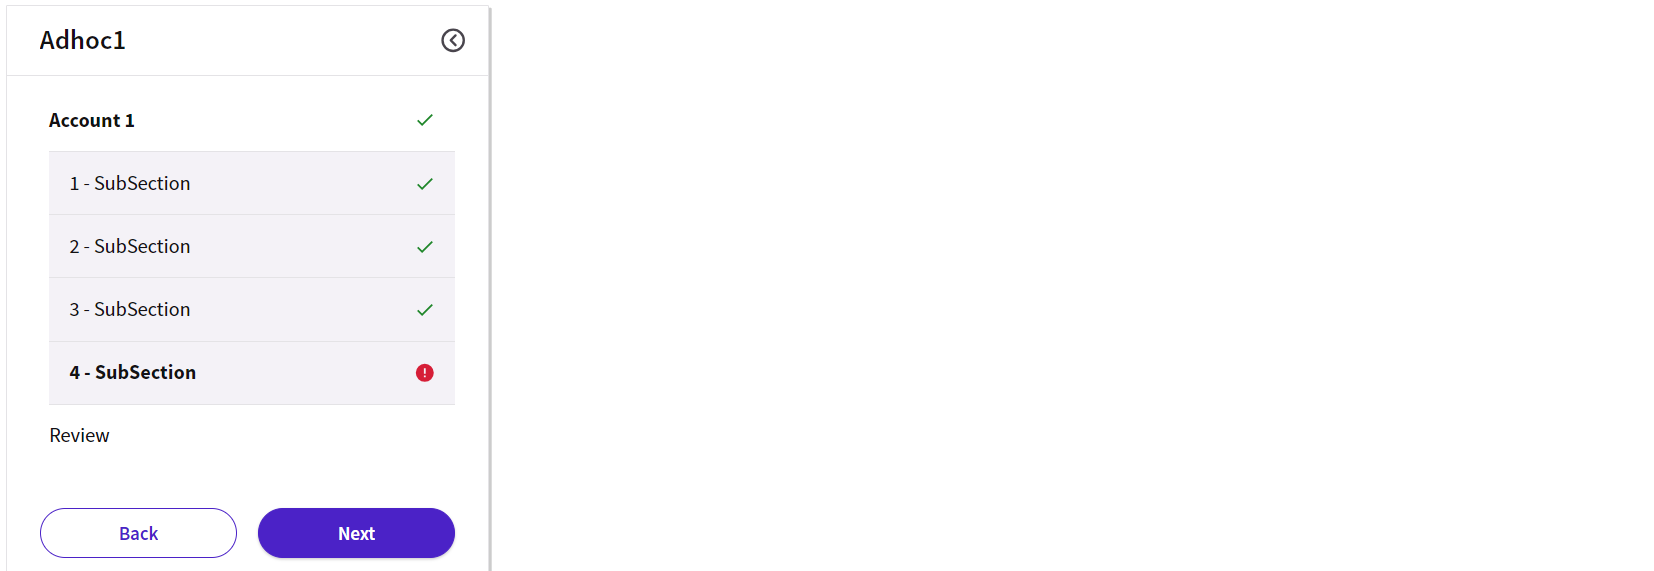
The sidebar shows the validation status of each step in the navigation (i.e. if the step is complete or incomplete). When validation is configured, users are provided with an overview of errors and can quickly take action where needed. Valid/ invalid Navigation Items are visually indicated by a badge.
Configuration
To have navigation validation rendered in your Relationship Definition, you need to perform the following basic step:
- Your Relationship Definition App Task must be contained in and Ad-Hoc Sub-Process Component.
- Go to the Ad-Hoc tab of your the Relationship Definition Process Editor and configure Validation Badges as described below.
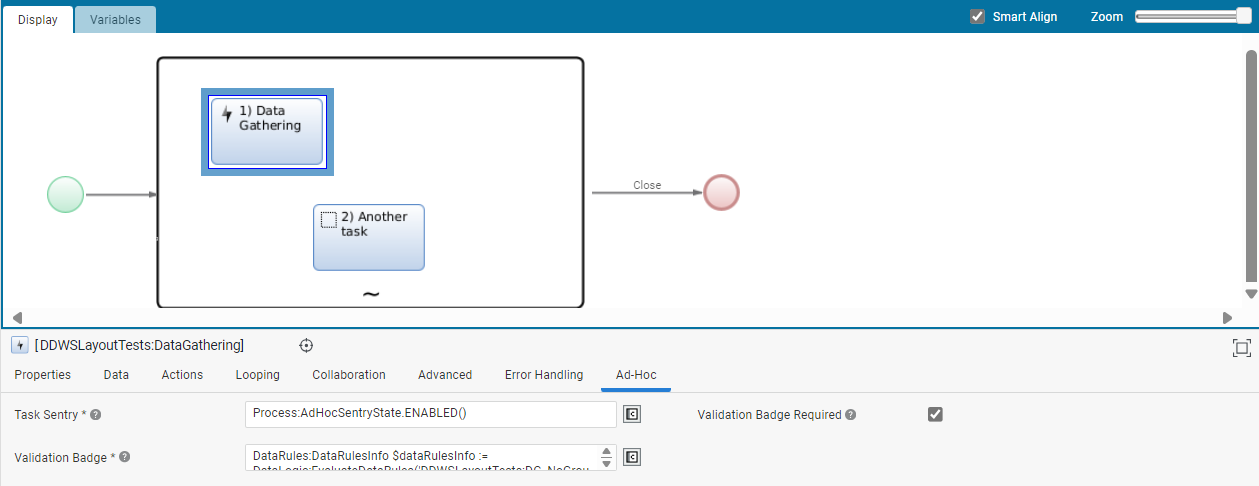
| Property | Configuration |
|---|---|
| Validation Badge Required checkbox | Select this checkbox if you want validation badges to be shown. If a Validation Badge is configured on a Navigation Item, a (red/green) badge may be shown based on the configuration set by the developer (e.g., a green badge indicates there are no blocking issues, a red badge indicates there is at least one blocking issue). |
| Validation Badge field | Enter the expression that defines the condition which governs the validation badge for the current item, namely: Process:AdHocValidationBadgeState.OK() (default value): the Navigation Item state is valid; Process:AdHocValidationBadgeState.NOT_OK(): the Navigation Item state is not valid; Process:AdHocValidationBadgeState.NO_BADGE(): the validation badge is hidden. |
Structure Validation (Relationship Rules)
While defining business relationships, the user needs to be guided through the whole process to ensure that the defined structure is compliant with business regulations. The Relationship Definition App Task provide configuration features to specify the Rules to be applied to Relationships. Example of Rules may be: 'Each account can have at most 1 account holder and not more than 10 beneficial owners', or 'The account holder cannot be a minor'.
There are basically two ways to define rules on Relationships:
- Enforced rules: The UI prevents the user from performing certain actions, such as associating a wrong type of Object with a Relationship or exceeding the number of Relationships of a certain type. These rules are enforced by the UI wherever possible. Enforced rules are configured through Rule Business Objects. Note that this option is available for the Relationship Definition App Task only. See details in the section below.
- Validation rules: Issues are highlighted in the UI and the user is guided to fix them. These Rules are validated, that is, they are not enforced, rather, a validation message is reported to the user in case of violation. Validated rules are configured through Data Rules (Data Logic Business Object). Note that this option is available both for the Relationship Definition and the Relationship Review App Task. The two approaches can be combined in a Relationship Definition App Task to cover different use cases. See details in the section below.
Enforced Rules
Feature Overview
Enforced Rules allow expressing constraints for a given Object used as a source of Relationships. Constraints may be:
- Which types of Relationships can be created, including the type of the allowed target Objects (defined by the type of the target property of the Relationship Data Class).
- The minimum number of Relationships of a given type.
- The maximum number of Relationships of a given type
Based on these constraints, the UI prevents the user from adding non-allowed Relationships, or more than the maximum number of Relationships of a given type, and it shows placeholders for mandatory Relationships (minimum number bigger than 0).
Configuration
Enforced Rules are based on the Rule Business Object.
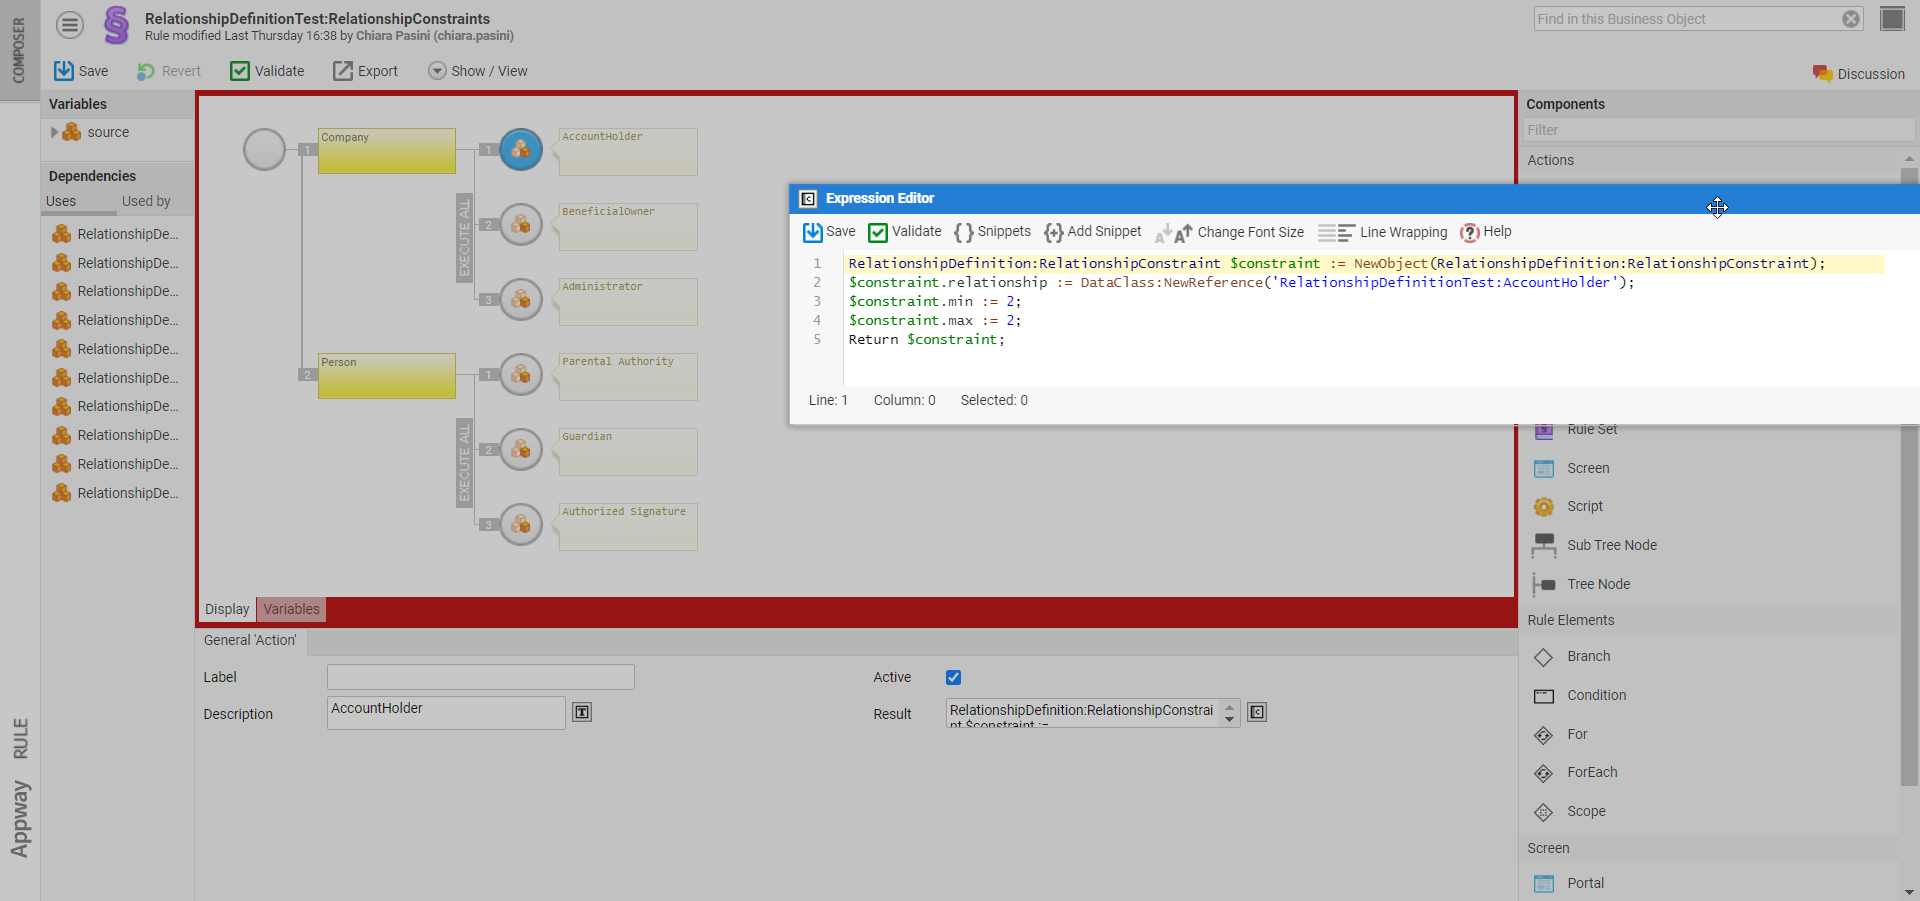
Enforced Rule constraints are modeled using instances of a Platform built-in Data Class called RelationshipDefinition:RelationshipConstraint which has the properties:
relationship: a Data Class Reference of the Relationship Data Class being constrainedmin: an integer representing the minimum number of Relationships of the type being constrainedmax: an integer representing the maximum number of Relationships of the type being constrained
Example:
RelationshipDefinition:RelationshipConstraint $constraint := NewObject(RelationshipDefinition:RelationshipConstraint);
$constraint.relationship := DataClass:NewReference('RelationshipDefinitionTest:AccountHolder');
$constraint.min := 1;
$constraint.max := 2;
Return $constraint;
To set the configured Rule Business Object for your Relationship Definition App Task, use the Relationship Constraints property (Relationships tab).
Configuration details are illustrated below:
| Configuration field | Description |
|---|---|
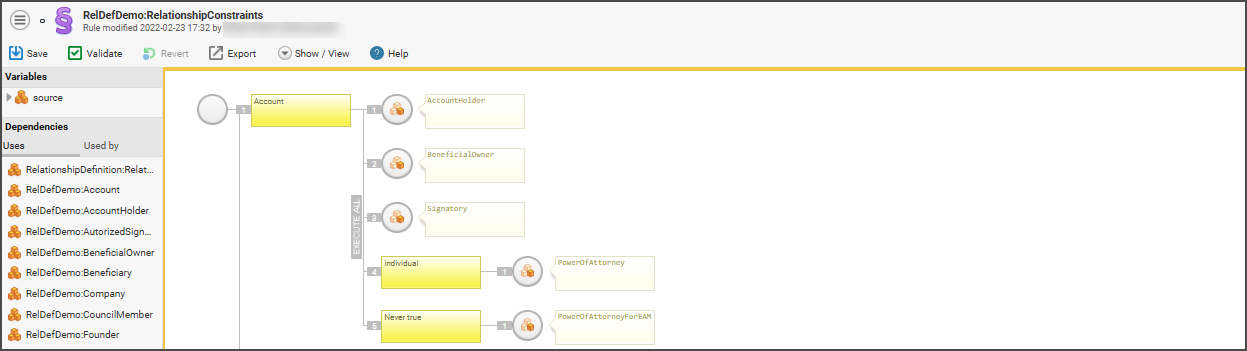
| Relationship Constraints field | Select a Rule Business Object. The Return Type of the Rule Business Object must be an Indexed Collection of RelationshipDefinition:RelationshipConstraint. If no Rule Business Object is set, no Rules of this type are applied. The RelationshipDefinition:RelationshipConstraint instances are built and returned using Data Actions in the Rule Business Object. The Rule Business Object is executed once for each Object provided in the Root Objects Collection and for each Object (if reachable from Root Objects) in the Objects Collection. The Rule decision tree goes through decisions such as "is the source Object a legal entity" or "is the source Object age above 18", and finally returns a Collection of RelationshipDefinition:RelationshipConstraint instances, which represent the constraints to be applied considering that Object as a source. |
| Variable Assignments fields | To assign the current source Object, whose constraints must be calculated to the Rule Business Object, an implicitly defined variable called $object is available when assigning variables to the Rule Business Object. The type of the Variable is the one selected in the Object Type field (see Object configuration). Additionally, you can define Rules that are dependent on the Root Object currently being displayed. For example, you can specify that a given Relationship type is mandatory for a given Party (Object) only in the context of a specific Account Type (Root Object). This can be achieved by using the implicitly defined $rootObject variable. The type of the Variable is the one selected in the Object Type field. The variable contains the Root Object currently being displayed. |
Additional information Consider the following information about the constraint specification using the Rule Business Object:
- If the Rule Business Object returns constraints for Relationship types that are not configured in the Relationship Configuration section, such constraints are ignored.
- If the Rule Business Object returns no constraints for a given source Object, no Relationships can be created with that Object as a source.
- If, for a given source Object, the Rule Business Object returns constraints just for a subset of the Relationship types configured in the Relationship Configuration section, all other Relationship types cannot be created with that Object as a source.
- If multiple
RelationshipDefinition:RelationshipConstraintinstances are returned by the Rule Business Object for the same Relationship type, they are merged into one. For example, if there are twoRelationshipDefinition:RelationshipConstraintinstances forAccountHolder, and one of them determines that there should be between 2-5 account holders, and the other one there should be 1-3, then the merged constraint allows 2-3 account holders. - The Script Function
RelationshipDefinition:HasRelationshipConstraintViolationsallows checking if the App Task contains any violation to Relationship Constraints defined in the Rule Business Object. This can be used inSentryexpression of Custom Actions defined on the App Task and, for example, disable one or more of the Custom Actions accordingly.
Validation Rules
Feature Overview
Validation Rules are not enforced in the UI, and can be used to express:
- Rules involving Relationship metadata, e.g., "the sum of ownership percentages for all beneficial owners must be 100%".
- Rules involving properties of Relationship target Objects, e.g., "the account holder cannot be a minor".
If a change made by the user causes a violation of these Rules, the violation is reported with a validation message in FNZ Studio Runtime.
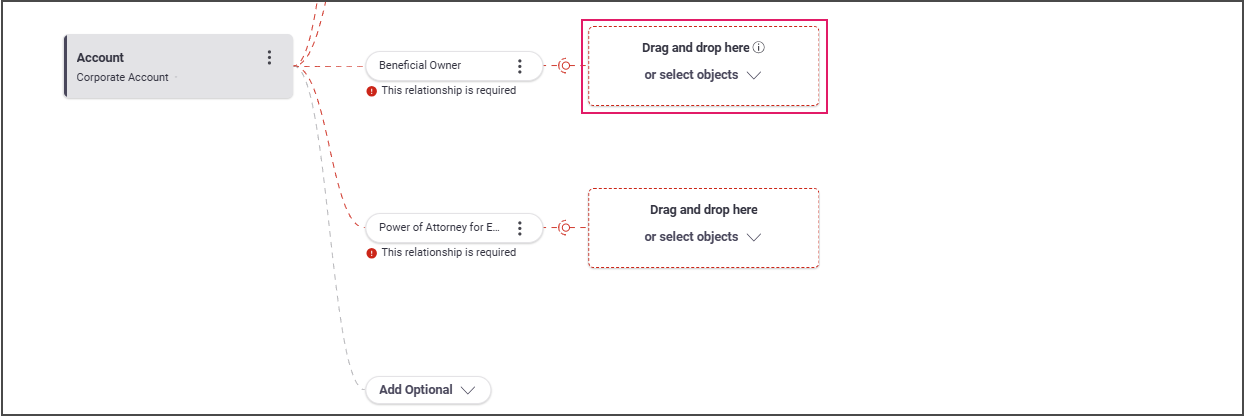
These content violations are shown in three areas:
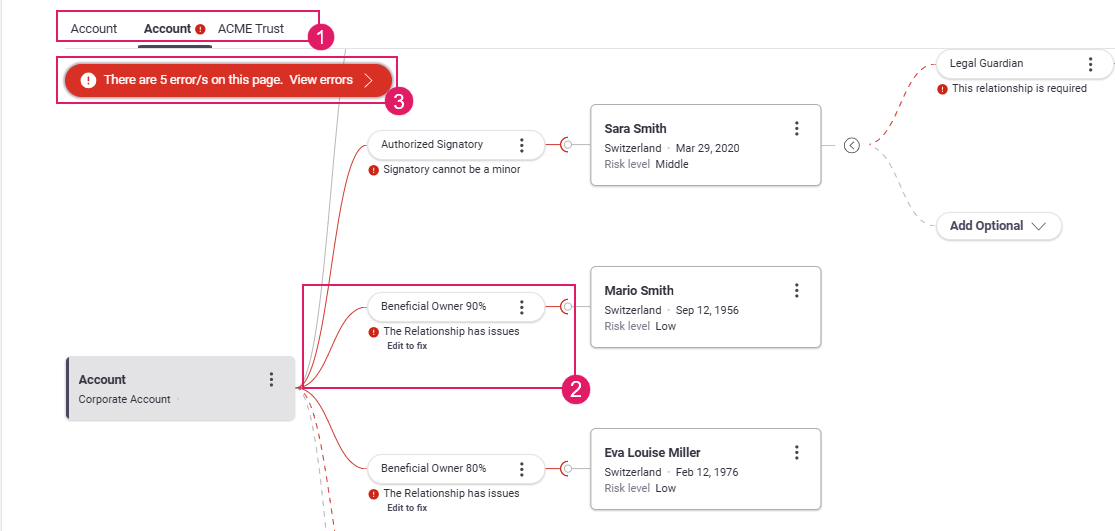
- Tab Bar (
1) — An icon shows whether there are any issues to be solved in the current page. - Content Area (
2) — An icon and a text message under the field affected by the issue/s provide information on how to fix the problem. - Violation Panel (
3) — The Violation panel under the tab bar can be opened to show a list of all the issues affecting the current page and allows jumping to the issue to be fixed directly.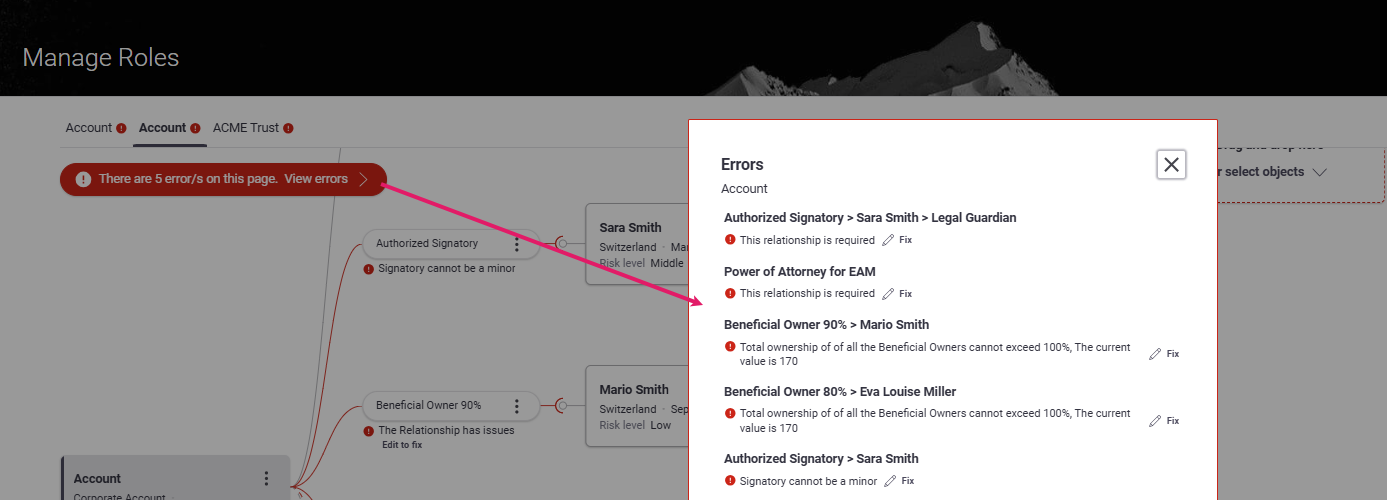
The content area may show two types of violations, which are marked by an icon and/or a text message.
- Blocking issues (errors) — These must be fixed to proceed and end the task. The lines connecting items marked by errors are marked in red (dotted lines represent missing items).

- Non-blocking issues (warnings) — These are suggestions on how to improve the quality of entered data. Fixing them is not required to proceed and end the task, but it is recommended. The lines connecting items marked by warnings are marked in yellow.

Configuration
To configure validation Rules, follow these steps (illustrated in details below):
- Configure a Data Logic Business Object with the necessary Data Rules.
- Reference the configured Data Logic BO in your Relationship Definition App Task (Relationships tab).
- Set specific Rule violation messages for your Relationship Definition App Task (UI tab).
Step 1
Validation Rules are based on Data Rules (Data Logic Business Object). For example, you may create a Catalog Data Rule to include the list of possible Beneficial Owners for an account, or a Single Property Expression Rule to set the maximum amount of ownership percentage.
Step 2
After configuring your Data Logic Business Object, you need to reference it in your Relationship Definition / Relationship Review App Task by using the Validation Rules property (Relationships tab). Configuration details are illustrated in the table below:
| Configuration field | Description |
|---|---|
| Validation Rules field | Select a Data Logic Business Object. If no Data Logic Business Object is set, no validation rules are applied. Note that only the content of the Data Rules in the Data Logic is used. In particular, all Controls defined in this Data Logic are ignored. |
| Variable Assignments fields | Assign a Process Variable to the Data Logic Business Object. For example, you can assign the whole Objects Collection or the whole Relationships Collection, or just a subset of those. Consider that only violations which are related to Root Objects and Objects and Relationships which are reachable from Root Objects are considered, other violations are discarded. Violations which impact exclusively properties of Objects or Root Objects are also not considered (use the Data Gathering ABC / App Task for such validation). Additionally, you can define Data Rules which are dependent on the current Root Object being displayed. For example, you can specify that a given Relationship metadata field is mandatory only in the context of a specific Account type (Root Object). This can be achieved by using the implicitly defined $rootObject variable. The variable type is the one selected in the Object Type field. The variable contains the Root Object currently being displayed. |
Additional information
- The Script Function
AppTask:HasBlockingViolations(common to all App Tasks) allows checking if the App Task contains any violation to Data Rules which are defined as Blocking in the Data Logic. This can be used inSentryexpression of Custom Actions defined on the App Task and, for example, disable one or more of the Custom Actions accordingly.
Step 3
Relationship Definition supports different types of validation violations, each of them represented by a different configurable message (see the Localization section for details):
- Relationship has issues (blocking) — Indicates that the Relationship properties have a blocking issue affecting Data Logic metadata, e.g. A mandatory signature power for an authorized signatory is not specified.
- Relationship is required (blocking) — Indicates that a mandatory Relationship is currently not associated with a target Object.
- Relationship is not valid (blocking) — Indicates that the affected Relationship is not valid, e.g. the account has been changed from corporate to individual and, therefore, the Settlor is no longer required.
- Relationship exceeds cardinality (blocking) — Indicates that the number of Relationships exceeds the maximum cardinality, e.g. a private account can have no more than three beneficial owners.
- Object is not valid (blocking) — Indicates a blocking issue affecting the Object, e.g. the Object is a minor.
- Object has issues (non-blocking) — Indicates a non-blocking issue affecting the Object.
- Relationship has issues (non-blocking) — Indicates that the Relationship properties have a non-blocking issue affecting Data Logic metadata.
Review Mode
As mentioned, validation on Ad-Hoc navigation and on content are separate. However, the Review Mode setting (configured for the Ad-Hoc Sub-Process containing one or more App Tasks) may influence the way both types of validation are displayed in FNZ Studio Runtime. See Review Mode (Ad-Hoc Sub-Process) for full configuration details.
Review ModeOn
Violations are displayed immediately, as soon as the user lands on the page. This is valid both for Ad-Hoc sidebar where validation badges are displayed, as well as for the content area, where violation icons and messages are shown on the page and in the Issue Panel (see Content Validation (Data Logic) for details).
Review Mode Off
Most violations are not displayed when the user lands on the page. This is valid for Ad-Hoc navigation (i.e. no validation badges are displayed), and the Issue Panel (i.e. the panel is not displayed). An exception to this rule are mandatory violations in the content area (marked with an icon), which are displayed.
However, when the user tries to leave the page (e.g., clicks on the Next button), a confirmation modal window warns them that there may be issues.
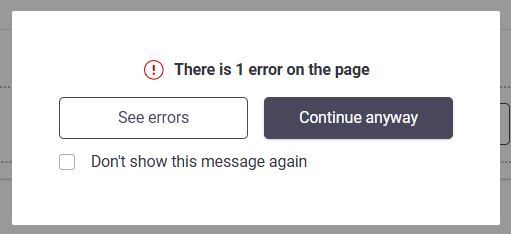
If the user decides to stay on the page, all errors are then shown, both at content level (violation icons, messages and issue panel) and at navigation level (Ad-Hoc validation badges).
Review Mode Override
Finally, it is possible to override the Review Mode specified at the level of the Ad-Hoc Sub-Process (as described above) for a specific Relationship Definition App Task contained inside the Ad-Hoc Sub-Process itself.
This may be useful if a given Relationship Definition task needs to have a different review mode with respect to the container Ad-Hoc Sub-Process.
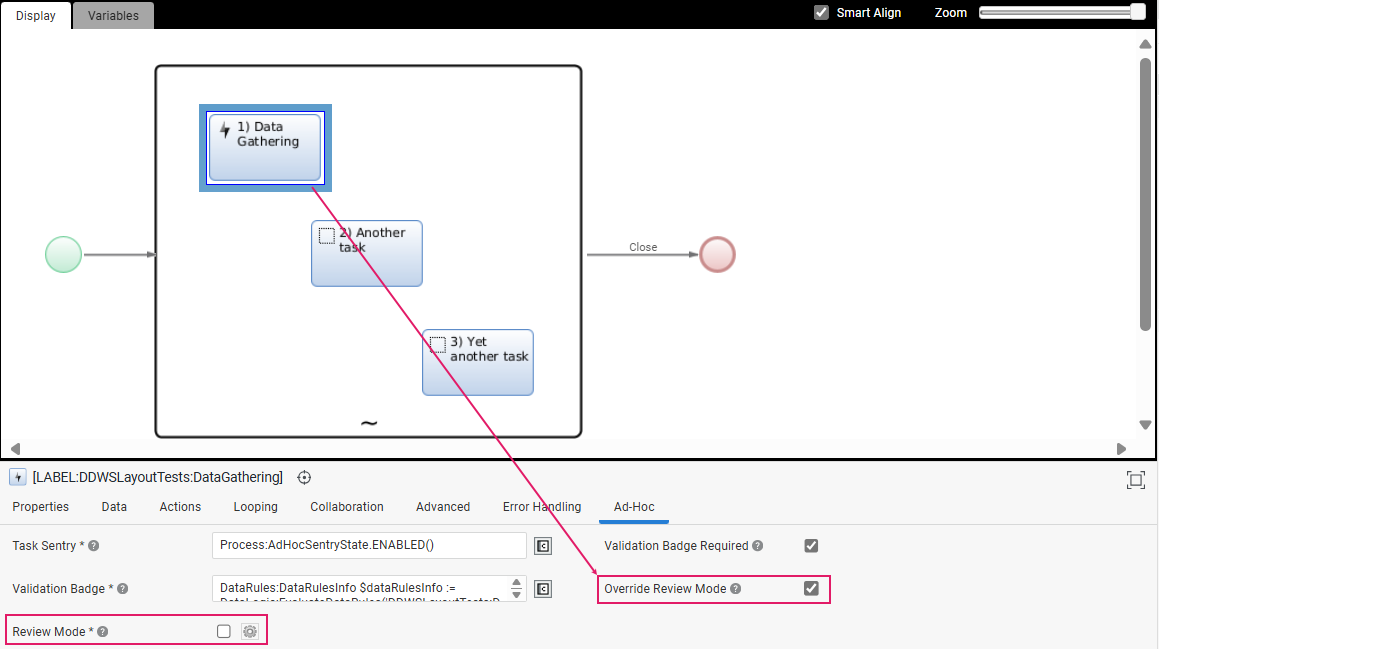
To override the Review Mode for a task, go to its Ad-Hoc tab and:
-
Select the Override Review Modeoption. This will override the review mode option set at the Ad-Hoc Sub-Process level.
-
Select theReview Mode setting in case you want to apply specific Review Mode conditions to this task. Note that this setting is computed only once when the task is initialized.
Developer Toolbar
The Developer Toolbar allows your to access three important developing features:
- The Theme Editor, which allows editing the look-and-feel of FNZ Studio Runtime. See Theming (Theme Editor).

- The Inspector tool, which allows navigating to and editing the Business Objects responsible for the FNZ Studio Runtime page. See Inspector.
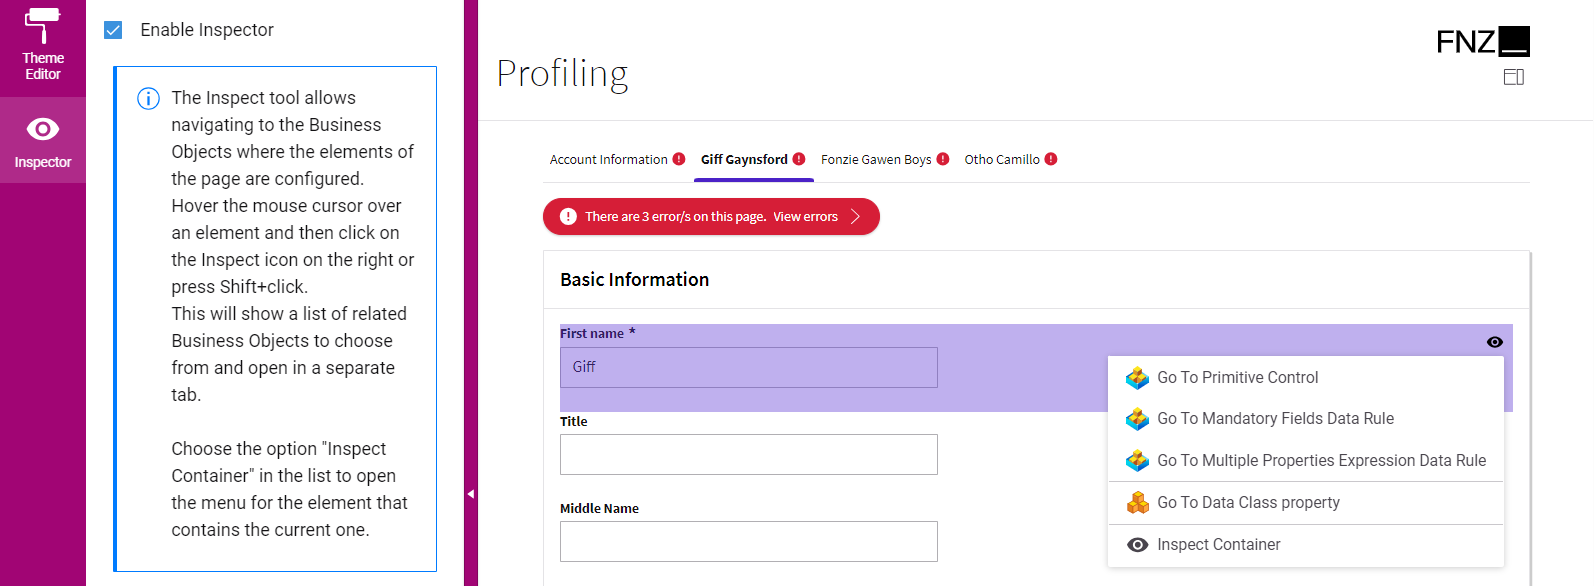
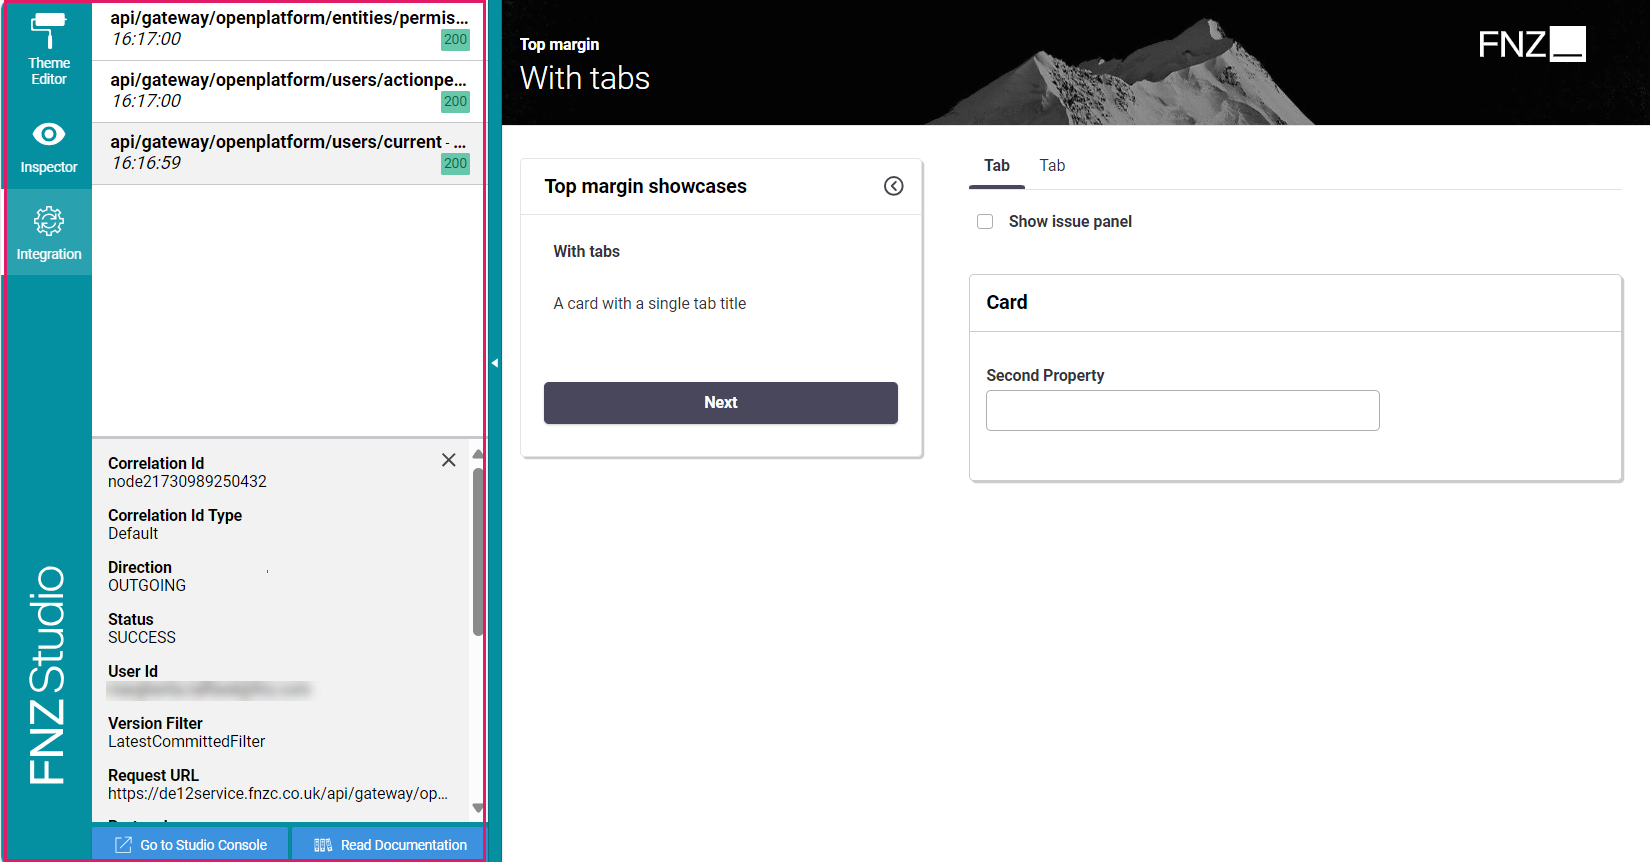
- The Integration console, which shows all the integration calls performed by the current Process Instance for easier contextual debugging. The content is a filtered version of the data contained in the Integration Troubleshooting Console available in FNZ Studio (Data & Integration module). See Integration.
You can open the Developer Toolbar from your ABC page by clicking on the arrow on the left-hand side (this is displayed when hovering over the page left border). Note that you need Advanced Studio Permissions to access the tool.
Localization
All non-configurable Labels are contained in the RelationshipDefinition Sealed Package and AppTask Platform Package which are deployed when the related extensions are started for the first time. Such Labels can be changed using Overriding Translations for Labels.
However, the Relationship Definition App Tasks, namely Relationship Definition and Relationship Review, allow configuring specific Label Business Objects through the UI tab of the related App Task in the Process Editor.
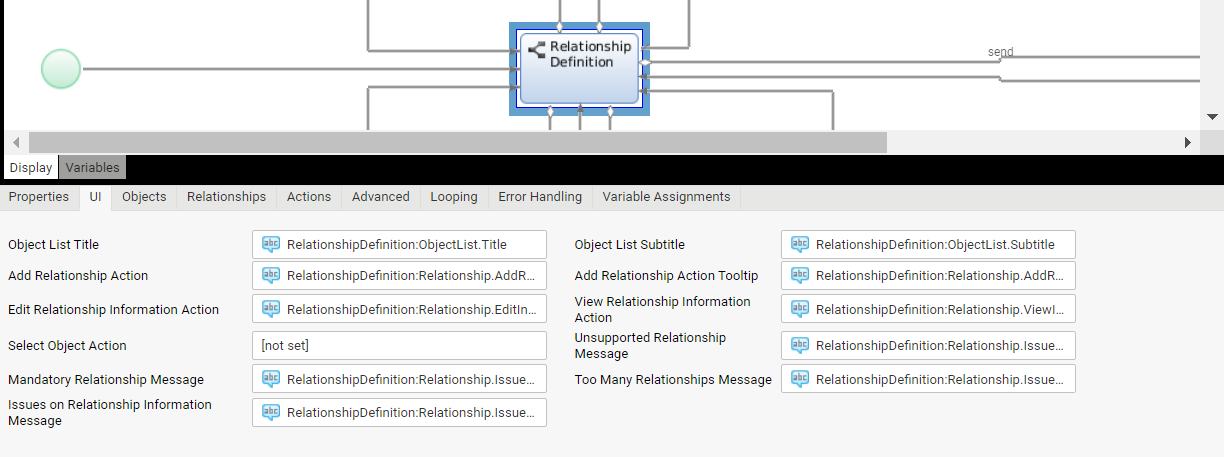
The table below lists all the available Properties UI tab, the App Task they apply to (Relationship Definition (RD) and Relationship Review (RR), respectively), where they usually appear in the UI, and the corresponding Label IDs.
| N | Property | App Task | UI Reference | Default Label ID |
|---|---|---|---|---|
| 1 | Object List Title | RD/RR | Title of list of Objects | RelationshipDefinition:ObjectList.Title
|
| 2 | Object List Subtitle | RD/RR | Subtitle of list of Objects | RelationshipDefinition:ObjectList.Subtitle
|
| 3 | Add Object Action | RD | Placeholder for adding a target to a Relationship placeholder | RelationshipDefinition:Relationship.AddObject
|
| 4 | Add Relationship Action | RD | 'Add Relationship' button | RelationshipDefinition:Relationship.AddRelationship
|
| 5 | Add Relationship Action Tooltip | RD | Tooltip for the 'Add Relationship' button | RelationshipDefinition:Relationship.AddRelationshipTooltip
|
| 6 | Edit Relationship Information Action | RD | 'Edit Relationship' button | RelationshipDefinition:Relationship.EditInformation
|
| 7 | Relationship is not valid Message | RD | 'Relationship is not valid' message | RelationshipDefinition:Relationship.Issue.UnsupportedRelationship
|
| 8 | Relationship is required]Message | RD | 'Relationship is required' message | RelationshipDefinition:Relationship.Issue.RequiredRelationship
|
| 9 | Relationship exceeds cardinality Message | RD | 'No more than x relationships can be defined' message | RelationshipDefinition:Relationship.Issue.TooManyRelationships
|
| 10 | Relationship has issues]Message | RD | 'This relationship has issues' message | RelationshipDefinition:Relationship.Issue.RelationshipInformation
|
| 11 | Fit tree to window Message (referred to the minimap) | RD | 'Fit tree to window' message | RelationshipDefinition:Minimap.Zoom.Fit
|
| 12 | Reset zoom Message (referred to the minimap) | RD | 'Reset zoom' message | RelationshipDefinition:Minimap.Zoom.Reset
|
| 13 | View Relationship Information Action | RD/RR | View Relationship Information | RelationshipDefinition:Relationship.ViewInformation
|
| 14 | Empty Object List | RD | 'No object created' | RelationshipDefinition:ObjectList.EmptyState
|
Accessibility
FNZ Studio's Application Business Components (ABCs) have been designed with special attention to accessibility criteria and follow the latest Web Content Accessibility Guidelines (WCAG). All App Tasks have been designed following WCAG 2.1 Success Criteria.